Exercise - Ingest data from Azure Health Data services by using the DICOM service
In this exercise, you ingest data from an Azure Healthcare Data Services – DICOM service into healthcare data solutions in Microsoft Fabric. During the exercise, you complete the high-level tasks as depicted in the following image.

Prerequisites
To complete this exercise, make sure that you meet the following prerequisites:
Healthcare data solutions in Microsoft Fabric are deployed into a Microsoft Fabric workspace. For more information, see Deploy healthcare data solutions in Microsoft Fabric with sample data exercise.
An active Azure subscription is in the same tenant as the Microsoft Fabric workspace.
You already have an Azure Health Data Services workspace created.
Create a storage account and container
To create a storage account and container, follow these steps:
Go to Azure portal and select + Create a resource.
Search for and select Storage account.
Select Create.
Select your subscription and then select a resource group. If you don't have one, create a new resource group. Enter fldicomstorage as the Storage account name and replace fl with your initials. If a name isn't available, provide a name. Select your region and then select Next.
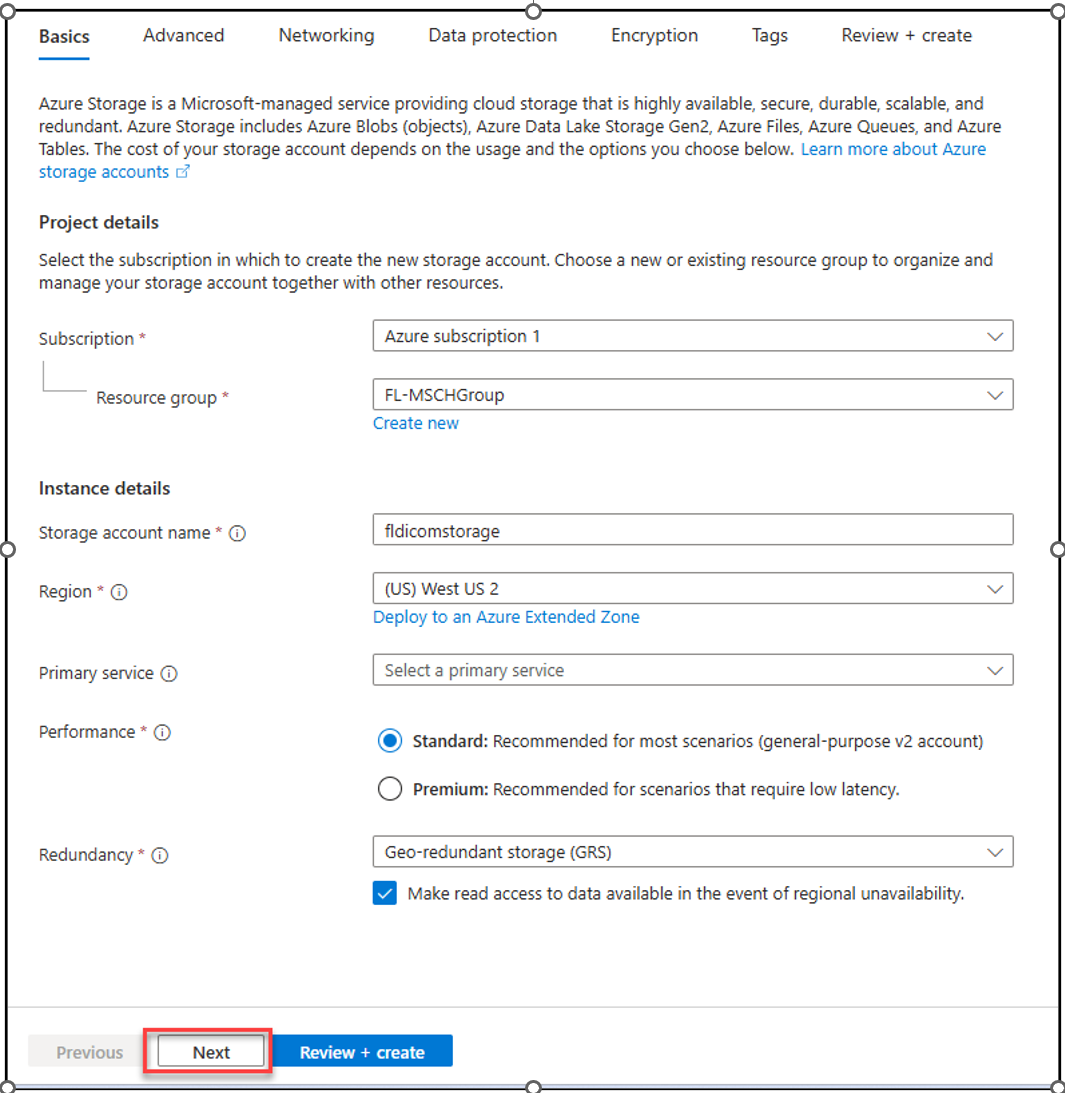
Select the Enable hierarchical namespace checkbox and then select Review + create.
Select Create.
After the system creates the storage account, select Go to resource.
Select Containers and then select + Container.
Enter fldicomdata as the Name and replace fl with your initials. If a name isn't available, provide a name that is available. Select Create.
Select Home and then stay on this page.

Register a client application in Microsoft Entra ID
To register a client application in Microsoft Entra ID, follow these steps:
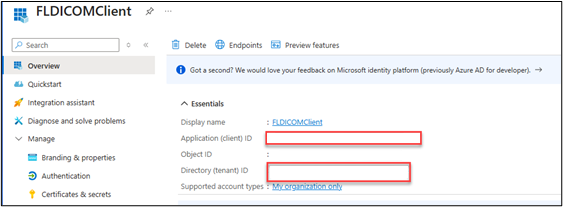
Go to Azure portal and select Microsoft Entra ID.
From the left pane, select App registrations and then select + New registration.
Enter FLDICOMClient for the Display name and replace FL with your initials. If a name isn't available, provide a name that is available. Select Accounts in this organization directory only, and then select Register.
Copy the Application (client) ID and the Directory (tenant) ID and then note these IDs because you need them in future steps.
Select Authentication, select Yes in Allow public client flows, and then select + Add a platform.
Select Mobile and desktop applications.
Select the
https://login.microsoftonline.com/common/oauth2/nativeclientcheckbox and then select Configure.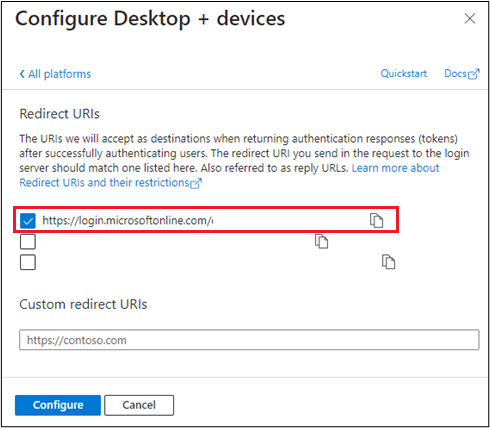
Select Save.
Select Certificates & secrets and then select + New client secret.
Enter the Description, select 90 days for Expires, and then select Add.
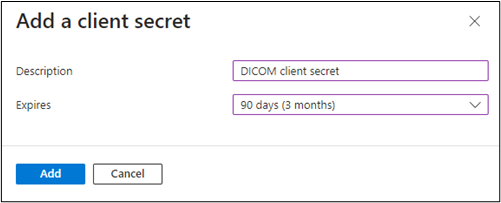
Copy the value and then note it because you need this value in future steps.
Select Home and then stay on this page.


Add the Azure Healthcare Data Services DICOM service
To add the Azure Healthcare Data Services DICOM service, follow these steps:
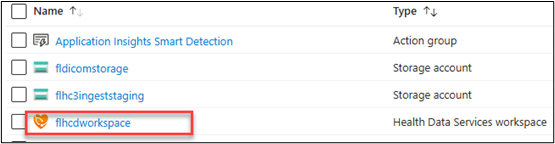
Select All resources and then open the Azure Health Data Services workspace that you created.
Select + DICOM service and then select + Add DICOM service.
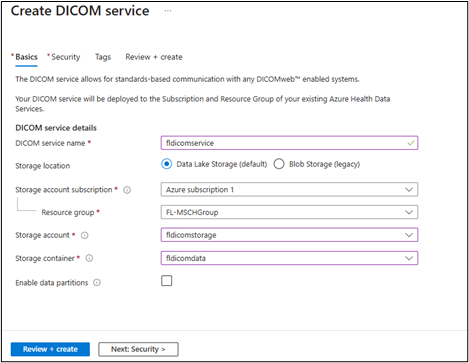
Enter fldicomservice for DICOM service name and replace fl with your initials. If a name isn't available, provide a name that is available. Select Data Lake Storage and your subscription. Select the resource group, storage account, and container that you created, and then select Review + create.
Select Create and then wait for the system to create the service.
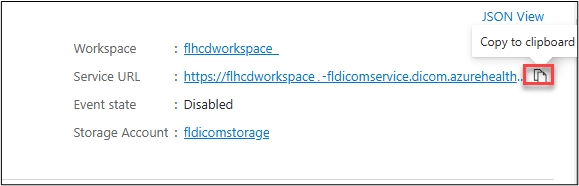
After the system creates the service, select Go to resource.
Copy the Service URL and make note of it. You need this URL in a future step.
Select Access control (IAM), select + Add, and then select Add role assignment.
From the Role tab, locate and select DICOM Data Owner.
Select Next.
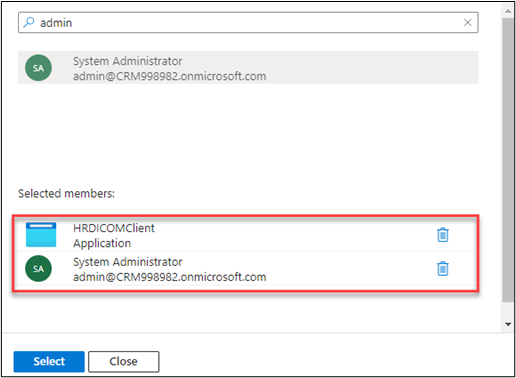
From the Members tab, select the + Select members button.
Search for and select the FLDICOMClient app registration that you created.
Search for and select your username.
You should now have two members selected. Select the Select button.
Select Review and assign.
Select Review and assign again. The role is now assigned.


Load sample data
In this task, you create a notebook that loads the sample data to the storage container that you created by using the DICOM service API.
Go to Power BI and select the FL HC Cloud workspace that you created.
Locate and select bronze lakehouse.
Select the ellipsis (...) button of the Files folder and then select Properties.
Copy the ABFS path and make note of it because you need it in the next task.
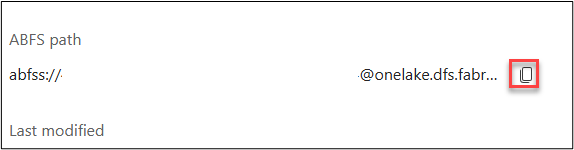
Close the Properties pane.
Select your Open notebook and choose New notebook.
Paste the following code, replacing with the values that you noted in the previous steps.
- [ABFS path] with the ABFS path
- [DICOM Service URL] with the service URL
- [Application (client) ID] with the client ID
- [Client Secret] with the client secret
- [Directory (tenant) ID] with the tenant ID
- [File Name] with the zip file you want to load
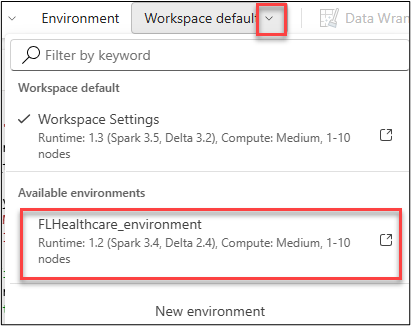
import requests
from azure.identity import DefaultAzureCredential
from pyspark.sql import SparkSession
from pathlib import Path
from urllib3.filepost import encode_multipart_formdata, choose_boundary
import zipfile
from io import BytesIO
import os
import uuid
import shutil
from notebookutils import mssparkutils

# Initialize Spark session (Fabric notebook)
spark = SparkSession.builder.getOrCreate()

# Path to the DICOM folder in OneLake (replace with your Lakehouse path)
abfs_path = "[ABFS path]"

base_url = "[DICOM Service URL]/v1"

# Set the service principal credentials
os.environ['AZURE_CLIENT_ID'] = '[Application (client) ID]'
os.environ['AZURE_CLIENT_SECRET'] = '[Client Secret]'
os.environ['AZURE_TENANT_ID'] = '[Directory (tenant) ID]'

lakehouse_path = f'{abfs_path}/SampleData/Imaging/DICOM/DICOM-HDS/340ImagingStudies'

# Name of the zip file in OneLake
zipFile = "[File Name]"

# Path to the DICOM zip file in OneLake
zip_file_path = f"{lakehouse_path}/{zipFile}"

credential = DefaultAzureCredential()

# Get an access token for the DICOM service
token = credential.get_token("https://dicom.healthcareapis.azure.com/.default")

# Function to encode multipart/related data for the DICOM files
def encode_multipart_related(fields, boundary=None):
    if boundary is None:
        boundary = choose_boundary()

    body, _ = encode_multipart_formdata(fields, boundary)
    content_type = str('multipart/related; boundary=%s' % boundary)

    return body, content_type

client = requests.session()

# Headers for requests
headers = {"Authorization": f"Bearer {token.token}"}

# Check authentication
url = f'{base_url}/changefeed'
response = client.get(url, headers=headers)
if response.status_code != 200:
    print('Error! Likely not authenticated!')

# Load the zip file content
dicom_zip_content = spark.read.format("binaryFile").load(zip_file_path).collect()[0].content

# Create a unique local temporary directory to extract files
local_temp_dir = f"/tmp/dicom_extract_{uuid.uuid4()}"
os.makedirs(local_temp_dir, exist_ok=True)


# Extract files locally to avoid parallel write issues in ADLS
with zipfile.ZipFile(BytesIO(dicom_zip_content), 'r') as dicom_zipfile:
    dicom_zipfile.extractall(local_temp_dir)


# Write each extracted file to the Lakehouse directory individually
for root, _, files in os.walk(local_temp_dir):
    for file_name in files:
        local_file_path = os.path.join(root, file_name)
        relative_path = os.path.relpath(local_file_path, local_temp_dir)
        lakehouse_file_path = f"{lakehouse_path}/{relative_path}"

        # Create the Lakehouse path and write the file content
        with open(local_file_path, "rb") as f:
            file_content = f.read()
        # Load the file content
        rawfile = file_content
        files = {'file': (file_name, rawfile, 'application/dicom')}
        # Encode the file as multipart/related
        body, content_type = encode_multipart_related(fields=files)
        # Set headers for the upload request
        headers = {
            'Accept': 'application/dicom+json',
            "Content-Type": content_type,
            "Authorization": f"Bearer {token.token}"
        }

        # Upload to the DICOM server
        url = f'{base_url}/studies'
        response = client.post(url, body, headers=headers)

        if response.status_code == 200:
            print(f"Successfully uploaded {file_name}")
        else:
            print(f"Failed to upload {file_name}, status code: {response.status_code}")

# Cleanup: delete the local temporary directory
shutil.rmtree(local_temp_dir)

print("Done")
Switch to your FLHealthcare_environment environment.
Select Run cell.
The DCM files should successfully load. If 409 error codes display, you can ignore them.
Go to Azure portal and select the fldicomstorage storage account that you created.
Select Containers and then select the fldicomdata container that you created.
Select and open AHDS.
Go to flhcdworkspace | dicom | fldicomservice.
You should view the files that you uploaded.
Return to the storage account containers by selecting the storage account name and then stay on this page.


Create the shortcut
To create the shortcut, follow these steps:
From the Settings section, select Endpoints.
Copy the value of the Primary endpoint Data Lake Storage and make note of it.

Expand Security + networking and then select Access keys.
Select the Show button of key1 and then copy the value of Key from key1. Save the key to your notepad.
Go to Power BI.
Select the FL HC Cloud workspace that you created and then open the FLHealthcare_msft_bronze lakehouse.
Expand Folders > External > Imaging > DICOM.
From the ellipsis (...) button of the new AHDS-DICOM folder that you created, select New shortcut.
Select Azure Data Lake Gen2.
Select the Create new connection option.
Paste the Primary endpoint of the Data Lake Storage from your notepad to the URL field, change the Connection name to fldicomservice, replace fl with your initials, and then select Account key from the Authentication kind dropdown list.
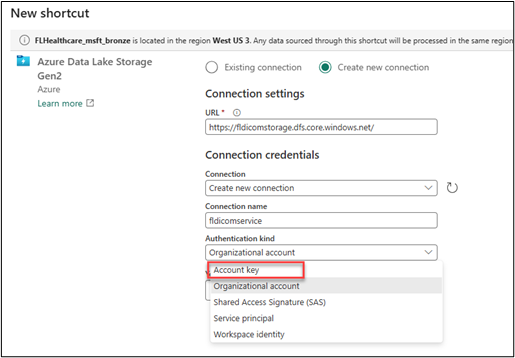
Paste the key that you copied from your Azure storage account and then select Next.
Expand fldicomdata | AHDS | flhcdworkspace | dicom.
Select the fldicomservice checkbox and then select Next.
Select Create.
Select the shortcut that you created.
All your files should now display.


Adjust global config to use shortcuts
In this section, you adjust global config in the Admin lakehouse to change the configuration file from using the Ingest folder, where you can use copies of your files, to using the External folder, which only references your files and doesn't move them. This configuration also requires you to turn off compression and moving of the files. You can also accomplish this change by downloading the Files/system-configurations/deploymentParametersConfiguration.json file, making the changes, and then uploading it back to the Admin lakehouse.
Select your FL HC Cloud workspace.
Open the Admin lakehouse.
Select the ellipsis (...) button on the Files node and then select Properties.
Copy the ABFS path. You need this path when you create the notebook.
Close the Properties pane.
Select Open notebook button and then choose New notebook.
Copy the following code and then add it to the notebook that you created, replacing [ABFS path] with the ABFS path that you copied.
This code changes the configuration file from using the Ingest folder, which requires you to use copies of your files, to using the External folder, which only references your files and doesn't move them. You need to turn off compression and moving of the files.
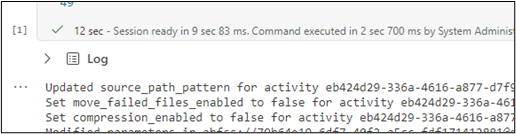
   import json
   # Define the source file path
   abfs_path = "[ABFS path]"

   source_file_path = f"{abfs_path}/system-configurations/deploymentParametersConfiguration.json"

   # Step 1: Read the JSON file content (first 1MB)
   file_content = mssparkutils.fs.head(source_file_path, 1024 * 1024)  # Read the first MB of the file

   # Step 2: Parse the JSON data
   json_data = json.loads(file_content)

   # Step 3: Iterate over all activities and update the parameters (source_path_pattern, move_failed_files_enabled, compression_enabled)
   if "activities" in json_data:
       for activity_id, activity_data in json_data["activities"].items():

           # Check if the activity name partially matches "msft_imaging_dicom_extract_bronze_ingestion"
           if "name" in activity_data and "msft_imaging_dicom_extract_bronze_ingestion" in activity_data["name"]:
               if "parameters" in activity_data:
                   parameters = activity_data["parameters"]

                   # Set move_failed_files_enabled to "false"
                   if "move_failed_files_enabled" in parameters:
                       parameters["move_failed_files_enabled"] = "false"
                       print(f"Set move_failed_files_enabled to false for activity {activity_id}")

                   # Set compression_enabled to "false"
                   if "compression_enabled" in parameters:
                       parameters["compression_enabled"] = "false"
                       print(f"Set compression_enabled to false for activity {activity_id}")

                   # Set byos_enabled to "false"
                   if "byos_enabled" in parameters:
                       parameters["byos_enabled"] = "false"
                       print(f"Set byos_enabled to false for activity {activity_id}")
           else:
               print(f"Activity {activity_id} does not match the filter")
   else:
       raise KeyError("No activities found in the JSON file")

   # Step 4: Convert the modified JSON data back to string
   modified_json_content = json.dumps(json_data, indent=4)

   # Step 5: Delete the existing file (to avoid FileAlreadyExistsException)
   mssparkutils.fs.rm(source_file_path)

   # Step 6: Save the modified JSON content back to the destination file
   mssparkutils.fs.put(source_file_path, modified_json_content)

   # Confirm that the modification was successful
   print(f"Modified parameters in {source_file_path}")
Switch to your FLHealthcare_environment environment.
Select Run cell. If it fails with a File not found error, confirm that you properly updated the [ABFS path].


Run the data ingestion pipeline
To run the data ingestion pipeline, follow these steps:
Select the FL HC Cloud workspace that you created.
Select FLHealthcare_msft_imaging_with_clinical_foundation_ingestion to open the ingestion data pipeline.
Review the five notebooks.

Select Run from the command bar and then monitor the progress in the Pipeline status in the lower part of the page.
After processing completes, you can view the Succeeded activity status for each process. If the update isn't successful for a while, use the Refresh icon.

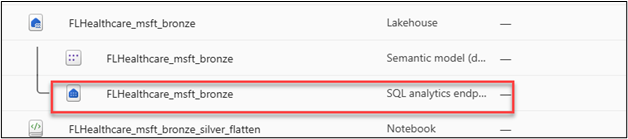
Query the bronze lakehouse
To query the bronze lakehouse, follow these steps:
Select the FL HC Cloud workspace that you created.
In the bronze lakehouse, select bronze SQL analytics endpoint.
Select the New SQL query button.
Paste the following query to query the ImagingDicom table, replacing FL with your initials.
SELECT
    [modality],
    COUNT(*) AS [study_count]
FROM [FLHealthcare_msft_bronze].[dbo].[ImagingDicom]
GROUP BY [modality]
ORDER BY [study_count] DESC;
Select Run.
Review the query result.

Query the silver lakehouse
To query the silver lakehouse, follow these steps:
Select the FL HC Cloud workspace that you created.
Under silver lakehouse, select silver SQL analytics endpoint.

Select the New SQL query button.
Paste the following query in the ImagingStudy table, replacing FL with your initials.
SELECT [msftSourceSystem],
COUNT (*)
AS [study_count] FROM [FLHealthcare_msft_silver].[dbo].[ImagingStudy] GROUP BY [msftSourceSystem] ORDER BY [study_count] DESC;
Select Run.
Review the query result.
