Explore Ledger
Ledger provides tamper-evidence capabilities in your database. You can cryptographically attest to other parties, such as auditors or other business parties, that your data hasn't been tampered with.
How it works
Cryptography and blockchain have begun to appear in far reaching areas of technology with varying degrees of success. One place where it has proved useful and beneficial is in being used as the technology behind the Ledger. Ledger provides tamper-evidence capabilities in your database. Using this feature, you can provide concrete proof to auditors, business partners or any interested parties what data has been changed or tampered with.
A traditional ledger is defined as a collection of accounts of a particular type and that's exactly what the Azure SQL Database Ledger feature provides in your environment. It provides transparent protection of your data from bad actors including but not limited to attackers or even database or cloud administrators. It provides guarantees of cryptographic data integrity while maintaining the power, flexibility, and performance of Azure SQL Database.
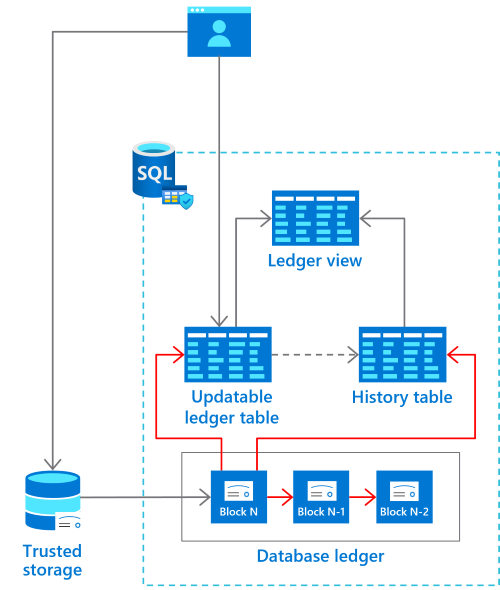
Each transaction that the database receives is cryptographically hashed (SHA-256). The function cryptographically links all transactions together, like a blockchain.
Components
Ledger function currently exists for tables in two forms: The Updatable Ledger Tables and the Append-only Ledger Tables.
Updatable ledger tables
Updatable ledger table can be used for applications that issue updates and deletes and inserts. It works well for system of record applications and transactional systems where matter of fact record keeping and auditing is required and happen. The updatable ledger tables track history of changes to any rows and uses the built-in system versioning to create a history table that stores the previous version of the row for full history is kept for any updates or deletes.
Append-only ledger tables
Append-only ledger tables work well with insert only applications such as an accounting system, which still needs auditing or security information and event management (SIEM) applications. The append-only ledger table blocks all updates and deletes at the API level so not only does it provide certainty, it aides in management.
Benefits
Ledger provides multiple benefits:
Ease Audits – Audits are frequently enacted to ensure that proper security controls are in place to reduce potential attacks, backup and restore practices are as required, and thorough disaster recovery procedures are in place. Ledger provides documented proof that your data hasn't been altered in an auditing process.
Increased trust – Ledger also can help establish trust between multiple-party business processes without the complexity and performance implications that network consensus can introduce.
Data integrity – Querying the data on a blockchain network without sacrificing performance can be a serious challenge. Ledger provides data integrity for off-chain storage of blockchain networks, which helps ensure complete data trust through the entire system.
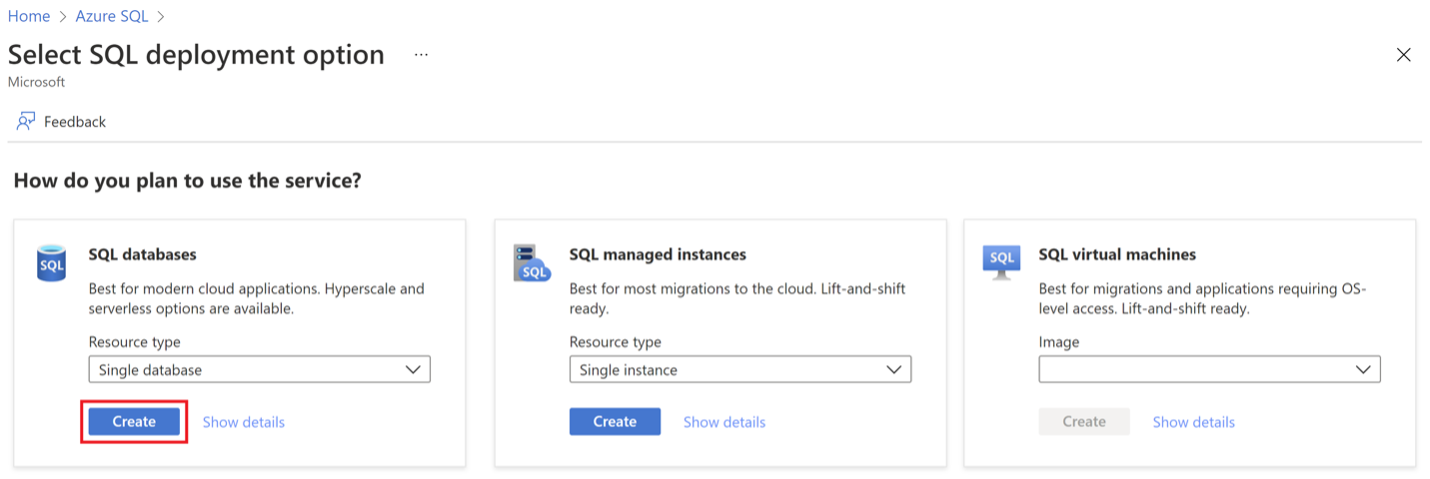
Enable ledger on a SQL database
You can enable the ledger capability only during the database creation process. Once the database is created, you cannot modify it.
During the dababase creation, select Ledger under the Security tab of the Create SQL Database page in Azure portal.
Select the Configure ledger link. On the Configure ledger page, select the Enable for all future tables in this database checkbox. Provide the information to create a new storage for your database digests. Select Apply.
Note
This setting ensures that all future tables in the database will be ledger tables. For this reason, all data in the database will show any evidence of tampering. By default, new tables will be created as updatable ledger tables, even if you don't specify LEDGER = ON in the CREATE TABLE statement.
You can also leave this option unselected. You're then required to enable ledger functionality on a per-table basis when you create new tables by using Transact-SQL.