Deploy IP Address Management
- 10 minutes
Before you deploy IPAM, you should understand the deployment requirements and limitations.
IPAM server requirements
The IPAM server must meet the following requirements:
The IPAM server must be a member server in the domain. Installing the IPAM server on a domain controller isn't supported.
The IPAM server should be a single-purpose server. You shouldn't install other network roles such as DHCP or DNS on the same server.
Caution
If you install the IPAM server on a DHCP server, IPAM won't be able to detect other DHCP servers on the network.
The IPAM server needs access to a database. You can use WID on the IPAM server or a Microsoft SQL Server database. If you use a SQL Server database for IPAM, you can use a database on a separate server.
Important
If you use SQL Server to host your IPAM database, that must be the only SQL Server instance running on that server.
IPAM needs plenty of storage. Ensure that the disk hosting the SQL database is large enough to store the data collected. For example, IP address utilization data for 10,000 clients requires approximately 1 GB of disk space per month.
IPAM deployment considerations
Consider the following when implementing IPAM:
- To manage the IPv6 address space, IPv6 must not be disabled on the IPAM server.
- Sign in to the IPAM server with a domain account and not a local account.
- For IPAM’s IP address tracking and auditing feature to work, you must enable logging of account sign-in events on domain controllers and NPS servers.
- You can define the scope of discovery to a subset of domains in the forest.
- A single IPAM server can support up to 150 DHCP servers, 6,000 DHCP scopes, 500 DNS servers, and 150 DNS zones.
- IP address utilization trends are provided only for IPv4.
- IP address reclamation support is provided only for IPv4.
- IPAM doesn't check for IP address consistency with routers and switches.
Deploy IPAM
Before you deploy IPAM, you must complete a planning process to determine how you want to use IPAM and the deployment topology that supports your organizational needs. You should only start deploying IPAM after you complete this planning process. To deploy IPAM, you must deploy IPAM servers and IPAM clients.
Deploy IPAM servers
Deploying IPAM servers begins with the installation of the IPAM Server feature. After determining which IPAM topology to use, you can deploy IPAM servers by performing the following steps:
Install the IPAM Server feature. You can install it by using Windows Admin Center, Server Manager, or by using the following Windows PowerShell command:
Install-WindowsFeature IPAM -IncludeManagementToolsProvision IPAM servers. After installing the IPAM server feature, you must provision each IPAM server. When you provision the IPAM servers, you configure how servers that IPAM will monitor will be configured (which includes configuring permissions, shares, and scheduled tasks). During provisioning the IPAM server, you must specify how to do this. You can do this manually or by using GPOs. If you choose to use GPOs, you specify their prefix. You also need to manually create GPOs, by running the
Invoke-IpamGpoProvisioningcmdlet.Tip
Using GPOs is recommended because it automates the configuration process for managed servers.
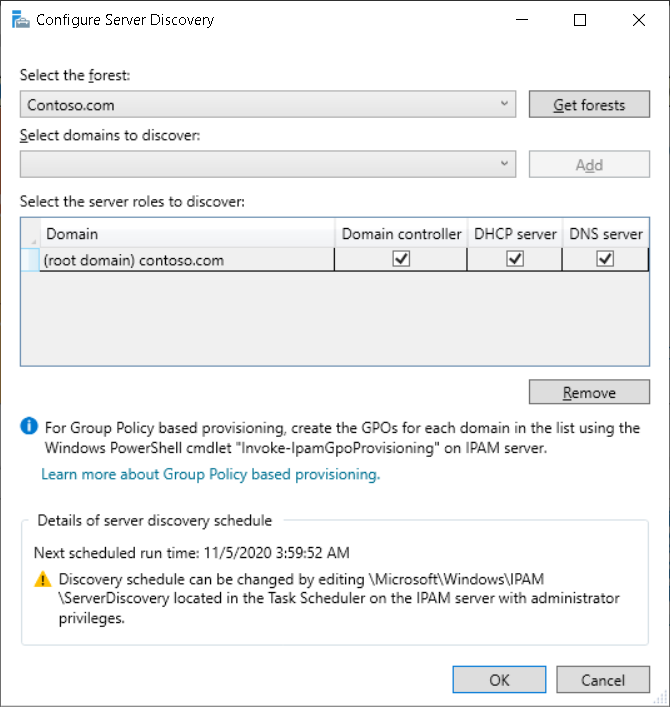
Configure and run server discovery. You must configure the scope of discovery for servers that you're going to manage. Selecting the domain or domains on which the IPAM server will run discovery determines the discovery scope. You can also manually add a server in the IPAM management console by specifying the fully qualified domain name (FQDN) of the server that you want to manage.
Choose and manage the discovered servers. After discovery completes, and after you manually add any servers that weren't discovered, choose the servers that you want to manage. Do this by editing the server properties in the IPAM console and changing the Manageability Status to Managed. After setting the management permission for a server, note the status indicator displaying IPAM Access Unblocked in the IPAM server inventory.
Deploy IPAM clients
You use the IPAM client to configure and manage IPAM servers. If you install the IPAM role on a Windows server with the Desktop Experience, then the IPAM client is installed automatically on the IPAM server. If you install the IPAM role on Server Core, then you need to manually install the IPAM client on another Windows Server used for management or a Windows client to manage IPAM remotely. IPAM installation varies based on the operating system:
- Windows Server. You can install the IPAM client by installing the Windows feature under Remote Server Administration Tools\Feature Administration Tools\IP Address Management (IPAM) Client.
- Windows 10. Install the RSAT: IP Address Management (IPAM) Client tool from Settings.
Demonstration
The following video demonstrates how to implement IPAM by using Windows Admin Center and Server Manager. The main steps in the process are:
Open Windows Admin Center.
From the Tools pane, select Roles & features.
Add the IP Address Management (IPAM) Server feature.
Add the IP Address Management (IPAM) Client feature.
Open Server Manager.
Provision a new IPAM server, and specify the following options:
- Select a database type and location.
- Select Group Policy Based provisioning.
- Enter a GPO prefix.
Open Windows PowerShell and create the required GPOs by running the
Invoke-IpamGpoProvisioningcmdlet.Verify the GPOs with the
Get-GPOcmdlet.In Server Manager, select Configure server discovery.
After discovery, review discovered servers.
Retrieve data from managed servers, and then review:
- IP Address Blocks.
- DHCP scopes.
- DNS Zones.