Exercise - configure external collaboration
Configure external collaboration settings
- Sign in to the Microsoft Entra admin center as a tenant administrator.
- Select Identity.
- Select External Identities - External collaboration settings.
- Under Guest user access, review access levels that are available and then select Guest user access is restricted to properties and memberships of their own directory objects (most restrictive).
Note
- Guest users have the same access as members (most inclusive): This option gives guests the same access to Microsoft Entra resources and directory data as member users.
- Guest users access limited to properties and memberships of directory objects: (Default) This setting blocks guest users from certain directory tasks, like enumerating users, groups, or other directory resources. Guests can see membership of all nonhidden groups.
- Guest user access is restricted to properties and memberships of their own directory objects (most restrictive): With this setting, guests can access only their own profiles. Guests aren't allowed to see other users' profiles, groups, or group memberships.
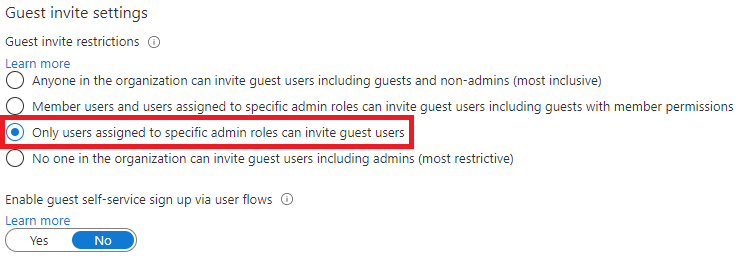
- Under Guest invite settings, mark Only user assigned to specific admin roles can invite guest users.
- Inviting guests to collaborate moves the least restrictive option, where anyone can invite guests, to the most restrictive where no one can invite guests.
- Anyone in the organization can invite guests: Set to allow anyone to invite guest users, including users, admins, and even other guest users.
- Member users and users assigned to specific admin roles: Set to allow only full members of the organization or members of admin groups to invite guests.
- Only users assigned specific admin roles: Set to allow only those people included in specific admin roles to invite guests.
- No one in organization can invite guests: Set to restrict all guest user invites by members.
- Users in the Guest Inviter role can invite guests, if admin users can invite guest.
12. Under Collaboration restrictions, review the available options and accept the default settings.
Important
You can create either an allowlist or a blocklist. You can't set up both types of lists. By default, whatever domains aren't in the allowlist are on the blocklist, and vice versa. You can create only one policy per organization. You can update the policy to include more domains, or you can delete the policy to create a new one. The number of domains you can add to an allowlist or blocklist is limited only by the size of the policy. The maximum size of the entire policy is 25 KB (25,000 characters), which includes the allowlist or blocklist and any other parameters configured for other features. This list works independently from OneDrive and SharePoint Online allow/block lists. If you want to restrict individual file sharing in SharePoint Online, you need to set up an allow or blocklist for OneDrive for Business and SharePoint Online. The list doesn't apply to external users who redeemed the invitation. The list will be enforced after the list is set up. If a user invitation is in a pending state, and you set a policy that blocks their domain, the user's attempt to redeem the invitation fails.
- When finished, save your changes.