Manage notification settings and templates
As customers attempt to engage with your organization across different chat channels, conversation requests are created and directed to available representatives. After the system has identified the representative, it will send a notification to them. A notification is a visual alert that appears whenever you receive a chat or text conversation request from a customer. The notification includes details about the customer whom you'll be interacting with. When you accept the request, a session will be started, and you can view the contextual information of the customer and case on the customer summary page.
Scenarios where you might receive notifications include:
Incoming chat, text (SMS), or social channel conversation.
Conversation that's being transferred to you from another representative.
Conversation that's being escalated to you from another representative or a bot.
The following image shows examples of two different notifications from different channels.

The first image is a notification coming from an identified existing customer from a LINE social channel, and the second is from an unidentified user over a chat channel. Each organization has varied business requirements and wants the notifications to show relevant information to the representatives.
Similar to session and application tab templates, you can use the existing out-of-the-box notification templates or create your own. A notification template is a combination of notification-related, reusable information, and it's used to set up what information needs to be displayed to the representatives and supervisors for an incoming conversation, escalation, transfer, or consult.
Out-of-the-box notification templates
When your organization is using Omnichannel for Customer Service to provide support across multiple channels, you'll be provided with multiple out-of-the-box notification templates that you can use in your environment. Depending on whether a customer is authenticated or not, different authenticated and non-authenticated templates are available. For example, if a customer signs in to your company’s support portal and then initiates a chat conversation, their information will be passed over, and the notification message will include customer details. If they aren't signed in to the portal, customer information won't be included in the message.
These out-of-the-box templates are described in the following table.
| Channel/Entity | Consult | Authenticated | Unauthenticated | Transfer |
|---|---|---|---|---|
| Chat | Chat - consult - default | Chat - incoming authenticated - default | Chat - incoming unauthenticated - default | Chat - transfer - default |
| Custom messaging | Custom messaging - consult - default | Custom messaging - incoming authenticated - default | Custom messaging - incoming unauthenticated - default | Custom messaging - transfer - default |
| Facebook - consult - default | Facebook - incoming authenticated - default | Facebook - incoming unauthenticated - default | Facebook - transfer - default | |
| LINE | LINE - consult - default | LINE - incoming authenticated - default | LINE - incoming unauthenticated - default | LINE - transfer - default |
| SMS | SMS - consult - default | SMS - incoming authenticated - default | SMS - incoming unauthenticated - default | SMS - transfer - default |
| Microsoft Teams | Teams - consult - default | Teams - incoming authenticated - default | Teams - incoming unauthenticated - default | Teams - transfer - default |
| Twitter - consult - default | Twitter - incoming authenticated - default | Twitter - incoming unauthenticated - default | Twitter - transfer - default | |
| WeChat - consult - default | WeChat - incoming authenticated - default | WeChat - incoming unauthenticated - default | WeChat - transfer - default |
You can't customize the out-of-the-box notification templates. If you need customized notification messages, you'll need to create your own custom templates.
Create a notification template
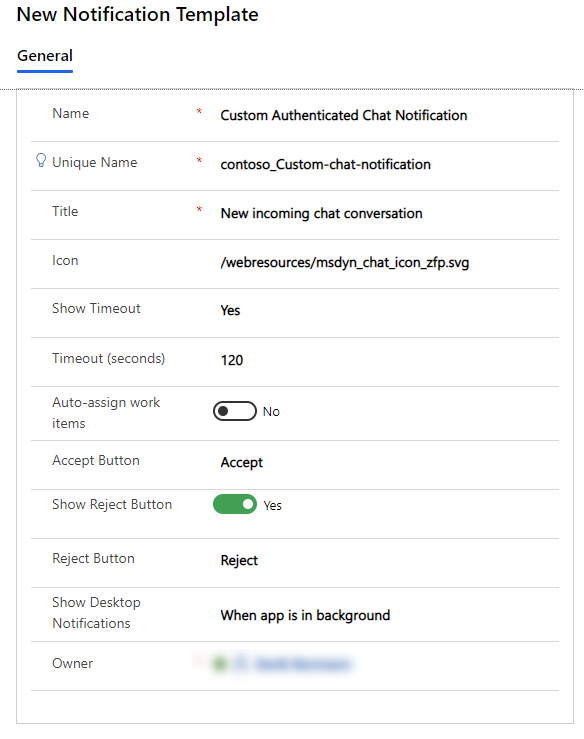
To create new notification templates, go to the Customer Service admin center. Under the Agent Experience, select Workspaces and then select Manage next to Notification Templates. You can create new templates by selecting the New Notification Template button on the command bar.
The notification template includes the following items:
Name - Defines the name of the notification.
Unique Name - A unique identifier in the
<prefix>_<name>format.Title - Defines the title of the notification that's displayed to representatives in the user interface (UI) at runtime, such as New incoming chat conversation.
Icon - Specifies the path to the web resource that will be used for the notification icon, such as
/webresources/msdyn_chat_icon_zfp.svg.Show timeout - Specifies if a count-down timer should be displayed to the user that defines when the notification expires.
Timeout (seconds) - Defines the duration of the timeout counter.
Auto-assign work items - Specifies if items should be auto assigned to technicians.
Accept Button - Defines the text that will be displayed on the text button.
Reject Button - Specifies if the Reject button should be displayed to representatives. If this toggle is set to Yes, then you can modify the text that's displayed.
Show desktop notifications - Defines if you want to display notifications to the representatives when the Omnichannel for Customer Service app isn't in focus.
Notification fields
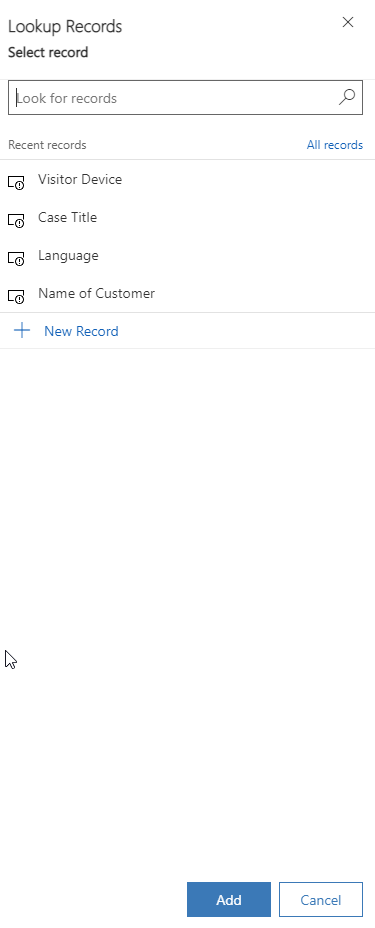
After you've initially saved the notification template, the Notification Fields section will appear on the page.
A notification field is used to display contextual information in a notification. For example, if you want the notification to display the name of the customer who's requesting the chat, you'd create a notification field that defines what data to populate. You can define which notification fields to use for this template by selecting the Add Existing Notification button. A lookup window will open, where you can add existing notification fields or a new one if needed.
When defining a notification field, you'll need to specify the following information:
Name - Defines the name of the notification field.
Unique Name - A unique identifier in the
<prefix>_<name>format.Title - Defines the title of the notification field.
Value - Specifies the value that will be presented to the representative at runtime, such as {customerName}.
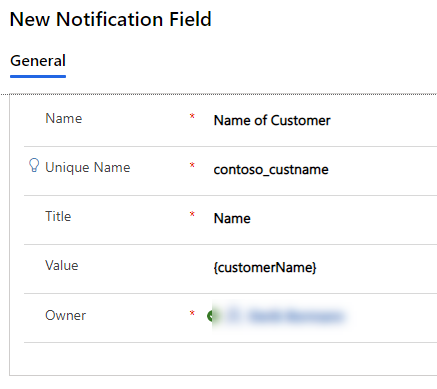
The preceding example shows that {customerName} is being used in the Value field. This entry is referred to as a slug, which is a replacement parameter that's populated at runtime based on context variables. In this instance, {customerName} will be replaced with the name of the customer who initiates the chat conversation, such as Kenny Smith.
The following table provides a list of the slugs that are available.
| Slug | Description |
|---|---|
| {customerName} | Name of the customer who initiates the conversation. |
| {caseId} | GUID of a case. The case ID is displayed only if a case is linked to the conversation. |
| {caseTitle} | Title of the case. The title of the case is displayed only if a case is linked to the conversation. |
| {queueId} | GUID of a queue. |
| {visitorLanguage} | The language in which the customer initiates the conversation. |
| {visitorDevice} | The device of the customer who initiates the conversation. |
| {entityRoutingLogicalName} | Name of the entity if the notification is for entity records. |
| {entityRoutingRecordId} | GUID of the entity record if the notification is for entity records. |
| {customerEntityName} | Name of the entity (contact or account entity) if the customer is authenticated. |
| {customerRecordId} | GUID of the entity (contact or account entity) if the customer is authenticated. |
| {<name of the pre-chat survey question>} | All the pre-chat survey questions that are set up for a workstream can be used as the slug. The format is the same as the question. |
After you've added the notification fields that you want to include in the template, they'll be populated when the notification is presented if data exists for those values.

Now that you've finished defining the templates that you want to use, the last step is to ensure that they're being used appropriately by assigning them to the appropriate workstreams.