Exercise - Configure a public load balancer
You can configure Azure Load Balancer by using the Azure portal, PowerShell, or the Azure CLI.
In your healthcare organization, you want to load-balance client traffic to provide a consistent response based on the patient portal web servers' health. You have two virtual machines (VMs) in an availability set to act as your healthcare-portal web application.
Here, you create a load balancer resource and use it to distribute a load across the virtual machines.
Deploy the patient portal web application
First, deploy your patient-portal application across two virtual machines in a single availability set. To save time, let's start by running a script to create this application. The script:
- Creates a virtual network and network infrastructure for the virtual machines.
- Creates two virtual machines in this virtual network.
To deploy the patient portal web application:
Run the following
git clonecommand in Azure Cloud Shell. The command clones the repo that contains the source for the app and runs the setup script from GitHub. Then changes to the directory of the cloned repo.git clone https://github.com/MicrosoftDocs/mslearn-improve-app-scalability-resiliency-with-load-balancer.git cd mslearn-improve-app-scalability-resiliency-with-load-balancerAs its name suggests, the script generates two virtual machines in a single availability set. It takes about two minutes to run.
bash create-high-availability-vm-with-sets.sh <rgn>[sandbox resource group name]</rgn>When the script finishes, on the Azure portal menu or from the Home page, select Resource groups, then select the
[sandbox resource group name] resource group. Review the resources created by the script.
Create a load balancer
Now, let's create the load balancer.
On the Azure portal menu or from the Home page, under Azure services, select Create a resource. The Create a resource pane appears.
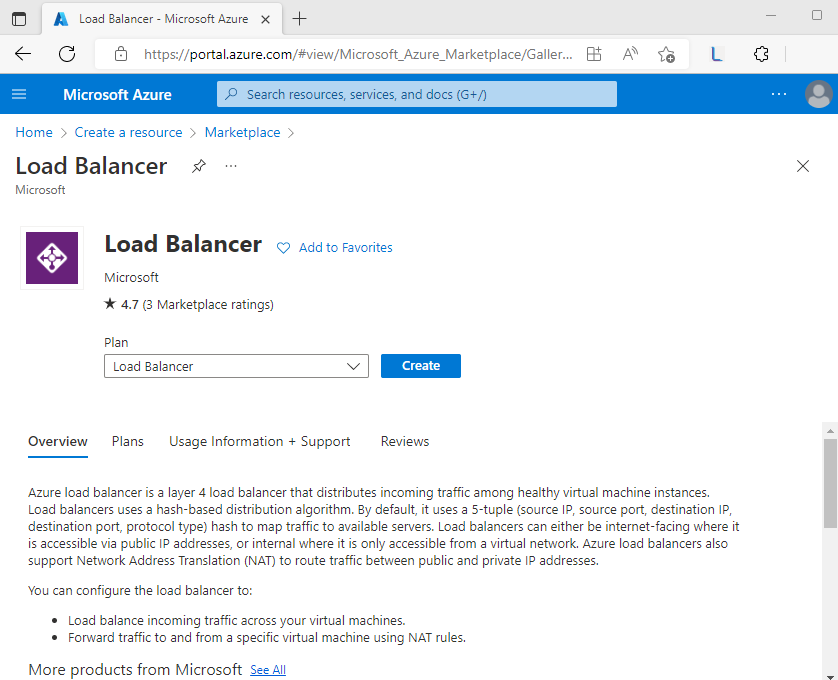
In the Search services and marketplace search box, enter Load Balancer, and then press Enter.
From the ensuing list, select Load Balancer - Microsoft, then select Create.
On the Basics tab, enter the following values for each setting:
Setting Value Project details Subscription Your subscription Resource group Select [sandbox resource group name] Instance details Name Enter a unique name. For example, Pub-LB-PatientsPortal. Region Select the location where the virtual machines were created. SKU Standard Type Public Tier Regional 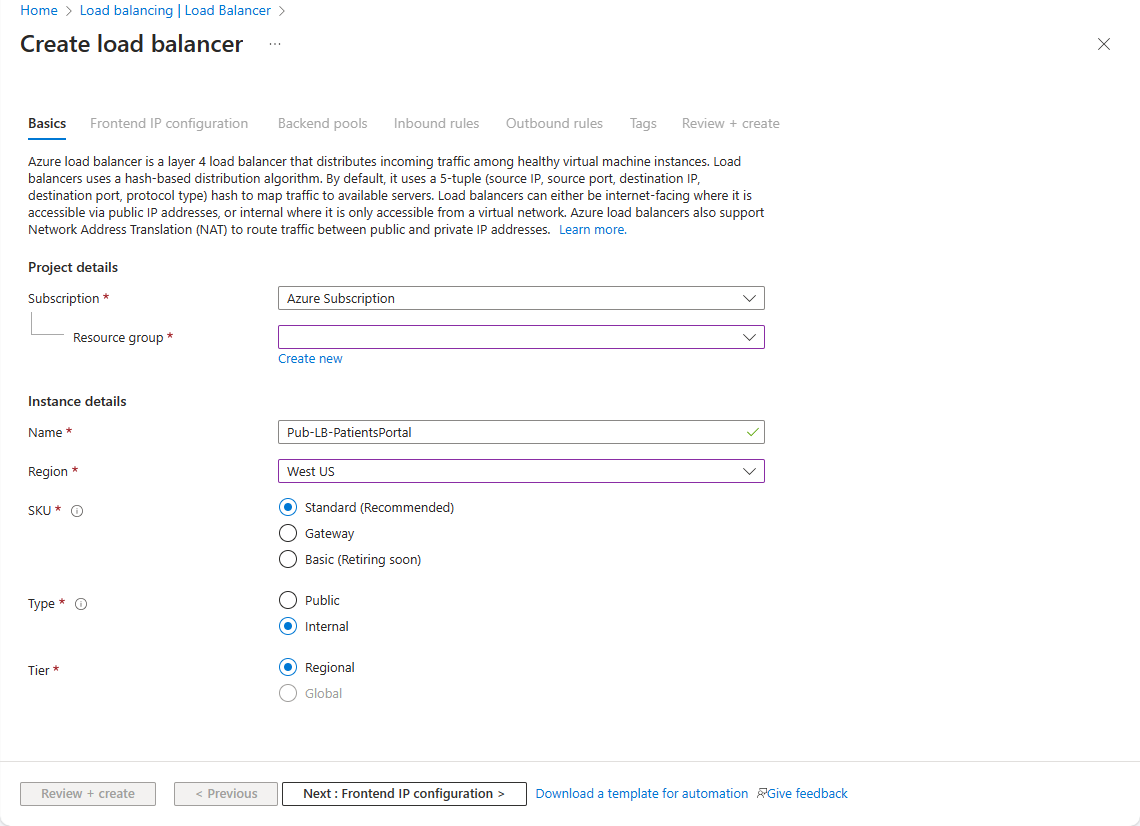
Add a front-end IP configuration
Select Next : Frontend IP configuration.
Select + Add a frontend IP configuration. The Add frontend IP configuration pane appears.
Enter the following values for each setting.
Setting Value Name Enter a unique name for the front-end IP configuration. For example, myFrontendIP IP version Select IPv4 IP type Select IP address Public IP address Select Create new, then give your IP address a name and select Save Gateway Load Balancer Select None 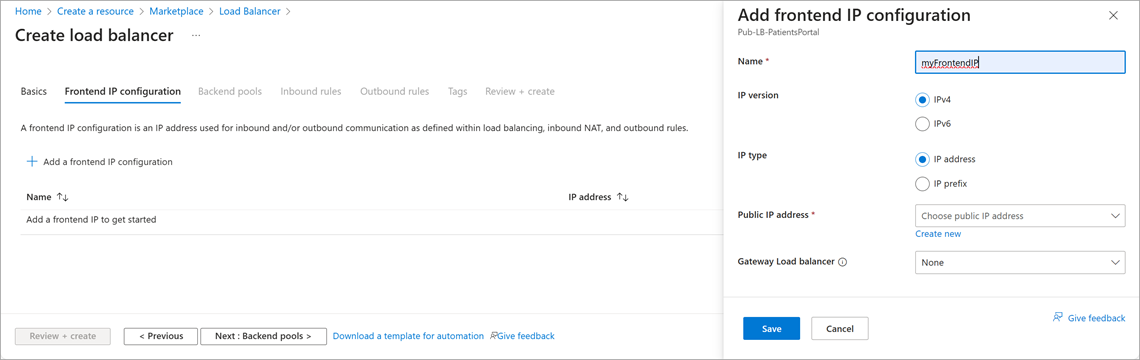
To close the dialog box, select Save. The Create load balancer pane appears.
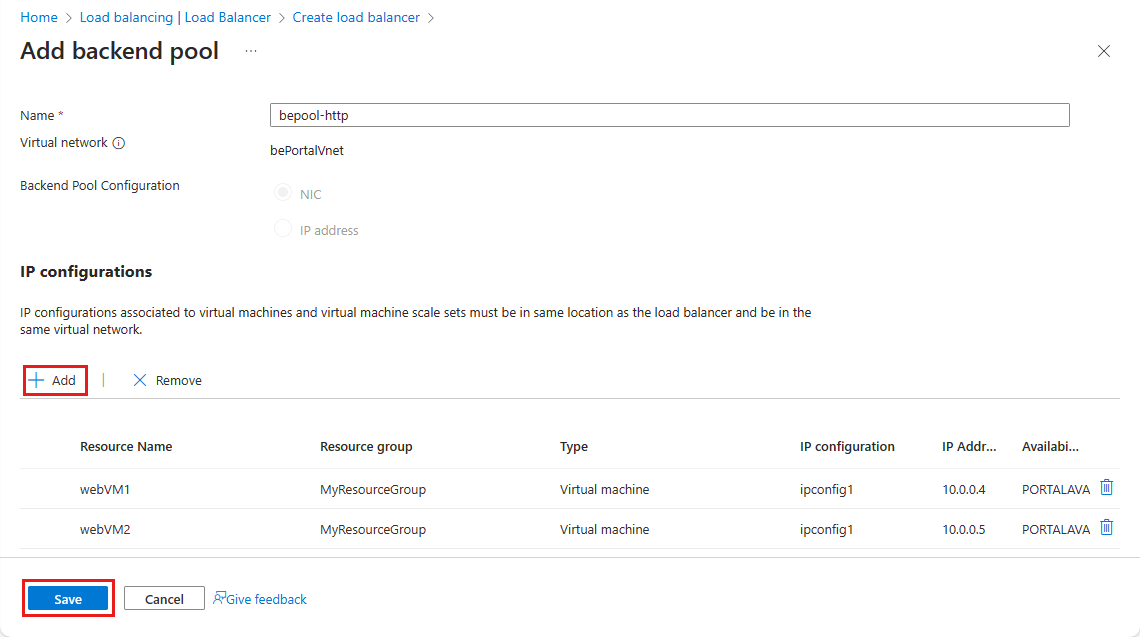
Add a back-end pool
Select Next : Backend pools.
Select + Add a backend pool. The Add backend pool pane appears.
Enter the following values for each setting.
Setting Value Name Enter a unique name for the back-end pool. For example, bepool-http. Virtual network Confirm bePortalVnet is selected. Under IP configurations, select Add. The Add IP configurations to backend pool pane appears.
Under Virtual machine, select the webVM1 and webVM2 virtual machines and select Add.
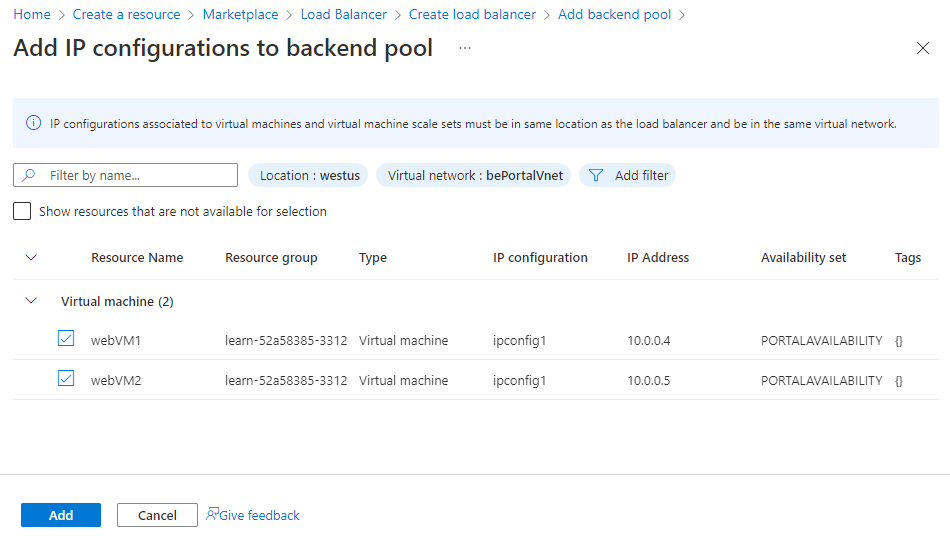
The Add backend pool screen reappears. Under IP configurations, select the webVM1 and webVM2 virtual machines and select Save. The Create load balancer screen reappears.
Add a load balancing rule
Finally, let's create a rule for the load balancer.
Select Next : Inbound rules.
In the Load balancing rule section, select + Add a load balancing rule. The Add load balancing rule pane appears.
Enter the following values for each setting.
Setting Value Name A name for the load balancing rule. For example, lbrule-http. IP Version IPv4 Frontend IP address Select the Frontend IP address that you named earlier. Backend pool Select the back-end pool that you named earlier. For example, bepool-http. Protocol TCP Port Enter 80 (default). Backend port Enter 80 (default). Health probe Select the Create new link. The Add health probe dialog box appears. Enter the following values for each setting.
Setting Value Name A name for the health probe. For example, healthprobe-http. Protocol TCP Port Enter 80 (default). Interval Enter 5 (default). This value is the amount of time between probes. Select Save to close the dialog box. The Add load balancing rule pane reappears.
Continue entering the following values for each setting.
Setting Value Session persistence* None (default) Idle timeout (minutes) Select 4 (default). This value is the time to keep a Transmission Control Protocol (TCP) or HTTP connection open without relying on clients to send keep-alive messages. Floating IP Disabled (default). 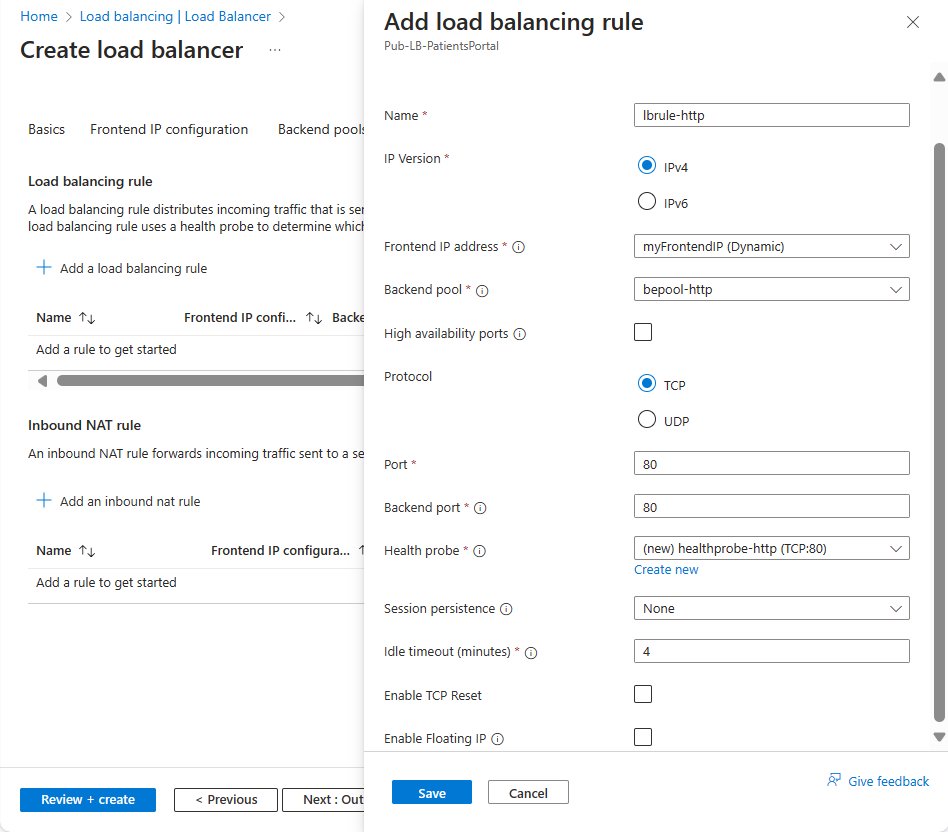
Select Save to complete the load balancing rule configuration.
The Create load balancer screen reappears. Select Review + create.
When validation passes, select Create. When the deployment completes, select Go to resource.
On the Overview page, copy and save the Public IP address. You might have to select See more... to view the Public IP address.
Create IP addresses
First, we need a public IP address for the load balancer.
In Cloud Shell, start PowerShell by running this command:
pwshIn PowerShell, create a new public IP address:
$Location = $(Get-AzureRmResourceGroup -ResourceGroupName <rgn>[sandbox resource group name]</rgn>).Location

$publicIP = New-AzPublicIpAddress `
  -ResourceGroupName <rgn>[sandbox resource group name]</rgn> `
  -Location $Location `
  -AllocationMethod "Static" `
  -Name "myPublicIP"
Create a front-end IP by using the New-AzLoadBalancerFrontendIpConfig cmdlet. The following code creates a front-end IP configuration named myFrontEnd and attaches the myPublicIP address:
$frontendIP = New-AzLoadBalancerFrontendIpConfig `
  -Name "myFrontEnd" `
  -PublicIpAddress $publicIP
Create the load balancer
When you use PowerShell to configure a load balancer, you must create the back-end address pool, the health probe, and the rule before you create the balancer itself.
Create a back-end address pool by running the New-AzLoadBalancerBackendAddressPoolConfig cmdlet. You're going to attach the virtual machines to this back-end pool in the final steps. The following example creates a back-end address pool named myBackEndPool:
$backendPool = New-AzLoadBalancerBackendAddressPoolConfig -Name "myBackEndPool"Create a health probe to allow the load balancer to monitor the status of the healthcare portal. The health probe dynamically adds or removes virtual machines from the load balancer rotation based on their response to health checks.
$probe = New-AzLoadBalancerProbeConfig `
  -Name "myHealthProbe" `
  -Protocol http `
  -Port 80 `
  -IntervalInSeconds 5 `
  -ProbeCount 2 `
  -RequestPath "/"
You now need a load balancer rule to define how traffic is distributed to the virtual machines. You define the front-end IP configuration for the incoming traffic and the back-end IP pool to receive the traffic, along with the required source and destination port. To make sure only healthy virtual machines receive traffic, you also define the health probe to use.
$lbrule = New-AzLoadBalancerRuleConfig `
  -Name "myLoadBalancerRule" `
  -FrontendIpConfiguration $frontendIP `
  -BackendAddressPool $backendPool `
  -Protocol Tcp `
  -FrontendPort 80 `
  -BackendPort 80 `
  -Probe $probe
Now, you can create the basic load balancer by running the New-AzLoadBalancer cmdlet:
$lb = New-AzLoadBalancer `
  -ResourceGroupName <rgn>[sandbox resource group name]</rgn> `
  -Name 'MyLoadBalancer' `
  -Location $Location `
  -FrontendIpConfiguration $frontendIP `
  -BackendAddressPool $backendPool `
  -Probe $probe `
  -LoadBalancingRule $lbrule
Connect the virtual machines to the back-end pool by updating the network interfaces that the script created to use the back-end pool information.
$nic1 = Get-AzNetworkInterface -ResourceGroupName <rgn>[sandbox resource group name]</rgn> -Name "webNic1"
$nic2 = Get-AzNetworkInterface -ResourceGroupName <rgn>[sandbox resource group name]</rgn> -Name "webNic2"

$nic1.IpConfigurations[0].LoadBalancerBackendAddressPools = $backendPool
$nic2.IpConfigurations[0].LoadBalancerBackendAddressPools = $backendPool

Set-AzNetworkInterface -NetworkInterface $nic1 -AsJob
Set-AzNetworkInterface -NetworkInterface $nic2 -AsJob
Run the following command to get the load balancer's public IP address and your website's URL:
Write-Host http://$($(Get-AzPublicIPAddress `
  -ResourceGroupName <rgn>[sandbox resource group name]</rgn> `
  -Name "myPublicIP").IpAddress)
Create a load balancer
Let's use the Azure CLI to create the load balancer and its associated resources.
Create a new public IP address.
az network public-ip create \
  --resource-group <rgn>[sandbox resource group name]</rgn> \
  --allocation-method Static \
  --name myPublicIP
Create the load balancer.
az network lb create \
  --resource-group <rgn>[sandbox resource group name]</rgn> \
  --name myLoadBalancer \
  --public-ip-address myPublicIP \
  --frontend-ip-name myFrontEndPool \
  --backend-pool-name myBackEndPool
Create a health probe that allows the load balancer to monitor the healthcare portal's status. The health probe dynamically adds or removes virtual machines from the load-balancer rotation based on their response to health checks.
az network lb probe create \
  --resource-group <rgn>[sandbox resource group name]</rgn> \
  --lb-name myLoadBalancer \
  --name myHealthProbe \
  --protocol tcp \
  --port 80
Now, you need a load balancer rule to define how traffic is distributed to the virtual machines. You define the front-end IP configuration for the incoming traffic and the back-end IP pool to receive the traffic, along with the required source and destination port. To make sure only healthy virtual machines receive traffic, you also define the health probe to use.
az network lb rule create \
  --resource-group <rgn>[sandbox resource group name]</rgn> \
  --lb-name myLoadBalancer \
  --name myHTTPRule \
  --protocol tcp \
  --frontend-port 80 \
  --backend-port 80 \
  --frontend-ip-name myFrontEndPool \
  --backend-pool-name myBackEndPool \
  --probe-name myHealthProbe
Connect the virtual machines to the back-end pool by updating the network interfaces that the script created to use the back-end pool information.
az network nic ip-config update \
  --resource-group <rgn>[sandbox resource group name]</rgn> \
  --nic-name webNic1 \
  --name ipconfig1 \
  --lb-name myLoadBalancer \
  --lb-address-pools myBackEndPool

az network nic ip-config update \
  --resource-group <rgn>[sandbox resource group name]</rgn> \
  --nic-name webNic2 \
  --name ipconfig1 \
  --lb-name myLoadBalancer \
  --lb-address-pools myBackEndPool
Run the following command to get the load balancer's public IP address and your website's URL:
echo http://$(az network public-ip show \
                --resource-group <rgn>[sandbox resource group name]</rgn> \
                --name myPublicIP \
                --query ipAddress \
                --output tsv)
Test the load balancer configuration
Let's test the load balancer setup, by showing how it can handle availability and health issues dynamically.
In a new browser tab, go to the public IP address that you noted. A response from one of the virtual machines is displayed in the browser.
Try a "force refresh" by pressing Ctrl+F5 a few times to see that the response is returned randomly from both virtual machines.
On the Azure portal menu or from the Home page, select All resources. Then select webVM1, and select Stop.
Return to the tab that shows the website and force a refresh of the webpage. All requests are returned from webVM2.