Exercise - Create conditional logic
In Power Automate, you can add conditions to take different actions depending on a certain result, in this case, to indicate whether the request was approved or rejected.
Note
To complete the exercises, you'll need to use a few files. Download the App in a Day files for use in this module. The file folders that are in this download include:
- Completed modules with instructions - Package files to import the completed exercise steps.
- Machine-Order-Data.xlsx - File used in the exercises.
Section 1: Add conditional logic to the flow
In this task, you add conditional logic to the flow by following these steps. If you closed your flow from earlier, you can find your flow in your solution and choose to edit.
Select + under the Start and wait for an approval action to open the Add an action pane.
Search for and then select Condition.
Select the Choose a value box and select Outcome from the Dynamic content pane. Remember to select the lighting bolt icon to access the dynamic content.
Select is equal to for the condition and then type
Approvefor Value.Save the flow.
Section 2: Set up actions to perform
Now, you set up what actions to perform if the response is approved or not: True branch vs. False branch.
You add two actions:
Update the record in the Machine Order table.
Send an email to the employee who requested the machine.
Follow the steps to add the actions.
In the left True box, select the + icon to open the Add an action pane.
Search for
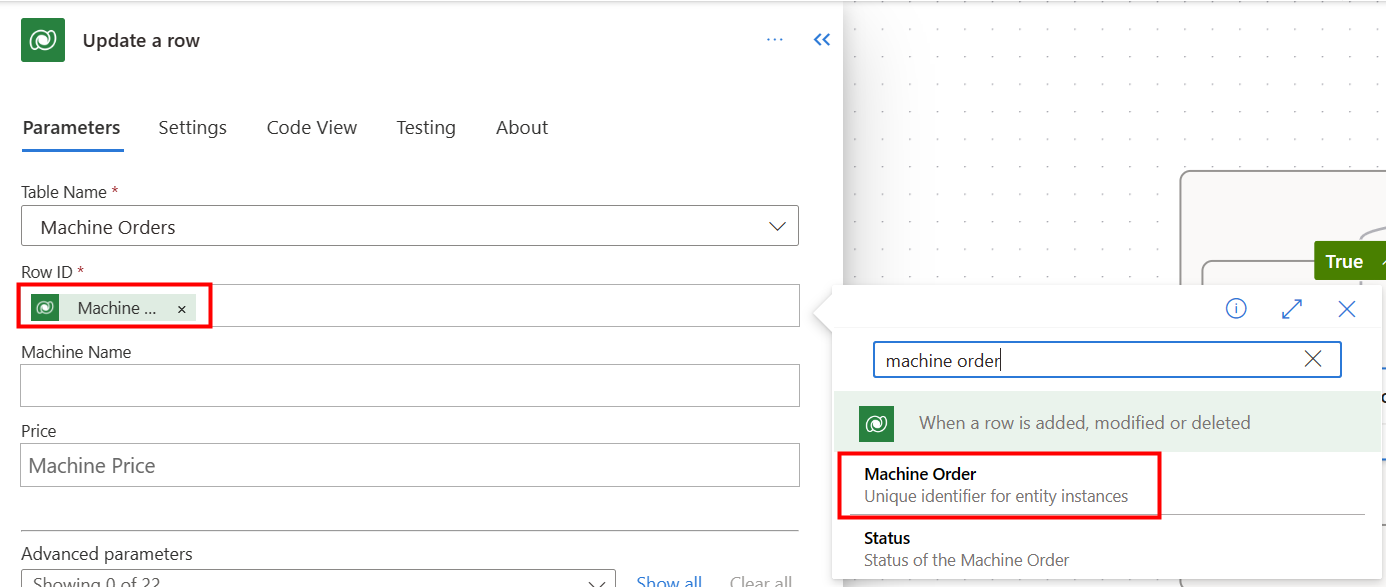
Update a rowand select Update a row (Microsoft Dataverse).Select Machine Orders from the Table name dropdown menu.
Select the Row ID and then select Machine Order from the Dynamic content pane.
Every time you create a table in Dataverse, a column is automatically created with the same name of the Display Name of the table. This column serves as the unique lookup ID for the record (or row) that was created.
Select Show all next to Advanced parameters.
Select Approve from the Approval Status dropdown menu.
Select the Approved Date field and then select the fx icon to write an expression.
Type
utcNow()in the window above the Function tab and then select Add.Save the flow.
Section 3: Add another action
Your next task is to add the send email action to the True branch.
From within the True branch, select the + icon to open the Add an action pane.
Search for
send an emailand select Send an email (V2) - Office 365 Outlook.Select Sign in if prompted.
Select Switch to Advanced mode and then select the To entry.
Select Requested By from the Dynamic content window from under the When a row is added, modified, or deleted action for the To field.
In the Subject field, enter
Your machine order has been approved!In the Body field, enter
Your machine has been approvedand select Machine Name from the Dynamic content pane from under When a row is added, modified or deleted.In the Body field, hit return to move to the next line. Enter
Estimated ship date:and select Estimated Ship Date under Update row from the Dynamic content pane.Note
If estimated ship date is selected from When a row is added, modified, or deleted NO ship date returns in the email as this value isn't populated until the approval status column contains data. This was the business rule set up earlier in a previous exercise.
In the Body field, hit return to move to the next line. Select Response summary from the Dynamic content pane from under Start and wait for an approval.
Note
If you don't have a Microsoft Office 365 mailbox set up, you can use another connector to send the email, such as Outlook.com, Gmail, or SendGrid.
Save and Publish your flow. You can now close out of this flow designer browser tab.


