Develop an entity and enable it for data export
A data entity is a de-normalized view of data that is spread across multiple normalized tables. The abstracted nature of a data entity simplifies application development and customization. Data entities provide a single stack to capture business logic and to enable scenarios such as import and export and integrations. Data entities are the primary method for importing and exporting data packages, and they can be exposed as OData services and then used in tabular-style synchronous integration scenarios. You can use data entities to access your finance and operations apps data through a third-party application, which is any program outside of finance and operations apps, whether it is a Microsoft product or not.
Data entities enable public application programming interfaces (APIs) to be exposed, and then enables synchronous services, which are used in Office integrations and third-party apps. By using a data management pipeline, data entities support asynchronous integrations, such as interactive file-based import/export and recurring integrations.
Many data entities are available in the Application Object Tree (AOT) in Visual Studio. You can also create a new data entity by using a wizard in Visual Studio.
Create a new data entity
To create a new data entity, follow these steps.
- Select a primary and secondary data source to build your entity, which could be tables from either the AOT or from your own project.
- Enable public API and data management capabilities so your data entity can be used for data exports. When public API and data management capabilities are enabled, a staging table is created with the entity, which is used in import/export scenarios to provide intermediary storage during file parsing and transformation.
- Select the fields from your primary table that you want included in your entity.
- You can rename the fields or select Convert labels to field names to generate names from existing labels.
- Select the check box in the Is Mandatory column for the field that you want to use as the natural key.
- Select your secondary data source and choose the fields that you want included. In the field selection, you have the same label options that you did with the primary data source.
- After you finish creating the entity, new items are displayed under your project in the Solution Explorer window. In addition to having your data entity listed, a staging table and two privileges to view and maintain the entity is available for you.
To see how to create a new data entity in Visual Studio, watch this video.
Add a data entity
New data entities can be added from Solution Explorer by using the Data Entity Wizard.
- Right-click your project or activate the context menu, and then select Add > New Item > Data Model > Data Entity.
- Create a name, such as mySalesPoolEntity, and then select Add. The Data Entity Wizard opens, and you should enter a primary data source, such as SalesPool.
- Enable Public API and the Public entity name and Public collection name prefixes with my, such as mySalesPoolEntity.
- Select Next.
- On the Add fields tab, select Next, and remove any fields that have the container type. A data entity should now be added to your project.
- Ensure that Synchronize Database on Build is set to true for your project’s property, and then save and build your project in Solution Explorer. If you experience build errors, find the model used for the field and add it as a reference to your model.
Entities are created as views in the database, and fields and keys are taken from our primary data source.
Test your entity by using X++
To test your entity by using X++, follow these steps.
Right-click your project or activate the context menu, and then select Add > New Item > Code > Runnable class to add a runnable class. Use the name mySalesPoolRunnableClass and select Add.
Enter the following code into your runnable class:
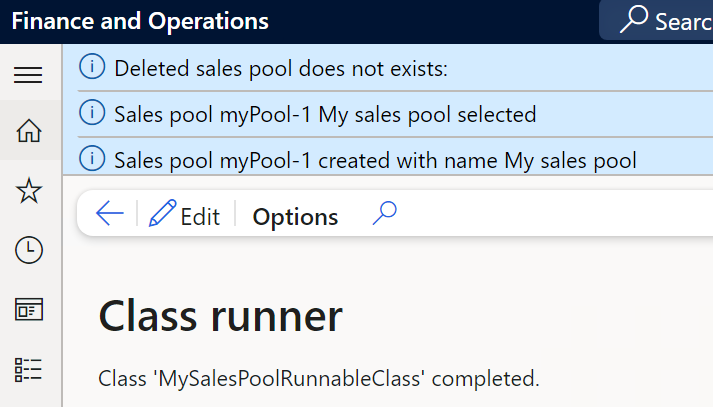
public static void main(Args _args)
{
    mySalesPoolEnitity  salesPoolEntity;
    SalesPoolId         salesPoolId = "myPool-1";

    // create records with entity

        //  Optional
        //salesPoolEntity.clear();
        salesPoolEntity.SalesPoolId = salesPoolId;
        salesPoolEntity.Name        = "My sales pool";

ttsBegin;
salesPoolEntity.insert();
ttscCommit;

    Info(strFmt("Sales pool %1 created with name %2", salesPoolEntity.SalesPoolId,  salesPoolEntity.Name));

    select firstonly forupdate salesPoolEntity
        where salesPoolEntity.SalesPoolId == salesPoolId;

    Info(strFmt("Sales pool %1 %2 selected", salesPoolEntity.SalesPoolId, salesPoolEntity.Name));

    ttsBegin;
    salesPoolEntity.delete();
    ttscCommit;

    select salesPoolEntity
        where salesPoolEntity.SalesPoolId == salesPoolId;

    Info(strFmt("Deleted sales pool does not exists: %1", salesPoolEntity.SalesPoolId));
}
Run the job with the debugger. The following screenshot shows what you should observe in the Infolog.

The data entity can be accessed with OData by entering the you base url for dynamics/data/MySalesPoolEntities URL, which the following screenshot shows.

To add an action to the data entity, follow these steps.
- In Solution Explorer, right-click mySalesPoolEntity or activate the context menu and then select View code.
- Add the following code:
The SysODataActionAttribute attribute defines the action attribute on the data entity.public class MySalesPoolEnitity extends common { [SysODataActionAttribute("Check", false)] public static str check(SalesPoolId _salesPoolId) { // do something return SalesPool::exist(_salesPoolId) ? "Sales pool exist" : "Sales pool does not exist"; } } - After building the project, the OData endpoint needs to be updated by using Restart IIS Express.
- Use another application to test the action on the data entity by using the https://base url.axcloud.dynamics.com/data/MySalesPoolEntities/Microsoft.Dynamics.DataEntities.Check URL. To find metadata and actions on a data entity, use the https://base url.axcloud.dynamics.com/Metadata/PublicEntities/ URL.