Exercise - Access data from a Blazor component
The current hard-coded pizzas in the app need to be replaced with a database. You can use the Microsoft Entity Framework to add connections to data sources. In this app, we use a SQLite database to store the pizzas.
In this exercise, you add packages to support database functionality, connect classes to a back-end database, and add a helper class to preload data for the company's pizzas.
Add packages that support database access
Stop the app if it's still running.
In Visual Studio Code, select Terminal > New Terminal.
In the new terminal, set your location to the BlazingPizza directory.
cd BlazingPizzaRun these commands to add the Microsoft.EntityFrameworkCore, Microsoft.EntityFrameworkCore.Sqlite, and System.Net.Http.Json packages:
dotnet add package Microsoft.EntityFrameworkCore --version 9.0.0
dotnet add package Microsoft.EntityFrameworkCore.Sqlite --version 9.0.0
dotnet add package System.Net.Http.Json --version 9.0.0
These commands add package references to your BlazingPizza.csproj file:
  <ItemGroup>
    <PackageReference Include="Microsoft.EntityFrameworkCore" Version="9.0.0-*" />
    <PackageReference Include="Microsoft.EntityFrameworkCore.Sqlite" Version="9.0.0-*" />
    <PackageReference Include="System.Net.Http.Json" Version="9.0.0-*" />
  </ItemGroup>
Add a database context
In Visual Studio Code, create a new folder in the BlazingPizza folder. Name it Data.
In the Data folder, create a new file named PizzaStoreContext.cs.
In the new file, enter this code for the class:
using Microsoft.EntityFrameworkCore;

namespace BlazingPizza.Data;

public class PizzaStoreContext : DbContext
{
    public PizzaStoreContext(DbContextOptions options) : base(options)
    {
    }

    public DbSet<PizzaSpecial> Specials { get; set; }
}
This class creates a database context we can use to register a database service. The context also allows us to have a controller that accesses the database.
Save your changes with Ctrl+S.
Add a controller
Create a new folder in the BlazingPizza folder. Name it Controllers.
Create a new file in the Controllers folder. Name it SpecialsController.cs.
Enter this code for the class:
using Microsoft.AspNetCore.Mvc;
using Microsoft.EntityFrameworkCore;
using BlazingPizza.Data;

namespace BlazingPizza.Controllers;

[Route("specials")]
[ApiController]
public class SpecialsController : Controller
{
    private readonly PizzaStoreContext _db;

    public SpecialsController(PizzaStoreContext db)
    {
        _db = db;
    }

    [HttpGet]
    public async Task<ActionResult<List<PizzaSpecial>>> GetSpecials()
    {
        return (await _db.Specials.ToListAsync()).OrderByDescending(s => s.BasePrice).ToList();
    }
}
This class creates a controller that allows us to query the database for pizza specials and returns them as JSON at the
(http://localhost:5000/specials)URL.Save your changes.
Load data into the database
The app checks to see if there's an existing SQLite database and creates one with some premade pizzas.
Create a new file in the Data directory. Name it SeedData.cs.
Enter this code for the class:
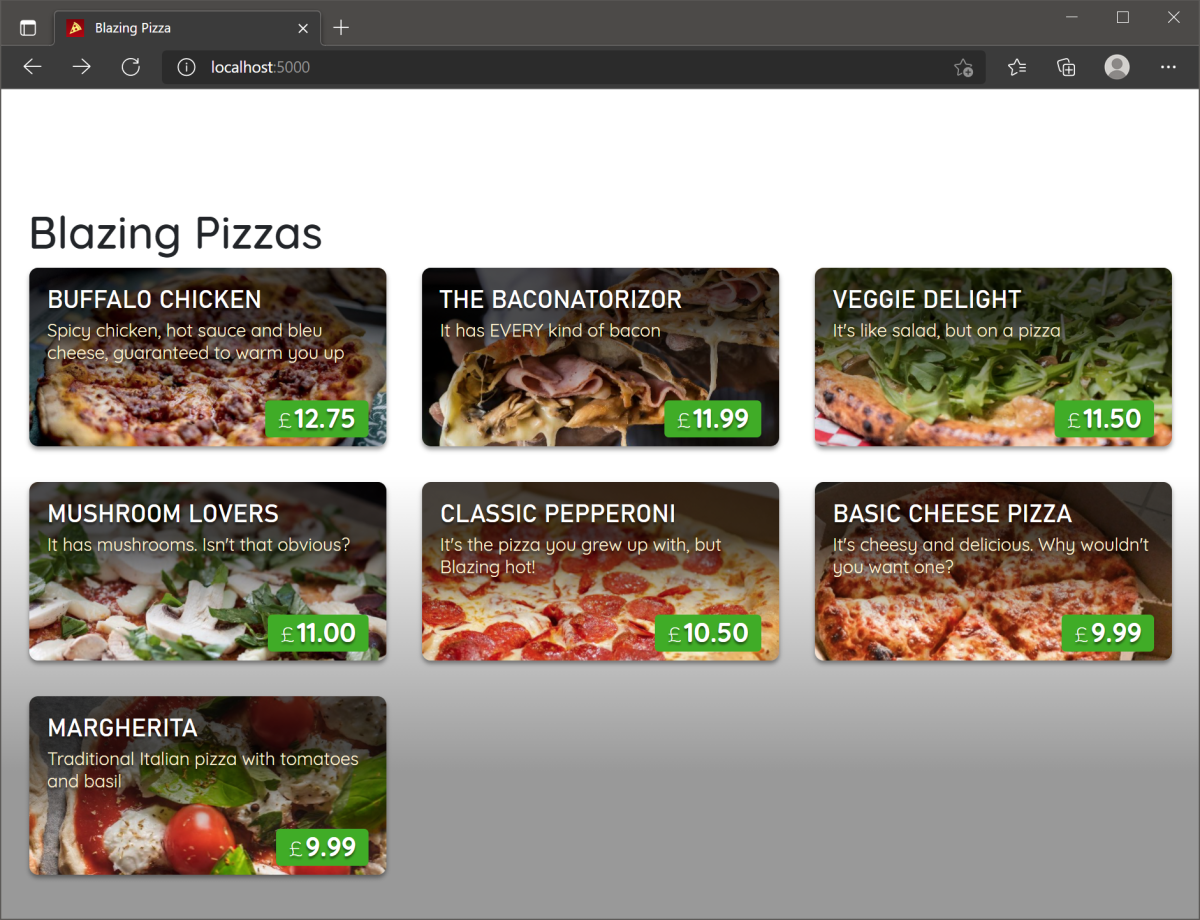
namespace BlazingPizza.Data;

public static class SeedData
{
    public static void Initialize(PizzaStoreContext db)
    {
        var specials = new PizzaSpecial[]
        {
            new PizzaSpecial()
            {
                Name = "Basic Cheese Pizza",
                Description = "It's cheesy and delicious. Why wouldn't you want one?",
                BasePrice = 9.99m,
                ImageUrl = "img/pizzas/cheese.jpg",
            },
            new PizzaSpecial()
            {
                Id = 2,
                Name = "The Baconatorizor",
                Description = "It has EVERY kind of bacon",
                BasePrice = 11.99m,
                ImageUrl = "img/pizzas/bacon.jpg",
            },
            new PizzaSpecial()
            {
                Id = 3,
                Name = "Classic pepperoni",
                Description = "It's the pizza you grew up with, but Blazing hot!",
                BasePrice = 10.50m,
                ImageUrl = "img/pizzas/pepperoni.jpg",
            },
            new PizzaSpecial()
            {
                Id = 4,
                Name = "Buffalo chicken",
                Description = "Spicy chicken, hot sauce and bleu cheese, guaranteed to warm you up",
                BasePrice = 12.75m,
                ImageUrl = "img/pizzas/meaty.jpg",
            },
            new PizzaSpecial()
            {
                Id = 5,
                Name = "Mushroom Lovers",
                Description = "It has mushrooms. Isn't that obvious?",
                BasePrice = 11.00m,
                ImageUrl = "img/pizzas/mushroom.jpg",
            },
            new PizzaSpecial()
            {
                Id = 7,
                Name = "Veggie Delight",
                Description = "It's like salad, but on a pizza",
                BasePrice = 11.50m,
                ImageUrl = "img/pizzas/salad.jpg",
            },
            new PizzaSpecial()
            {
                Id = 8,
                Name = "Margherita",
                Description = "Traditional Italian pizza with tomatoes and basil",
                BasePrice = 9.99m,
                ImageUrl = "img/pizzas/margherita.jpg",
            },
        };
        db.Specials.AddRange(specials);
        db.SaveChanges();
    }
}
The class uses a passed database context, creates some
PizzaSpecialobjects in an array, and then saves them.In the file explorer, select Program.cs.
At the top, add a reference to a new
PizzaStoreContext:using BlazingPizza.Data;This statement allows the app to use the new service.
Insert this segment above the
app.Run();method:// Initialize the database var scopeFactory = app.Services.GetRequiredService<IServiceScopeFactory>(); using (var scope = scopeFactory.CreateScope()) { var db = scope.ServiceProvider.GetRequiredService<PizzaStoreContext>(); if (db.Database.EnsureCreated()) { SeedData.Initialize(db); } } app.Run();This change creates a database scope with the
PizzaStoreContext. If there isn't a database already created, it calls theSeedDatastatic class to create one.At the moment, the app doesn't work because the
PizzaStoreContextisn't initialized yet. In the Program.cs file, add this code under the current services (the lines that startbuilder.Services.):builder.Services.AddHttpClient(); builder.Services.AddSqlite<PizzaStoreContext>("Data Source=pizza.db");This code registers two services. The first
AddHttpClientstatement allows the app to access HTTP commands. The app uses an HttpClient to get the JSON for pizza specials. The second statement registers the newPizzaStoreContextand provides the filename for the SQLite database.
Use the database to display pizzas
We can now replace the hard-coded pizza in the Index.razor page.
In the file explorer, expand Pages, and then select Index.razor.
Replace the existing
OnInitialized()method with:protected override async Task OnInitializedAsync() { specials = await HttpClient.GetFromJsonAsync<List<PizzaSpecial>>(NavigationManager.BaseUri + "specials"); }Note
This code replaces
OnInitialized()withOnInitializedAsync(). Specials are now going to be returned as JSON from the app asynchronously.There are some errors that you need to fix. Add these
@injectstatements under the@pagedirective:@inject HttpClient HttpClient @inject NavigationManager NavigationManagerSave all your changes, and then select F5 or select Run. Then select Start Debugging.
There's a runtime error when you run the app. The JsonReader raised an exception.
Remember that the app should be creating JSON at
(http://localhost:5000/specials). Go to that URL.The app doesn't know how to route this request. You learn about routing in the module on Blazor routing. Let's fix the error now.
Select Shift + F5, or select Stop Debugging.
In the file explorer, select Program.cs.
Around the middle of the file, after the lines that start
app., add this endpoint:app.MapControllerRoute("default", "{controller=Home}/{action=Index}/{id?}");The code should now be:
...
app.MapRazorPages();
app.MapBlazorHub();
app.MapFallbackToPage("/_Host");
app.MapControllerRoute("default", "{controller=Home}/{action=Index}/{id?}");
...
Select F5 or select Run. Then select Start Debugging.
The app should now work, but let's check that the JSON is being created correctly.
Go to
(http://localhost:5000/specials)to see: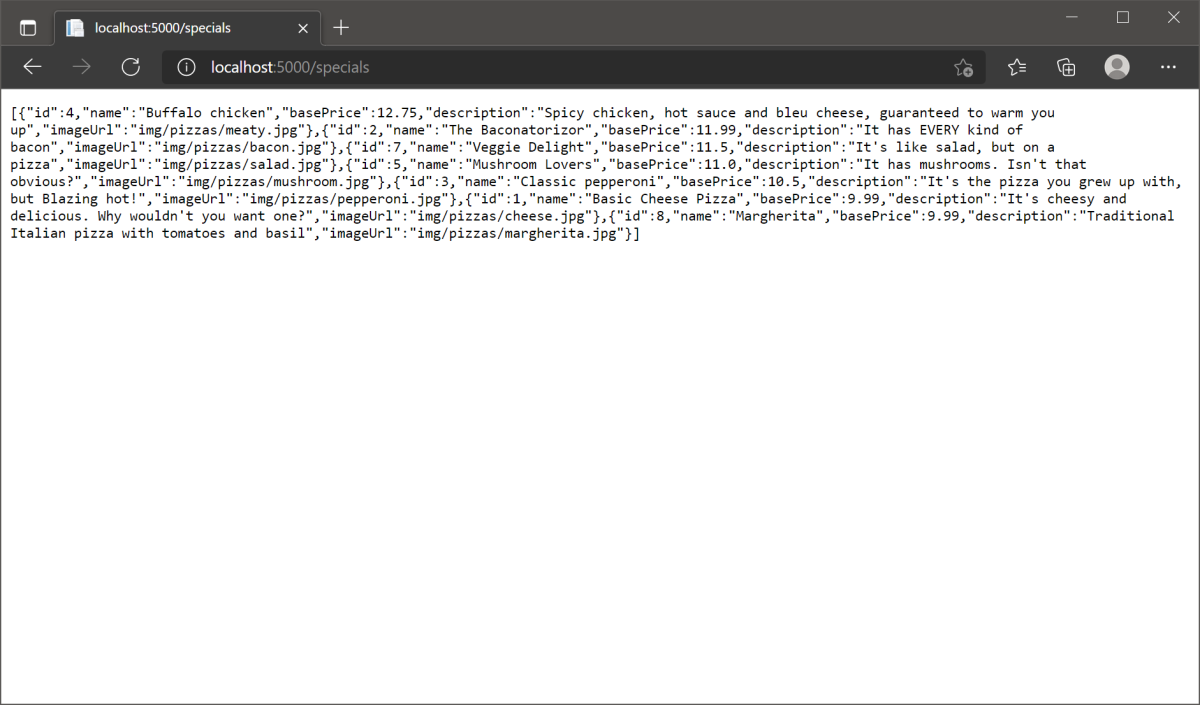
The JSON has the pizzas listed in descending order of price as specified in the special pizza controller.