Create a new Business Central extension in Visual Studio Code
All functionality in Dynamics 365 Business Central is coded in objects. If you want to modify existing objects (like tables, pages, and so on), you must create extensions. Extensions are part of a programming model, which is object-based. You can create new objects or extend existing objects, depending on what you want your extension to do. An extension defines extra functionality that modifies the behavior of the Business Central application.
All objects are stored as code, which is known as Application Language code (AL code). Every object is saved in files with an .al file extension. You can put multiple objects in a single .al file, though we recommend that you use a single file for each object.
By using the AL Language extension for Visual Studio Code, you get the benefits of a modern development environment along with seamless publishing, debugging, and implementation integration with Business Central.
When your extension is compiled, you get an .app package file, which can be deployed to the Business Central server. You can even submit your extension package to AppSource, where you can offer your solution to thousands of potential customers worldwide.
After installing the AL extension in Visual Studio Code, you can start creating extensions for Business Central by following these steps:
Open Visual Studio Code.
Select View in the menu bar and then select Command Palette. You can also use the Ctrl+Shift+P keyboard shortcut.
In the menu that appears, enter AL: Go, and then select the AL: Go! command (or use the Alt+A Alt+L keyboard shortcut). This action creates a new AL extension.

Provide a path where you want to store your extension code files. Visual Studio Code suggests a path in your Documents folder.
The AL Language extension can be used to develop extensions for different versions of Business Central. Visual Studio Code asks you to select the version that you want to target.
Select which instance to connect to for developing and testing your extension. Select Microsoft cloud sandbox if you connect to the online cloud sandbox, or select Your own server if you work with a Docker container or an on-premises version. Select Microsoft cloud sandbox if you're setting up this instance for completing this module, because you need to use an online cloud sandbox to complete the exercises.

You need to provide your user credentials to connect to the cloud sandbox.
Visual Studio Code doesn't know which objects (tables, pages, and so on) are already
available in Business Central. Therefore, after you provide your credentials, Visual
Studio Code attempts to download reference symbols. These symbols are .app files, which
are downloaded to a .alpackages folder in your AL Extension folder. The symbols
contain references on how objects are structured. For example, which fields are defined
in a customer table, how the layout of a vendor card is defined, and so on.
Before you start developing, make sure that you download these symbol files. If Visual Studio Code didn't download the symbols automatically, you can ask Visual Studio Code to download them from your cloud sandbox.
To download the symbols, follow these steps:
Select View in the menu bar and then select Command Palette. Alternatively, you can use the Ctrl+Shift+P keyboard shortcut.
In the menu that appears, enter AL: Download Symbols and then select the AL: Download Symbols command.
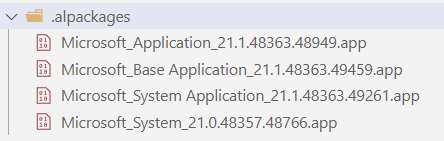
Downloading symbols can take a few minutes. After the symbols download, you'll see a new folder,
.alpackages, in File Explorer. The folder has at least these .app files:Application
Base Application
System Application
System
Business Foundation
In the output window of Visual Studio Code, you also see a message indicating that All reference symbols have been downloaded.
If Visual Studio Code encountered an error, you can see the error displayed in the output window. You can open the output window by selecting View > Output, or you can use the Ctrl+Shift+U keyboard shortcut.
To deploy your application, press the F5 key and wait until the Business Central application launches in your default web browser. If no problems occur, you should see the following message: App published: Hello world.
If you go back to your Visual Studio Code application, you see an extra toolbar indicating that you are in debug mode. Pressing the F5 key in Visual Studio Code deploys and starts the debugger. You can select the red Stop icon to stop your debugging session.


When you create a new extension with AL: Go!, a HelloWorld.al file is always generated by default. This file contains code that displays the message box from the previous example. The .al file extension indicates that this file contains AL code. We recommend that you delete this file each time you start a new extension.
The Microsoft_Application.app file
The Microsoft_Application.app file is included with Business Central and is located
in the \Applications\Application\Source folder. The Microsoft_Application.app file
logically encapsulates all of the extensions making up a solution, for example,
version 16.0.0.0 of the base and system application package files, and it provides a
convenient way to define and refer to this solution identity.
In previous versions, the references to base and system application were stated explicitly under dependencies in the app.json file of the extension. Instead, now you must use the Application version property in the app.json file.
The file name of the reference is Microsoft_Application.app and in the app.json file of the application package file, the name is Application. For code-customized base applications that have their own appId, the Microsoft_Application.app file can be modified to reference the appId of the code-customized base applications instead. This allows any extensions that are dependent on the Application to resolve to the custom appId.
When you start a new AL project in Visual Studio Code using the AL:Go template, the implicit WITH code statements are now switched off by default to encourage using explicit WITH statements going forward. This is done by adding the NoImplicitWith option to the features property in the generated app.json file.
Store app files
By default, when you build AL projects, the output app file is stored in the project folder. However, if you work on multiple apps that aren't in the same workspace and depend on each other, outputting to a shared app folder can be a benefit.
In the al.compilerOptions settings, you can now use the outFolder property
to specify which output folder to use when generating an app file as part of
building an AL project.
This makes it easier to manage and reuse generated apps in a single location. The AL project in Visual Studio Code still contains a node for the output file, but the file is then physically stored outside of the project folder.
Here's an example of saving built app files in "myappfolder" on the user's C drive.

Default folder location
The AL Language extension for Microsoft Dynamics 365 Business Central has a command to generate a new AL project. Since the start, the folder location for projects was fixed to the users' Documents folder in Windows. Based on asks, we added the ability for partners to define a different default location for AL projects in the settings, making the project creation workflow easier.
There's an al.algoSuggestedFolder setting for specifying the default folder
location for new AL projects. This can be set per user or per workspace,
offering some flexibility in the location for new projects.
