Understand Office JavaScript APIs
- 21 minutes
In this unit, you'll explore the Office Add-ins programming model, developer tools, and the capabilities of the Office JavaScript APIs for Excel, Outlook, and Word.
Understand the Office Add-ins programming model
The Office Add-in programming model relies on two JavaScript object models:
- Host-specific JavaScript API - Host-specific APIs for Excel and Word provide typed objects that you can use to access specific elements in the host application. For example, the Excel API contains objects that represent worksheets, ranges, tables, charts, and more.
- Common API - Introduced with Office 2013, the Common API enables you to access features such as:
- UI
- Dialogs
- Client settings that are common across multiple types of Office applications
Custom functions use a slightly different programming model and will be covered in a later unit.
Office JavaScript API requirement sets
You may not always have control over the version of Office your users have installed. Depending on the version of Office and platform it runs on, there are different APIs and features supported for your add-in. For example, Office 2016 supports more capabilities than Office 2013. To handle this situation, we provide requirement sets to help you determine whether an Office host supports the capabilities you need in your Office Add-in.
Requirement sets can be specific to Office hosts, such as an ExcelApi 1.7 set, or common to multiple hosts, such as the Dialog API. Requirement set support varies by Office host and host version.
It's possible to programmatically check if requirement sets are supported by your add-in's Office host, using isSetSupported. If the requirement set is supported, isSetSupported returns true and your add-in can run the extra code that uses the API members from that requirement set. If the Office host doesn't support the requirement set, isSetSupported returns false and the extra code won't run. The following code shows the syntax to use with isSetSupported.
if (Office.context.requirements.isSetSupported(RequirementSetName, MinimumVersion)) {
  // Code that uses API members from RequirementSetName.
}
Note
Office Insider's Program
To get the earliest or monthly changes to any of the Office hosts, you can join the Office Insider's program. This program is for Windows PC only and requires a Microsoft 365 subscription. From any Office application, select File > Account > Office Insider to quickly join the program.
Using Office JavaScript APIs
To use these APIs, reference them on the Office.js content delivery network (CDN), typically by adding one of the following code statements to your page's <head> tag.
<!-- Reference the production APIs on the CDN -->
<script src="https://appsforoffice.microsoft.com/lib/1/hosted/office.js" type="text/javascript"></script>
<!-- Reference the beta/preview APIs on the CDN -->
<script src="https://appsforoffice.microsoft.com/lib/beta/hosted/office.js" type="text/javascript"></script>
Along with adding your preferred CDN link, all Office Add-ins require an Office.onReady() call. You put your add-in code in this method, and it gets called once the Office.js library has initialized. Inside the onReady() method, you can determine which host your add-in is running in by checking the Office.HostType enum value (for example, Excel or Word). You can check which platform your add-in is running on with an Office.PlatformType enum value (for example, PC or Mac).
If you're using other JavaScript frameworks that include their own initialization handler or tests, they should be placed within the response to Office.onReady(). For example, you would reference jQuery's $(document).ready() function as shown in the following code example.
Office.onReady(function() {
  // Office is ready.
  $(document).ready(function () {
    // The document is ready.
  });
});
Making asynchronous calls with proxy objects
When you work with a document, requested read, or write actions are batched up using a proxy object. Your API calls don't actually read or update the underlying document until you call the sync() method.
For better security, your add-in runs in a sandboxed JavaScript environment that can't directly access the document, or other add-ins. The Office Add-ins platform provides a RequestContext object that in turn provides proxy objects to represent the document (such as worksheets, ranges, and tables). The RequestContext is typically passed to your code as a parameter named context. You can use the context object to get any proxy objects you need to work with the document.
Before you can read the properties of a proxy object, you must load the properties to populate the proxy object with data from the Office document. You do this by calling the load() method on the proxy object for any properties you need. Then call the context.sync() method, which will load all of the requested properties. For example, if you create a proxy range object to work with a user-selected range in an Excel worksheet, and then want to read the selected range's address property, you need to load the address property before you can read it. To request properties of a proxy object to be loaded, call the load() method on the object and specify the properties to load.
The following example shows a function that defines a local proxy object (selectedRange), loads the address property of that object, then calls context.sync(). When the promise from context.sync() is resolved, the code can then read the address property. Excel.run is required for this specific host, to load properties that affect platform behavior when the function runs. Not all hosts contain a run call.
Excel.run(function (context) {
  var selectedRange = context.workbook.getSelectedRange();
  selectedRange.load('address');
  return context.sync()
    .then(function () {
    console.log('The selected range is: ' + selectedRange.address);
  });
}).catch(function (error) {
  console.log('error: ' + error);
  if (error instanceof OfficeExtension.Error) {
    console.log('Debug info: ' + JSON.stringify(error.debugInfo));
  }
});
Understand Office Add-ins developer tools
You can use Office Add-ins developer tools to create an Office Add-in, explore Office JavaScript APIs, and validate an Office Add-in manifest file. In this unit, you'll learn about the following tools:
- Yeoman generator for Office Add-ins
- Visual Studio
- Script Lab
- Manifest validator
Creating an Office Add-in
You can create an Office Add-in by using the Yeoman generator for Office Add-ins or Visual Studio.
Tip
Install and learn more about the Yeoman generator for Office Add-ins at github.com/OfficeDev/generator-office.
Yeoman generator for Office Add-ins
The Yeoman generator for Office Add-ins can be used to create a Node.js Office Add-in project that can be managed with Visual Studio Code or any other editor. The generator can create Office Add-ins for:
- Excel
- OneNote
- Outlook
- PowerPoint
- Project
- Word
- Excel custom functions
You can choose to create the project using HTML, CSS, and JavaScript, or using Angular or React. TypeScript is also an option.
To create an Office Add-in project with the Yeoman generator, complete the following steps.
To globally install Yeoman and the Yeoman generator for Office Add-ins using npm, the Node package manager, run the following command.
npm install -g yo generator-officeTo create an add-in project using the Yeoman generator, run the following command.
yo office
Visual Studio
Visual Studio can be used to create Office Add-ins for Excel, Word, PowerPoint, or Outlook. An Office Add-in project gets created as part of a Visual Studio solution, which means you can use Visual Studio features like selecting Start or choosing F5 to automatically run your add-in locally on IIS. Office Add-in projects that you create with Visual Studio use HTML, CSS, and JavaScript.
To create an Office Add-in with Visual Studio, create a new C# or Visual Basic project and choose one of the following project types.
- Excel Web add-in
- Outlook Web add-in
- PowerPoint Web add-in
- Word Web add-in
Explore the APIs using Script Lab
Script Lab is an add-in that enables you to run Office JavaScript snippets while you're working in an Office program such as Excel or Word. It's available for free via AppSource and is a useful tool to include in your development toolkit as you test and verify the functionality you want in your add-in. In Script Lab, you can access a library of built-in samples to quickly try out APIs or even use a sample as the starting point for your own code.
The following video shows Script Lab in action.

Validating an Office Add-in's manifest file
The Office Add-ins manifest validator examines your add-in's manifest file to determine if it's correct and complete. If you created your add-in project using the Yeoman generator for Office Add-ins (version 1.1.17 or later), you can validate the manifest by running the following command in the root directory of the project.
npm run validate
If you didn't use the Yeoman generator to create your add-in project, you can validate your add-in's manifest by completing the following steps.
Install Node.js.
Run the following command in the root directory of your project.
Important
Replace
{{MANIFEST_FILE}}with the name of your manifest file.npx office-addin-manifest validate {{MANIFEST_FILE}}
Understand the capabilities of the Excel JavaScript API
The Excel JavaScript APIs give your add-ins access to Excel documents. An Excel add-in can manage the content, formatting, and structure of a workbook or spreadsheet.
Understand the capabilities of the Outlook JavaScript API
The Outlook JavaScript APIs give your add-ins access to the user's mailbox, messages, and appointments in Outlook. An Outlook add-in can get the content and properties of a message or appointment. An add-in can also manage the content, formatting, and structure of a message or appointment that is being composed.
Object model
To understand the Outlook APIs, first see how the main components of a mailbox relate to each other.
- The Mailbox object enables you to handle authentication, manage a selected item, and view user profile details.
- The Item object represents the selected message or appointment that the user is reading or composing.
Using the Outlook APIs, you can manage many properties of an email or appointment. Many of the APIs are organized around the mode the user is in. The following table maps item types and modes.
| Item type | Modes |
|---|---|
| Message | Read Compose |
| Appointment/meeting | Attendee (read) Organizer (compose) |
Key features
In addition to task pane add-ins, you can create contextual and module add-ins. In this section, you'll learn about a few key features of Outlook APIs.
- Authentication options
- Contextual add-ins
- Module add-ins
Authentication
Your Outlook add-in can access information from anywhere on the Internet. A few examples include the server that hosts the add-in, your internal network, or elsewhere in the cloud. If that information is protected, your add-in needs a way to authenticate your user. Outlook add-ins provide many different methods to authenticate, depending on your specific scenario.
Exchange user identity token
Exchange user identity tokens provide a way for your add-in to establish the identity of the user. By verifying the user's identity, you can authenticate a user into your system once, then accept the user identity token as an authorization for future requests. Consider using user identity tokens if your add-in is used primarily by Exchange on-premises users or needs access to a non-Microsoft service that you control. Your add-in can call getUserIdentityTokenAsync() to get Exchange user identity tokens.
Obtain access tokens with OAuth2 flows
Add-ins can also access third-party services that support OAuth2 for authorization. Consider using OAuth2 tokens if your add-in needs access to a third-party service outside of your control. Using this method, your add-in prompts the user to sign in to the service by using the displayDialogAsync() method to initialize the OAuth2 flow, for example.
Callback tokens
Callback tokens provide your add-in access to the user's mailbox from your server, either using Exchange Web Services (EWS), or the Outlook REST API. Add-ins obtain callback tokens using one of the getCallbackTokenAsync() methods. The level of access is controlled by the permissions specified in the add-in manifest.
Authentication summary
The following table summarizes when you should use each type of access token.
| Access token | Use if your add-in... |
|---|---|
| Exchange user identity tokens | Is used primarily by Exchange on-premises users. Needs access to a non-Microsoft service that you control. |
| OAuth2 access tokens | Needs access to a third-party service outside of your control. |
| Callback tokens | Needs access to the user's mailbox from your server. |
Contextual add-ins
Contextual add-ins are Outlook add-ins that activate based on text in a message or appointment. You may have seen the default contextual add-ins in Outlook, such as Bing Maps or Suggested Meetings. Using contextual add-ins, a user can start tasks related to a message without leaving the message itself, which results in an easier and richer user experience.
The following table lists a few example tasks based on a user's selection.
| User chooses... | Contextual add-in action |
|---|---|
| Address | Open a map of the location. |
| String | Open a meeting suggestion add-in. |
| Phone number | Add number to your contacts. |
Note
Contextual add-ins are not currently available in Outlook on Android and iOS at this time.
The following image shows a contextual add-in displayed in Outlook.
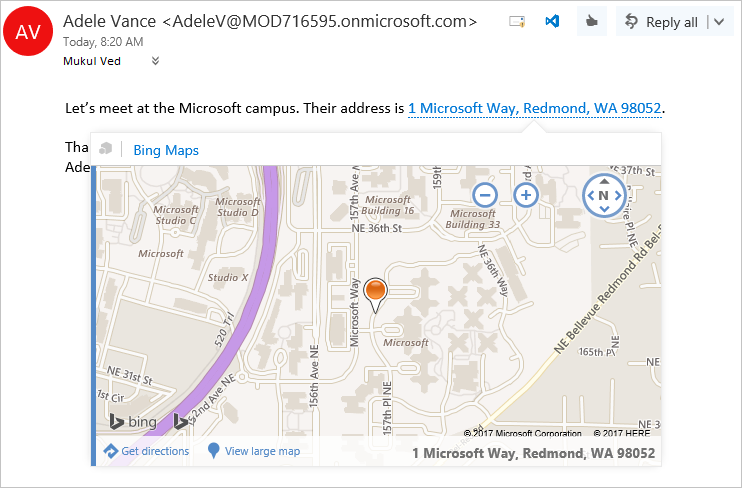
A contextual add-in displayed in Outlook
A contextual add-in's manifest must include an ExtensionPoint element with an xsi:type attribute set to DetectedEntity. Within the ExtensionPoint element, the add-in specifies the entities or regular expression that can activate it. If an entity is specified, the entity can be any of the properties in the Entities object.
As such, the add-in manifest must contain a rule of type ItemHasKnownEntity or ItemHasRegularExpressionMatch. The following example shows how to specify that an add-in should activate on messages when it detects a phone number.
<ExtensionPoint xsi:type="DetectedEntity">
  <Label resid="contextLabel" />
  <SourceLocation resid="detectedEntityURL" />
  <Rule xsi:type="RuleCollection" Mode="And">
    <Rule xsi:type="ItemIs" ItemType="Message" />
    <Rule xsi:type="ItemHasKnownEntity" EntityType="PhoneNumber" Highlight="all" />
  </Rule>
</ExtensionPoint>
After a contextual add-in is associated with an account, it will automatically start when the user selects a highlighted entity or regular expression.
A user launches a contextual add-in through text, either a known entity or a developer's regular expression. Typically, a user identifies a contextual add-in because the entity is highlighted.
Module add-ins
Module add-ins appear in the Outlook navigation bar, right alongside mail, tasks, and calendars. You can use all of the features of the Outlook JavaScript API in your add-in, and create command buttons in the Outlook ribbon so the user can interact with the add-in content.
Note
Module add-ins are only supported in Outlook 2016 or later on Windows.
The following image shows an example of a module extension add-in.

A Module add-in example in Outlook on Windows
To make a module add-in, include the module extension point in your add-in's manifest file. The following example shows a snippet of a manifest file adjusted to define a module extension.
...
<!-- Add Outlook module extension point. -->
<VersionOverrides xmlns="http://schemas.microsoft.com/office/mailappversionoverrides"
                  xsi:type="VersionOverridesV1_0">
  <VersionOverrides xmlns="http://schemas.microsoft.com/office/mailappversionoverrides/1.1"
                    xsi:type="VersionOverridesV1_1">

    <!-- Begin override of existing elements. -->
    <Description resid="residVersionOverrideDesc" />

    <Requirements>
      <bt:Sets DefaultMinVersion="1.3">
        <bt:Set Name="Mailbox" />
      </bt:Sets>
    </Requirements>
    <!-- End override of existing elements. -->

    <Hosts>
      <Host xsi:type="MailHost">
        <DesktopFormFactor>
          <!-- Set the URL of the file that contains the
               JavaScript function that controls the extension. -->
          <FunctionFile resid="residFunctionFileUrl" />

          <!-- Module extension point for a ModuleApp -->
          <ExtensionPoint xsi:type="Module">
            <SourceLocation resid="residExtensionPointUrl" />
            <Label resid="residExtensionPointLabel" />

            <CommandSurface>
              <CustomTab id="idTab">
                <Group id="idGroup">
                  <Label resid="residGroupLabel" />

                  <Control xsi:type="Button" id="group.changeToAssociate">
                    <Label resid="residChangeToAssociateLabel" />
                    <Supertip>
                      <Title resid="residChangeToAssociateLabel" />
                      <Description resid="residChangeToAssociateDesc" />
                    </Supertip>
                    <Icon>
                      <bt:Image size="16" resid="residAssociateIcon16" />
                      <bt:Image size="32" resid="residAssociateIcon32" />
                      <bt:Image size="80" resid="residAssociateIcon80" />
                    </Icon>
                    <Action xsi:type="ExecuteFunction">
                      <FunctionName>changeToAssociateRate</FunctionName>
                    </Action>
                  </Control>
                </Group>
                <Label resid="residCustomTabLabel" />
              </CustomTab>
            </CommandSurface>
          </ExtensionPoint>
        </DesktopFormFactor>
      </Host>
    </Hosts>

    <Resources>
      ...
    </Resources>
  </VersionOverrides>
</VersionOverrides>
Getting started developing Outlook add-ins
To develop an Outlook add-in, use:
- The Yeoman generator for Office Add-ins
- Visual Studio
You can use a template as your base then add your functionality.
Understand the capabilities of the Word JavaScript API
The Word JavaScript APIs give your add-ins access to Word documents. A Word add-in can manage the content, formatting, and structure of a document.
Object model
To understand the Word APIs, you must see how the main components of a document relate to each other.
- A Document contains a Body and at least one Section.
- A Body can contain:
- Paragraph (one or more)
- Table (one or more)
- List (one or more)
- Text
- Objects like images and lists
- A Section gives access to its body, headers, and footers.
Key scenarios
In this section, you'll learn about a couple of key scenarios for Word APIs.
- Work with document text
- Search
Note
You can apply simple formatting to an entire existing document using the Office.js APIs. However, if you wish to apply complex formatting or use rich content objects, you can use Office Open XML (OOXML) to create these effects. Examples of capabilities in OOXML include applying drop shadows to text or pictures, coercing text boxes into shapes, and inserting Excel charts as live charts in Word documents. Because this is a more advanced skill, we will not cover this subject in its entirety but mention it for developers who are familiar with OOXML.
Working with document text
Word add-ins use the Office.onReady() event handler to start. If the add-in targets Word 2016 or later, it calls the Word.run() method to run Word JavaScript APIs. The add-in must pass a function to Word.run() that expects a context object to be passed as the parameter. The context object allows the add-in to interact with the Word document. You can use the context object to create any needed proxy objects for the Word document and load the proxies with any properties you wish to use. You can also program actions to run using those properties. As always, a context.sync() command then synchronizes the state between the proxy objects and objects in the Word document.
The following example shows code that inserts text after the body text of a Word document. For simplicity, this sample omits the Office.onReady() code and focuses on the code within a Word.run() code block.
// Run a batch operation against the Word JavaScript API.
Word.run(function (context) {
  // Create a proxy object for the document body.
  var body = context.document.body;

  // Queue a command to load the text property of the proxy body object.
  body.load("text");

  // Queue a command to insert text into the end of the Word document body.
  body.insertText('This is text inserted after loading the body.text property',
                  Word.InsertLocation.end);

  // Synchronize the document state by executing the queued commands,
  // and return a promise to indicate task completion.
  return context.sync().then(function () {
    console.log("Body contents: " + body.text);
  });
})
Search
You can use the APIs to search the document for text that meets your criteria. You can also scope your search to certain types of content, for example, paragraphs or tables.
The following code sample searches for the text "video you" and ignores punctuation. If the text is found, the matches are bolded, highlighted in yellow, and the font color set to purple.
// Run a batch operation against the Word object model.
Word.run(function (context) {
  // Queue a command to search the document and ignore punctuation.
  var searchResults = context.document.body.search('video you', {ignorePunct: true});

  // Queue a command to load the search results and get the font property values.
  context.load(searchResults, 'font');

  // Synchronize the document state by executing the queued commands,
  // and return a promise to indicate task completion.
  return context.sync().then(function () {
      console.log('Found count: ' + searchResults.items.length);

      // Queue a set of commands to change the font for each found item.
      for (var i = 0; i < searchResults.items.length; i++) {
        searchResults.items[i].font.color = 'purple';
        searchResults.items[i].font.highlightColor = '#FFFF00'; // Yellow
        searchResults.items[i].font.bold = true;
      }

      // Synchronize the document state by executing the queued commands,
      // and return a promise to indicate task completion.
      return context.sync();
  });
})
.catch(function (error) {
  console.log('Error: ' + JSON.stringify(error));
  if (error instanceof OfficeExtension.Error) {
    console.log('Debug info: ' + JSON.stringify(error.debugInfo));
  }
});
Getting started developing Word add-ins
To develop a Word add-in, use:
- The Yeoman generator for Office Add-ins
- Visual Studio
If you want to explore the APIs more, the Script Lab add-in is recommended. There, you'll see many TypeScript and JavaScript snippets and can experiment with Word documents without creating an entire add-in.
Understand the capabilities of custom functions
Custom functions have several unique capabilities and restrictions because they run in a separate runtime from other add-in interactions, like task panes.
Custom function capabilities
You can create custom JavaScript or TypeScript functions that can be accessed like built-in Excel functions such as SUM(). You can also create streaming custom functions, which return a value based on a timer. For example, you can update the current time value in a cell every second. You can make network calls from custom functions as well.
Custom function JavaScript example
The following code sample defines the custom function add() that accepts two numbers then returns their sum.
/**
 * Adds two numbers.
 * @customfunction
 * @param first First number.
 * @param second Second number.
 * @returns The sum of the two numbers.
 */

function add(first, second){
  return first + second;
}
JSDoc code comment descriptions
The JSDoc tags in the code comments are used to generate a JSON metadata file that describes the custom function to Excel. The JSON metadata file enables Excel to accurately present information to a user and pass expected parameters to your custom function.
@customfunction: Is declared first and indicates it's a custom function. Required.@param: Describes the parameter. Include for each parameter defined by the function.@returns: Describes what the function outputs.
Note
The comment description "Adds two numbers." is also added to the JSON Metadata file for Excel to display when the user is viewing your custom function.
Custom function runtime restrictions
The custom function runtime only runs JavaScript. There's no document object model (DOM) or local storage, as you would find in a browser-based JavaScript runtime environment. This means you can't load any libraries that use the DOM, such as jQuery. Also, you can't access the Office.js API to interact with the document like you can from a task pane. Instead, the custom functions runtime is optimized for tasks such as doing rapid calculations and generally doesn't need to use some of the Office.js APIs such as formatting tools in Excel.
Custom functions have a webpage that loads the custom functions runtime. Since the custom functions runtime doesn't have a UI, there's nothing for the webpage to display. You'll find the following script tag in the webpage that loads the library for the custom functions runtime.
<script src="https://appsforoffice.microsoft.com/lib/1/hosted/custom-functions-runtime.js" type="text/javascript"></script>
Typically custom functions are combined with a task pane in the same add-in. If you create your add-in project using the Yeoman generator for Office Add-ins, the project will have a webpage for the custom functions, and a web page with UI for the task pane.
Using storage API to communicate with the task pane
Custom function code and task pane code (which uses Office.js) can't call or communicate directly with each other. But you can use a storage API that allows them to share data. A common scenario for using the storage API is when the add-in needs to share a security token for accessing a secure network resource. The user might first call a custom function that requires them to be signed in. After authentication, it receives the security token. Then it shares the security token using the storage API so that later, when the user opens the task pane, the task pane doesn't need to sign them in again.
Instead, the user might open the task pane first. In this case, the task pane will sign in the user and share the security token through the storage API. When a custom function is used later, the custom function can get the security token through the storage API.
Storage API example
The following code sample shows how to store and retrieve any value created by the user.
/**
 * @customfunction
 * @description Stores a value in OfficeRuntime.storage.
 * @param {any} key Key in the key-value pair you will store.
 * @param {any} value Value in the key-value pair you will store.
 */
function storeValue(key, value) {
  return OfficeRuntime.storage.setItem(key, value).then(function (result) {
    return "Success: Item with key '" + key + "' saved to storage.";
  }, function (error) {
    return "Error: Unable to save item with key '" + key + "' to storage. " + error;
  });
}

/**
 * @customfunction
 * @description Gets value from OfficeRuntime.storage.
 * @param {any} key Key of item you intend to get.
 */
function getValue(key) {
  return OfficeRuntime.storage.getItem(key);
}
Dialog API
Custom functions have their own dialog API since they can't access the Office.js API. However, the functionality is similar. The most common scenario is to launch a dialog to sign in a user and receive a security token.
The following code sample shows how to display a web dialog from a custom function.
OfficeRuntime.displayWebDialog('https://myDomain/myDialog.html', {height: 30, width: 20});
Creating a custom functions project
You can create a custom functions project by using the Yeoman generator for Office Add-ins. Run yo office to start the generator, then choose the Excel Custom Functions add-in project option. Once created, your project will contain a /src/taskpane/ folder for the task pane source files, and a /src/functions folder for the custom function source files.
Note
You can't create a custom functions project in Visual Studio.
Summary
In this unit, you explored the Office Add-ins programming model, developer tools, and the capabilities of the Office JavaScript APIs for Excel, Outlook, and Word.