How does Azure Cloud Shell work?
As an IT admin for Contoso Corporation, you're frequently on-call to perform administrative tasks and resolve workload disruptions to resources in your organization's Azure subscriptions. When visiting a family member during a weekend that you're on call, the development team notifies you of a problem with an Azure virtual machine (VM). The VM became nonresponsive during scheduled maintenance for the upgrade of an application that runs on it. Because the developers weren't granted access to the underlying Azure virtual machine hosting infrastructure, they're only able to remotely access the VM when it's operating normally. So, you're being called to diagnose and remediate the problem.
Since you're visiting family, you don’t have access to your administrative workstation and diagnostic scripts. You do have access to a laptop with an internet browser. Using the laptop, you browse to the Azure portal, authenticate against your organization’s Azure subscription, open Azure Cloud Shell, mount an Azure File Share, access your diagnostic scripts, and diagnose and remediate the problems with the VM, returning it to operation.
Access Cloud Shell
You have a few different options for accessing Azure Cloud Shell:
From a direct link: https://shell.azure.com
From the Azure portal

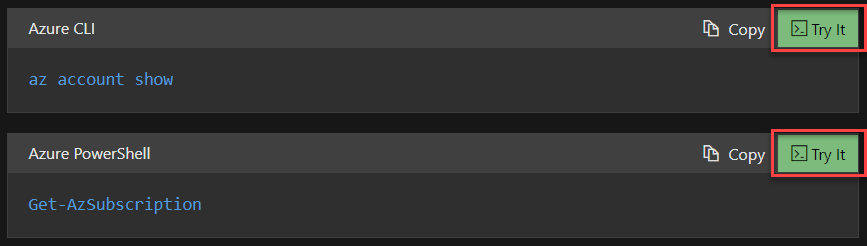
From code snippets when accessing Microsoft Learn:


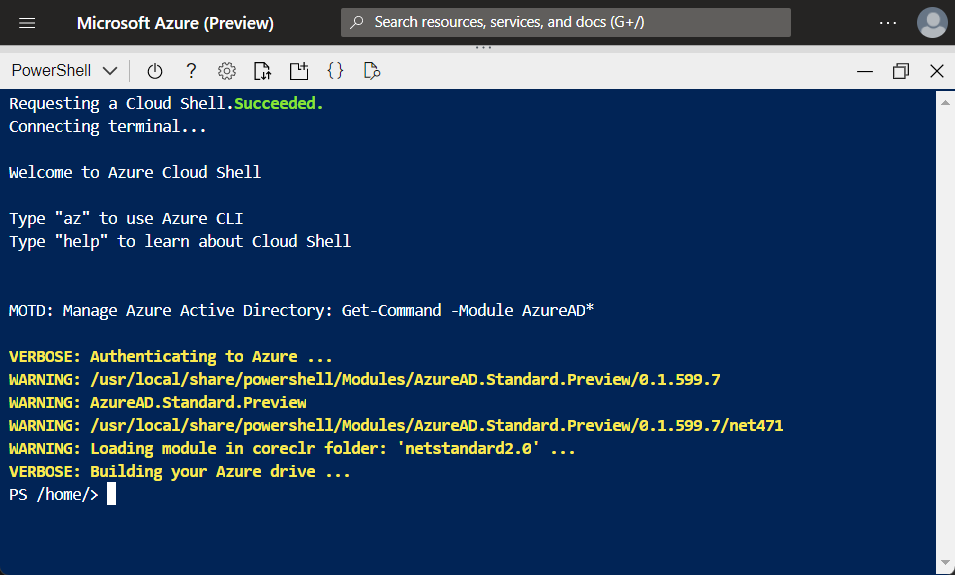
When you open a Cloud Shell session, a temporary host is allocated to your session. This VM is preconfigured with the latest versions of PowerShell and Bash. You can then select the command-line experience you want to use:

After you select the shell experience you want to use, you can start managing your Azure resources:

Cloud Shell sessions terminate after 20 minutes of inactivity. When a session terminates, files on your CloudDrive are persisted, but you need to start a new session to access the Cloud Shell environment.
Access your own scripts and files
When using Cloud Shell, you might also need to run scripts or use files for different actions. You can persist files on Cloud Shell by using the Azure CloudDrive:

After uploading files, you can interact with them as you would in a regular PowerShell or Bash session:

Now that your file resides on CloudDrive, you can close the session and open another session on a different device and still access the same file. Cloud Shell also lets you map an Azure Storage File Share, which is tied to a specific region. Access to an Azure File Share lets you work with the contents of that share through Cloud Shell.
If you need to edit scripts hosted on the CloudDrive or File Share, you can use the Cloud Shell editor. Select the curly brackets {} icon on the browser and open the file you want to edit, or use the command code and specify the filename; for example:
code temp.txt

Note
The code command only works in the Classic mode in Cloud Shell. To enable Classic mode, select the More icon (...), then select Settings > Go to Classic version.
Cloud Shell tools
If you need to manage resources (such as Docker containers or Kubernetes Clusters) or want to use non-Microsoft tools (such as Ansible and Terraform) in Cloud Shell, the Cloud Shell session comes with these add-ons already preconfigured.
Here’s a list of all add-ons available to you within a Cloud Shell session:
| Category | Name |
|---|---|
| Linux tools | bash zsh sh tmux dig |
| Azure tools | Azure CLI AzCopy Azure Functions CLI Service Fabric CLI Batch Shipyard blobxfer |
| Text editors | code (Cloud Shell editor) vim nano emacs |
| Source control | git |
| Build tools | make maven npm pip |
| Containers | Docker Machine Kubectl Helm DC/OS CLI |
| Databases | MySQL client PostgreSql client sqlcmd Utility mssql-scripter |
| Other | iPython Client Cloud Foundry CLI Terraform Ansible Chef InSpec Puppet Bolt HashiCorp Packer Office 365 CLI |