Deploy Azure Route Server
To create and configure Azure Route Server, you can use several tools, such as the Azure portal, Azure PowerShell, Azure CLI, or Azure Resource Manager templates.
Configure Azure Route Server in the Azure portal
To create and configure Azure Route Server in the Azure portal, you should follow the same procedure as creating any other Azure resource. Before you start to create an Azure Route Server, make sure that you have an existing virtual network with a subnet named RouteServerSubnet. This subnet should have at least a /27 network prefix. Also, this virtual network should be in the same resource group and same location where you want to create the Azure Route Server.
When you start a wizard to create an Azure Route Server, you'll be presented with the following set of options:
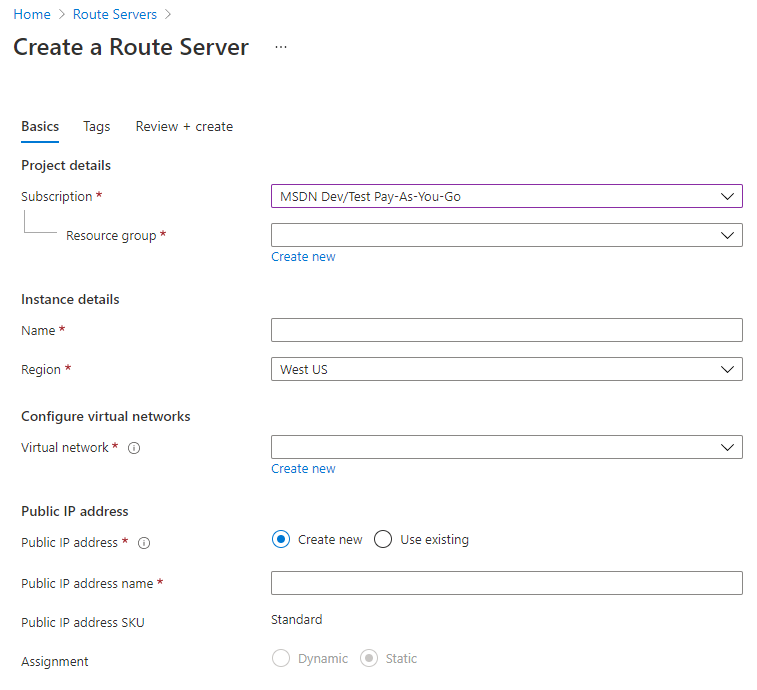
You should first choose the appropriate Azure subscription. Based on the subscription you choose, you’ll then choose the resource group where you want to place the Azure Route Server and other resources.
Choose the instance name for the Azure Route Server, then select the region where your virtual network resides. Ensure that you select the proper region, or you won’t be able to select a virtual network.
When you select a virtual network for the Azure Route Server, the appropriate subnet with name RouteServerSubnet will be automatically selected. You’ll also have the option to create the subnet from this wizard.
In the last set of options, you need to create a public IP address for the Azure Route Server. You can select an existing public IP if you have it from before, or you can create a new one. Although Azure Router Server doesn’t actually manage the data between networks, it needs a public IP address to help ensure connectivity to the backend service that manages the Route Server configuration. At this time, only IPv4 addresses are supported.
Before you create an Azure Route Server object, you’ll have a chance to assign it a tag. Tags are name/value pairs that enable you to categorize resources and review consolidated billing. You do this by applying the same tag to multiple resources and resource groups. This is not mandatory, however.
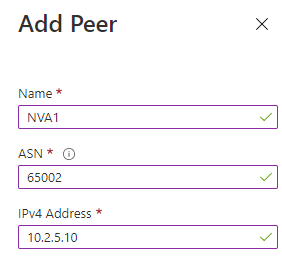
After creating the Azure Route Server object, you need to add its peers so it can exchange route information. In the Azure Route Server portal, navigate to Peers, then select + Add. To add a peer, you need to provide a peer name, ASN number, and the IP address of the peer interface that’s accessible to Azure Route Server. The following screenshot depicts an example of these settings:
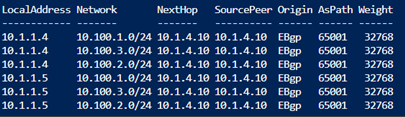
After you add one or more peers to the Azure Route Server object, it will start learning and exchanging routes by using BGP. However, you can’t use the Azure portal to review these routes. If you want to check the routes that Azure Route Server received from its peers, you need to use the Get-AzRouteServerPeerLearnedRoute cmdlet. For this command, you need to provide the name of your Azure Route Server and resource group. You also need to provide the name of a peer, as routes are listed on a per-peer basis. For example:
Get-AzRouteServerPeerLearnedRoute -RouteServerName TestARS -ResourceGroupName RG1 -PeerName NVA1 | ft
This command will give you the list of routes, as the following screenshot depicts:
Use Azure PowerShell to create Azure Route Server
To automate Azure Route Server deployment, you can use Azure PowerShell cmdlets. Azure Route Server deployment and configuration are fully supported in Azure PowerShell. The following code creates a resource group named myRouteServerRG, a virtual network named myVirtualNetwork within that same resource group, a dedicated subnet named RouteServerSubnet for Azure Route Server, and a Route Server object named myRouteServer. Finally, it configures the connection to its BGP peer myNVA.
$rg = @{
    Name = 'myRouteServerRG'
    Location = 'WestUS'
}
New-AzResourceGroup @rg
$vnet = @{
    Name = 'myVirtualNetwork'
    ResourceGroupName = 'myRouteServerRG'
    Location = 'WestUS'
    AddressPrefix = '10.0.0.0/16'
}
$virtualNetwork = New-AzVirtualNetwork @vnet
$subnet = @{
    Name = 'RouteServerSubnet'
    VirtualNetwork = $virtualNetwork
    AddressPrefix = '10.0.0.0/24'
}
$subnetConfig = Add-AzVirtualNetworkSubnetConfig @subnet
$virtualnetwork | Set-AzVirtualNetwork
$ip = @{
    Name = 'myRouteServerIP'
    ResourceGroupName = 'myRouteServerRG'
    Location = 'WestUS'
    AllocationMethod = 'Static'
    IpAddressVersion = 'Ipv4'
    Sku = 'Standard'
}
$publicIp = New-AzPublicIpAddress @ip
$rs = @{
    RouteServerName = 'myRouteServer'
    ResourceGroupName = 'myRouteServerRG'
    Location = 'WestUS'
    HostedSubnet = $subnetConfig.Id
    PublicIP = $publicIp
}
New-AzRouteServer @rs
$peer = @{
    PeerName = 'myNVA'
    PeerIp = '192.168.0.1'
    PeerAsn = '65501'
    RouteServerName = 'myRouteServer'
    ResourceGroupName = myRouteServerRG'
}
Add-AzRouteServerPeer @peer
$routeserver = @{
    RouteServerName = 'myRouteServer'
    ResourceGroupName = 'myRouteServerRG'
}
Get-AzRouteServer @routeserver