What is GitHub?
In this unit, we review the following learning objectives:
- Brief overview of the GitHub Enterprise Platform
- How to create a repository
- Adding files to a repository
- How to search for repositories
- Introduction to gists and wikis
GitHub
Before we explore the GitHub platform in detail, it's important to understand what it's built on: Git.
Git is a distributed version control system that lets developers track changes, collaborate on code, and manage revisions over time. GitHub builds on top of Git by adding collaboration tools, automation features, and a user-friendly web interface. Understanding Git basics—like commits, branches, and merging—will help you use GitHub more effectively.

GitHub is a cloud-based platform that uses Git, a distributed version control system, at its core. The GitHub platform simplifies the process of collaborating on projects and provides a website, command-line tools, and overall flow that allows developers and users to work together.
As we learned earlier, GitHub provides an AI powered developer platform to build, scale, and deliver secure software. Let’s break down each one of the core pillars of the GitHub Enterprise platform, AI, Collaboration, Productivity, Security, and Scale.
AI
Generative AI is dramatically transforming software development. The GitHub Enterprise platform enhances collaboration through AI-powered pull requests and issues, productivity through Copilot, Copilot Chat, and Copilot Agents, and security by providing quicker feedback to improve security.
Collaboration
Collaboration is at the core of everything GitHub does. GitHub offers tools that help teams work together efficiently, reducing delays and streamlining workflows.
Repositories, Issues, Pull Requests, and other tools help to support faster collaboration across roles, shorten approval cycles, and improve delivery speed.
Productivity
Productivity is accelerated with automation that the GitHub Enterprise Platform provides. With built-in CI/CD (Continuous Integration and Continuous Delivery) tools directly integrated into the development process, the platform lets users automate repetitive tasks and speed up daily work. This allows developers to focus more on coding and solving problems.
Security
GitHub integrates security directly into the development process from the very beginning and at every stage. GitHub Enterprise includes native, first-party features like CodeQL, secret scanning, Dependabot, and security overview to minimize risks. Code remains private, while still benefiting from integrated security checks.
GitHub continues to invest in enterprise-grade security and compliance. Trusted by Microsoft and organizations in highly regulated industries, GitHub adheres to global compliance standards, making it a reliable choice for secure development at scale.
Scale
GitHub is the largest developer community of its kind, with real-time data from over 100 million developers, 420 million repositories, and countless deployments. GitHub continuously learns and evolves its products. Its large user base provides a diverse perspective on what developers need, driving ongoing innovation to meet those needs. At the same time, GitHub is an extensible platform—open source developers from around the world contribute to and enhance the very features that make GitHub exceptional.
This has translated into an incredible scale that is unmatched and unparalleled by any other company on the planet. Insights from this large developer base help GitHub continuously evolve the platform.
In essence, the GitHub Enterprise Platform focuses on the developer experience. It provides collaboration tools, automation, and AI-driven features that support productivity, security, and scalability in a unified developer experience.
Now let’s get into the backbone of GitHub, repositories.
Introduction to repositories
Let’s first review:
- What is a repository?
- How to create a repository
- Adding files to a repository
- How to search for repositories
- Introduction to gists, wikis, and GitHub pages
What is a repository?
A repository contains all of your project's files and each file's revision history. It's one of the essential parts that helps you collaborate with people. You can use repositories to manage your work, track changes, store revision history, and work with others. Before we dive too deep, let’s first start with how to create a repository.
How to create a repository
You can create a new repository on your personal account or any organization where you have sufficient permissions.
Let’s walk through how to create a repository from github.com.
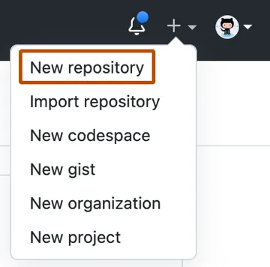
In the upper-right corner of any page, use the drop-down menu, and select New repository.
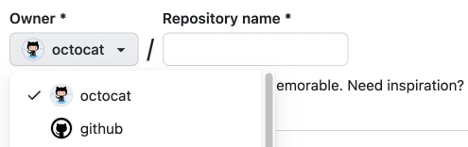
Use the Owner drop-down menu to select the account you want to own the repository.
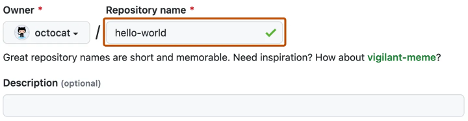
Type a name for your repository, and an optional description.
Choose a repository visibility.
Public repositories are accessible to everyone on the internet.
Private repositories are only accessible to you, people you explicitly share access with, and, for organization repositories, certain organization members.
Select Create repository and congratulations! You just created a repository!
How to clone a repository
Cloning a repository allows you to create a local copy of a repository on your computer. This is useful for making changes locally and syncing them back to the remote repository.
On GitHub.com, navigate to the main page of the repository you want to clone.
Above the list of files, click the Code button.

Copy the URL for the repository using the HTTPS, SSH, or GitHub CLI option.
Open your terminal and navigate to the directory where you want to clone the repository.
Run the following command, replacing
<repository-url>with the URL you copied:git clone <repository-url>Once the cloning process is complete, navigate into the repository folder:
cd <repository-name>
Congratulations! You now have a local copy of the repository.
Next up, let’s review how to add files to your repository.
How to add a file to your repository
Files in GitHub can do a handful of things, but the main purpose of files is to store data and information about your project. To add a file to a repository, you need at least Write access.
Let’s review how to add a file to your repository.
On GitHub.com, navigate to the main page of the repository.
In your repository, browse to the folder where you want to create a file by selecting the creating a new file link or uploading an existing file.
Once added, above the list of files select the Add file ᐁ drop-down menu. Then select Create new file.

In the file name field, type the name and extension for the file. To create subdirectories, type the / directory separator.
In the file contents text box, type content for the file.
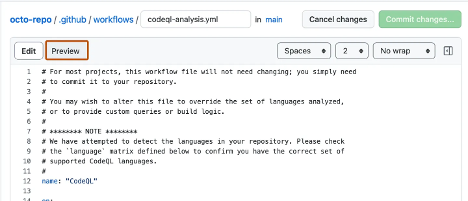
To review the new content, above the file contents, select Preview.
Select Commit changes.
In the Commit message field, type a short and meaningful commit message that describes the change you made to the file. You can attribute the commit to more than one author in the commit message.
Below the Commit message fields, decide whether to add your commit to the current branch or to a new branch. If your current branch is the default branch, you should choose to create a new branch for your commit, and then create a pull request.
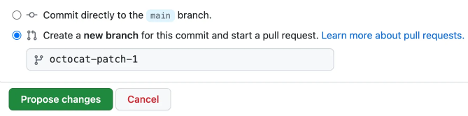
Select Commit changes or Propose changes.
Congratulations, you just created a new file in your repository! You have also created a new branch and made a commit.
Before we review branches and commits in the next unit, let’s quickly review gists, wikis, and GitHub pages because they're similar to repositories.
What are Gists?
Gists are a feature of GitHub that allows users to share code snippets, notes, or other small pieces of information in a lightweight and convenient way. They are essentially mini Git repositories, which means you can fork, clone, and version-control them just like a full repository. Gists are particularly useful for sharing quick solutions, configuration files, or examples without the need to create a full repository.
Key Features of Gists:
Public and Secret Gists:
- Public Gists: These are visible to everyone and can be discovered through GitHub's search functionality. They are ideal for sharing code snippets or solutions that you want to make available to the broader community.
- Secret Gists: These are not searchable or publicly listed, but they are not entirely private. Anyone with the URL can access them. They are useful for sharing code with a limited audience, such as collaborators or friends.
Version control:
- Every change made to a gist is tracked, allowing you to view the history of edits. This makes it easy to revert to a previous version or see how the snippet has evolved over time.
Forking and cloning:
- Like repositories, gists can be forked and cloned. This allows others to build upon your work or adapt it to their needs.
Embedding:
- Gists can be embedded into websites or blogs, making them a great tool for sharing code examples in tutorials or documentation.
Markdown support:
- Gists support Markdown formatting, which means you can include rich text, headings, links, and even images alongside your code. This is particularly useful for adding context or explanations to your snippets.
Collaboration:
- While gists are typically used for individual snippets, they can also be shared and collaborated on by multiple users. Forking and commenting on gists enable lightweight collaboration.
Use cases for Gists:
- Sharing quick code examples or solutions.
- Storing configuration files or scripts for personal use.
- Creating templates for commonly used code patterns.
- Sharing error logs or debugging information with others.
- Embedding code snippets in blogs, forums, or documentation.
Important
Never use gists to store sensitive or confidential data, such as passwords, secrets, or API keys—even in scripts or config files.
Gists are not fully private: even secret gists can be accessed by anyone with the link. Always review your content carefully before sharing.
Limitations of Gists:
- Gists are not entirely private, even if marked as secret. Anyone with the URL can access them, so they should not be used for sensitive or confidential information.
- They are best suited for small snippets or single files. For larger projects or multi-file structures, a full repository is more appropriate.
To learn more about how to create and manage gists, refer to the GitHub documentation in the Resources section of this module or visit the GitHub Gists documentation.
Forking and cloning Gists
You can fork a gist to create a copy of someone else's gist in your account.
- Navigate to the gist you want to fork.
- Select Fork at the top-right of the gist page.
To clone a gist locally:
git clone https://gist.github.com/your-gist-id.git
To learn more about gists, see the linked article in our Resources section at the end of this module titled Creating Gists.
What are wikis?
Every repository on GitHub.com comes equipped with a section for hosting documentation, called a wiki. You can use your repository's wiki to share long-form content about your project, such as how to use it, how you designed it, or its core principles. While a README file quickly tells what your project can do, you can use a wiki to provide additional documentation.
It’s worth a reminder that if your repository is private, only people who have at least read access to your repository will have access to your wiki.
Creating, editing, and deleting wiki pages
You can use the GitHub wiki to create and manage documentation for your project.
To create a wiki page:
- Navigate to the repository.
- Select the Wiki tab.
- Select Create the first page if no pages exist, or New Page to add a page.
- Enter a title and content, then select Save Page.
To edit a wiki page:
- Navigate to the wiki page you want to edit.
- Select Edit at the top-right.
- Make changes and select Save Page.
To delete a wiki page:
- Deleting a wiki page requires using Git. Clone the wiki repository, remove the file, and push the change.
Learn more about managing wikis in GitHub Docs - Adding or editing wiki pages.
What are Feature Previews?
Feature Previews allow you to try out experimental features on GitHub before they are officially released. These previews give you early access to new functionality and allow you to provide feedback to help shape the final product.
To enable or disable a feature preview:
- Navigate to your GitHub account by selecting your profile picture in the top-right corner of GitHub.com.
- Select Feature preview from the drop-down menu.
- Browse the list of available previews and toggle the features you want to try.
Feature Previews are a great way to stay ahead of the curve and explore new tools that can enhance your GitHub experience.
Tip
GitHub frequently adds new experimental features for users to explore, so keep an eye on the Feature review to discover new tools and enhancements.