Explore Azure Traffic Manager
Azure Traffic Manager is a DNS-based traffic load balancer. This service allows you to distribute traffic to your public facing applications across the global Azure regions. Traffic Manager also provides your public endpoints with high availability and quick responsiveness.
Traffic Manager uses DNS to direct the client requests to the appropriate service endpoint based on a traffic-routing method. Traffic manager also provides health monitoring for every endpoint. The endpoint can be any Internet-facing service hosted inside or outside of Azure. Traffic Manager provides a range of traffic-routing methods and endpoint monitoring options to suit different application needs and automatic failover models. Traffic Manager is resilient to failure, including the failure of an entire Azure region.
Key features of Traffic Manager
Traffic Manager offers the several key features.
Feature
Description
Increase application availability
Traffic Manager delivers high availability for your critical applications by monitoring your endpoints and providing automatic failover when an endpoint goes down.
Improve application performance
Azure allows you to run cloud services and websites in datacenters located around the world. Traffic Manager can improve the responsiveness of your website by directing traffic to the endpoint with the lowest latency.
Service maintenance without downtime
You can plan maintenance on your applications without downtime. Traffic Manager can direct traffic to alternative endpoints while the maintenance is in progress.
Combine hybrid applications
Traffic Manager supports external, non-Azure endpoints enabling it to be used with hybrid cloud and on-premises deployments, including the burst-to-cloud, migrate-to-cloud, and failover-to-cloud scenarios.
Distribute traffic for complex deployments
Using nested Traffic Manager profiles, multiple traffic-routing methods are combined to create sophisticated and flexible rules to scale to the needs of larger, more complex deployments.
How Traffic Manager works
Azure Traffic Manager enables you to control the distribution of traffic across your application endpoints. An endpoint is any Internet-facing service hosted inside or outside of Azure.
Traffic Manager provides two key benefits:
- Distribution of traffic according to one of several traffic-routing methods
- Continuous monitoring of endpoint health and automatic failover when endpoints fail
When a client attempts to connect to a service, it must first resolve the DNS name of the service to an IP address. The client then connects to that IP address to access the service.
Traffic Manager uses DNS to direct clients to specific service endpoints based on the rules of the traffic-routing method. Clients connect to the selected endpoint directly. Traffic Manager isn't a proxy or a gateway. Traffic Manager doesn't see the traffic passing between the client and the service.
Traffic Manager works at the DNS level which is at the Application layer (Layer-7).
Traffic Manager example deployment
Contoso Corp has a new partner portal. The URL for this portal is https://partners.contoso.com/login.aspx.
The application is hosted in three regions of Azure. To improve availability and maximize global performance, they use Traffic Manager to distribute client traffic to the closest available endpoint.
To achieve this configuration, they complete the following steps:
- Deploy three instances of their service. The DNS names of these deployments are contoso-us.cloudapp.net, contoso-eu.cloudapp.net, and contoso-asia.cloudapp.net.
- Create a Traffic Manager profile, named contoso.trafficmanager.net, and configure it to use the 'Performance' traffic-routing method across the three endpoints.
- Configure their vanity domain name, partners.contoso.com, to point to contoso.trafficmanager.net, using a DNS CNAME record.

Traffic Manager example client usage
Following on from the previous deployment example; when a client requests the page https://partners.contoso.com/login.aspx, the client performs the following steps to resolve the DNS name and establish a connection:
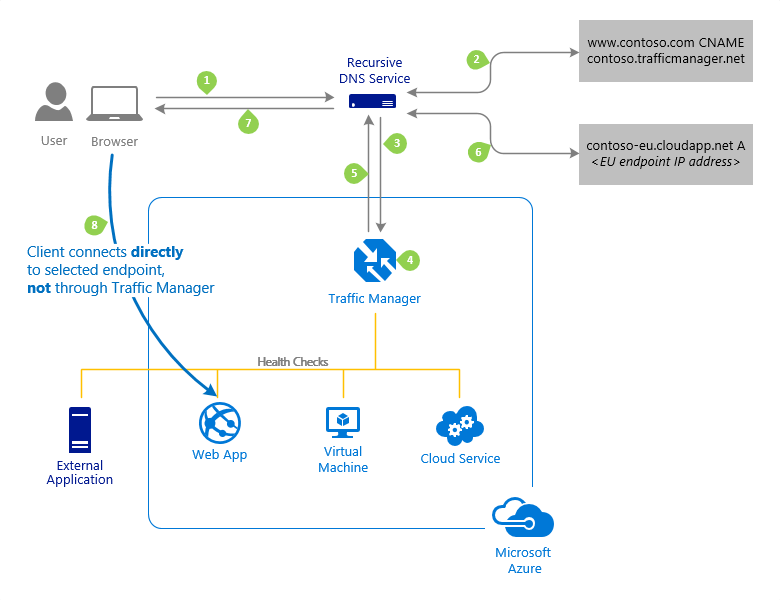
The client sends a DNS query to its configured recursive DNS service to resolve the name 'partners.contoso.com'. A recursive DNS service sometimes called a 'local DNS' service, doesn't host DNS domains directly. Rather, the client off-loads the work of contacting the various authoritative DNS services across the Internet needed to resolve a DNS name.
To resolve the DNS name, the recursive DNS service finds the name servers for the 'contoso.com' domain. It then contacts those name servers to request the 'partners.contoso.com' DNS record. The contoso.com DNS servers return the CNAME record which points to contoso.trafficmanager.net.
Next, the recursive DNS service finds the name servers for the 'trafficmanager.net' domain, which are provided by the Azure Traffic Manager service. It then sends a request for the 'contoso.trafficmanager.net' DNS record to those DNS servers.
The Traffic Manager name servers receive the request. They choose an endpoint based on:
- The configured state of each endpoint (disabled endpoints aren't returned)
- The current health of each endpoint, as determined by the Traffic Manager health checks.
- The chosen traffic-routing method.
The chosen endpoint is returned as another DNS CNAME record. In this case, let us suppose contoso-eu.cloudapp.net is returned.
Next, the recursive DNS service finds the name servers for the 'cloudapp.net' domain. It contacts those name servers to request the 'contoso-eu.cloudapp.net' DNS record. A DNS 'A' record containing the IP address of the EU-based service endpoint is returned.
The recursive DNS service consolidates the results and returns a single DNS response to the client.
The client receives the DNS results and connects to the given IP address. The client connects to the application service endpoint directly, not through Traffic Manager. Since it's an HTTPS endpoint, the client performs the necessary SSL/TLS handshake, and then makes an HTTP GET request for the '/login.aspx' page.
The recursive DNS service caches the DNS responses it receives. The DNS resolver on the client device also caches the result. Caching enables subsequent DNS queries to be answered more quickly by using data from the cache rather than querying other name servers. The 'time-to-live' (TTL) property of each DNS record determines the cache duration. Shorter values result in faster cache expiry and thus more round-trips to the Traffic Manager name servers. Longer values mean that it can take longer to direct traffic away from a failed endpoint. Traffic Manager allows you to configure the TTL used in Traffic Manager DNS responses to be as low as 0 seconds and as high as 2,147,483,647 seconds (the maximum range compliant with RFC-1035), enabling you to choose the value that best balances the needs of your application.
Traffic routing methods
Azure Traffic Manager supports six traffic-routing methods to determine how to route network traffic to the various service endpoints. For any profile, Traffic Manager applies the traffic-routing method associated to it to each DNS query it receives. The traffic-routing method determines which endpoint is returned in the DNS response.
The following traffic routing methods are available in Traffic Manager:
Routing method
When to use
Priority
This routing method for a primary service endpoint for all traffic. You can provide multiple backup endpoints in case the primary or one of the backup endpoints is unavailable.
Weighted
This routing method when you want to distribute traffic across a set of endpoints based on their weight. Set the weight the same to distribute evenly across all endpoints.
Performance
This routing method when endpoints are in different geographic locations. Users should use the "closest" endpoint for the lowest network latency.
Geographic
This routing method to direct users to specific endpoints (Azure, External, or Nested) based on where their DNS queries originate from geographically. With this routing method, it enables you to be compliant with scenarios such as data sovereignty mandates, localization of content & user experience and measuring traffic from different regions.
MultiValue
This routing method for Traffic Manager profiles with only one IPv4/IPv6 address endpoint. When a query is received for this profile, all healthy endpoints are returned.
Subnet
This routing method to map sets of end-user IP address ranges to a specific endpoint. When a request is received, the endpoint is the one mapped for that request’s source IP address.
Routing method examples
Here's an example of the Priority routing method.
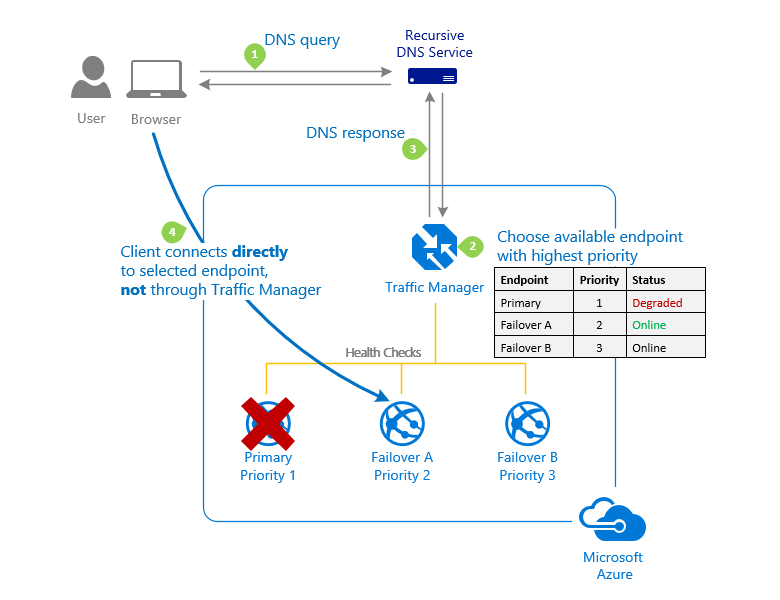
For more information, see Priority traffic-routing method.
Here's an example of the Weighted routing method.
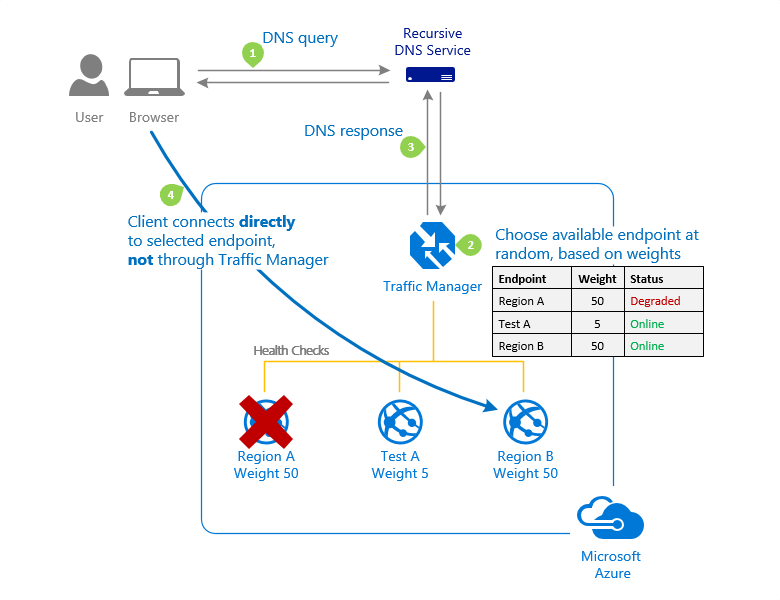
For more information, see Weighted traffic-routing method.
Here's an example of the Performance routing method.
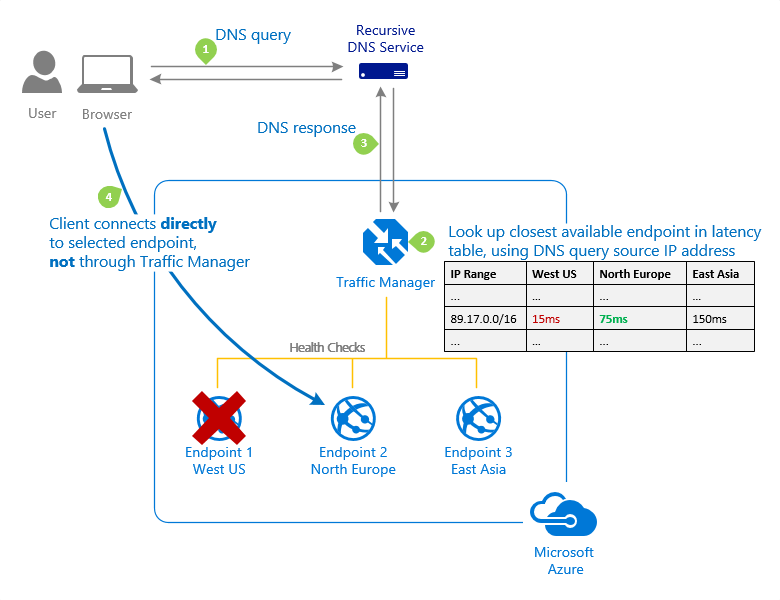
For more information, see Performance traffic-routing method.
Here's an example of the Geographic routing method.
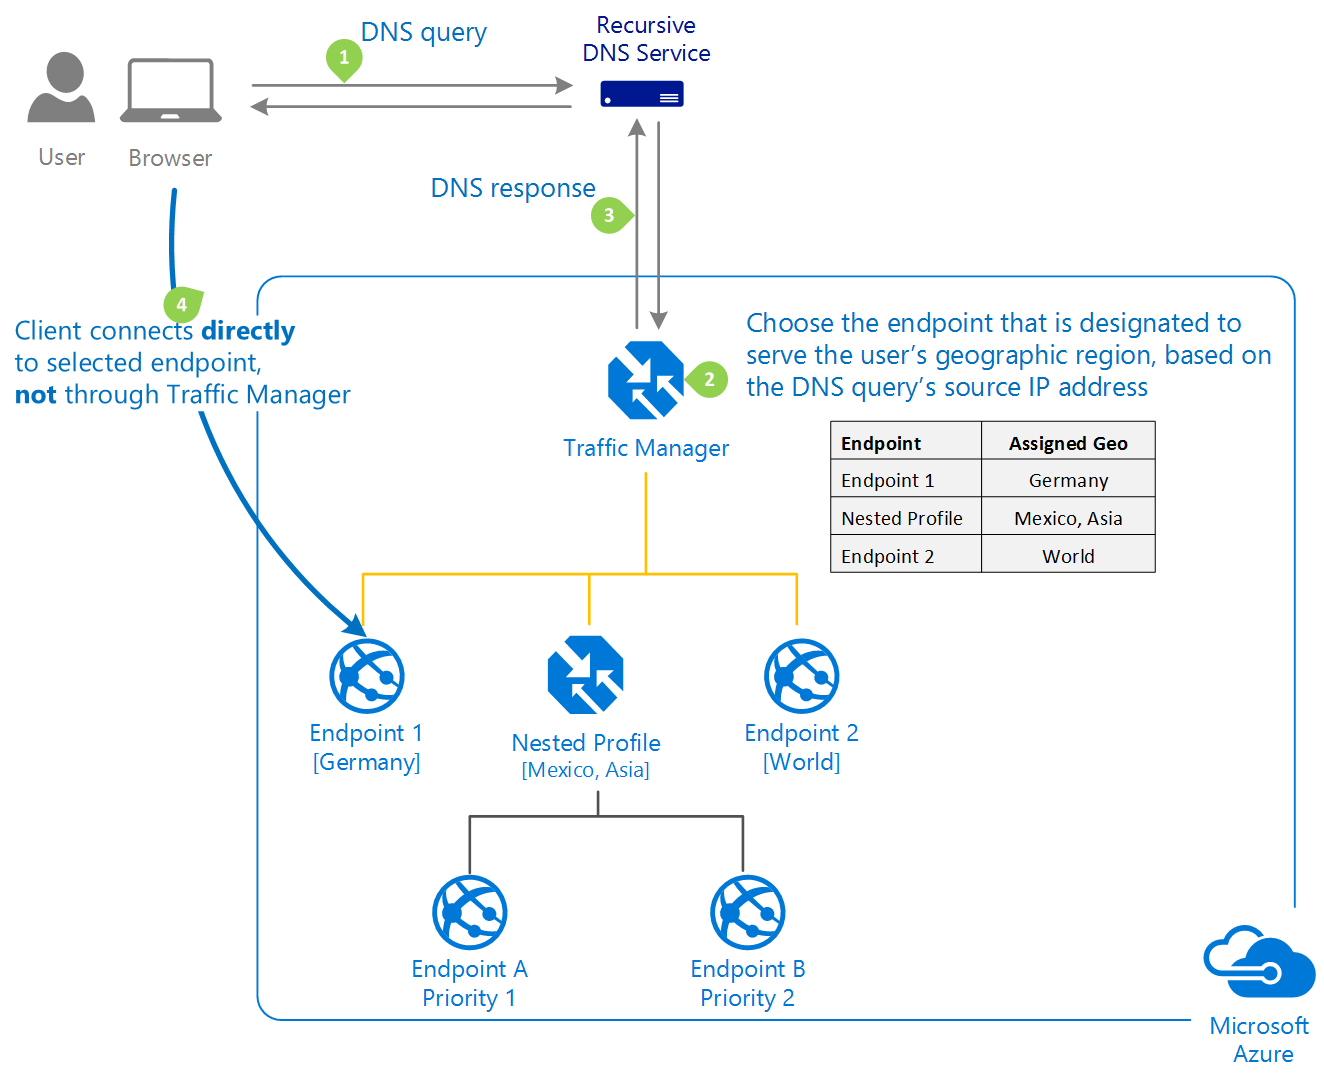
For more information, see Geographic traffic-routing method.
Traffic Manager profiles
Within a Traffic Manager profile, you can only configure one traffic routing method at a time. You can select a different traffic routing method for your profile at any time. Your changes are applied within a minute without any downtime.
All Traffic Manager profiles include health monitoring and automatic failover of endpoints.
Nested Traffic Manager profiles
As mentioned earlier, each Traffic Manager profile can only specify one traffic-routing method. This example shows how to combine the Performance and Weighted traffic-routing methods.
Example: Combining 'performance' and 'weighted' traffic routing methods using nested profiles
Suppose that you deployed an application in the following Azure regions: West US, West Europe, and East Asia. You use the Performance traffic-routing method to distribute traffic to the region closest to the user.
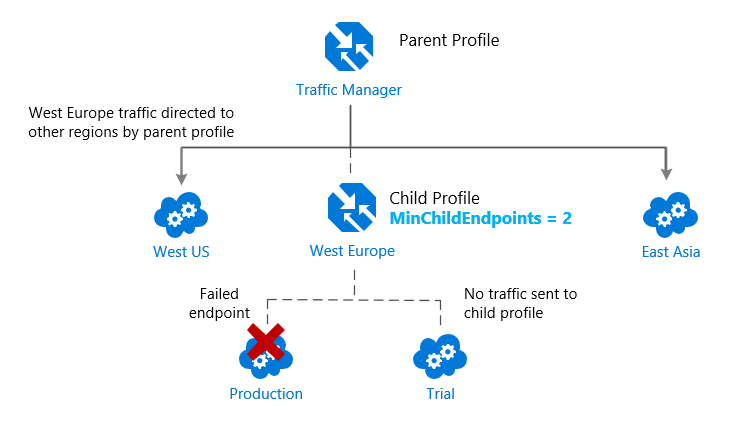
But what if you wanted to test an update to your service before rolling it out more widely, and you wanted to use the Weighted traffic-routing method to direct a small percentage of traffic to your test deployment?
You would set up the test deployment alongside the existing production deployment in West Europe.
As you just learned, you can't combine both the Weighted and Performance traffic-routing methods in a single profile. Therefore, to support this scenario, you would create a Traffic Manager profile using the two West Europe endpoints and the Weighted traffic-routing method. Then you would add this child profile as an endpoint to the parent profile. The parent profile would still use the Performance traffic-routing method and would contain the other global deployments as endpoints.
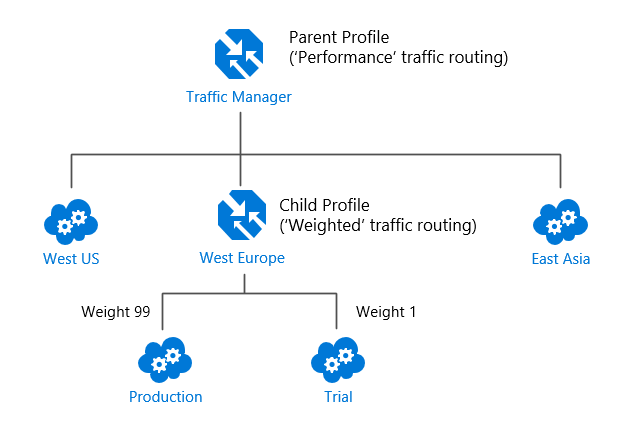
In this configuration, traffic directed via the parent profile (using the Performance routing method) distributes traffic across regions normally.
When the parent profile uses the Performance traffic-routing method, each endpoint must be assigned a location, which is done when you configure the endpoint. Chooses the Azure region closest to your deployment.
For more information, and for more example scenarios, see Nested Traffic Manager profiles.
Traffic Manager endpoints
Azure Traffic Manager enables you to control how network traffic is distributed to application deployments running in your different datacenters. You configure each application deployment as an endpoint in Traffic Manager. When Traffic Manager receives a DNS request, it chooses an available endpoint to return in the DNS response. Traffic manager bases the choice on the current endpoint status and the traffic-routing method.
Traffic Manager supports three types of endpoints:
- Azure endpoints - Use this type of endpoint to load-balance traffic to a cloud service, web app, or public IP address in the same subscription within Azure.
- External endpoints - Use this type of endpoint to load balance traffic for IPv4/IPv6 addresses, FQDNs, or for services hosted outside Azure. These services can either be on-premises or with a different hosting provider.
- Nested endpoints - Use this type of endpoint to combine Traffic Manager profiles to create more flexible traffic-routing schemes to support the needs of larger, more complex deployments. With Nested endpoints, a child profile is added as an endpoint to a parent profile. Both the child and parent profiles can contain other endpoints of any type, including other nested profiles.
There are no restrictions on how different endpoints types can be combined in a single Traffic Manager profile; each profile can contain any mix of endpoint types.
You add endpoints to existing Traffic Manager profiles from the Endpoints page of a Traffic Manager profile in the Azure portal.
For more information, visit Traffic Manager endpoints.
Configuring Traffic Manager profiles
This example shows how to create and configure a new Traffic Manager profile to direct client traffic based on endpoint priority.
From the Azure portal home page, select Create a resource. In the search box, query for 'Traffic Manager profile', and then click Traffic Manager profile.

Click Create.

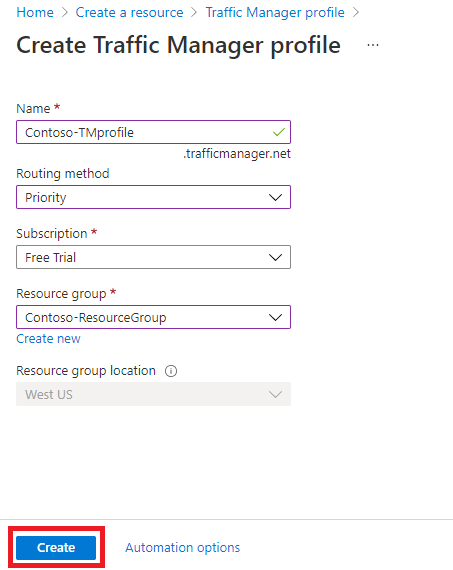
You need to enter the following information on the Create Traffic Manager profile page.
Field
Information
Name
Enters a unique name for the Traffic Manager profile.
Routing method
Selects the routing method to use in this profile.
Subscription
Selects the subscription from the list that you want this profile to be applied to.
Resource group
Selects the appropriate resource group from the list or create a new one.
Resource group location
The Azure Traffic Manager service is global and not bound to a location. This setting refers to the location of the selected resource group and has no impact on the runtime availability of your Traffic Manager profile.
Click Create to create the profile.
The next step is to add endpoints to the Traffic Manager profile.
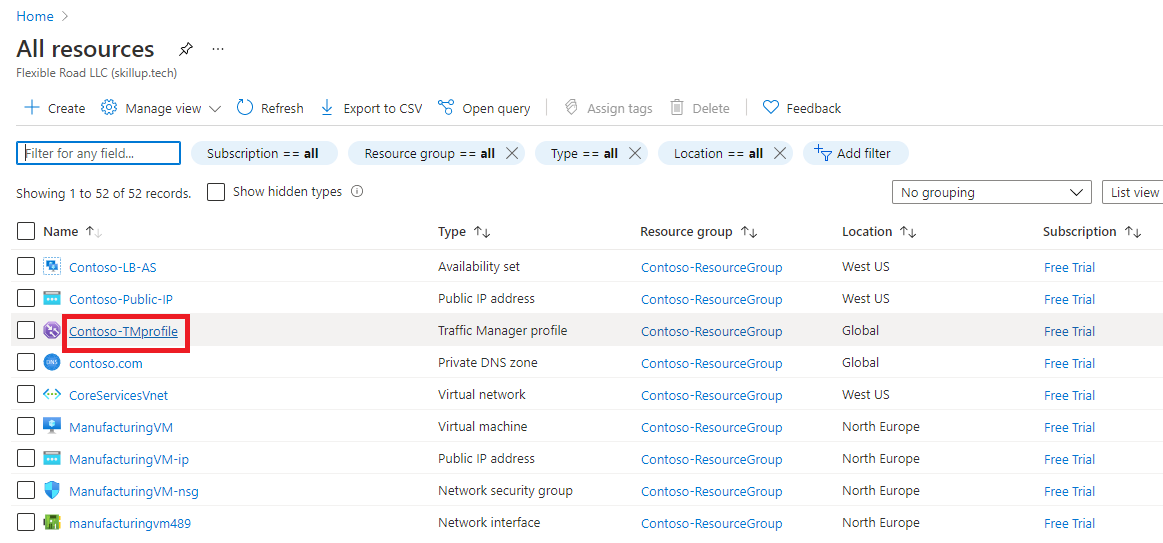
From the Azure portal home page, select All resources, then select the Traffic Manager profile from the list.
On the Traffic manager profile page, under Settings, select Endpoints, then click Add.
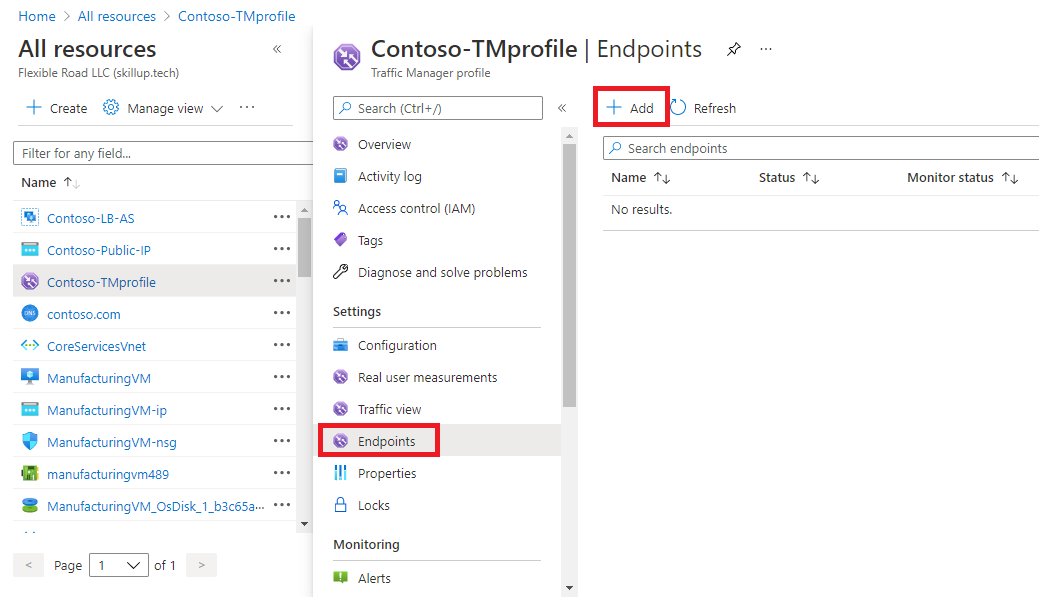
You then enter the required information on the Add endpoint page.
Field
Information
Type
Select the type of endpoint to add. You can select from the following endpoint types: Azure endpoints External endpoints Nested endpoints Depending on which endpoint type you select, the remaining options are different.
Name
Enters a unique name for the endpoint.
Target resource type (for Azure endpoints only)
If you select the Azure endpoint type, you can select from the following resource types: Cloud service App Service App Service slot Public IP address
Target resource (for Azure and Nested endpoints only)
Select the appropriate target service, IP address, or profile from the list.
fully qualified domain name (FQDN) or IP (for External endpoints only)
Specify the FQDN or IP address for the external endpoint.
Priority
Specify the priority for this endpoint. If you enter 1, then all traffic goes to this endpoint when it's healthy.
Minimum child endpoints (for Nested endpoints only)
Specify the minimum number of endpoints that must be available in the child Traffic Manager profile for it to receive traffic. If the available endpoints in the child profile miss this threshold, this endpoint is degraded.
Custom Header setting (optional setting)
You can configure custom headers for your endpoint, using the following paired formatting: host:contoso.com,customheader:contoso The maximum number of supported pairs is 8, and they're applicable for both the HTTP and HTTPS protocols. These endpoint Custom Header settings override the settings configured in a profile.
Add as disabled (optional setting)
Disabling an endpoint in Traffic Manager can be useful to temporarily remove traffic from an endpoint that is in maintenance mode or being redeployed. Once the endpoint is running again, it can be re-enabled.
Click Add to add the endpoint to the Traffic Manager profile.

If you're adding a failover endpoint for another Azure region, then you would add another endpoint for that region. The application target resource in the other region and has a priority setting of 2.

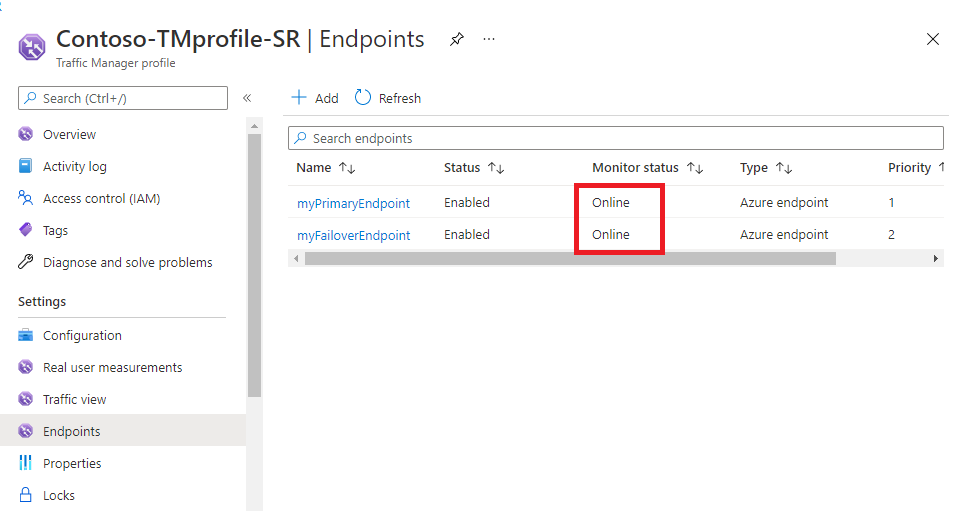
When you add endpoints to a Traffic Manager profile, their status is checked.
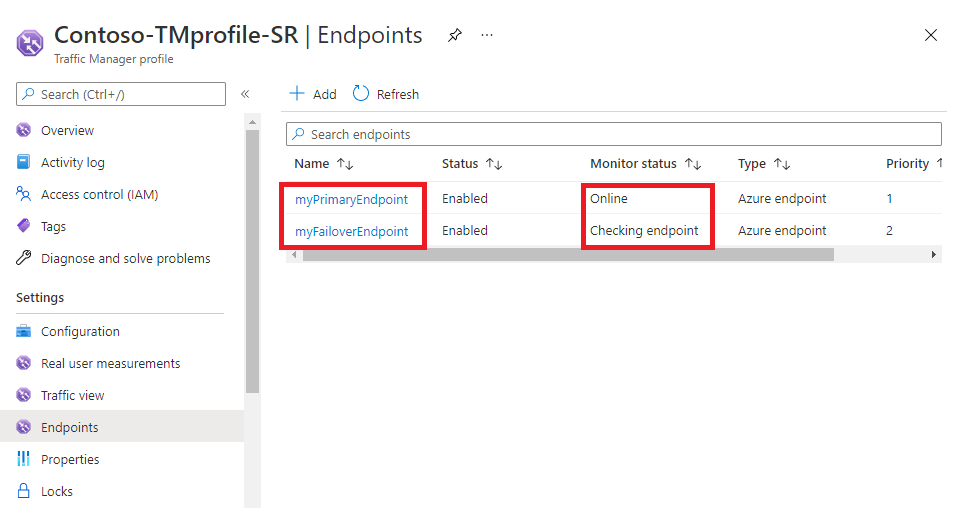
Once the profiles are validated their Monitor status changes to Online.
Configuring endpoint monitoring
Azure Traffic Manager includes built-in endpoint monitoring and automatic endpoint failover. This feature helps you deliver high-availability applications that are resilient to endpoint failure, including Azure region failures.
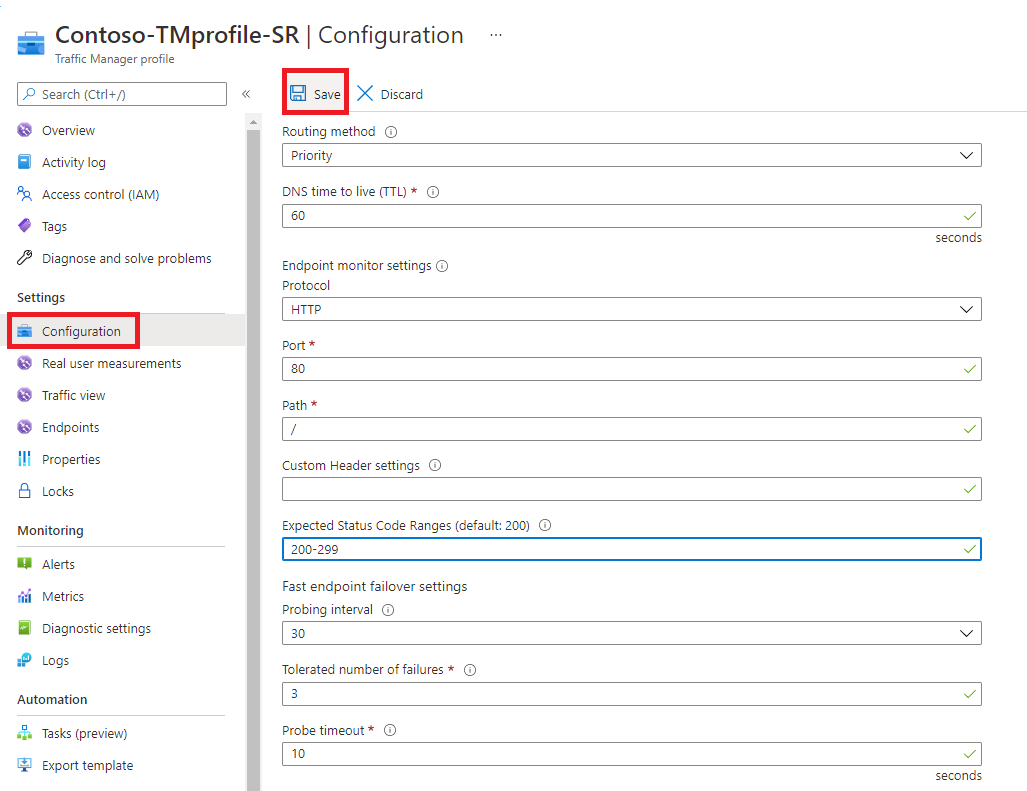
To configure endpoint monitoring, you open the Configuration page for the Traffic Manager profile.
Then, under the Endpoint monitor settings section, you specify the following settings for the Traffic Manager profile:
Setting
Description
Protocol
Chooses HTTP, HTTPS, or TCP as the protocol that Traffic Manager uses when probing your endpoint to check its health. HTTPS monitoring doesn't verify whether your TLS/SSL certificate is valid; it only checks that the certificate is present.
Port
Chooses the port used for the request.
Path
This configuration setting is valid only for the HTTP and HTTPS protocols, for which specifying the path setting is required. Providing this setting for the TCP monitoring protocol results in an error. For HTTP and HTTPS protocol, give the relative path and the name of the webpage or the file that the monitoring accesses. A forward slash (/) is a valid entry for the relative path. This value implies that the file is in the root directory (default).
Custom Header settings
This configuration setting helps you add specific HTTP headers to the health checks that Traffic Manager sends to endpoints under a profile. The custom headers can be specified at a profile level to be applicable for all endpoints in that profile and / or at an endpoint level applicable only to that endpoint. You can use custom headers for health checks of endpoints in a multitenant environment. That way it can be routed correctly to their destination by specifying a host header. You can also use this setting by adding unique headers that can be used to identify Traffic Manager originated HTTP(S) requests and processes them differently. You can specify up to eight header:value pairs separated by a comma. Example - header1:value1, header2:value2
Expected Status Code Ranges
This setting allows you to specify multiple success code ranges in the format 200-299, 301-301. If these status codes are received as response from an endpoint when a health check is done, Traffic Manager marks those endpoints as healthy. You can specify a maximum of eight status code ranges. This setting is applicable only to HTTP and HTTPS protocol and to all endpoints. This setting is at the Traffic Manager profile level and by default the value 200 is defined as the success status code.
Probing interval
This value specifies how often an endpoint is checked for its health from a Traffic Manager probing agent. You can specify two values here: 30 seconds (normal probing) and 10 seconds (fast probing). If no values are provided, the profile sets to a default value of 30 seconds. Visit the Traffic Manager Pricing page to learn more about fast probing pricing.
Tolerated number of failures
This value specifies how many failures a Traffic Manager probing agent tolerates before marking that endpoint as unhealthy. Its value can range between 0 and 9. A value of 0 means a single monitoring failure can cause that endpoint to be marked as unhealthy. If no value is specified, it uses the default value of 3.
Probe timeout
This property specifies the amount of time the Traffic Manager probing agent should wait before considering a health probe check to an endpoint a failure. If the Probing Interval is set to 30 seconds, then you can set the Timeout value between 5 and 10 seconds. If no value is specified, it uses a default value of 10 seconds. If the Probing Interval is set to 10 seconds, then you can set the Timeout value between 5 and 9 seconds. If no Timeout value is specified, it uses a default value of 9 seconds.
Click Save.
How endpoint monitoring works
When the monitoring protocol is set as HTTP or HTTPS, the Traffic Manager probing agent makes a GET request to the endpoint using the protocol, port, and relative path given. An endpoint is considered healthy if probing agent receives a 200-OK response, or any of the responses configured in the Expected status code *ranges. If the response is a different value or no response get received within the timeout period, the Traffic Manager probing agent reattempts according to the Tolerated Number of Failures setting. No reattempts are done if this setting is 0. The endpoint is marked unhealthy if the number of consecutive failures is higher than the Tolerated Number of Failures setting.
When the monitoring protocol is TCP, the Traffic Manager probing agent creates a TCP connection request using the port specified. If the endpoint responds to the request with a response to establish the connection, that health check is marked as a success. The Traffic Manager probing agent resets the TCP connection. In cases where the response is a different value or no response get received within the timeout period, the Traffic Manager probing agent reattempts according to the Tolerated Number of Failures setting. No reattempts are made if this setting is 0. If the number of consecutive failures is higher than the Tolerated Number of Failures setting, then that endpoint is marked unhealthy.
In all cases, Traffic Manager probes from multiple locations. The consecutive failure determines what happen within each region. Endpoints are receiving health probes from Traffic Manager with a higher frequency than the setting used for Probing Interval.
For HTTP or HTTPS monitoring protocol, a common practice on the endpoint side is to implement a custom page within your application - for example, /health.aspx. Using this path for monitoring, you can perform application-specific checks, such as checking performance counters or verifying database availability. Based on these custom checks, the page returns an appropriate HTTP status code.
All endpoints in a Traffic Manager profile share monitoring settings. If you need to use different monitoring settings for different endpoints, you can create nested Traffic Manager profiles.