Monitor, investigate, and remediate elevated risky users
Investigate risk
Identity Protection provides organizations with three reports they can use to investigate identity risks in their environment: risky users, risky sign-ins, and risk detections. Investigating events is key to better understanding and identifying any weak points in your security strategy.
All three reports allow for downloading of events in .CSV format for further analysis outside of the Azure portal. The risky users and risky sign-ins reports allow for downloading the most recent 2,500 entries, while the risk detections report allows for downloading the most recent 5,000 records.
Organizations can take advantage of the Microsoft Graph API integrations to aggregate data with other sources they have access to as an organization.
You can find the three reports in the Microsoft Entra admin center, then Identity, and then Protection - Identity Protection.
Navigating the reports
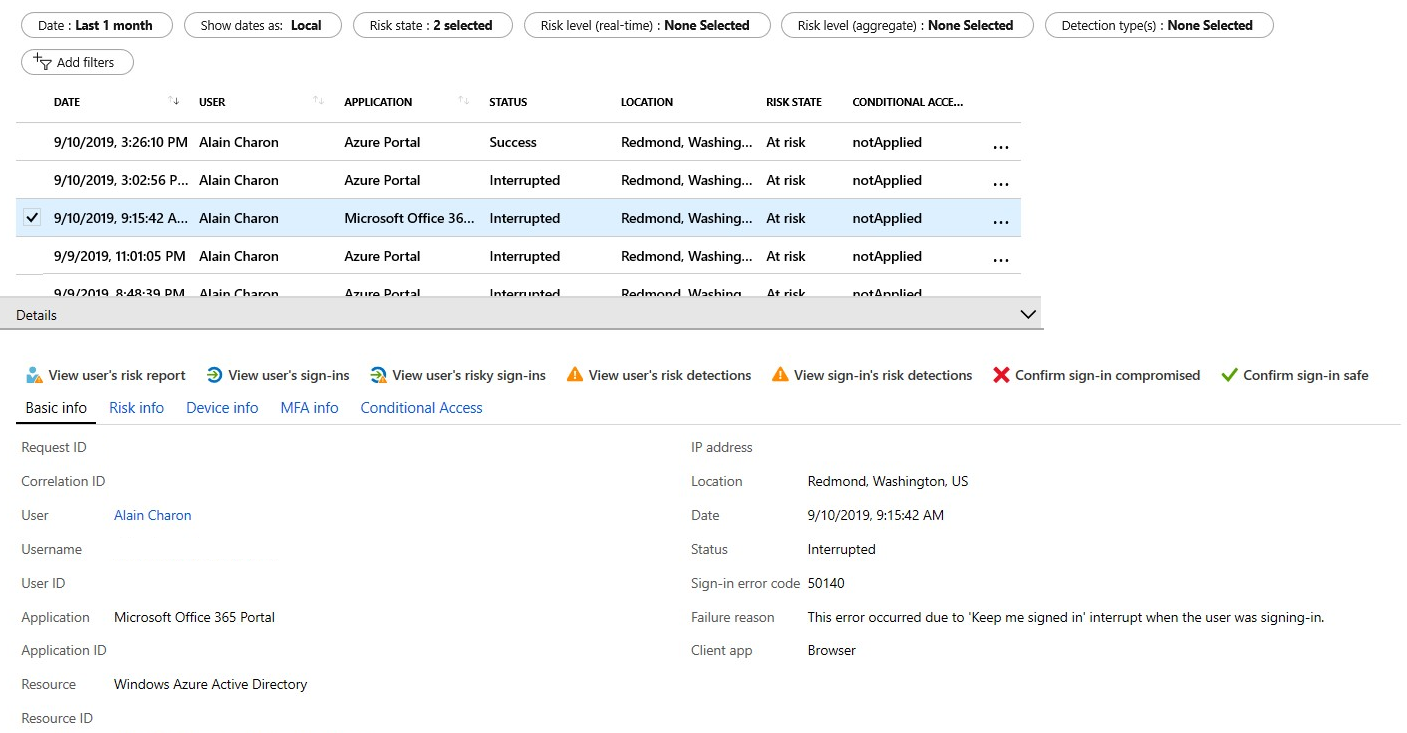
Each report launches with a list of all detections for the period shown at the top of the report. Each report allows for the addition or removal of columns based on administrator preference. Administrators can choose to download the data in .CSV or .JSON format. Reports can be filtered using the filters across the top of the report.
Selecting individual entries enables additional entries at the top of the report, such as the ability to confirm a sign-in as compromised or safe, confirm a user as compromised, or dismiss user risk.
Selecting individual entries expands a details window below the detections. The details view allows administrators to investigate and perform actions on each detection.
Risky users
With the information provided by the risky users report, administrators can find:
- Which users are at risk, have had risk remediated, or have had risk dismissed?
- Details about detections.
- History of all risky sign-ins.
- Risk history.
Administrators can then choose to take action on these events. They can choose to:
- Reset the user password.
- Confirm user compromise.
- Dismiss user risk.
- Block user from signing in.
- Investigate further using Azure ATP.
Risky sign-ins
The risky sign-ins report contains filterable data for up to the past 30 days (one month).
With the information provided by the risky sign-ins report, administrators can find:
- Which sign-ins are classified as at risk, confirmed compromised, confirmed safe, dismissed, or remediated.
- Real-time and aggregate risk levels associated with sign-in attempts.
- Detection types triggered.
- Conditional Access policies applied.
- MFA details.
- Device information.
- Application information.
- Location information.
Administrators can then choose to take action on these events. Administrators can choose to:
- Confirm sign-in compromise.
- Confirm sign-in safe.
Risk detections
The risk detections report contains filterable data for up to the past 90 days (three months).
With the information provided by the risk detections report, administrators can find:
- Information about each risk detection including type.
- Other risks triggered at the same time.
- Sign-in attempt location.
Administrators can then choose to return to the user's risk or sign-ins report to take actions based on information gathered.
The risk detection report also provides a clickable link to the detection in the Microsoft Defender for Cloud Apps (MDCA) portal where you can view additional logs and alerts.
Note
Our system detects that the risk event that contributed to the risk user risk score was a false positive or that the user risk was remediated with policy enforcement such as completing an MFA prompt or secure password change. Therefore, our system will dismiss the risk state, and a risk detail of “AI confirmed sign-in safe” will surface and no longer contribute to the user’s risk.
Remediate risks and unblock users
After completing your investigation, you'll want to take action to remediate the risk or unblock users. Organizations also have the option to enable automated remediation using their risk policies. Organizations should try to close all risk detections that they're presented with in a time period your organization is comfortable with. Microsoft recommends closing events as soon as possible because time matters when working with risk.
Remediation
All active risk detections contribute to the calculation of a value called user risk level. The user risk level is an indicator (low, medium, high) for the probability that an account has been compromised. As an administrator, you want to get all risk detections closed, so that the affected users are no longer at risk.
Some risk detections are marked by Identity Protection as "Closed (system)" because the events were no longer determined to be risky.
Administrators have the following options to remediate:
- Self-remediation with risk policy.
- Manual password reset.
- Dismiss user risk.
- Close individual risk detections manually.
Self-remediation with risk policy
If you allow users to self-remediate, with multifactor authentication (MFA) and self-service password reset (SSPR) in your risk policies, they can unblock themselves when risk is detected. These detections are then considered closed. Users must have previously registered for MFA and SSPR in order to use when risk is detected.
Some detections don't raise risk to the level where a user self-remediation would be required, but administrators should still evaluate these detections. Administrators determine that additional measures are necessary, such as blocking access from locations or lowering the acceptable risk in their policies.
Manual password reset
If requiring a password reset using a user risk policy isn't an option, administrators can close all risk detections for a user with a manual password reset.
Administrators are given two options when resetting a password for their users:
Generate a temporary password - By generating a temporary password, you can immediately bring an identity back into a safe state. This method requires contacting the affected users since they need to know what the temporary password is. Because the password is temporary, the user is prompted to change the password to something new during the next sign-in.
Require the user to reset password - Requiring the users to reset passwords enables self-recovery without contacting help desk or an administrator. This method only applies to users who are registered for MFA and SSPR. For users who haven't been registered, this option isn't available.
Dismiss user risk
If a password reset isn't an option for you because, for example, the user has been deleted, you can choose to dismiss user risk detections.
When you select Dismiss user risk, all events are closed and the affected user is no longer at risk. However, because this method doesn't affect the existing password, it doesn't bring the related identity back into a safe state.
Close individual risk detections manually
By closing individual risk detections manually, you can lower the user risk level. Typically, risk detections are closed manually in response to a related investigation, such as when talking to a user reveals that an active risk detection isn't required anymore.
When closing risk detections manually, you can choose to take any of the following actions to change the status of a risk detection:
- Confirm user compromised.
- Dismiss user risk.
- Confirm sign-in safe.
- Confirm sign-in compromised.
Unblocking users
An administrator chooses to block a sign-in based on their risk policy or investigations. A block occurs based on either sign-in or user risk.
Unblocking based on user risk
To unblock an account blocked due to user risk, administrators have the following options:
- Reset password - You can reset the user's password.
- Dismiss user risk - The user risk policy blocks a user if the configured user risk level for blocking access has been reached. You can reduce a user's risk level by dismissing user risk or manually closing reported risk detections.
- Exclude the user from policy - If you think that the current configuration of your sign-in policy is causing issues for specific users, you can exclude the users from it.
- Disable policy - If you think that your policy configuration is causing issues for all your users, you can disable the policy.
Unblocking based on sign-in risk
To unblock an account based on sign-in risk, administrators have the following options:
- Sign in from a familiar location or device - A common reason for blocked suspicious sign-ins are sign-in attempts from unfamiliar locations or devices. Your users can quickly determine whether this reason is the blocking reason by trying to sign in from a familiar location or device.
- Exclude the user from policy - If you think that the current configuration of your sign-in policy is causing issues for specific users, you can exclude the users from it.
- Disable policy - If you think that your policy configuration is causing issues for all your users, you can disable the policy.
PowerShell preview
Using the Microsoft Graph PowerShell SDK Preview module, organizations can manage risk using PowerShell. The preview modules and sample code are located in the Azure GitHub repo.
Use the Microsoft Graph API
Microsoft Graph is the Microsoft unified API endpoint and the home of Microsoft Entra Identity Protection APIs. There are three APIs that expose information about risky users and sign-ins: riskDetection, riskyUsers, and signIn.
riskDetectionallows you to query Microsoft Graph for a list of both user and sign-in linked risk detections and associated information about the detection.
riskyUsersallows you to query Microsoft Graph for information about users that Identity Protection detected as being risky.
signIn allows you to query Microsoft Graph for information on Microsoft Entra ID sign-ins with specific properties related to risk state, detail, and level.
This section gets you started with connecting to the Microsoft Graph and querying these APIs. For an in-depth introduction, full documentation, and access to the Graph Explorer, see the Microsoft Graph site (https://graph.microsoft.io/) or the specific reference documentation for the riskDetection, riskyUsers, and signIn APIs.
Connect to Microsoft Graph
There are four steps to accessing Identity Protection data through Microsoft Graph: retrieve your domain name, create a new app registration, configure API permissions, and configure a valid credential.
Retrieve your domain name
- Sign in to the Microsoft Entra admin center.
- Browse to Identity, then open Settings, and select Domain names.
- Take note of the .onmicrosoft.com domain. You'll need this information in a later step.
Create a new app registration
In the Microsoft Entra admin center, browse to Identity and Applications, then App registrations.
Select New registration.
On the Create page, perform the following steps:
- In the Name textbox, type a name for your application (for example: Microsoft Entra Risk Detection API).
- Under Supported account types, select the type of accounts that will use the APIs.
- Select Register.
Copy the Application ID.
Configure API permissions
From the Application you created, select API permissions.
On the Configured permissions page, in the toolbar on the top, select Add a permission.
On the Add API access page, choose Select an API.
On the Select an API page, select Microsoft Graph, and then select Select.
On the Request API permissions page:
- Select Application permissions.
- Select the checkboxes next to IdentityRiskEvent.Read.All and IdentityRiskyUser.Read.All.
- Select Add permissions.
Select Grant admin consent for domain.
Configure a valid credential
From the Application you created, select Certificates and secrets.
Under Client secrets, select New client secret.
Give the client secret a Description and set the expiration time period according to your organizational policies.
Select Add.
Note
If you lose this key, you'll have to return to this section and create a new key. Keep this key a secret: Anyone who has it can access your data.
Authenticate to Microsoft Graph and query the Identity Protection risk detections API
At this point, you should have:
- The name of your tenant's domain
- The Application (client) ID
- The client secret or certificate
To authenticate, send a post request to https://login.microsoft.com with the following parameters in the body:
- grant_type:
client_credentials - resource:
https://graph.microsoft.com - client_id:
- client_secret:
If successful, this request returns an authentication token. To call the API, create a header with the following parameter:
Authorization`="<token_type> <access_token>"
When authenticating, you can find the token type and access token in the returned token.
Send this header as a request to the following API URL: https://graph.microsoft.com/v1.0/identityProtection/riskDetections.
The response, if successful, is a collection of identity risk detections and associated data in the OData JSON format, which can be parsed and handled as you see fit.
Sample
This sample shows the use of a shared secret to authenticate. In a production environment, storing secrets in code is generally frowned upon. Organizations can use managed identities for Azure resources to secure these credentials.
Here’s sample code for authenticating and calling the API using PowerShell. Just add your client ID, the secret key, and the tenant domain.
    $ClientID      = "<your client ID here>"        # Should be a ~36 hex character string; insert your info here

    $ClientSecret  = "<your client secret here>"    # Should be a ~44 character string; insert your info here

    $tenantdomain  = "<your tenant domain here>"    # For example, contoso.onmicrosoft.com

    $loginURL      = "https://login.microsoft.com"

    $resource      = "https://graph.microsoft.com"

    $body          = @{grant_type="client_credentials";resource=$resource;client_id=$ClientID;client_secret=$ClientSecret}

    $oauth        = Invoke-RestMethod -Method Post -Uri $loginURL/$tenantdomain/oauth2/token?api-version=1.0 -Body $body

    Write-Output $oauth

    if ($oauth.access_token -ne $null) {

        $headerParams = @{'Authorization'="$($oauth.token_type) $($oauth.access_token)"}

        $url = "https://graph.microsoft.com/v1.0/identityProtection/riskDetections"

        Write-Output $url

        $myReport = (Invoke-WebRequest -UseBasicParsing -Headers $headerParams -Uri $url)

        foreach ($event in ($myReport.Content | ConvertFrom-Json).value) {

            Write-Output $event

        }

    } else {

        Write-Host "ERROR: No Access Token"

    }
Get all of the offline risk detections (riskDetection API)
With Identity Protection sign-in risk policies, you can apply conditions when risk is detected in real time. But what about detections that are discovered offline? To understand what detections occurred offline and, thus, wouldn't have triggered the sign-in risk policy, you can query the riskDetection API.
GET https://graph.microsoft.com/v1.0/identityProtection/riskDetections?$filter=detectionTimingType eq 'offline'
Get all of the users who successfully passed an MFA challenge triggered by risky sign-ins policy (riskyUsers API)
To understand the value Identity Protection risk-based policies have on your organization, you can query all of the users who successfully passed an MFA challenge triggered by a risky sign-ins policy. This information can help you understand which users Identity Protection has falsely detected as a risk and which of your legitimate users are performing actions that the AI deems risky.
GET https://graph.microsoft.com/v1.0/identityProtection/riskyUsers?$filter=riskDetail eq 'userPassedMFADrivenByRiskBasedPolicy'