Commit files and view history
Now that you've initialized your Git repository, you're ready to start adding files. In this unit, you'll learn how to tell Git to track the changes to files in your repository.
Note
The commands in this unit are shown to illustrate concepts. Don't run the commands yet. You'll practice what you learn here soon.
Folder structure for your repository
When you work with a version control system like Git, it's important to plan how you store your files. It's a good idea to have a clear folder structure.
If you're building Bicep code to deploy an application or another solution, it's also a good idea to store your Bicep files in the same repository as the application code and other files. That way, anytime someone needs to add a new feature that changes both Bicep and application code, they'll be tracked together.
Planning your folder structure also makes it easier to deploy your solution from a pipeline. You'll learn about pipelines in a future module.
Different teams have different conventions for how they set up their repository folders and files. Even if you aren't working with a team, it's still a good idea to decide on a convention to follow. A good file and folder structure will help anyone who has to work with your code in future.
If your team doesn't already have a preference, here's a suggestion for how you might do it:
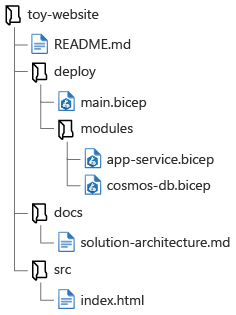
- At the root of your repository, create a README.md file. This text file, written in Markdown, describes the repository's contents and gives instructions to help team members work in the repository.
- At the root of your repository, create a deploy folder. Inside the folder:
- Store your main Bicep template, named main.bicep.
- Create a modules subfolder, to store your Bicep modules.
- If you have other scripts or files that are used during deployments, store them in the deploy folder.
- At the root of your repository, create a src folder for source code. Use it to store application code.
- At the root of your repository, create a docs folder. Use it to store documentation about your solution.
Here's an illustration of how this structure might look for your toy company's website:
Stage your changes
After you make changes to a file or files, you need to stage them. Staging tells Git that you consider the changes important enough to keep. It might seem like an unnecessary step, but staging gives you flexibility as you work. For example, you might make changes to several files but want to keep only one of them. Or, you might want to keep only some of the changes that you've made to a file.
To stage a file, you use the git add command and specify the file name or folder name that you want to stage. After you stage a file, Git knows that you might want to commit the changes. When you query the repository status by using git status, you see the staged changes.
Important
After you stage a file, if you make any further changes to it before you commit, Git won't record those changes. You need to stage the file again for Git to include the most recent changes.
For example, imagine you've created a Bicep module to define an Azure Cosmos DB account. It's named cosmos-db.bicep, and you saved it in the deploy/modules folder. Here's how you could stage the file:
git add deploy/modules/cosmos-db.bicep
You can also stage all of the changes in your repo by running this command from the root folder of your repository:
git add .
Commit the staged changes
A commit represents a set of changes to one or more files in your repository. When you're ready to commit the changes you've staged, you use the git commit command. Your commit includes a commit message, which is a human-readable description of the changes.
Here's an example that shows how you commit the staged changes shown earlier:
git commit --message "Add Cosmos DB account definition"
Note
Visual Studio Code can commit to your Git repository too. When you use Git integration in Visual Studio Code, if you haven't already staged the files, Visual Studio Code asks if you want it to stage all of the changed files for you. You can even set this as the default behavior. Or, if you prefer, you can manually stage and unstage files by using Source Control in Visual Studio Code.
Make your commit messages short, but make them descriptive. When you or a team member reviews the commit history in the future, each commit message should explain what the change was and why you made it.
There aren't any rules about what commit messages need to contain or how they're formatted. But conventionally, they're written in the present tense and in a full sentence, as if you're giving orders to your codebase.
Tip
It's a good practice to write descriptive commit messages even when you're working on your own. Someone else might need to look at your code in the future. Even if they don't, you might need to review your own history, and you want to make your own life easier!
Here are some examples of good commit messages:
- Update App Service configuration to add network configuration.
- Remove storage account since it's been replaced by a Cosmos DB database.
- Add Application Insights resource definition and integrate with function app.
View a file's history
After you commit files to your Git repository, you can use the git log CLI command to view the history of a file or even all the commits to the repository.
To view a list of commits, run the following command:
git log --pretty=oneline
The output of this command shows a list of the commits, with the most recent commits first. Each line includes the commit hash, which is an identifier that Git internally uses to track each commit. It also includes the commit message, which is one of the reasons why it's so important to write good commit messages.
It's also common to view the commits to a specific file. You can specify the file name when you run the git log command, like this:
git log deploy/main.bicep
The Git CLI and the git log command provide many arguments that you can use to view information about your commits and files. However, it's often easier to use Visual Studio Code to view the commit history for a file.
In the Visual Studio Code Explorer pane, you can select and hold (or right-click) a file in your repository and then select View Timeline. The Timeline pane opens and shows a list of each commit that affected that file. When you select a commit, you see the exact changes to the file. You'll see how to use this information in the next exercise.