Exercise - Commit files to your repository and view their history
In the previous exercise, you initialized a Git repository for your toy company's website. You added a Bicep file, but you didn't commit it.
In this exercise, you'll:
- Commit the file that you created in the previous exercise.
- Add a new Bicep module, and compare the differences in your Bicep code by using Git.
- Commit the updated Bicep code.
- View the commit history and the main Bicep file's history.
The process of making more changes to your Bicep code will show you how Git and Visual Studio Code help you track and manage changes.
Commit the Bicep file by using the Git CLI
By using the Visual Studio Code terminal, run the following command to stage the main.bicep file:
git add deploy/main.bicepRun the following command to commit the staged changes and provide a commit message:
git commit --message "Add first version of Bicep template"
Add a Bicep module
Here you add a Bicep module and reference it from your main.bicep file.
In the deploy folder, create a subfolder named modules.
In the modules folder, create a new file named app-service.bicep.
Open and save the empty app-service.bicep file so that Visual Studio Code loads the Bicep tooling.
Copy the following code into app-service.bicep:
@description('The Azure region into which the resources should be deployed.')
param location string

@description('The type of environment. This must be nonprod or prod.')
@allowed([
  'nonprod'
  'prod'
])
param environmentType string

@description('The name of the App Service app. This name must be globally unique.')
param appServiceAppName string

var appServicePlanName = 'toy-website-plan'
var appServicePlanSkuName = (environmentType == 'prod') ? 'P2v3' : 'F1'
var appServicePlanTierName = (environmentType == 'prod') ? 'PremiumV3' : 'Free'

resource appServicePlan 'Microsoft.Web/serverfarms@2024-04-01' = {
  name: appServicePlanName
  location: location
  sku: {
    name: appServicePlanSkuName
    tier: appServicePlanTierName
  }
}

resource appServiceApp 'Microsoft.Web/sites@2024-04-01' = {
  name: appServiceAppName
  location: location
  properties: {
    serverFarmId: appServicePlan.id
    httpsOnly: true
  }
}
Save and close the app-service.bicep file.
Open the main.bicep file.
Under the parameter declarations, add the following parameter declaration and module definition:
@description('The name of the App Service app. This name must be globally unique.')
param appServiceAppName string = 'toyweb-${uniqueString(resourceGroup().id)}'

module appService 'modules/app-service.bicep' = {
  name: 'app-service'
  params: {
    location: location
    environmentType: environmentType
    appServiceAppName: appServiceAppName
  }
}
Save and close the main.bicep file.
Compare the differences
Now that you've made a change to the main.bicep file, let's inspect the differences. It's a good idea to review the differences in each file you're about to stage and commit. You do the review to verify that your changes are correct.
In Visual Studio Code, select View > Source Control, or select Ctrl+Shift+G on the keyboard.
On the Source Control panel that opens, select the main.bicep file.
A view of file differences opens.
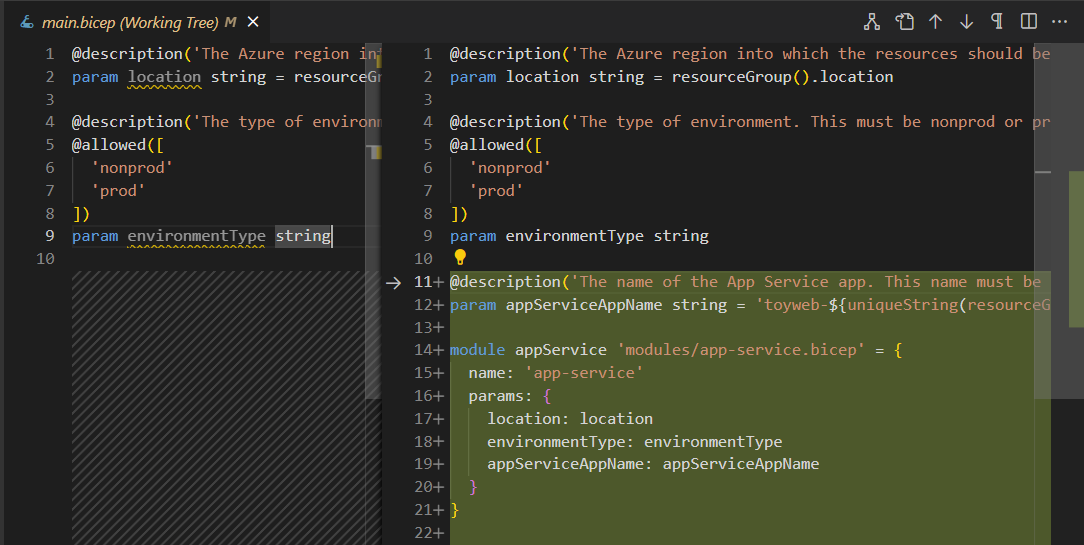
Notice that Visual Studio Code shows you the changes you've made. The original file is on the left, and the changed file is on the right. Additions to the file are displayed in green. When you edit a file and remove content, the deletions are displayed in red.
Open the differences for the app-service.bicep file.
Notice that there's nothing on the left side of the difference view, because this file is new and wasn't already added to the repository.
Commit the updated Bicep code by using Visual Studio Code
Now that you've reviewed the changes and are satisfied with it, you commit the update to the file. This time, you use Visual Studio Code.
Open Source Control.
Two changed files should appear. If you don't see them, select the refresh button so that Visual Studio Code scans for changes.

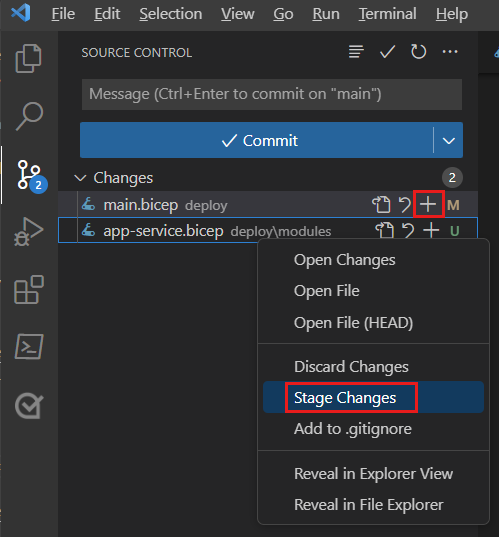
Select each of the two changed files and stage them. You can select the plus (+) icon on each file, or you can select and hold (or right-click) each file and select Stage Changes.
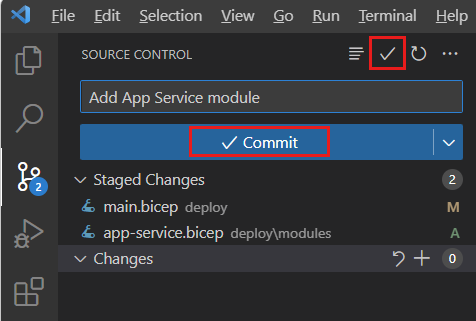
At the top of Source Control, enter a descriptive commit message, like:
Add App Service moduleSelect the check-mark icon above the text box for the commit message. Or you can select Commit.
Visual Studio Code commits the two changes.
View the commit history by using the Git CLI
In the Visual Studio Code terminal, enter the following command to view the repository's commit history:
git log --pretty=onelineThe output looks similar to the following example:
238b0867f533e14bcaabbade31b9d9e1bda6123b (HEAD -> main) Add App Service module
9e41f816bf0f5c590cee88590aacc977f1361124 Add first version of Bicep template
Inspect the output. Notice that both of your commits appear in the commit history.
View a file's history by using Visual Studio Code
You can also view the history of a single file, the state of the file from that commit, and the change that the commit applied.
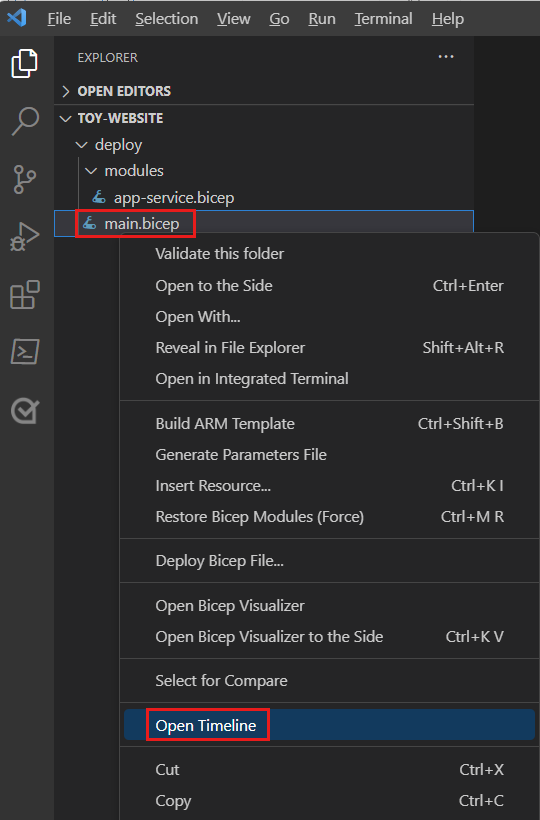
Open Explorer in Visual Studio Code.
Select and hold (or right-click) the main.bicep file, and then select Open Timeline.
The timeline opens and shows both commits.

Select each commit in the list to view the state of the file at that point in time.