Explore Git branch model for continuous delivery
Successful software delivery depends on a branching strategy that balances speed, quality, and risk management. The goal is to ship enhancements quickly while maintaining production stability.
Strategic Balance: Speed vs. Quality
An effective branching model must strike the right balance:
- Minimize process overhead to accelerate time-to-market.
- Maintain quality gates to prevent defects from reaching production.
- Enable parallel development for team scalability.
- Support rapid hotfix deployment for critical issues.
While numerous Git branching strategies exist, the most effective approach combines proven patterns with your team's specific needs. Modern enterprise teams typically adopt a lightweight, trunk-based development model centered on feature branches and pull requests.
Core Principle: Always-Ready Main Branch
This unit teaches you to implement a continuous delivery-ready branching model using feature branches and pull requests to maintain a consistently deployable main branch.
Enterprise Branching Strategy Framework
The following principles establish a robust foundation for continuous delivery:
Main Branch Stability
- Single source of truth: The main branch is the exclusive path for production releases.
- Production readiness: Main branch must always be in a deployable state.
- Branch protection: Implement comprehensive branch policies to prevent direct commits.
- Gated changes: All modifications flow through pull requests exclusively.
- Release tracking: Tag all production releases with semantic Git tags.
Feature Branch Discipline
- Isolated development: Create dedicated branches for all features and bug fixes.
- Feature flag integration: Manage long-running features with feature toggles to reduce branch lifetime.
- Strategic naming: Use descriptive naming conventions that reflect business value.
- Pull request workflow: Merge to main exclusively through reviewed pull requests.
Release Branch Strategy
- Dedicated preparation: Create release branches from stable feature integration points.
- Quality assurance: Conduct thorough testing and stabilization on release branches.
- Production hardening: Apply final bug fixes and performance optimizations.
- Milestone tracking: Tag significant release milestones for traceability.
Naming Conventions for Scale
# Bug fixes
bugfix/[ticket-id]-description
bugfix/AUTH-123-login-timeout

# Feature development
features/[area]/[feature-name]
features/authentication/oauth-integration
features/api/rate-limiting

# Hotfixes
hotfix/[severity]-description
hotfix/critical-payment-gateway

# Personal branches
users/[username]/[description]
users/john-doe/experimental-caching
Pull Request Management
- Mandatory code review: No exceptions for direct merges to main.
- Automated validation: Integrate CI/CD pipelines for quality gates.
- Performance metrics: Track and optimize pull request completion time.
- Knowledge sharing: Use reviews for team learning and standards enforcement.
Prerequisites and Setup
Essential Tools for Enterprise Git Workflows
This practical exercise leverages Azure's comprehensive DevOps toolchain:
- Azure CLI: Cloud-native command-line interface for Azure services.
- Azure DevOps CLI: Specialized extension for seamless Git, CI/CD, and Agile tool integration across Windows, Linux, and macOS.
Azure DevOps CLI Configuration
The Azure DevOps CLI provides flexible output formatting (JSON, YAML, table, TSV) to support various automation scenarios. Configure your preferred format using:
az devops configure --defaults output=table
Hands-On Implementation: Enterprise Git Workflow
This comprehensive walkthrough demonstrates enterprise-grade Git branching for continuous delivery, covering feature development, hotfix deployment, and conflict resolution.
Step 1: Feature Branch Creation and Development
Create a feature branch following enterprise naming conventions:
myWebApp
git checkout -b feature/myFeature-1
Output: Switched to a new branch 'feature/myFeature-1'.
Verify branch context and working tree status:
myWebApp
git branch
Output: ✓ feature/myFeature-1
- main*
Step 2: Feature Implementation and Version Control
Implement your feature changes:
myWebApp
# Edit your source files
code Program.cs  # Or your preferred editor
Follow the complete commit lifecycle:
myWebApp
git status
Output: On branch feature/myFeature-1 Changes not staged for commit:
- modified: Program.cs*
myWebApp
git add .
git commit -m "feat: implement myFeature-1 with enhanced error handling"
Output: [feature/myFeature-1 70f67b2] feat: implement myFeature-1 with enhanced error handling 1 file changed, 1 insertion(+)
Publish to remote repository:
myWebApp
git push -u origin feature/myFeature-1
Output: To https://dev.azure.com/organization/teamproject/_git/MyWebApp
- [new branch] feature/myFeature-1 -> feature/myFeature-1 Branch feature/myFeature-1 set up to track remote branch feature/myFeature-1 from origin.
Step 3: Azure DevOps CLI Configuration and Pull Request Creation
Configure Azure DevOps CLI for your organization and project. Replace organization and project name:
az devops configure --defaults organization=https://dev.azure.com/organization project="project name"
Create a new pull request (using the Azure DevOps CLI) to review the changes in the feature-1 branch:
az repos pr create --title "Review Feature-1 before merging to main" --work-items 38 39 `
--description "#Merge feature-1 to main" `
--source-branch feature/myFeature-1 --target-branch main `
--repository myWebApp --open
Use the --open switch when raising the pull request to open it in a web browser after it has been created. The --deletesource-branch switch can be used to delete the branch after the pull request is complete. Also, consider using --auto-complete to complete automatically when all policies have passed, and the source branch can be merged into the target branch.
Note
For more information about az repos pr create parameter, see Create a pull request to review and merge code.
The team jointly reviews the code changes and approves the pull request:
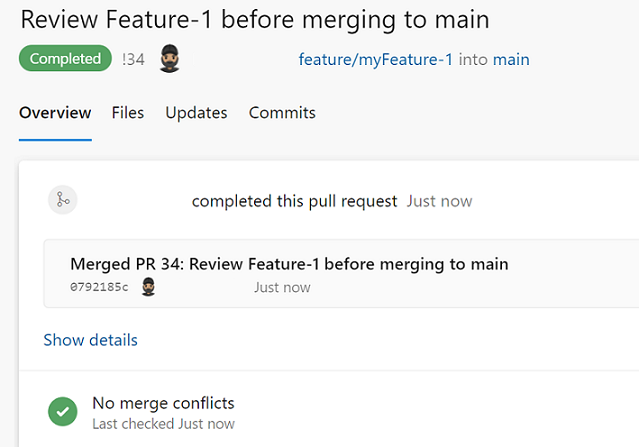
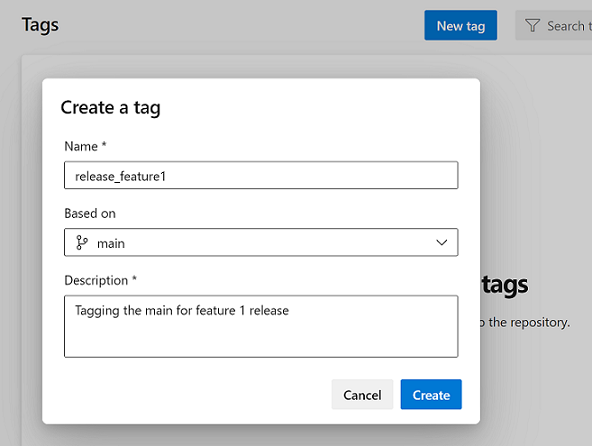
The main is ready to release. Team tags the main branch with the release number:
Step 4: Parallel Feature Development
Start work on Feature 2. Create a branch on remote from the main branch and do the checkout locally:
myWebApp
git push origin main:refs/heads/feature/myFeature-2
Output:
Total 0 (delta 0), reused 0 (delta 0) To https://dev.azure.com/**organization**/**teamproject**/\_git/MyWebApp * [new branch] origin/HEAD -> refs/heads/feature/myFeature-2.
myWebApp
git checkout feature/myFeature-2
Output: Switched to a new branch 'feature/myFeature-2' Branch feature/myFeature-2 set up to track remote branch feature/myFeature-2 from origin.
Modify Program.cs by changing the same comment line in the code changed in feature-1:
```
public class Program
{
    // Editing the same line (file from feature-2 branch)
    public static void Main(string[] args)
    {
        BuildWebHost(args).Run();
    }

    public static IWebHost BuildWebHost(string[] args) =>
        WebHost.CreateDefaultBuilder(args)
            .UseStartup<Startup>()
            .Build();
```
Step 5: Feature 2 Pull Request and Hotfix Scenario
Commit the changes locally, push them to the remote repository, and then raise a pull request to merge the changes from feature/myFeature-2 to the main branch:
az repos pr create --title "Review Feature-2 before merging to main" --work-items 40 42 `
--description "#Merge feature-2 to main" `
--source-branch feature/myFeature-2 --target-branch main `
--repository myWebApp --open
A critical bug is reported in production against the feature-1 release with the pull request in flight. To investigate the issue, you need to debug against the version of the code currently deployed in production. To investigate the issue, create a new fof branch using the release_feature1 tag:
myWebApp
git checkout -b fof/bug-1 release_feature1
Output: Switched to a new branch, 'fof/bug-1'.
Step 6: Critical Hotfix Implementation
Modify Program.cs by changing the same line of code that was changed in the feature-1 release:
public class Program
{
    // Editing the same line (file from feature-FOF branch)
    public static void Main(string[] args)
    {
        BuildWebHost(args).Run();
    }

    public static IWebHost BuildWebHost(string[] args) =>
        WebHost.CreateDefaultBuilder(args)
            .UseStartup<Startup>()
            .Build();
Stage and commit the changes locally, then push changes to the remote repository:
myWebApp
git add .
git commit -m "Adding FOF changes."
git push -u origin fof/bug-1
Output:
To https://dev.azure.com/**organization**/**teamproject**/\_git/MyWebApp * [new branch] fof/bug-1 - fof/bug-1 Branch fof/bug-1 set up to track remote branch fof/bug-1 from origin.
Step 7: Hotfix Integration and Conflict Resolution
Immediately after the changes have been rolled out to production, tag the fof\bug-1 branch with the release_bug-1 tag, then raise a pull request to merge the changes from fof/bug-1 back into the main:
az repos pr create --title "Review Bug-1 before merging to main" --work-items 100 `
--description "#Merge Bug-1 to main" `
--source-branch fof/Bug-1 --target-branch main `
--repository myWebApp --open
As part of the pull request, the branch is deleted. However, you can still reference the entire history using the tag.
With the critical bug fix out of the way, let's review the feature-2 pull request.
The branches page makes it clear that the feature/myFeature-2 branch is one change ahead of the main and two changes behind the main:

If you tried to approve the pull request, you'd see an error message informing you of a merge conflict:
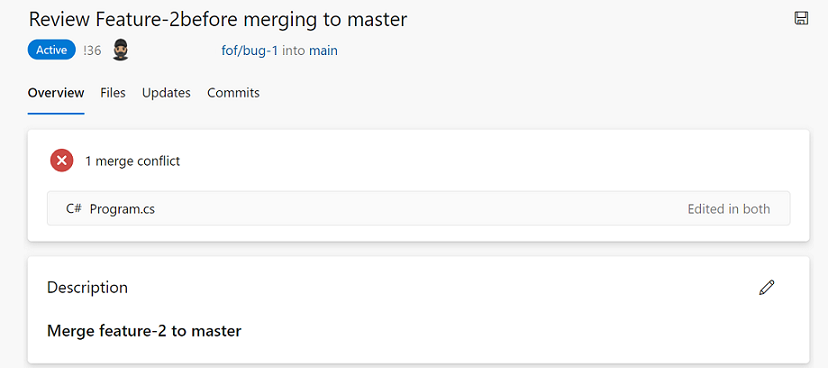
Resolve merge conflicts
To resolve merge conflicts, you can use the Azure DevOps web interface or resolve them locally using Git commands. For local resolution, first update your feature branch with the latest changes from main:
```CMD
git checkout feature/myFeature-2
git fetch origin
git merge origin/main
```
Resolve the conflicts in your preferred editor, then complete the merge:
```CMD
git add .
git commit -m "Resolve merge conflicts between feature-2 and main"
git push origin feature/myFeature-2
```
With the conflicts resolved, the pull request can be completed successfully.
At this point, you can create a release branch based on the critical bug fix implemented in the fof/bug-1 branch and merged into main. Using the git checkout command, create a dedicated release branch from the main branch.
git checkout -b release/v1.1 main
This command creates a new branch named release/v1.1 based on the main branch.
As significant milestones are reached during the release process, tag releases in the release branch using Git tags. Tags serve as markers to denote specific versions of the software.
git tag -a v1.1 -m "Release version 1.1"
This command creates a tag named v1.1 to mark the release version 1.1 in the release branch.
How it works
We learned how the Git branching model gives you the flexibility to work on features in parallel by creating a branch for each feature.
The pull request workflow allows you to review code changes using the branch policies.
Git tags are a great way to record milestones, such as the version of code released; tags give you a way to create branches from tags.
We created a branch from a previous release tag to fix a critical bug in production.
The branches view in the web portal makes it easy to identify branches ahead of the main. Also, it forces a merge conflict if any ongoing pull requests try to merge to the main without resolving the merge conflicts.
A lean branching model allows you to create short-lived branches and push quality changes to production faster.