Understand environments
Deployment workflows enable you to automate the steps in your deployment process. Often, you need to run the steps in multiple separate environments. In your toy company, you want to review the changes to your code before you deploy the changes to your production environment.
In this unit, you learn about how environments in GitHub Actions help you support your own process.
Why do you have multiple environments?
Deployment processes make changes to your Azure resources, including resources in use. Changing resources involves some risk, because the changes that you deploy might not behave as you expect. You might even discover that the changes break your current setup.
To minimize the risk of problems, it's a good practice to try out your changes in a safe way before you deploy them to your production environment. You minimize risk by deploying the changes to a non-production environment.
Many organizations set up multiple non-production environments where they progressively deploy their changes before releasing to production. Each non-production environment serves a specific purpose and often has specific quality gates that must be met to proceed to the next environment. If something goes wrong, like a test failing, the deployment stops. As your deployment moves through each environment, your confidence in the changes grows.
Common environments include:
Development: A development environment is typically used by developers to try their changes in, and to quickly iterate on their work.
Development environments often have minimal controls so that team members can easily try out ideas. You might use a development environment to test a certain configuration setting on a resource, or to see how you can set up a new website with a back-end database in a secure way. Many of these changes and trials might not advance in your deployment process, because you're eliminating the ideas that don't succeed.
In some teams, you might even set up a separate development environment for each team member so that they don't get in each other's way while they're working on new features.
Development environments are sometimes also called sandbox environments.
Test: A test environment is designed to run manual or automated tests against your changes.
Test environments can be used in a continuous integration process. After you deploy a change to a test environment, automated tests can be run against it. If all of the automated tests pass, then the change is safe to merge into the main branch of the project. Automated tests usually check for the core system functionality, along with things like policy violations in the newly deployed resources.
You might also create dedicated test environments for specific types of testing, like performance and security testing.
Integration: An integration environment can help you test any integration points with other systems.
You might simulate end-to-end transactions in an integration environment. These tests often run automatically, but many organizations also perform manual testing against this environment.
Integration environments are sometimes also called system integration test (SIT) environments.
User acceptance test: A user acceptance test (UAT) environment is used for manual validation, usually by business stakeholders rather than developers. In manual validation, someone goes through the solution and verifies that it behaves as expected and that it satisfies the necessary business requirements. That person then approves the changes so that the deployment can continue.
Pre-production: A pre-production environment is often a mirror of the production environment, with the same resource SKUs and configuration. It's used as a final check to verify how the production deployment will behave during and after the change is applied. It can also be used to verify whether to expect any downtime during the production deployment.
Pre-production environments are sometimes also called staging environments.
Production: Your production environment is the one that end users of the application use. It's your live environment that you want to protect and keep up and running as much as possible.
In some organizations, you might have multiple production environments. For example, you might have production environments in different geographic regions or to serve different groups of customers.
Demo: Your team might also create demonstration (demo) environments to show the application to end users, for use in training, or for sales teams to show certain capabilities to potential customers. You might even have multiple demo environments that serve different purposes. A demo environment is often a slimmed-down replica of your production environment, with fake customer data.
Environments in your organization
You might see variations of these environments. Some organizations use only a few environments, and some use many more. The number and type of environments that you use depend on the solution you're deploying, the size of the team that's building the solution, and the importance of the workload.
Sometimes, a single environment takes the role of several of the environments listed earlier. Other times, you might have a complex workflow that deploys to multiple environments, some in parallel and some in sequence. Some organizations even automatically delete or deprovision environments when they're no longer used, and then redeploy them when they're needed in the future.
Whatever your organization chooses as its list of environments, the goal is to improve your confidence in a change as it progresses through your deployment workflow. When a change doesn't meet your quality requirements, you want to be able to stop the deployment of that change to any subsequent environments in the chain.
In your toy company, you decide to start with a basic set of environments for your website. In addition to your production environment, you'll create one non-production environment named Test:

You'll update your workflow to deploy your Bicep code to your test environment and run some basic tests against it. If that effort succeeds, you can then deploy to your production environment.
Workflow environments
GitHub Actions also has the concept of an environment. You create a GitHub Actions environment to represent the environment that you have in Azure. When you define your workflow in a YAML file, you can link jobs to a specific environment. By using environments, you get some additional features in your workflow.
Protection rules
An environment in GitHub Actions can have protection rules configured. Each time the environment is used in a job in your workflow, GitHub Actions will make sure these rules are met before the job starts running.
For example, you can configure manual reviews on your production environment. Before a production deployment starts, the designated reviewer receives a notification. That person can manually verify that your policies and procedures are met before the deployment begins. For example, the approver might check that everything is working as they expect in the pre-production environment before they approve the deployment.
Additionally, you could run an automated check to confirm the branch that your change is coming from. If the change isn't on your main branch, you can configure GitHub to prevent it from being deployed to your production environment.
Secrets
GitHub Actions enables you to store secrets that can only be used with a specific environment. You'll learn more about secret management later in this module.
Deployment history
GitHub Actions tracks the history of the deployments to an environment. This history gives you an easy way to track what happens in the environment over time. It even allows you to trace a deployment to a commit in your repository. This feature can be useful if you have a problem with a deployment and need to identify the change that led to the problem.
Create environments
You can create an environment by using the GitHub web interface.
When your workflow refers to an environment that doesn't exist, GitHub Actions automatically creates it for you. This feature can affect the security of your GitHub repository because the new environment won't have any protection rules configured. It's best to create an environment yourself through the GitHub web interface, so that you have full control over its security.
Link a deployment job to an environment
In your deployment workflow definition, you can refer to an environment by using the environment property:
jobs:
  deploy:
    environment: Test
    runs-on: ubuntu-latest
    steps:
    - uses: actions/checkout@v3
In this example, the job named deploy is linked to the Test environment.
Environments and connections to Azure
When you use multiple environments, you should make each environment independent from the others. For example, your development environment's website shouldn't be able to access a database within your production environment.
The same principle also applies to the deployment workflow. You should create separate workload identities for each environment. Following this practice adds another layer of protection to ensure that your non-production deployments don't affect your production environment.
Workload identities should be assigned specific permissions to only deploy to the subscription and resource group used by that environment:
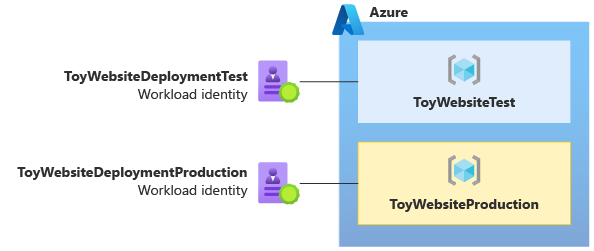
Important
Use a separate workload identity for each environment that you plan to deploy to. Grant the workload identity the minimum permissions that it needs to deploy to its environment, and no others.
It's also a good idea to separate your environments in Azure. At minimum, you should create a separate resource group for each environment. In many situations, it's better to create separate Azure subscriptions for each environment. Then you can create multiple resource groups within each environment's subscription.
Apply Azure role assignments so that users and workload identities can access only the environments that they need to access. And be careful to limit the access to your production environment to a small set of people and the deployment workload identity for that environment.
Federated credentials for environments
When your workload identity connects to Azure from your deployment workflow, it uses a federated credential to securely authenticate itself without any secrets or keys. In previous modules in this learning path, your federated credentials granted access to your deployment workflows when they deployed from the main branch of your Git repository.
When you deploy to an environment within your workflow, you need to use a federated credential scoped to that environment.
In this module, your workflow includes several jobs, many of which connect and deploy to Azure. Some of the jobs use environments, and some don't. So, you create two federated credentials for each of your workload identities: one scoped to the environment and one scoped to the main branch.