How to organize and automate your project
You created your Project, added issues and pull requests, and organized it. Now, let's talk about how to:
- Provide visibility and access to your Project.
- Close and delete your Project.
Project visibility and access
In this portion of the unit, you learn how to:
- Control visibility to your Project.
- Manage access to your Project.
- Invite collaborators and change roles.
- Add a Project to a team.
- Add a Project to a repository.
Control visibility to your Project
You have the ability to control whether your Project is public or private. When your Project is public, everyone on the internet can view it. When your Project is private, only users granted at least read access can see your Project.
To change your Project's visibility:
Navigate to your Project.
In the top-right, select the three dots at the top menu and choose Settings.
Scroll down to Danger zone, and under Visibility select Private or Public from the drop-down.

Manage access to your Project
Access to your Project depends on if your Project is an organization-owned Project or a personal/user-owned Project. Managing access is similar between the two levels.
Admins of organization-owned Projects can manage access for the entire organization, for teams, for individual organization members, and for outside collaborators. Admins of user-owned Projects can invite individual collaborators and manage their access.
Organization-owned Project
- No access: Only organization owners and users granted individual access can see the Project. Organization owners are also admins for the Project.
- Read: Everyone in the organization can see the Project. Organization owners are also admins for the Project.
- Write: Everyone in the organization can see and edit the Project. Organization owners are also admins for the Project.
- Admin: Everyone in the organization is an admin for the Project.
Personal/User-owned Project
- Read: The individual can view the Project.
- Write: The individual can view and edit the Project.
- Admin: The individual can view, edit, and add new collaborators to the Project.
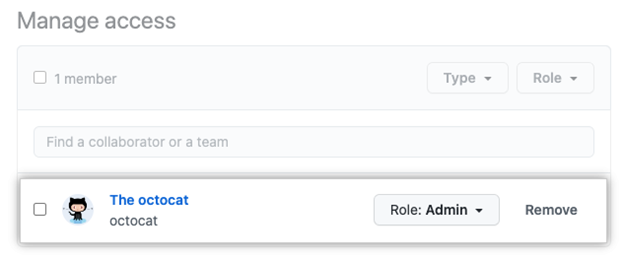
Invite collaborators and change roles
Navigate to your Project.
In the top right, select the three dots to open the menu and choose Settings.
In the left-hand navigation bar, select Manage access.
Once on the page you can either:
- Invite individuals and teams by searching in the Invite collaborators search bar.
- Change their role or remove them under Manage access.
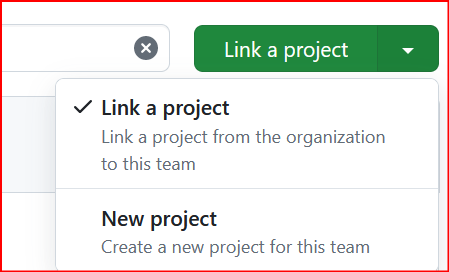
Add a Project to a team
You can add Projects to your team to give them collaborator access to their Projects. Adding lists them on the team's Projects page, which makes it easier for members to identify which Project a particular team uses. Teams are granted read permissions on any Project they get added to.
Here's how to add Projects to teams:
- In the top right corner of GitHub.com, select your profile photo and choose Your organizations.
- Select the name of your organization.
- Navigate to the Teams tab and select the name of the team to which you want to grant access.
- Select Projects and choose Link a project.
- Start typing the name of the Project you want to add and then select the Project in the list of matches.
Add a Project to a repository
You can list relevant Projects in a repository so your team can access information they need to stay up to date. However, you can only list Projects if the same user or organization owns both the Projects and the repository. In order for repository members to see a Project listed in a repository, they must have visibility to the Project.
Here are the steps to add a Project to a repository:
Navigate to the main page of your repository.
Select the Projects tab and choose to Link a project.
Search for Projects owned by the same user or organization as the repository owner.
Select a Project to list the Project in your repository.
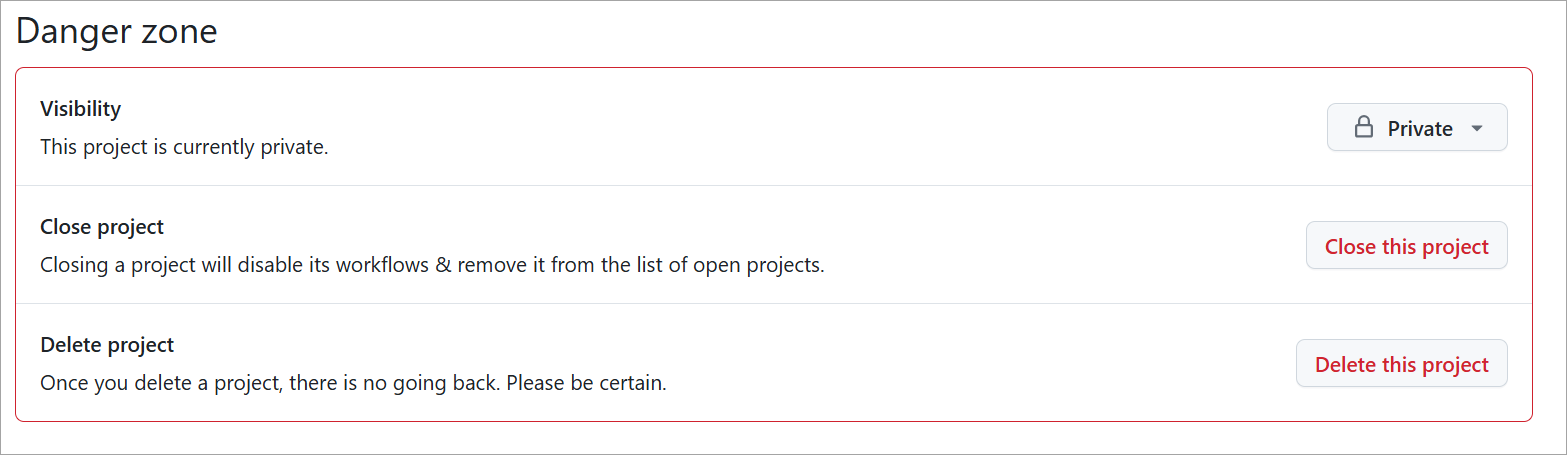
Close and delete Projects
Once you complete a Project or you no longer need to use it, you can either close or delete it.
Closing a Project enables you to remove it from the list of Projects but retain the content and ability to reopen the Project later. We recommend this option to preserve your data.
However, deleting a Project permanently removes it from the platform along with any saved views, custom fields and associated values, insights data, and drafted issues.
Regardless of which option you choose, both closing and deleting Project settings are in the same location.
Here are steps on how to navigate to them:
Navigate to your Project.
In the top-right, select the three dots to open the menu and choose Settings.
Scroll down to the Danger zone section and either select Close project or Delete project.
- Selecting Delete project prompts you to read the warnings, and then type the name of your Project into the text box.
Converting checklist items to sub-issues
GitHub Projects now supports converting checklist items into sub-issues for better task tracking and hierarchy.
To use this feature:
- Open any issue that includes a checklist.
- Hover over a checklist item and click the ... (more options) button.
- Select Convert to sub-issue.
This creates a dedicated issue linked back to the original one, which will also appear in your Projects view for tracking.
Next up, we'll review insights and automation in Projects.