Set up cloud-based PKI
Before devices can receive certificates, you need to build the PKI foundation in Microsoft Intune. That means creating the certification authorities (CAs) that will sign certificates, deploying trust to your devices, and configuring the enrollment protocol. Unlike traditional PKI, Cloud PKI requires no on-premises servers, network device enrollment service (NDES), or Intune certificate connectors - everything lives in the cloud.
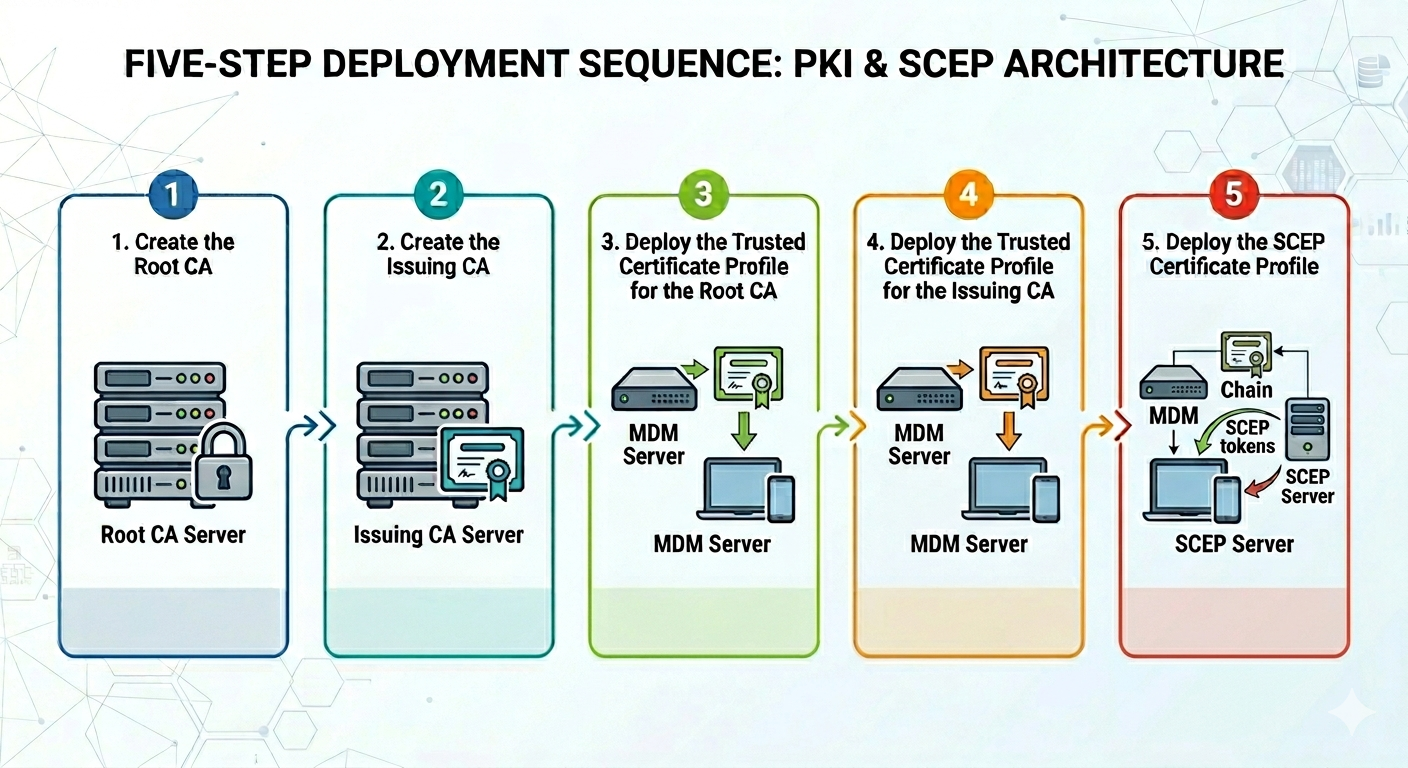
This unit walks you through the three steps needed for the deployment sequence:
- Create the CA hierarchy
- Publish trust to devices
- Configure SCEP certificate profiles
Verify licensing and permissions
Cloud PKI is a premium add-on, so your tenant needs one of the following licenses before you can create any CAs:
- Microsoft Intune Suite - includes Cloud PKI as part of the suite
- Microsoft Cloud PKI standalone add-on - purchased separately per user
You can also activate a free trial for either of the above options from the Intune admin center. CAs created during a trial period of Intune Suite or Cloud PKI standalone Add-on use software-backed signing and encryption keys. After you purchase a license, those keys remain software-backed and can't be converted to HSM-backed (Hardware Security Module) keys, so plan your pilot carefully.
Important
You can create a maximum of six CAs per Intune tenant across all CA types combined. Count root CAs, issuing CAs, and bring-your-own CAs (BYOCA) together when planning your hierarchy.
In addition to licensing, your account needs the correct role-based access control (RBAC) permissions. Assign one of these built-in permissions to the Intune role that will manage Cloud PKI:
| Permission | What it allows |
|---|---|
| Read CAs | View CA properties in the admin center |
| Create certificate authorities (CAs) | Create root CAs and issuing CAs |
| Revoke issued leaf certificates | Manually revoke a certificate issued by an issuing CA |
| Disable and reenable CAs | Disable CAs or reenable them again |
You can assign these permissions to a custom Intune role, or use a built-in Entra ID role such as Intune Administrator that already includes them.
Note
The mentioned permissions are only findable and manageable in Intune. You can't find those permissions in Entra ID besides the role Intune Administrator.
Create the CA hierarchy
Cloud PKI uses a two-tier hierarchy: a root CA at the top that anchors trust, and an issuing CA beneath it that signs device certificates. You create both in the Intune admin center under Tenant administration > Cloud PKI.
Step 1: Create the root CA
The root CA is the trust anchor for your entire PKI. Devices will be configured to trust this CA so that certificates issued by your issuing CA are automatically trusted.
Complete the following steps:
- In the Microsoft Intune admin center, go to Tenant administration > Cloud PKI.
- Select Create
- On the Basics page, enter a descriptive name, such as
Contoso Root CA. - On the Configuration settings page:
- CA type: Root CA
- Validity period: 25 years
- For the Extended Key Usages select all you need
- Enter the Subject attributes fields, including Common Name, Organization, Country/Region, and State.
- For the Encryption select RSA-4096 and SHA-512 (recommended for root CAs)
- Select Next, add Scope tags as you wish.
- Select Next review your settings, and select Create.
After a few seconds, the root CA appears in the list with a Active status. Intune automatically generates the CA keys in Azure Managed Hardware Security Module (Azure Managed HSM), so no additional key management is required.
Step 2: Create the issuing CA
The issuing CA sits beneath the root CA and is the CA that actually signs device certificates. Each issuing CA includes a built-in SCEP (Simple Certificate Enrollment Protocol) service that handles certificate requests from devices.
- In Tenant administration > Cloud PKI, select Create.
- On the Basics page, enter a name.
- On the Configuration settings select Issuing CA as the CA type.
- Under Root CA source, select Intune.
- Under Root CA select the CA you just created.
- Validity period: 5 years (recommended)
- For the Extended Key Usages select all you need for your usecase.
- Enter the Subject attributes fields, including Common Name, Organization, Country/Region, and State.
- The Encryption settings are inherited from the root CA.
- Select Next, add Scope tags as you wish.
- Select Next review your settings, and select Create.
Once the issuing CA is active, a SCEP URI is automatically generated. You'll use this URI when configuring SCEP certificate profiles.
Tip
If your organization already has an on-premises or third-party root CA, you can use Bring Your Own CA (BYOCA). This option creates an Intune issuing CA that chains to your existing root. Your external root maintains the trust anchor, while Cloud PKI handles the automation and SCEP services.
Deploy trust to devices
Devices need to trust your root CA and issuing CA before they'll accept certificates signed by them. You distribute this trust using trusted certificate profiles. One for the root CA, one for the issuing CA.
- In the Intune admin center, go to Devices > Configuration.
- Select Create > New policy.
- Select the target platform Windows 10 and later and Templates > Trusted certificate.
- Fill in the Name and continue on the Configuration settings page, upload the root CA certificate. You can download this certificate directly from the Cloud PKI CA detail page.
- Add scope tags as needed and assign it to the appropriate device or user groups, and save.
- Repeat the process for the issuing CA certificate.
Assign both profiles before you deploy any SCEP certificate profiles. Devices must receive and install the trust chain first, or certificate validation will fail.
Configure a SCEP certificate profile
With trust in place, you can now configure the profile that tells devices to enroll for a certificate via SCEP. The SCEP profile specifies the issuing CA, certificate subject name, validity period, and key attributes.
- In Devices > Configuration, select Create > New policy.
- Select the target platform Windows 10 and later and Templates > SCEP certificate.
- Fill in the Name and continue on the Configuration settings page:
- Certificate type: Device or User
- Subject name format: Gets filled with standard values
- Certificate validity period: 1 year (adjust to your policy)
- Key storage provider (KSP): Software KSP or TPM KSP
- Key usage: Digital signature, Key encipherment
- Root certificate: Select the trusted certificate profile you created for the issuing CA.
- SCEP Server URLs: Paste the SCEP URI from the issuing CA detail page
- Assign the SCEP profile to the appropriate groups and save.
Note
You must create a separate SCEP certificate profile for each platform (Windows, iOS/iPadOS, Android, macOS). The configuration is the same, but profiles are platform-specific in Intune.
Understand what happens next
Once you save and assign the profiles, the deployment sequence runs automatically when enrolled devices check in:
- The device receives the trusted certificate profiles and installs the root CA and issuing CA certificates.
- The device receives the SCEP profile and generates a certificate signing request (CSR). The private key is created on the device and never leaves it.
- The device sends the CSR and an encrypted SCEP challenge to the Cloud PKI SCEP service.
- The SCEP validation service verifies the request came from a managed, enrolled device.
- The issuing CA signs the CSR and returns the certificate to the device.
The whole process completes within minutes of the device checking in. No administrator action is needed after the initial setup.
Summary of deployment order
To avoid assignment dependency errors, always follow this order:
- Create the root CA
- Create the issuing CA
- Deploy the trusted certificate profile for the root CA
- Deploy the trusted certificate profile for the issuing CA
- Deploy the SCEP certificate profile
Skipping or reversing steps, especially deploying SCEP profiles before trust profiles, results in devices rejecting the issued certificates.