Prepare
The first step in moderating content with Azure AI Content Safety is to create a Content Safety resource and retrieve the key and endpoint that the workshop uses to call the APIs.
Create a Content Safety resource
Azure AI Content Safety is an Azure AI service that provides moderation and prompt-protection APIs. Follow these steps to create a resource that supports the exercises in this module:
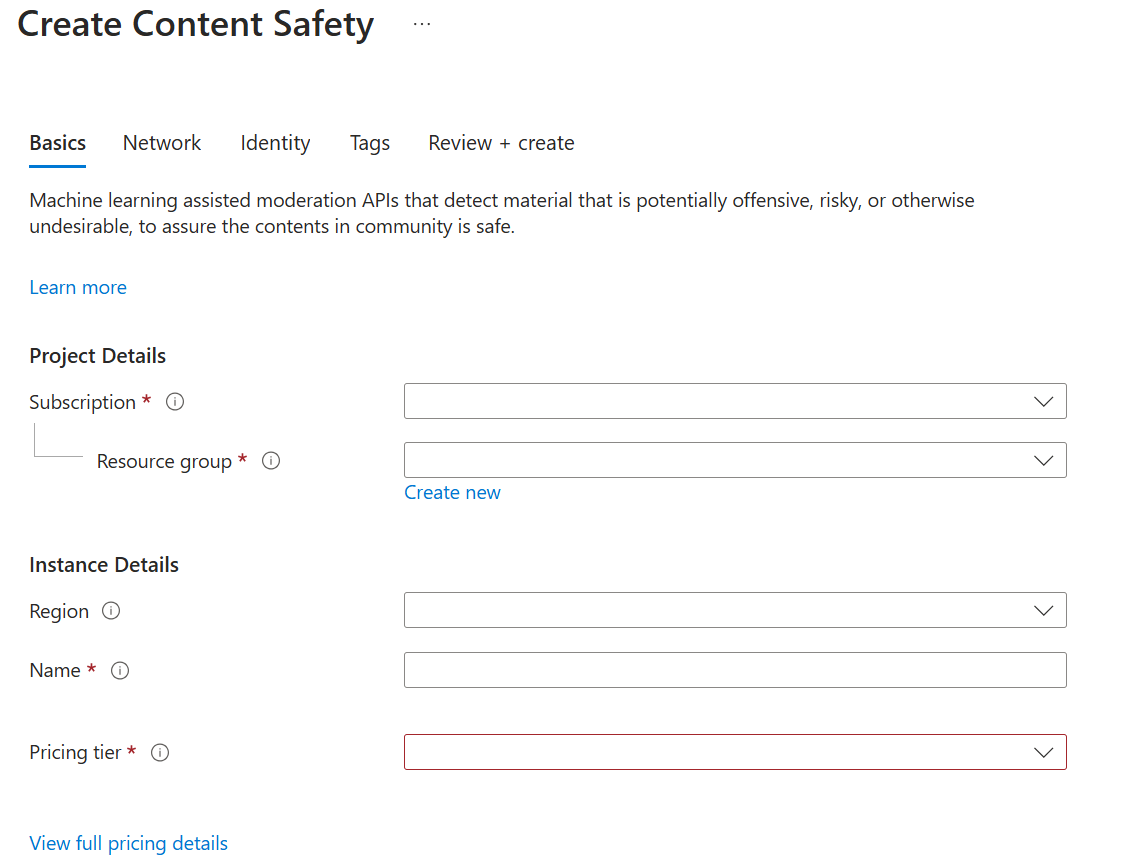
- Go to portal.azure.com.
- Select Create a resource.
- In the search bar, enter Azure AI Content Safety.
- In the results, select Azure AI Content Safety.
- Select Create.
- Complete the following fields:
- Subscription: Select the Azure subscription you want to use for the workshop.
- Resource group: Select or create a resource group.
- Region: To complete every exercise in this module with one standalone Content Safety resource, use East US. If you prefer a different region, verify that it currently supports text moderation, image moderation, Prompt Shields, protected material text detection, and groundedness detection in Region availability.
- Name: Provide a name for your resource.
- Pricing tier: Use Standard S0 for the full workshop. The Free F0 tier is useful for basic moderation experiments, but current service limits don't include groundedness detection throughput for F0.
- Select Review + create.
- Select Create.
Get the resource key and endpoint
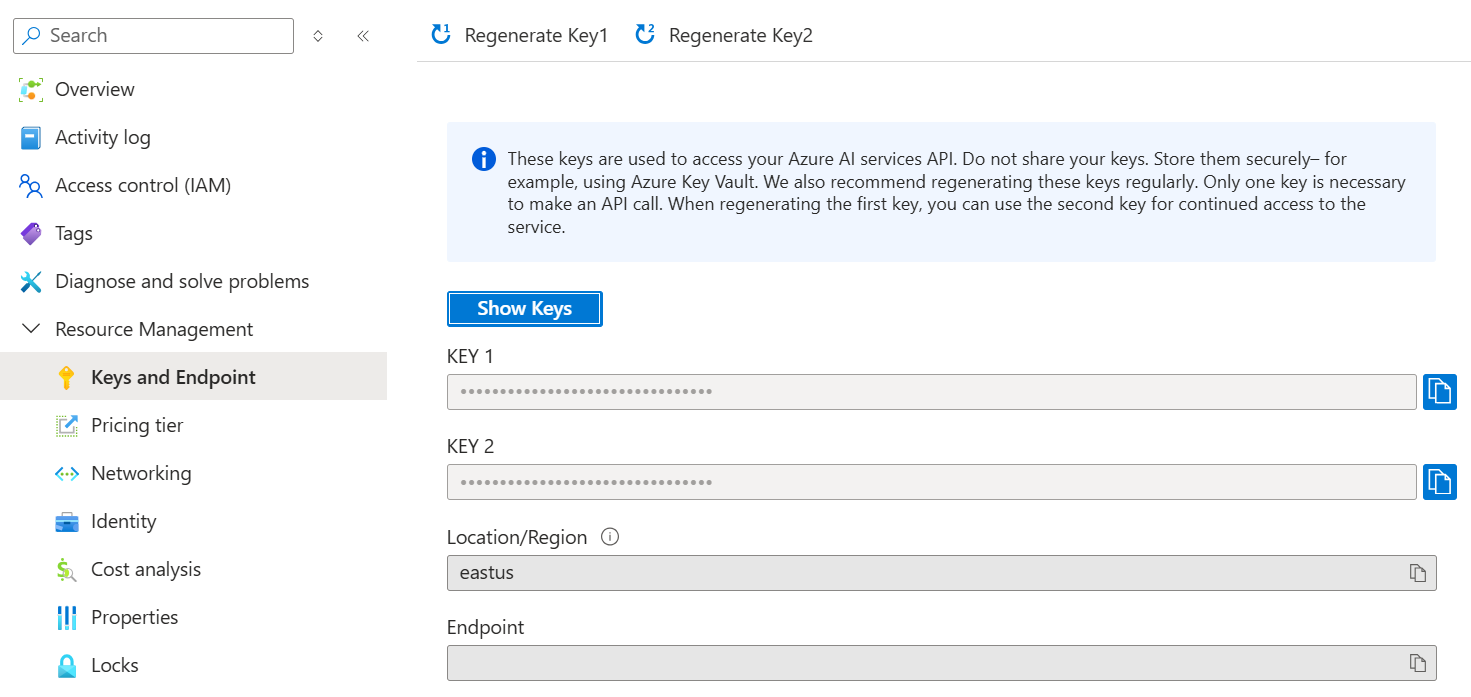
- After the resource is created, select Go to resource.
- In the Content Safety resource, under Resource Management, select API Keys and Endpoints. Depending on the portal experience, the label might appear as Subscription Key and Endpoint or Keys and Endpoint.
- Copy the values for KEY 1 and Endpoint and store them in a text editor; you'll need them in the next section.
Access workshop code
A development container environment is available with all dependencies required to complete every exercise in this project. You can run the development container in GitHub Codespaces or locally using Visual Studio Code.
GitHub Codespaces runs a development container managed by GitHub with Visual Studio Code for the Web as the browser-based user interface. For the most straightforward development environment, use GitHub Codespaces so that you have the correct developer tools and dependencies preinstalled to complete this training module.
Important
GitHub personal accounts include a monthly Codespaces quota, but the included compute and storage can change over time. Review the current GitHub Codespaces billing and included usage before you start the lab.
Create a new GitHub Codespace using the
https://codespaces.new/Azure-Samples/RAI-workshops?quickstart=1template.
On the Create codespace page, review the codespace configuration settings, then select Create new codespace.
Wait for the codespace to start. This startup process can take a few minutes.
The remaining exercises in this project take place in the context of this development container.
Assign environment variables
Once you have the development container open, you can create environment variables for your Content Safety resource key and endpoint.
- At the root of the
RAI-workshopsrepository, create or update the.envfile. - Assign the KEY 1 value that you copied to
CONTENT_SAFETY_KEY. - Assign the Endpoint value that you copied to
CONTENT_SAFETY_ENDPOINT. Use the full endpoint for your resource, such ashttps://<resource-name>.cognitiveservices.azure.com. - Save the
.envfile.
Note
The sample repo includes a placeholder .env file, but the placeholder text currently says Azure OpenAI for both values. Keep the variable names as CONTENT_SAFETY_KEY and CONTENT_SAFETY_ENDPOINT, and replace the placeholder values with your Azure AI Content Safety key and endpoint before you run the notebook.
Important
The .env file contains a secret after you add your key. Don't commit or share the populated file. If you use a fork or copy of the sample repository, restore the placeholder values before pushing changes.
Note
This workshop uses API keys to keep the steps short. For real applications, Microsoft recommends Microsoft Entra ID and managed identities instead of long-lived keys. Use DefaultAzureCredential for local development after you sign in with Azure CLI, Visual Studio Code, or another supported developer tool. In Azure-hosted production apps, prefer a deterministic credential such as ManagedIdentityCredential, assign the identity the least-privilege role it needs, and avoid storing service keys in application configuration. For more information, see Authenticate requests to Azure AI services and Authenticate Python apps to Azure services using the Azure Identity library.
Open the Jupyter notebook
- In the repository files, navigate to the Azure AI Content Safety Workshop folder and open the azure-ai-content-safety-module.ipynb notebook.
- If the kernel isn't selected, select Select Kernel at the upper-right of the notebook.
- Select the available Python 3 kernel for the development container, such as Python 3.11 or newer.
Note
The workshop notebook uses the standalone Azure AI Content Safety service and keeps groundedness reasoning set to false, so you only need the Content Safety resource to complete the exercises as written. An Azure OpenAI resource is only required if you separately enable the groundedness reasoning feature described in the official quickstart.
Note
The current Azure-Samples/RAI-workshops notebook still uses an older preview API version (2024-02-15-preview) for Groundedness detection and Prompt Shields. Azure AI Content Safety API versions are retired as newer versions become available, so update those notebook cells before you run them. For Groundedness detection, use 2024-09-15-preview; the non-reasoning request body used in this workshop remains compatible. For Prompt Shields, use 2024-09-01 and include both required request fields: a userPrompt string and a documents string array. The current Prompt Shields response returns userPromptAnalysis and documentsAnalysis, so update the old single-field notebook cells instead of changing only the URL.