Exercise - Integrate a Notebook within Azure Synapse Pipelines
In this unit, you create an Azure Synapse Spark notebook to analyze and transform data loaded by a mapping data flow, and store the data in a data lake. You create a parameter cell that accepts a string parameter that defines the folder name for the data the notebook writes to the data lake.
You then add this notebook to a Synapse pipeline, and pass the unique pipeline run ID to the notebook parameter so that you can later correlate the pipeline run with the data saved by the notebook activity.
Finally, you use the Monitor hub in Synapse Studio to monitor the pipeline run, obtain the run ID, and then locate the corresponding files stored in the data lake.
About Apache Spark and notebooks
Apache Spark is a parallel processing framework that supports in-memory processing to boost the performance of big-data analytic applications. Apache Spark in Azure Synapse Analytics is one of Microsoft's implementations of Apache Spark in the cloud.
An Apache Spark notebook in Synapse Studio is a web interface for you to create files that contain live code, visualizations, and narrative text. Notebooks are a good place to validate ideas and use quick experiments to get insights from your data. Notebooks are also widely used in data preparation, data visualization, machine learning, and other Big Data scenarios.
Create a Synapse Spark notebook
Suppose you created a mapping data flow in Synapse Analytics to process, join, and import user profile data. Now, you want to find the top five products for each user, based on which ones are both preferred and top choice, and have the most purchases in the past 12 months. Then, you want to calculate the top five products overall.
In this exercise, you create a Synapse Spark notebook to make these calculations.
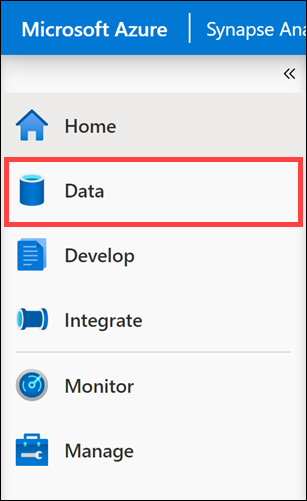
Open Synapse Analytics Studio (https://web.azuresynapse.net/), and go to the Data hub.
Select the Linked tab (1), and expand the primary data lake storage account (2) underneath the Azure Data Lake Storage Gen2. Select the wwi-02 container (3), and open the top-products folder (4). Right-click on any Parquet file (5), select the New notebook menu item (6), and then select Load to DataFrame (7). If you don't see the folder, select
Refresh.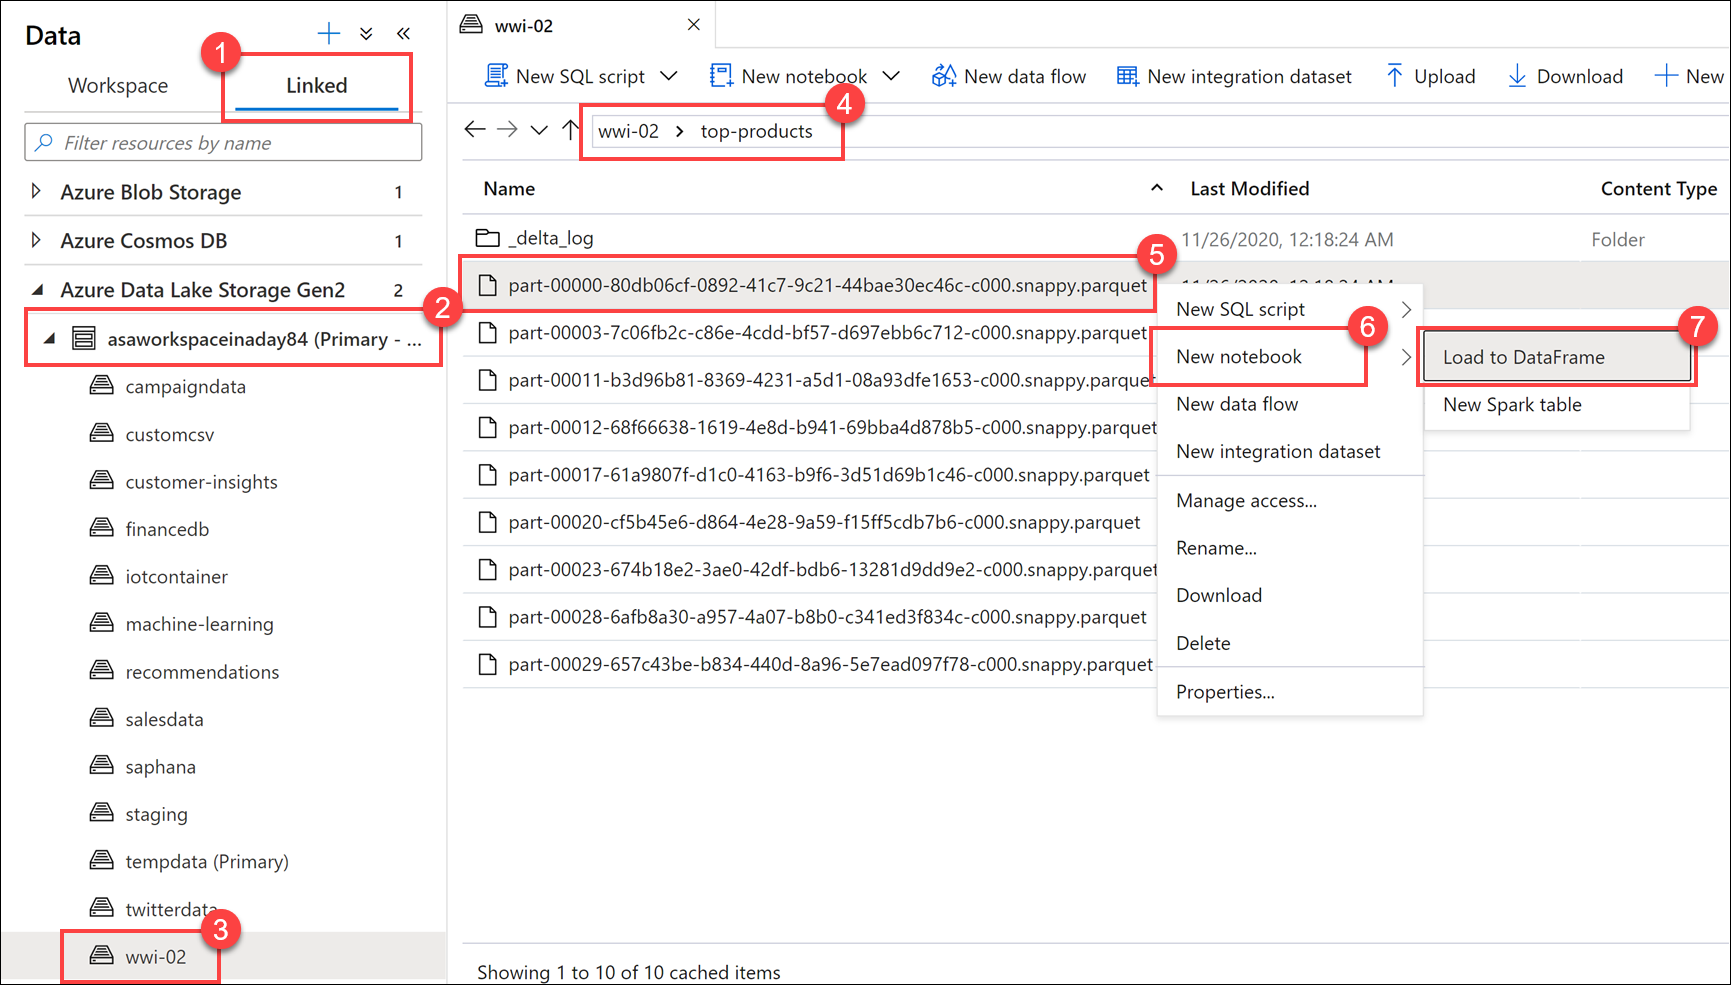
Make sure the notebook is attached to your Spark pool.

Replace the Parquet file name with
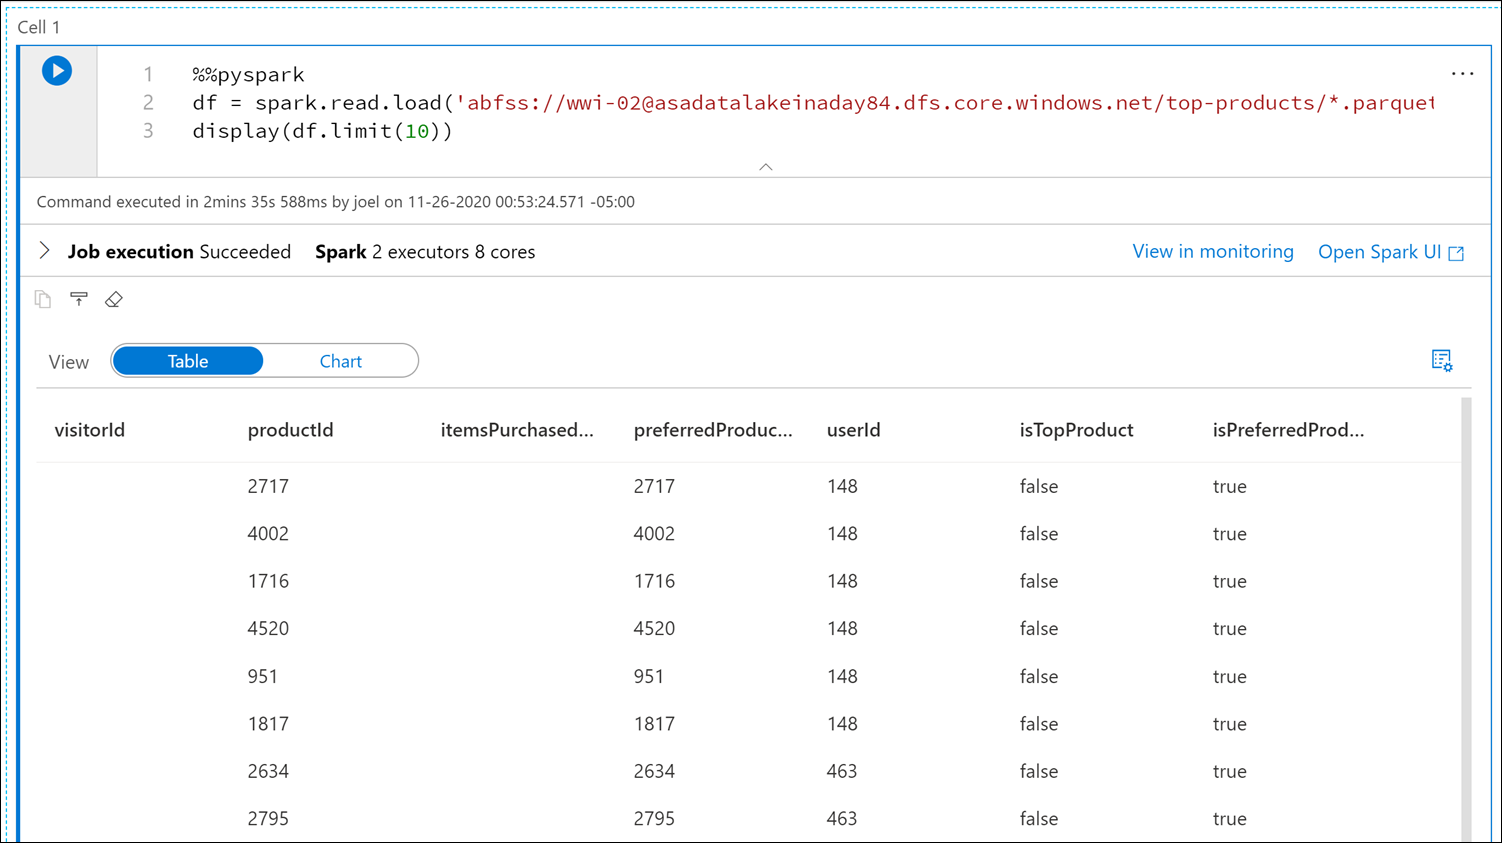
*.parquet(1) to select all Parquet files in thetop-productsfolder. For example, the path should be similar to:abfss://wwi-02@YOUR_DATALAKE_NAME.dfs.core.windows.net/top-products/*.parquet.
Select Run all on the notebook toolbar to execute the notebook.
Note
The first time you run a notebook in a Spark pool, Synapse creates a new session. This can take approximately 3 - 5 minutes.
Note
To run just the cell, either hover over the cell and select the Run cell icon to the left of the cell, or select the cell, then enter Ctrl+Enter.
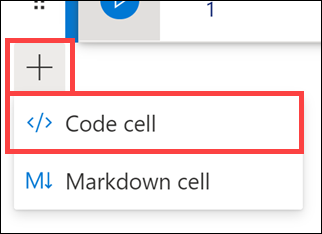
Create a new cell underneath by selecting the + button, and selecting the Code cell item. The + button is located beneath the notebook cell on the left. Alternatively, you can also expand the + Cell menu in the Notebook toolbar, and select the Code cell item.
Run the following command in the new cell to populate a new dataframe called
topPurchases, create a new temporary view namedtop_purchases, and show the first 100 rows:topPurchases = df.select( "UserId", "ProductId", "ItemsPurchasedLast12Months", "IsTopProduct", "IsPreferredProduct") # Populate a temporary view so we can query from SQL topPurchases.createOrReplaceTempView("top_purchases") topPurchases.show(100)The output should look similar to the following:
+------+---------+--------------------------+------------+------------------+
|UserId|ProductId|ItemsPurchasedLast12Months|IsTopProduct|IsPreferredProduct|
+------+---------+--------------------------+------------+------------------+
|   148|     2717|                      null|       false|              true|
|   148|     4002|                      null|       false|              true|
|   148|     1716|                      null|       false|              true|
|   148|     4520|                      null|       false|              true|
|   148|      951|                      null|       false|              true|
|   148|     1817|                      null|       false|              true|
|   463|     2634|                      null|       false|              true|
|   463|     2795|                      null|       false|              true|
|   471|     1946|                      null|       false|              true|
|   471|     4431|                      null|       false|              true|
|   471|      566|                      null|       false|              true|
|   471|     2179|                      null|       false|              true|
|   471|     3758|                      null|       false|              true|
|   471|     2434|                      null|       false|              true|
|   471|     1793|                      null|       false|              true|
|   471|     1620|                      null|       false|              true|
|   471|     1572|                      null|       false|              true|
|   833|      957|                      null|       false|              true|
|   833|     3140|                      null|       false|              true|
|   833|     1087|                      null|       false|              true|
Run the following command in a new cell to create a new temporary view by using SQL:
%%sql

CREATE OR REPLACE TEMPORARY VIEW top_5_products
AS
    select UserId, ProductId, ItemsPurchasedLast12Months
    from (select *,
                row_number() over (partition by UserId order by ItemsPurchasedLast12Months desc) as seqnum
        from top_purchases
        ) a
    where seqnum <= 5 and IsTopProduct == true and IsPreferredProduct = true
    order by a.UserId
Note
There is no output for this query.
The query uses the
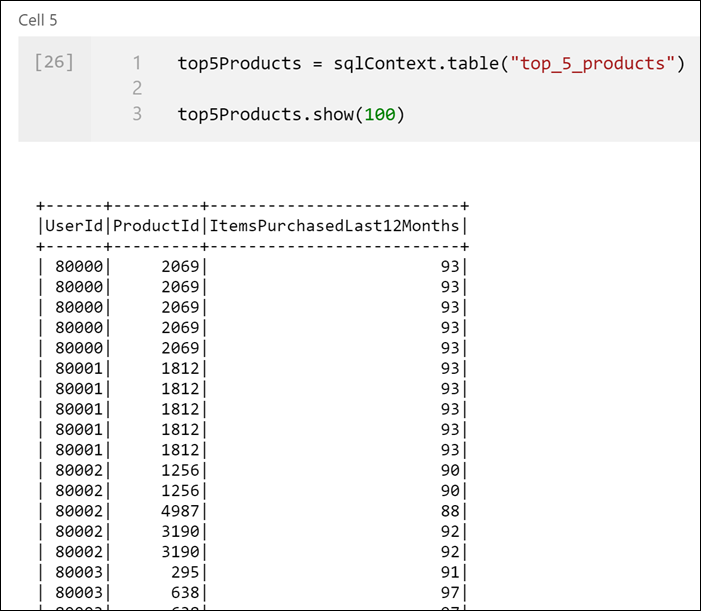
top_purchasestemporary view as a source and applies arow_number() overmethod to apply a row number for the records for each user whereItemsPurchasedLast12Monthsis greatest. Thewhereclause filters the results so we only retrieve up to five products where bothIsTopProductandIsPreferredProductare set to true. This gives us the top five most purchased products for each user where those products are also identified as their favorite products, according to their user profile stored in Azure Cosmos DB.Run the following command in a new cell to create and display a new DataFrame that stores the results of the
top_5_productstemporary view you created in the previous cell:top5Products = sqlContext.table("top_5_products") top5Products.show(100)You should see an output similar to the following, which displays the top five preferred products per user:
Calculate the top five products overall, based on those that are both preferred by customers and purchased the most. To do this, run the following command in a new cell:
top5ProductsOverall = (top5Products.select("ProductId","ItemsPurchasedLast12Months")
    .groupBy("ProductId")
    .agg( sum("ItemsPurchasedLast12Months").alias("Total") )
    .orderBy( col("Total").desc() )
    .limit(5))

top5ProductsOverall.show()
In this cell, we grouped the top five preferred products by product ID, summed up the total items purchased in the last 12 months, sorted that value in descending order, and returned the top five results. Your output should be similar to the following:
+---------+-----+
|ProductId|Total|
+---------+-----+
|     2107| 4538|
|     4833| 4533|
|      347| 4523|
|     3459| 4233|
|     4246| 4155|
+---------+-----+
Create a parameter cell
Azure Synapse pipelines look for the parameters cell, and treat this cell as defaults for the parameters passed in at execution time. The execution engine will add a new cell beneath the parameters cell with input parameters to overwrite the default values. When a parameters cell isn't designated, the injected cell will be inserted at the top of the notebook.
We are going to execute this notebook from a pipeline. We want to pass in a parameter that sets a
runIdvariable value that will be used to name the Parquet file. Run the following command in a new cell:import uuid # Generate random GUID runId = uuid.uuid4()We are using the
uuidlibrary that comes with Spark to generate a random GUID. We want to override therunIdvariable with a parameter passed in by the pipeline. To do this, we need to toggle this as a parameter cell.Select the actions ellipses (...) on the top-right corner of the cell (1), and then select Toggle parameter cell (2).
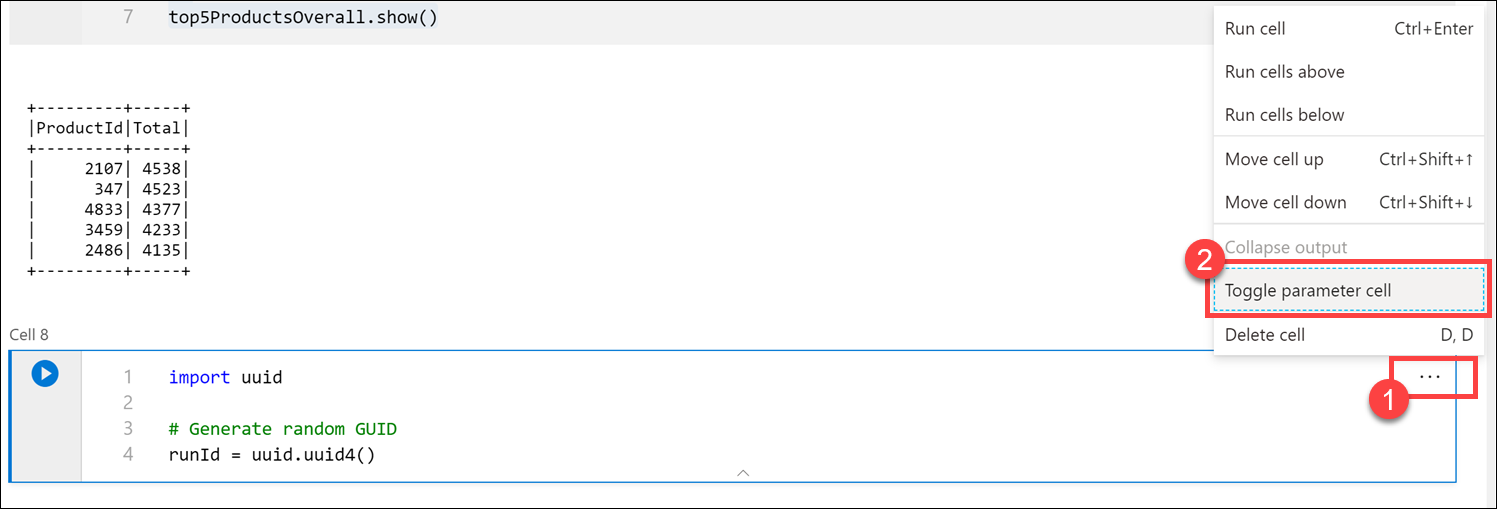
After toggling this option, you will see the Parameters tag on the cell.

Paste the following code in a new cell to use the
runIdvariable as the Parquet filename in the/top5-products/path in the primary data lake account. ReplaceYOUR_DATALAKE_NAMEin the path with the name of your primary data lake account. To find this, scroll up to Cell 1 at the top of the page (1). Copy the data lake storage account from the path (2). Paste this value as a replacement forYOUR_DATALAKE_NAMEin the path (3) inside the new cell, then run the command in the cell.%%pyspark top5ProductsOverall.write.parquet('abfss://wwi-02@YOUR_DATALAKE_NAME.dfs.core.windows.net/top5-products/' + str(runId) + '.parquet')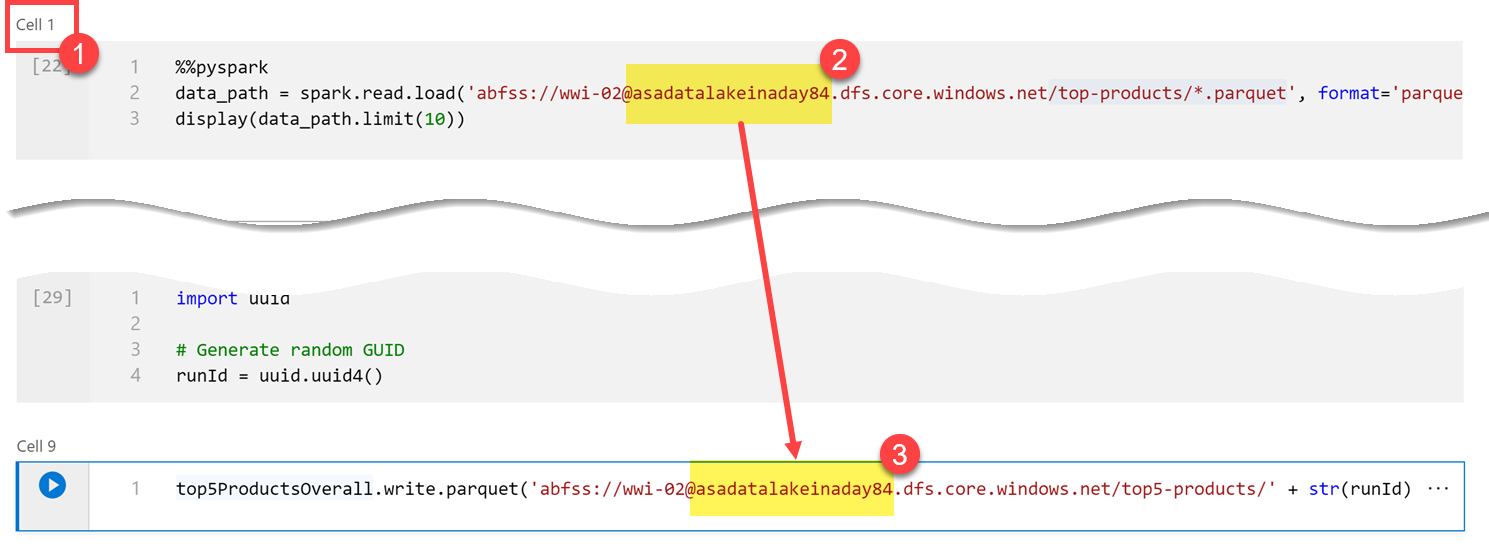
Verify that the file was written to the data lake. Go to the Data hub, and select the Linked tab (1). Expand the primary data lake storage account, and then select the wwi-02 container (2). Go to the top5-products folder (3). You should see a folder for the Parquet file in the directory with a GUID as the filename (4).
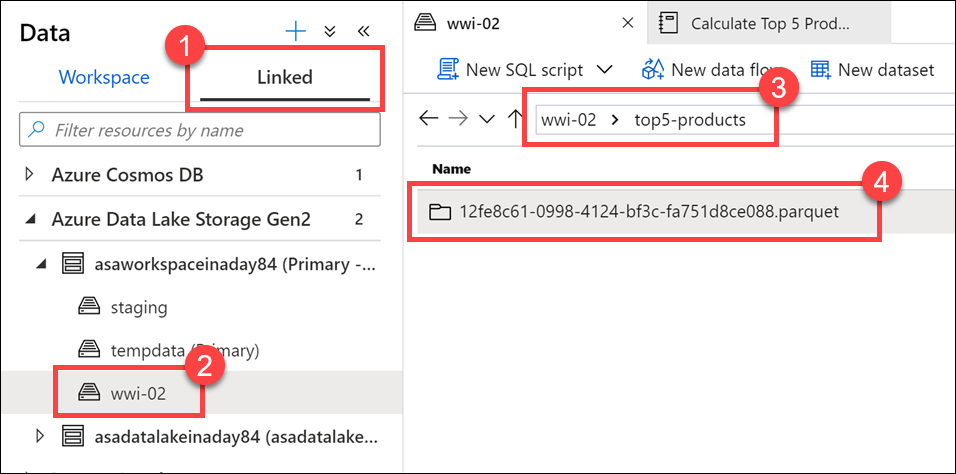
The Parquet write method on the dataframe in the Notebook cell created this directory because it did not previously exist.
Add the Notebook to a Synapse pipeline
Referring back to the Mapping Data Flow we described at the beginning of the exercise, suppose you want to execute this notebook after the Data Flow runs as part of your orchestration process. To do this, you add this notebook to a pipeline as a new Notebook activity.
Return to the notebook. Select Properties (1) at the top-right corner of the notebook, and then enter
Calculate Top 5 Productsfor the Name (2).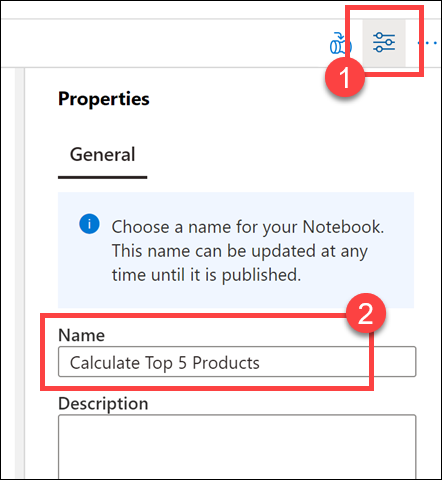
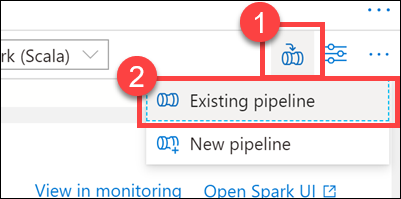
Select Add to pipeline (1) at the top-right corner of the notebook, and then select Existing pipeline (2).
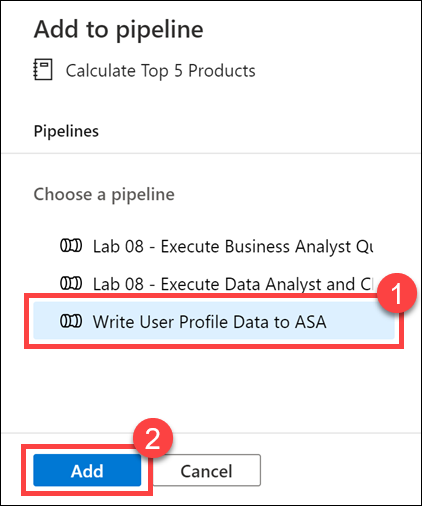
Select the Write User Profile Data to ASA pipeline (1), and then select Add *(2).
Synapse Studio adds the Notebook activity to the pipeline. Rearrange the Notebook activity so it sits to the right of the Data flow activity. Select the Data flow activity, and drag a Success activity pipeline connection green box to the Notebook activity.
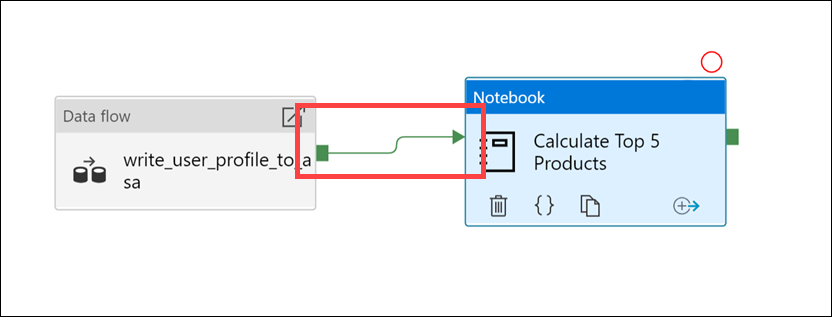
The Success activity arrow instructs the pipeline to run the Notebook activity after the Data flow activity successfully runs.
Select the Notebook activity (1), then select the Settings tab (2), expand Base parameters (3), and then select + New (4). Enter
runIdin the Name field (5). Select String for the Type (6). For the Value, select Add dynamic content (7).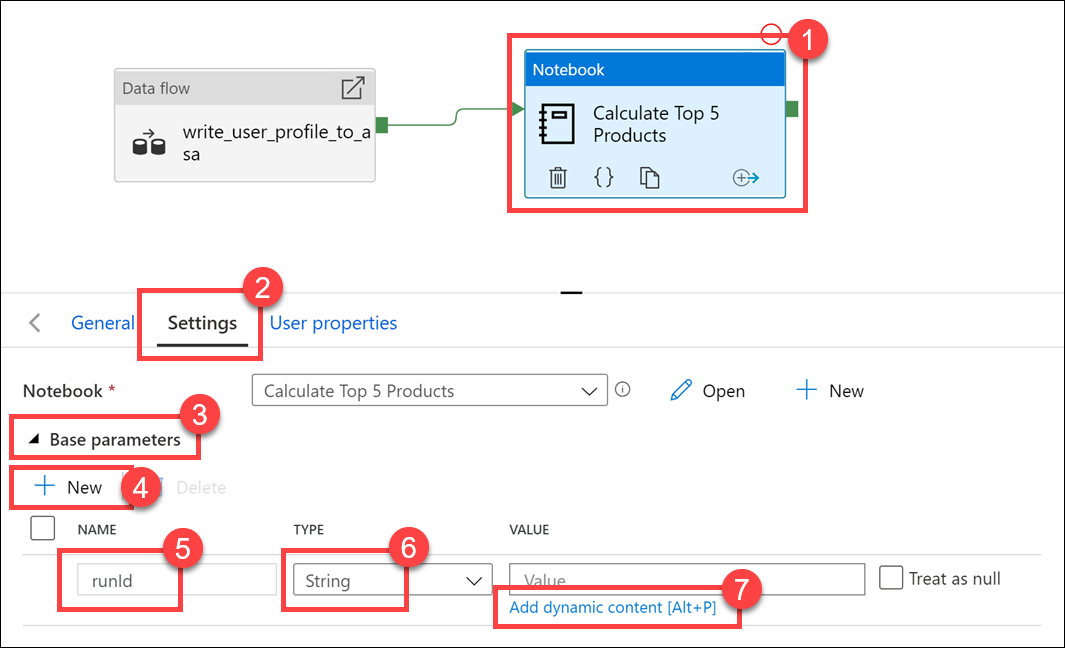
Select Pipeline run ID under System variables (1). This adds
@pipeline().RunIdto the dynamic content box (2). Select Finish (3) to close the dialog box.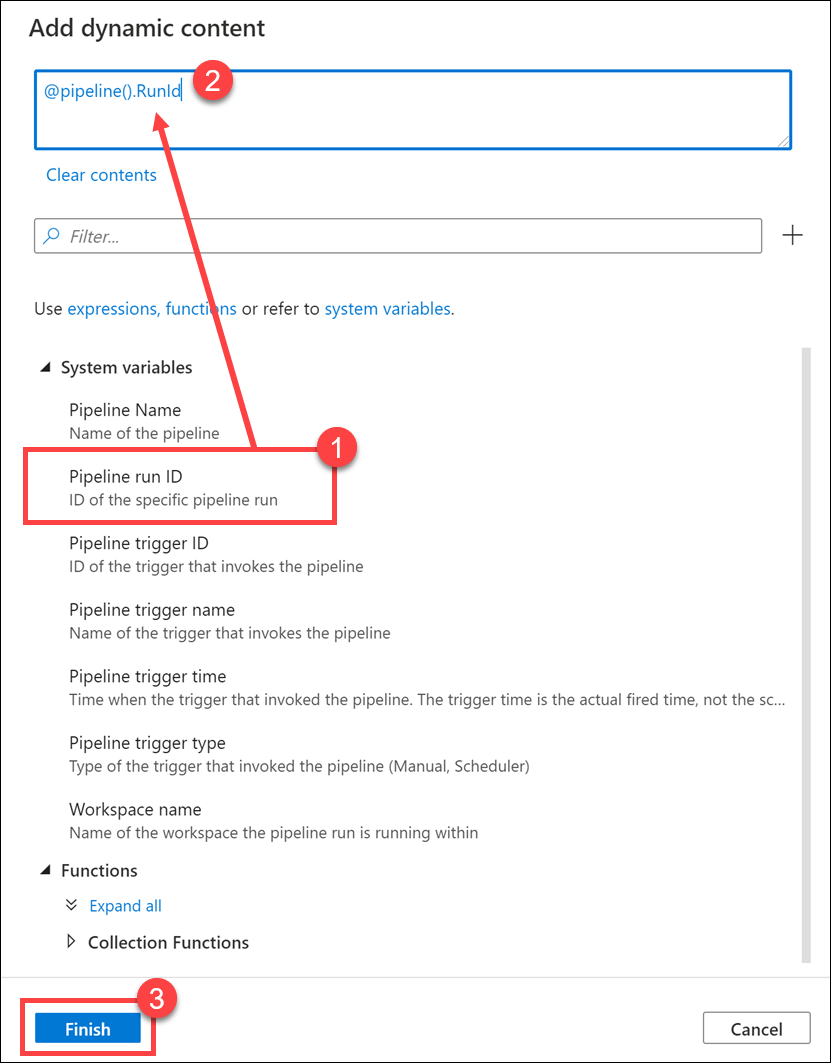
The Pipeline run ID value is a unique GUID assigned to each pipeline run. We will use this value for the name of the Parquet file by passing this value in as the
runIdNotebook parameter. We can then look through the pipeline run history and find the specific Parquet file created for each pipeline run.Select Publish all then Publish to save your changes.

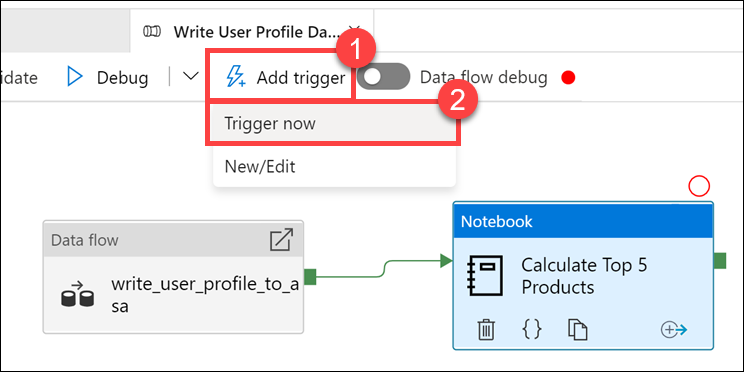
After publishing is complete, select Add trigger (1), then Trigger now (2) to run the updated pipeline.
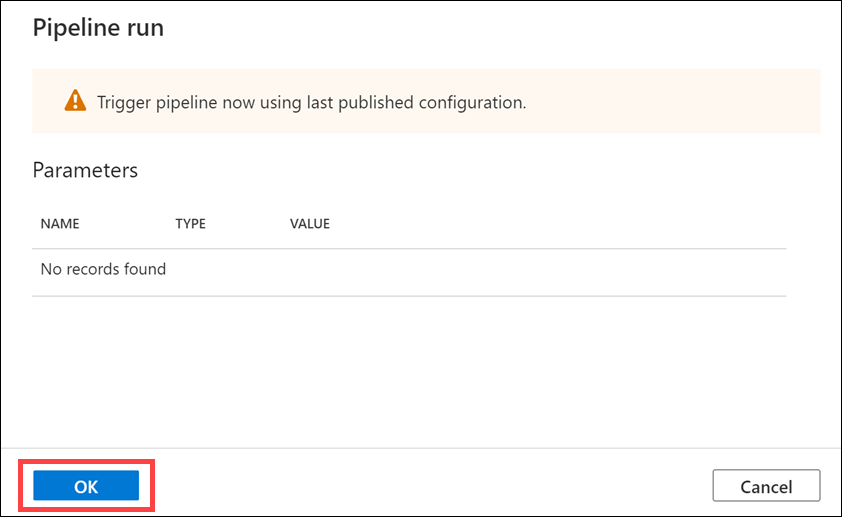
Select OK to run the trigger.
Monitor the pipeline run
The Monitor hub lets you monitor current and historical activities for SQL, Apache Spark, and Pipelines.
Go to the Monitor hub.
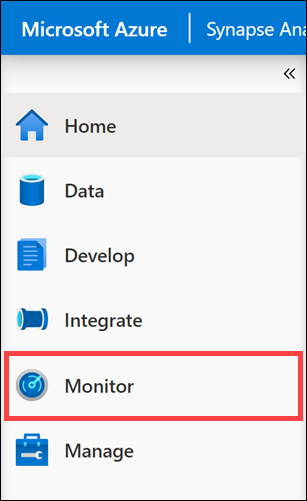
Select Pipeline runs (1), and wait for the pipeline run to successfully complete (2). You may need to refresh (3) the view.

Select the name of the pipeline to view the pipeline's activity runs.
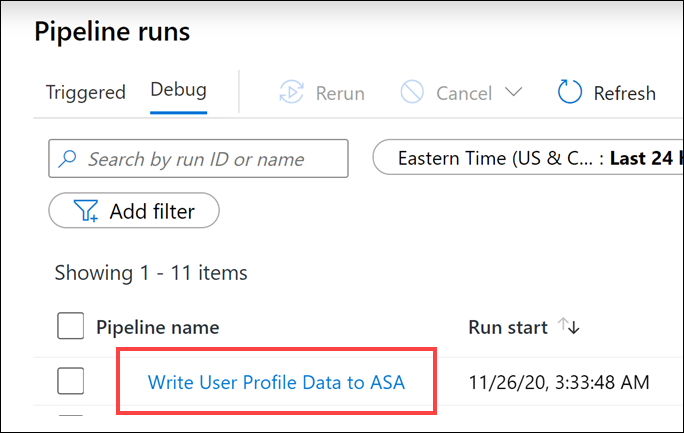
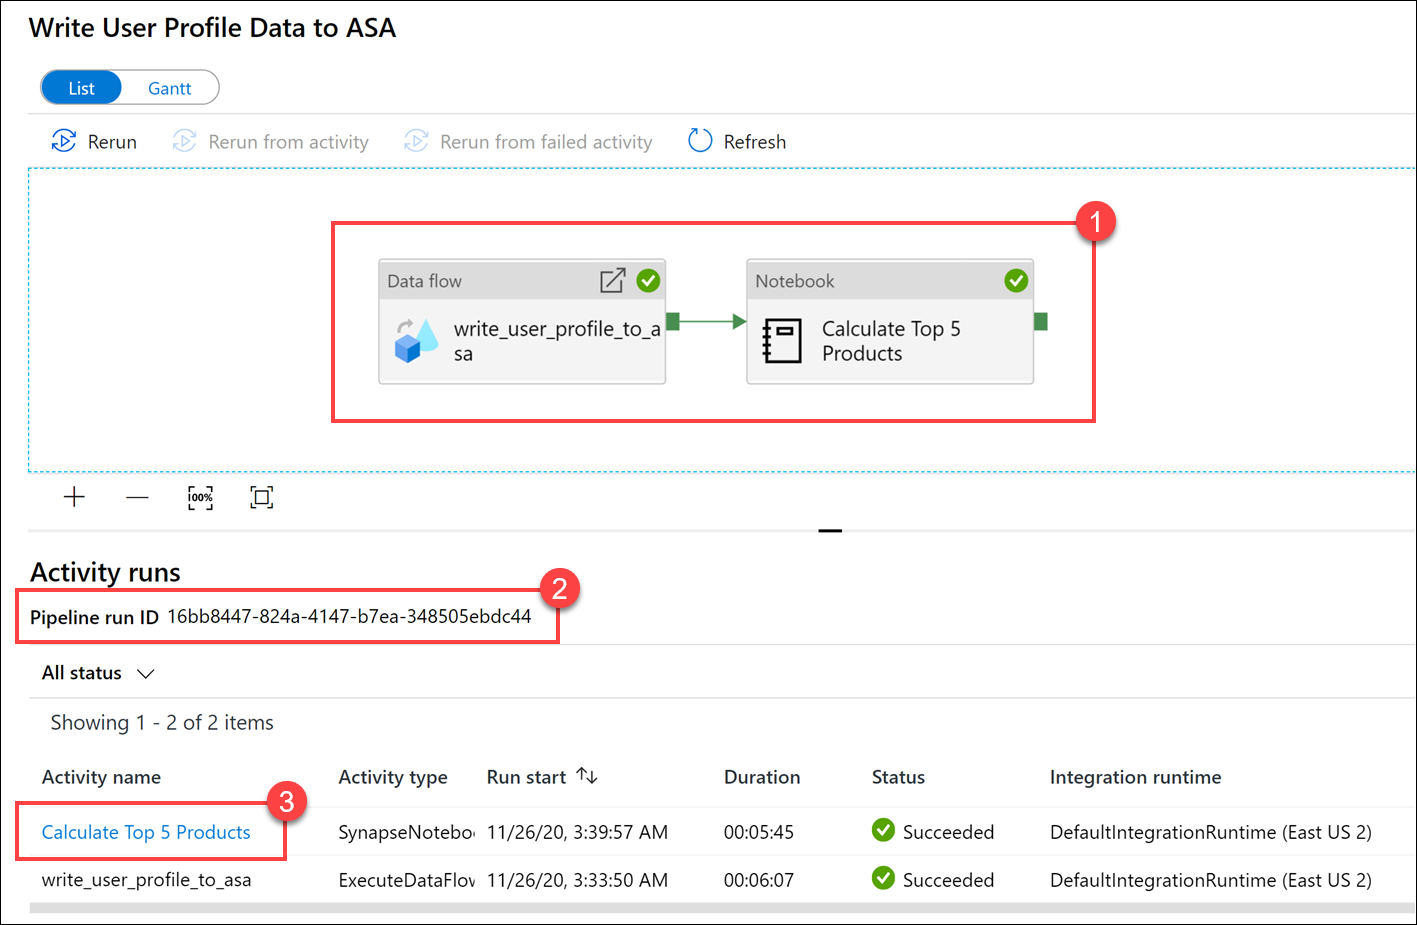
Notice both the Data flow activity and the new Notebook activity (1). Make note of the Pipeline run ID value (2). We will compare this to the Parquet file name generated by the notebook. Select the Calculate Top 5 Products Notebook name to view its details (3).
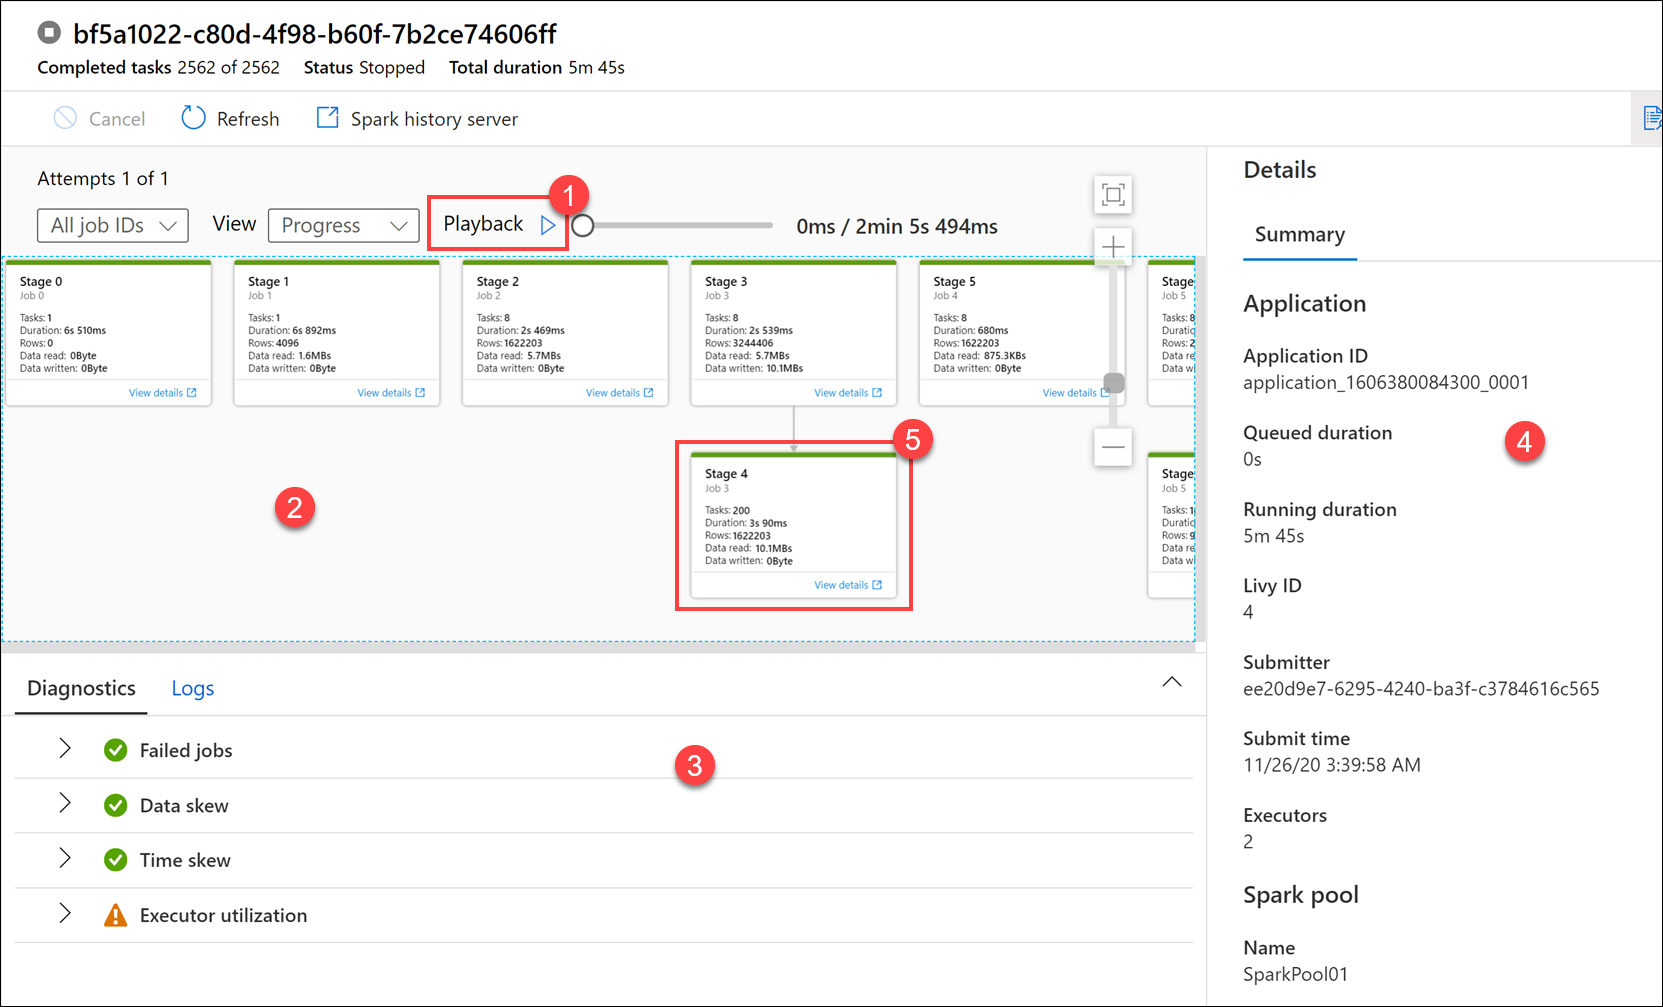
Here, we see the Notebook run details. You can select Playback (1) to watch a playback of the progress through the jobs (2). At the bottom, you can view the Diagnostics and Logs with different filter options (3). To the right, we can view the run details, such as the duration, Livy ID, Spark pool details, and so on. Select the View details link on a job to view its details (5).
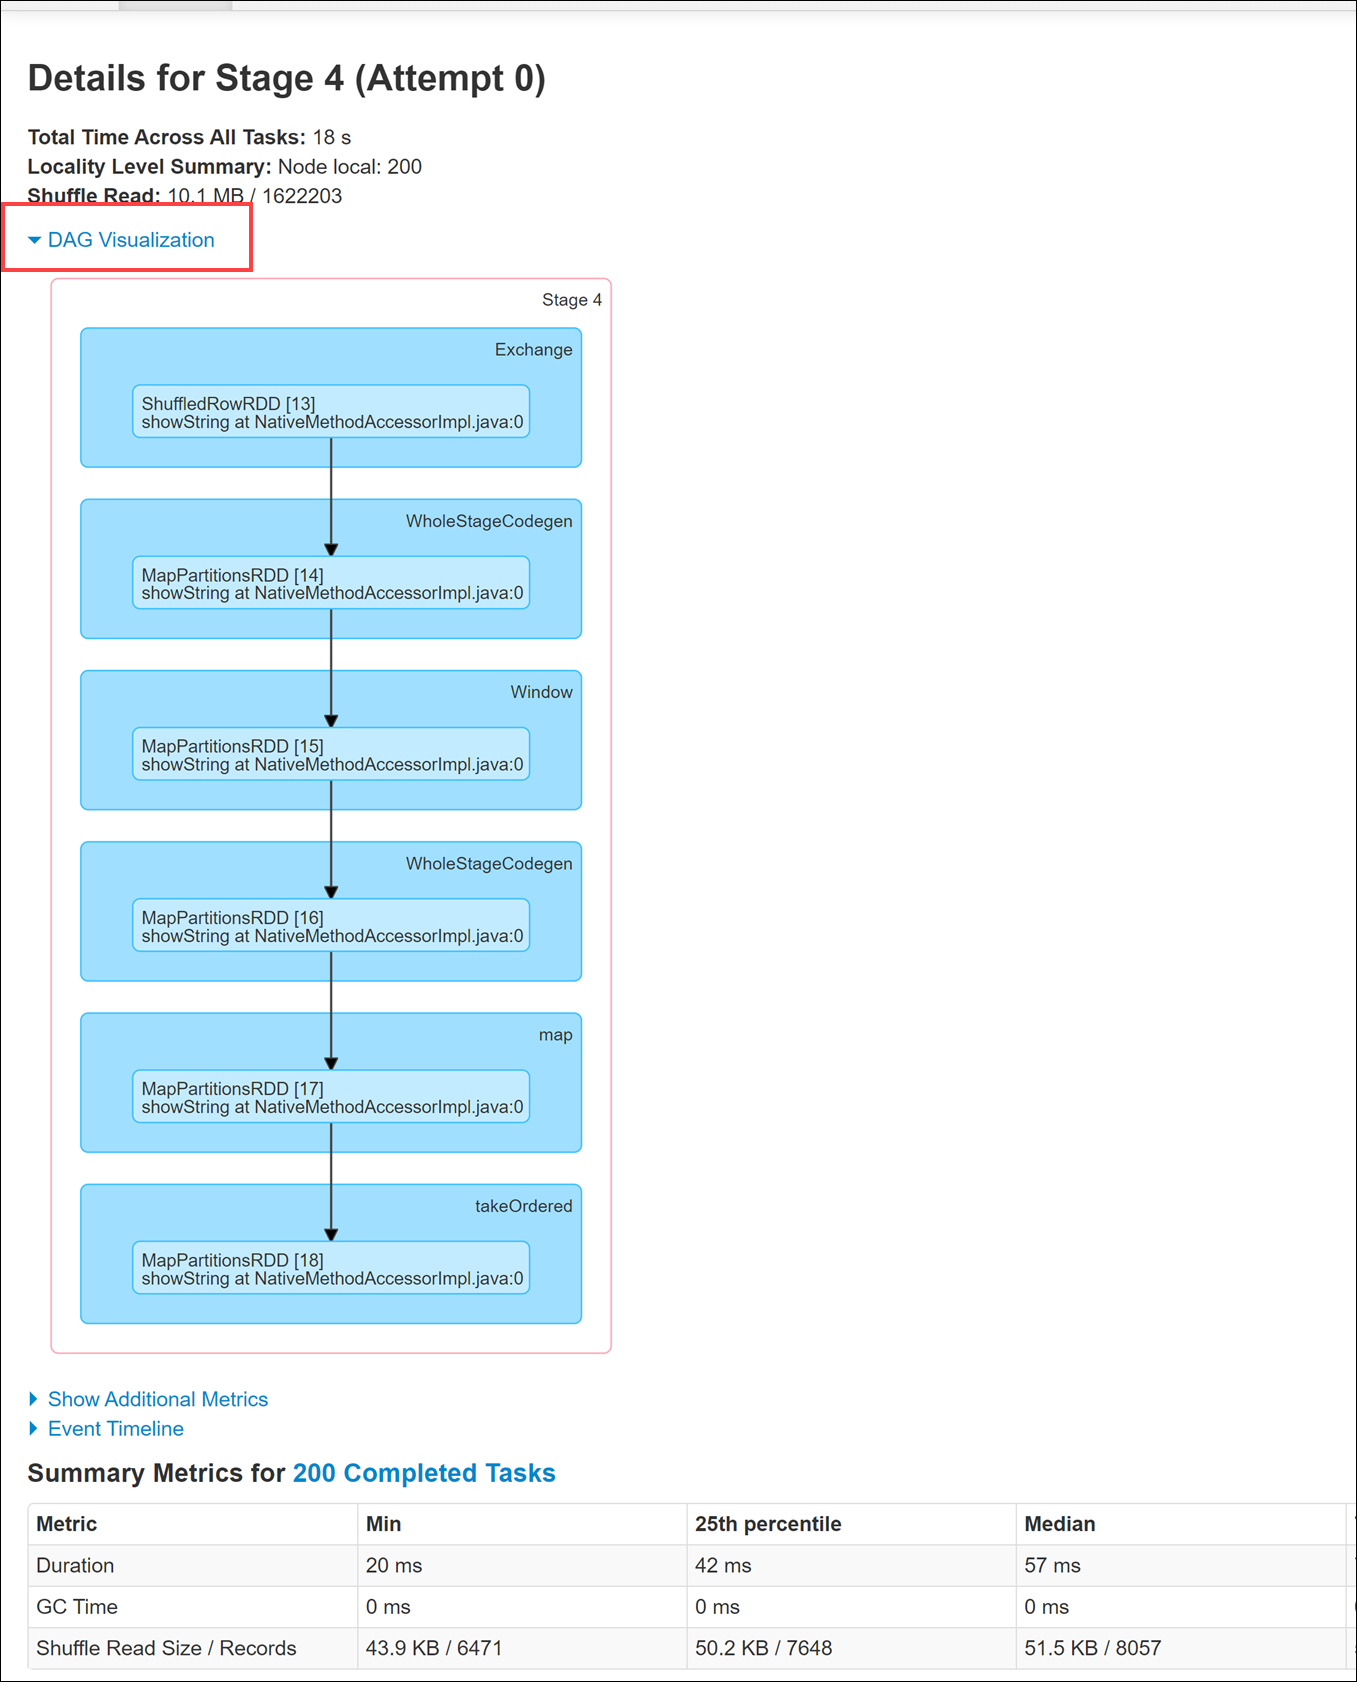
The Spark application UI opens in a new tab where we can see the stage details. Expand the DAG Visualization to view the stage details.
Go back to the Data hub.

Select the Linked tab (1), then select the wwi-02 container (2) on the primary data lake storage account, go to the top5-products folder (3), and verify that a folder exists for the Parquet file whose name matches the Pipeline run ID.
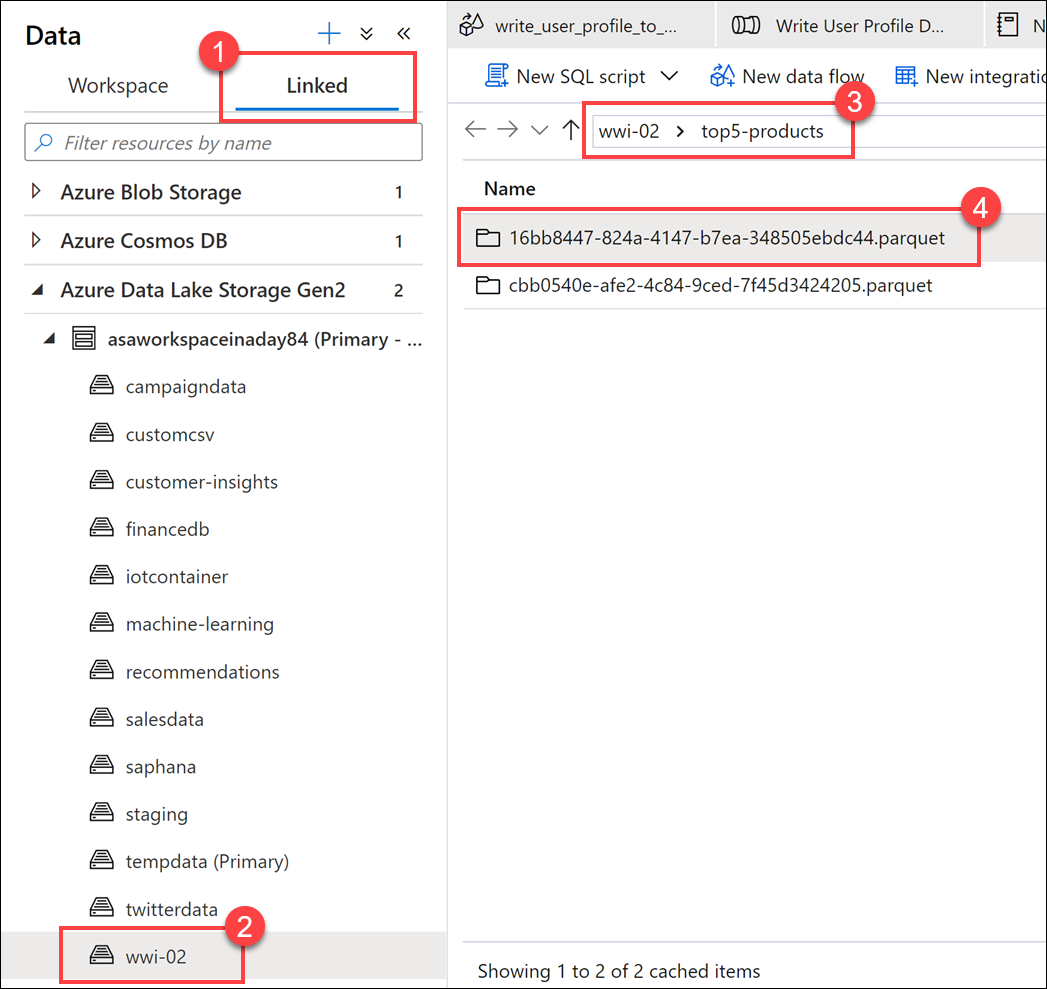
As you can see, we have a file whose name matches the Pipeline run ID we previously noted:
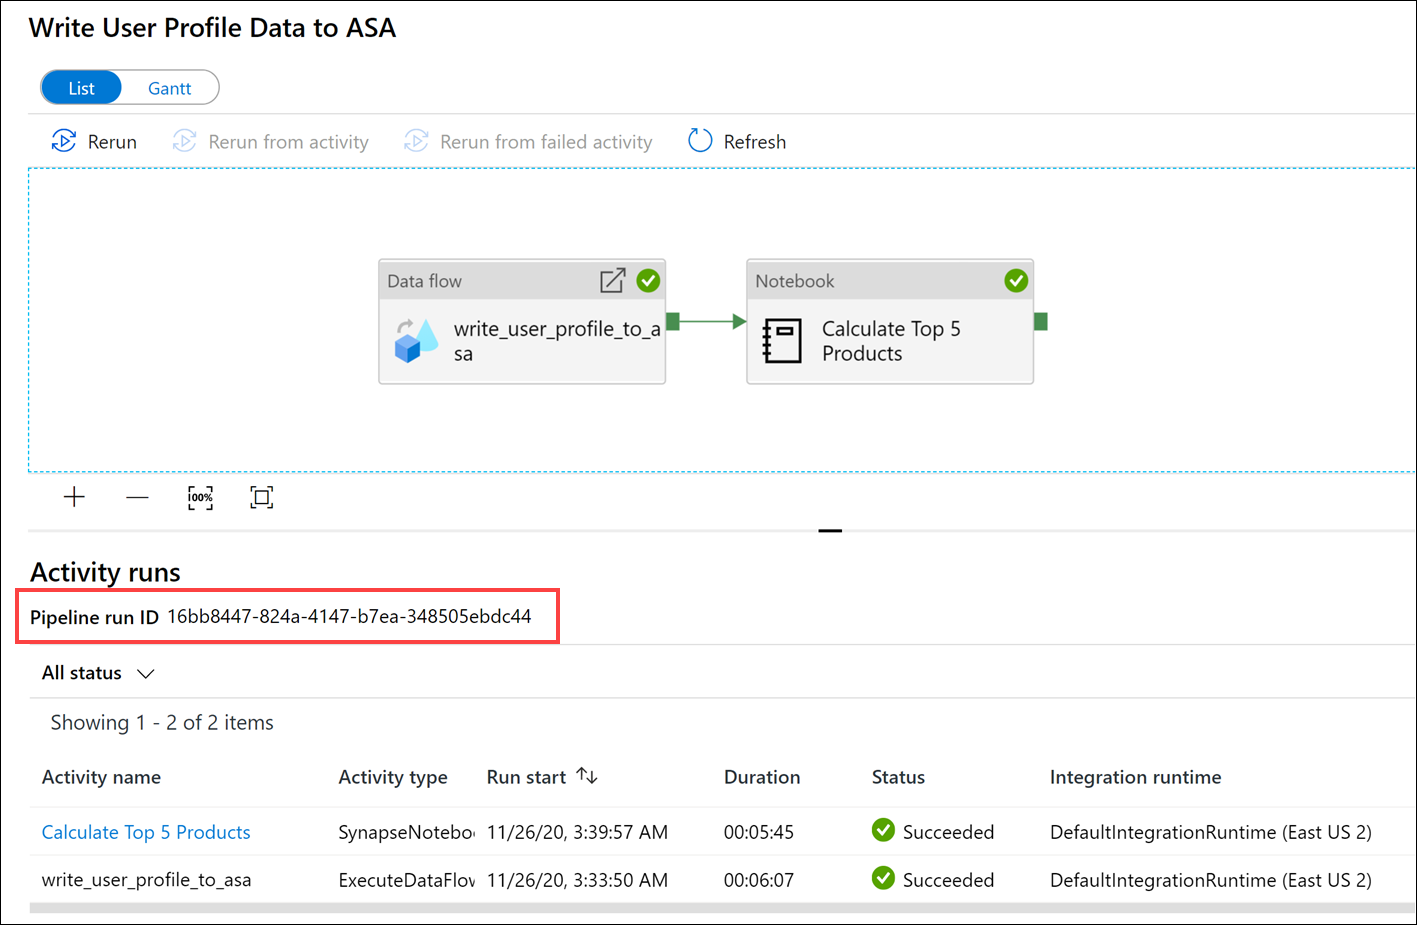
These values match because we passed in the Pipeline run ID to the
runIdparameter on the Notebook activity.