Use the Patch function to create and edit records
The Patch function is used to create and edit records in a data source when using a Form control doesn't meet your needs. Patch is used most often when you need to act on the data without user interaction in a repetitive manner. You also use it if your app design doesn't allow for the use of forms.
Use Patch to create a record
The Patch function can be used to create a new record in your data source. To create a new record, there are three parts to the formula.
Include the name of the data source you want to edit. This could be a tabular data source (such as Microsoft Dataverse or SharePoint) or a collection. For the example, you use CustomerOrders as the name of the data source.
The Defaults function returns a record that contains the default values for the data source. If a column within the data source doesn't have a default value, that property isn't present. By using Defaults with the data source, this notifies Patch to create a new record.
Include the columns that you want to populate in the new record. Here you specify the name of the column to update followed by the value to write to that column. For this example, you update the Region and Country column with a string value.
The example formula is as follows:
Patch(CustomerOrders, Defaults(CustomerOrders), {Region: "Americas", Country: "Canada"})
This formula creates a new record in the CustomerOrders data source and sets the Region to Americas and Country to Canada. Notice that you don't define any primary key information (the ID column) that the data source updates according to its settings.
Use Patch to edit a record
It's also possible to edit a record in the data source. To edit a single record, there are three parts to the formula.
Include the name of the data source you want to edit. This could be a tabular data source (such as Dataverse or SharePoint) or a collection. For the example, you use CustomerOrders as the name of the data source.
The record that you want to edit in the data source. The most common way to specify this record is to use the LookUp function to retrieve the record from the data source. Another option if you use a Gallery and you want to update the current record is to use the ThisItem function to reference the record. For this example, you use a LookUp function.
Include the changes that you want to make. Here you specify the name of the column to update followed by the value to write to that column. For this example, you update the Region and Country column with a string value.
The example formula is as follows:
Patch(CustomerOrders, LookUP(CustomerOrders, ID = 1), {Region: "Asia", Country: "China"})
This formula updates the record with an ID of 1 in the CustomerOrders table by setting the Region column to Asia and the Country column to China. If there are existing values in those fields, it is overwritten.
Update columns with Patch
The primary logic of most Patch functions is updating the proper columns with the correct information. This is the source of most of your troubleshooting of the Patch function. Use the following points to help you work through Patch.
Make sure you update all of the required columns from your data source.
You can update as many or as few of the optional columns as you would like.
Make sure your column names are spelled and capitalized correctly. Column names are case-sensitive.
Make sure you write the correct data type. For example, if your column in the data source is a number type, then you can't write a string value to it, even if that string contains a number.
There are four sources to pass values in your formula to Patch your data source:
You can hardcode a value. An example is if you want to patch the status of the record with "Pending," your Patch formula would look like:
Patch(CustomerOrders, Default(CustomerOrders), {Status: "Pending"})This formula creates a new record and sets the Status column to the string value of "Pending."
You can reference a variable. For example, you can store the string "Under Review" in a variable named varStatus with the following formula.
Set(varStatus, "Under Review")Then your Patch formula would be:
Patch(CustomerOrders, Default(CustomerOrders), {Status: varStatus})This formula creates a new record and sets the Status column to the string value of "Under Review."
You can reference the value from the property of a control. An example would be setting the value from a drop-down menu named Dropdown1 that contained the regions. Your Patch formula would look like:
Patch(CustomerOrders, Default(CustomerOrders), {Status: Dropdown1.Selected.Value})This formula creates a new record and sets the Status column to the value of the selected item in the drop-down menu.
You can use the output of a formula. An example would be setting the value of the Owner column using the FullName from the User() function. Your Patch formula would look like:
Patch(CustomerOrders, Default(CustomerOrders), {Owner: User().FullName})This formula creates a new record and sets the Owner column to the current user's FullName from Microsoft Entra ID.
Patch example
Let's take a look at another example, in this example you're trying to build a solution for signing users into class as they arrive. This type of Power Apps solution is common, and the Patch function helps you quickly achieve results.
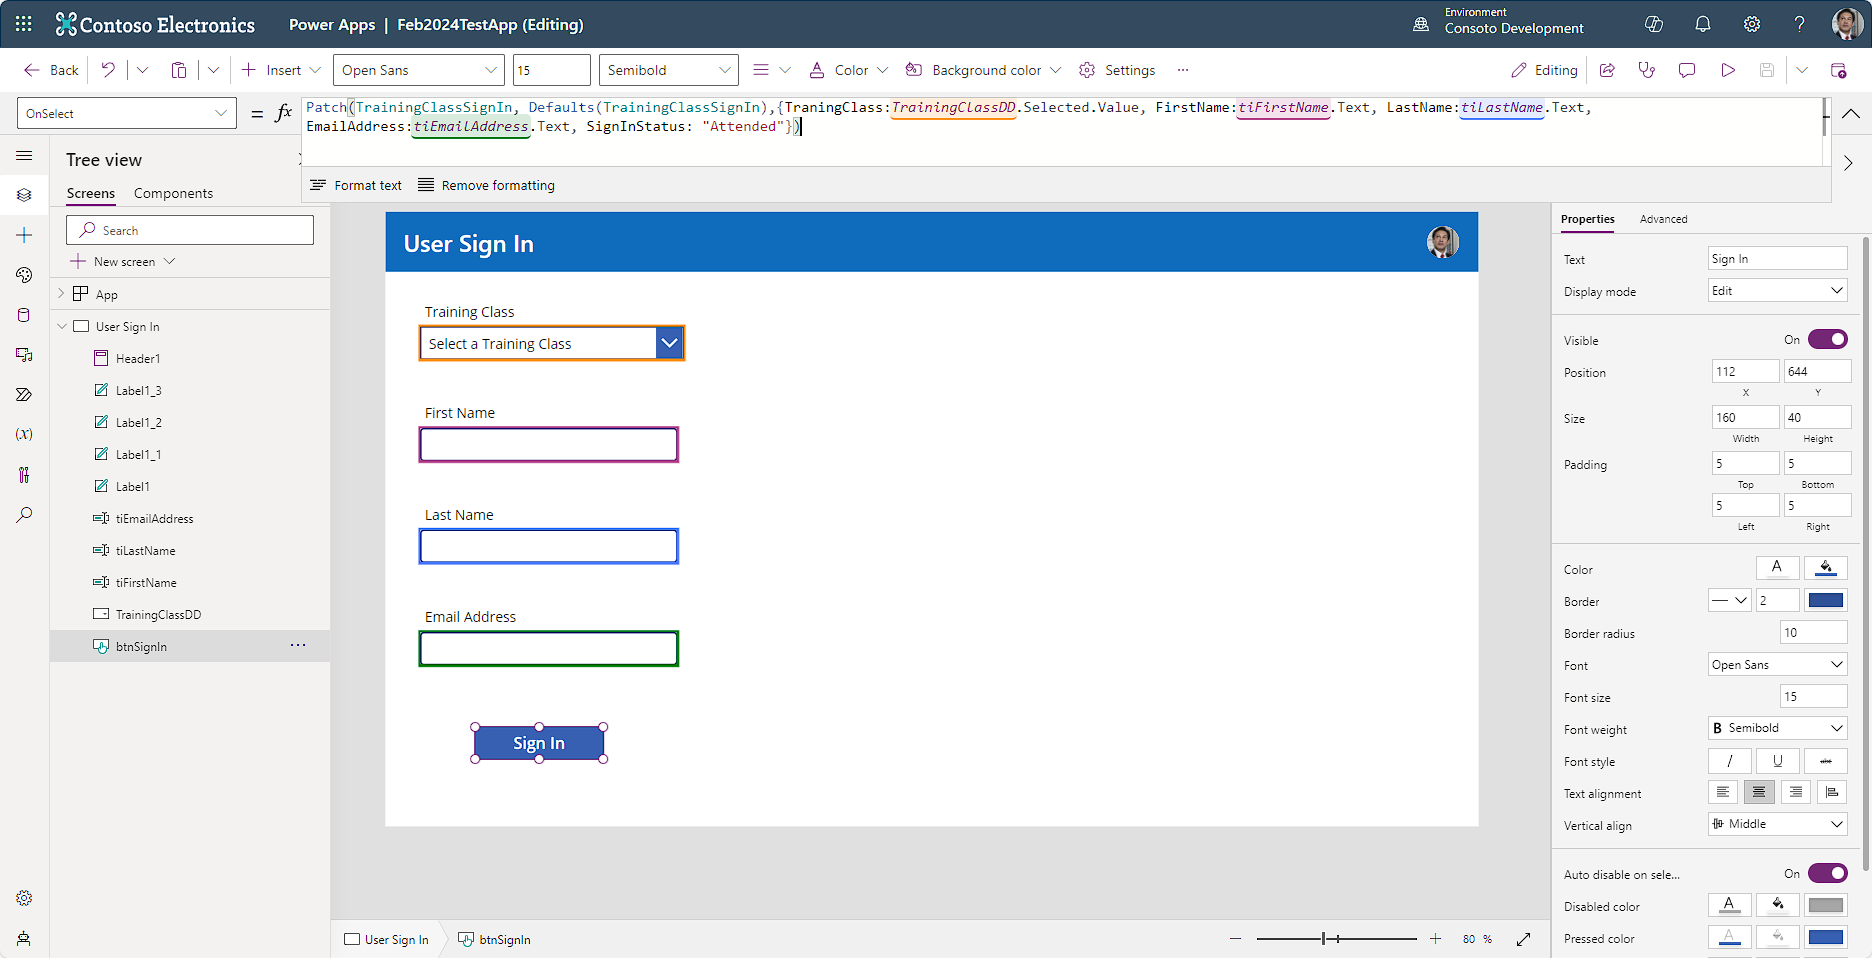
Solution breakdown
Here we have a simple Canvas app connected to our data source (TrainingClassSignIn). The data source has the following columns, Training Class, FirstName, LastName, EmailAddress, SignInStatus. This is the information we want to capture when a user selects the Sign In button. In the formula bar, you see the following code:
Patch(TrainingClassSignIn,Defaults(TrainingClassSignIn),{TrainingClass:TrainingClassDD.Selected.Value, FirstName:FirstNameInput.Text, LastName:LastNameInput.Text, EmailAddress:EmailAddressInput.Text, SignInStatus:"Attended"})
To elaborate, whenever someone selects the Sign In button, Power Apps writes a new record to the TrainingClassSignIn data source. As to what data is written back for the user signing in, you can see it's getting this information from the different controls we added (color coded in the formula). You might also notice that the code sets the SignInStatus each time to "Attended" for each new record submitted.
As you can see, Patch is flexible and powerful. Patch has even more capabilities including the ability to update multiple records and merge records. For more information about these scenarios, see Patch function in Power Apps.