Exercise - Extend forms with more actions
The purpose of this hands-on lab is to introduce the process of extending basic forms with more actions.
Exercises work best when you have sample data to work with. Depending on the environment that you're working with, you might want to install sample data to assist with exercises. Microsoft Power Platform lets you add sample data as needed. If the environment that you're working in doesn't have sample data installed, follow the steps in the Add or remove sample data documentation to install sample data into your environment.
Learning objectives
The goal of these exercises is for you to learn how to:
Create a new workflow for a case table.
Set up a new workflow action for basic forms.
Add a user prompt for a workflow action.
Apply a conditional filter to an action button.
Estimated time to complete this exercise: 15 to 20 minutes
Prerequisites
The prerequisites for completing tasks in this exercise are:
System Administrator access to a Microsoft Dataverse instance with the Microsoft Dynamics 365 Customer Service app installed. If you don't have a Dynamics 365 instance with the app installed, you can provision a Dynamics 365 Customer Service trial by going to Start a Free Trial for Microsoft Dynamics 365.
A provisioned Customer self-service, Community, or Partner website. If you don't have a Power Pages website available, follow the Create a site with Power Pages instructions, but make sure that you select one of the mentioned templates.
Scenario
Your organization has provisioned a Power Pages website to extend the case management capabilities of the Dynamics 365 Customer Service app.
The business wants customers to have the ability to place an active case on hold with the following parameters:
When a website user selects the button, they should receive a confirmation message.
Only active cases that aren't already on hold should display the interface to website users.
To finish the exercise, complete the following tasks:
Create a real-time workflow for the Case table that sets the case status to On Hold.
Add a workflow action button to the existing Edit Case form.
Add a confirmation message.
Add filter criteria to show the button only for active cases that aren't on hold.
Create a workflow process
Before you enable more actions for the basic form, you'll need to create a workflow that's called by the form. In the following steps, you'll create a real-time workflow for immediate visual feedback on the basic form.
Sign in to Power Apps.
Select a target environment by using the environment selector in the upper-right corner.
Select Solutions.
Select Microsoft Dataverse Default Solution.
Note
Depending on your environment version, the solution could also be named Common Data Services Default Solution.
Tip
Use search functionality and search for default to quickly locate the solution.
Select New > Automation > Process > Workflow.
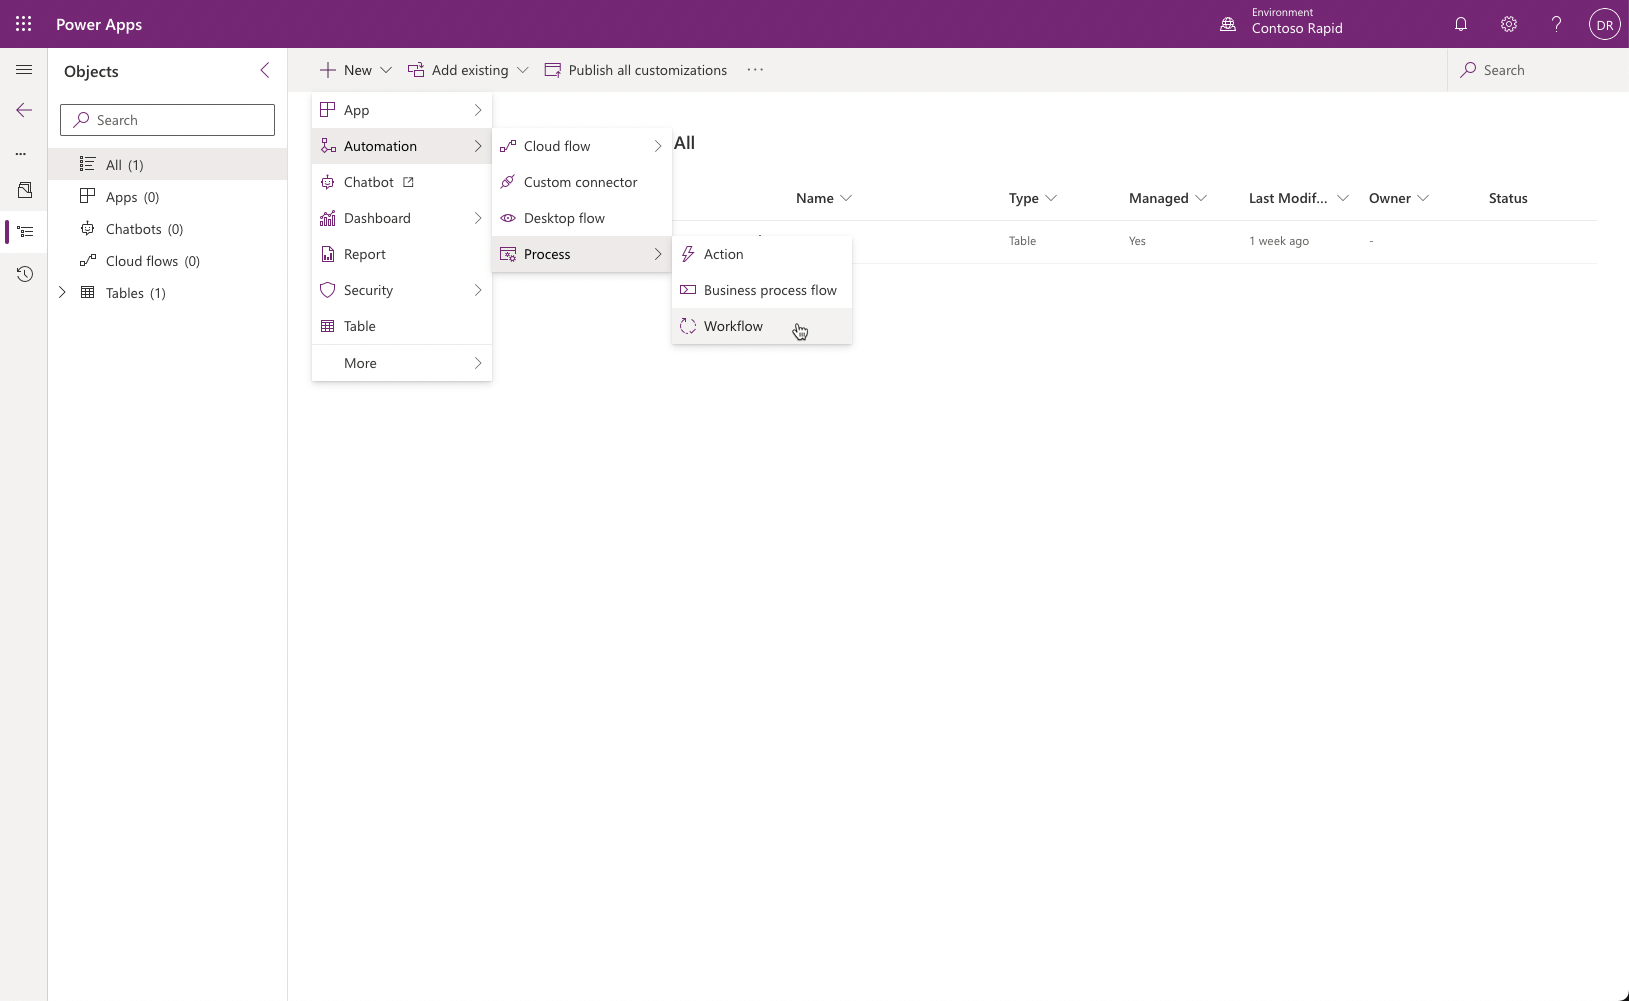
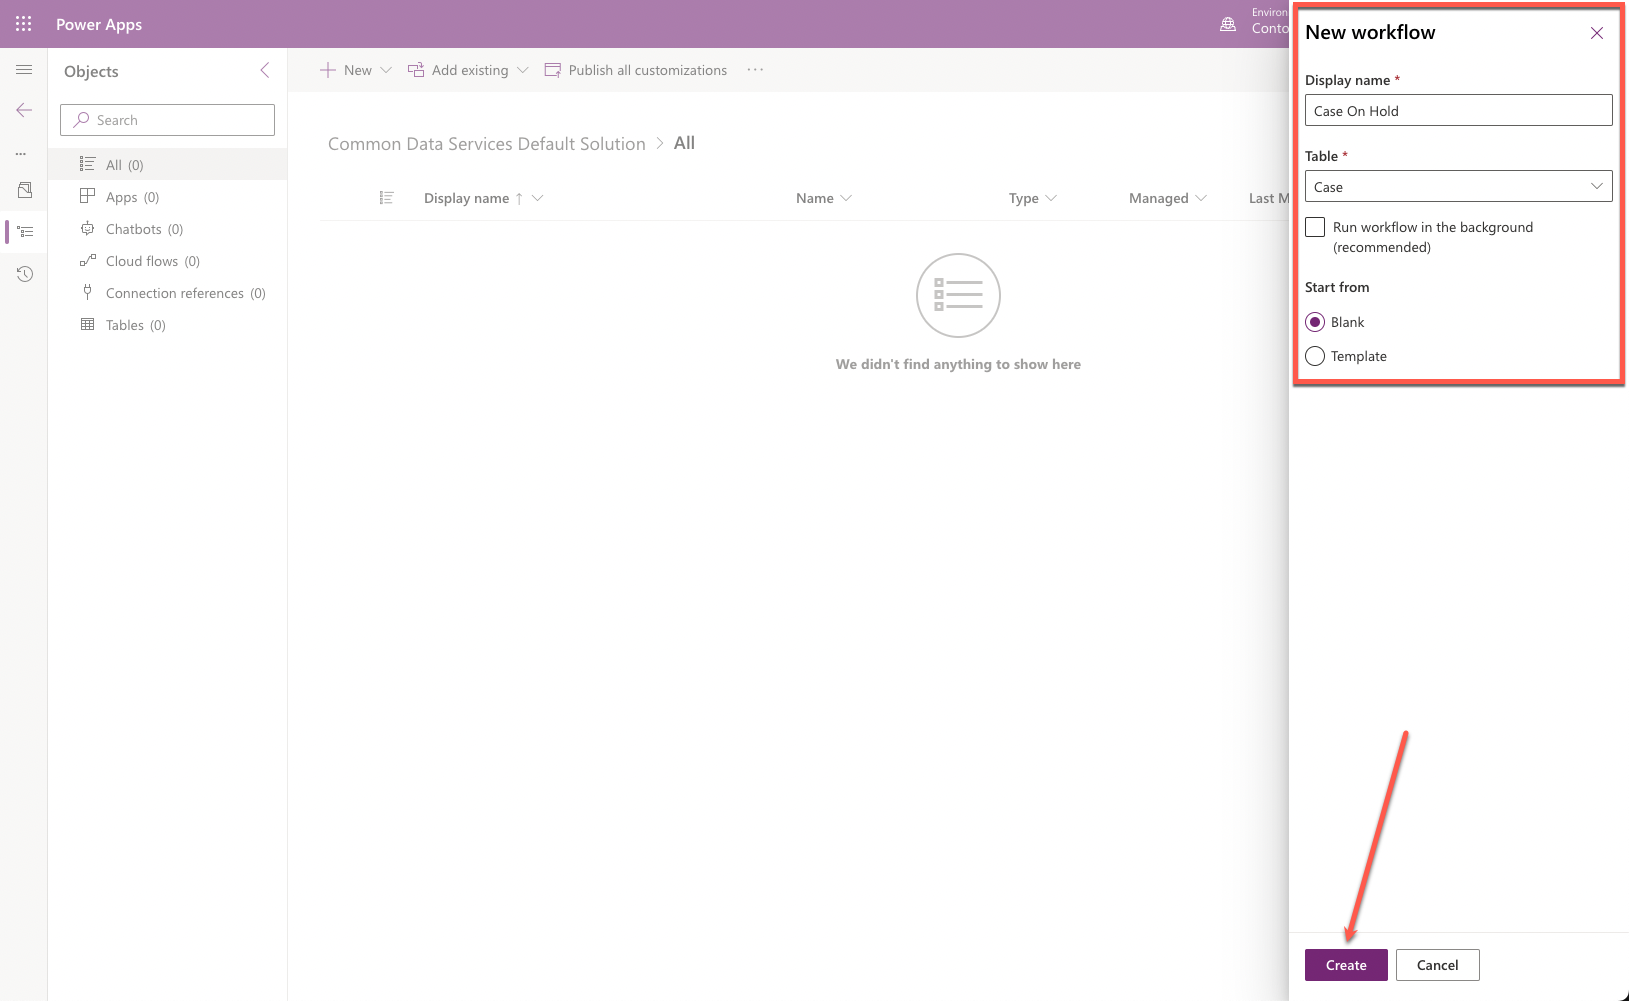
Enter the following values in the side panel:
Display name - Case On Hold
Table - Case
Run workflow in the background - Clear this option
Start from - select Blank
Select Create.
In the new window that opens, select As an on-demand process.
Clear the Record is created checkbox.
Select Add Step > Change Status.
Change the row status to On Hold.
Select Activate.
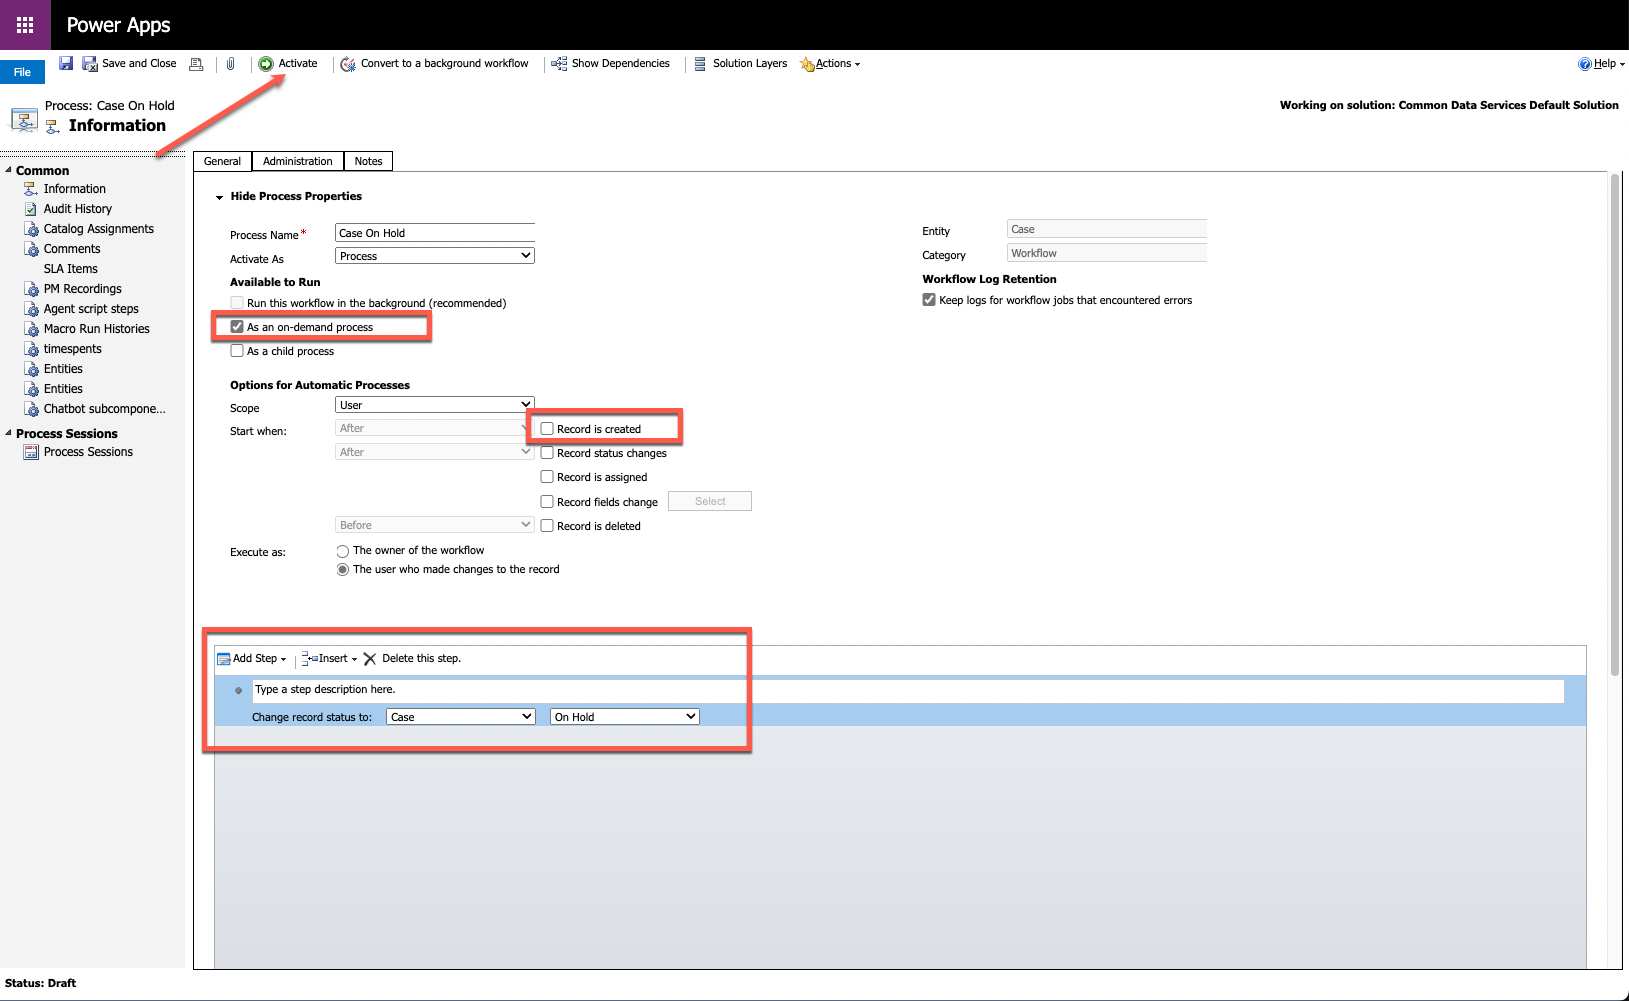
Select Close.


Create an action button
After the workflow has been created, you can add a workflow action button to the case basic form and then set up this button to call the workflow.
Sign in to Power Pages home.
Select the correct environment in the upper-right corner.
Select the website, select the ellipsis (...) menu, and then select Portal Management.
In the Portal Management app, select Forms (it could also be called Basic Forms).
Select Customer Service - Edit Case.
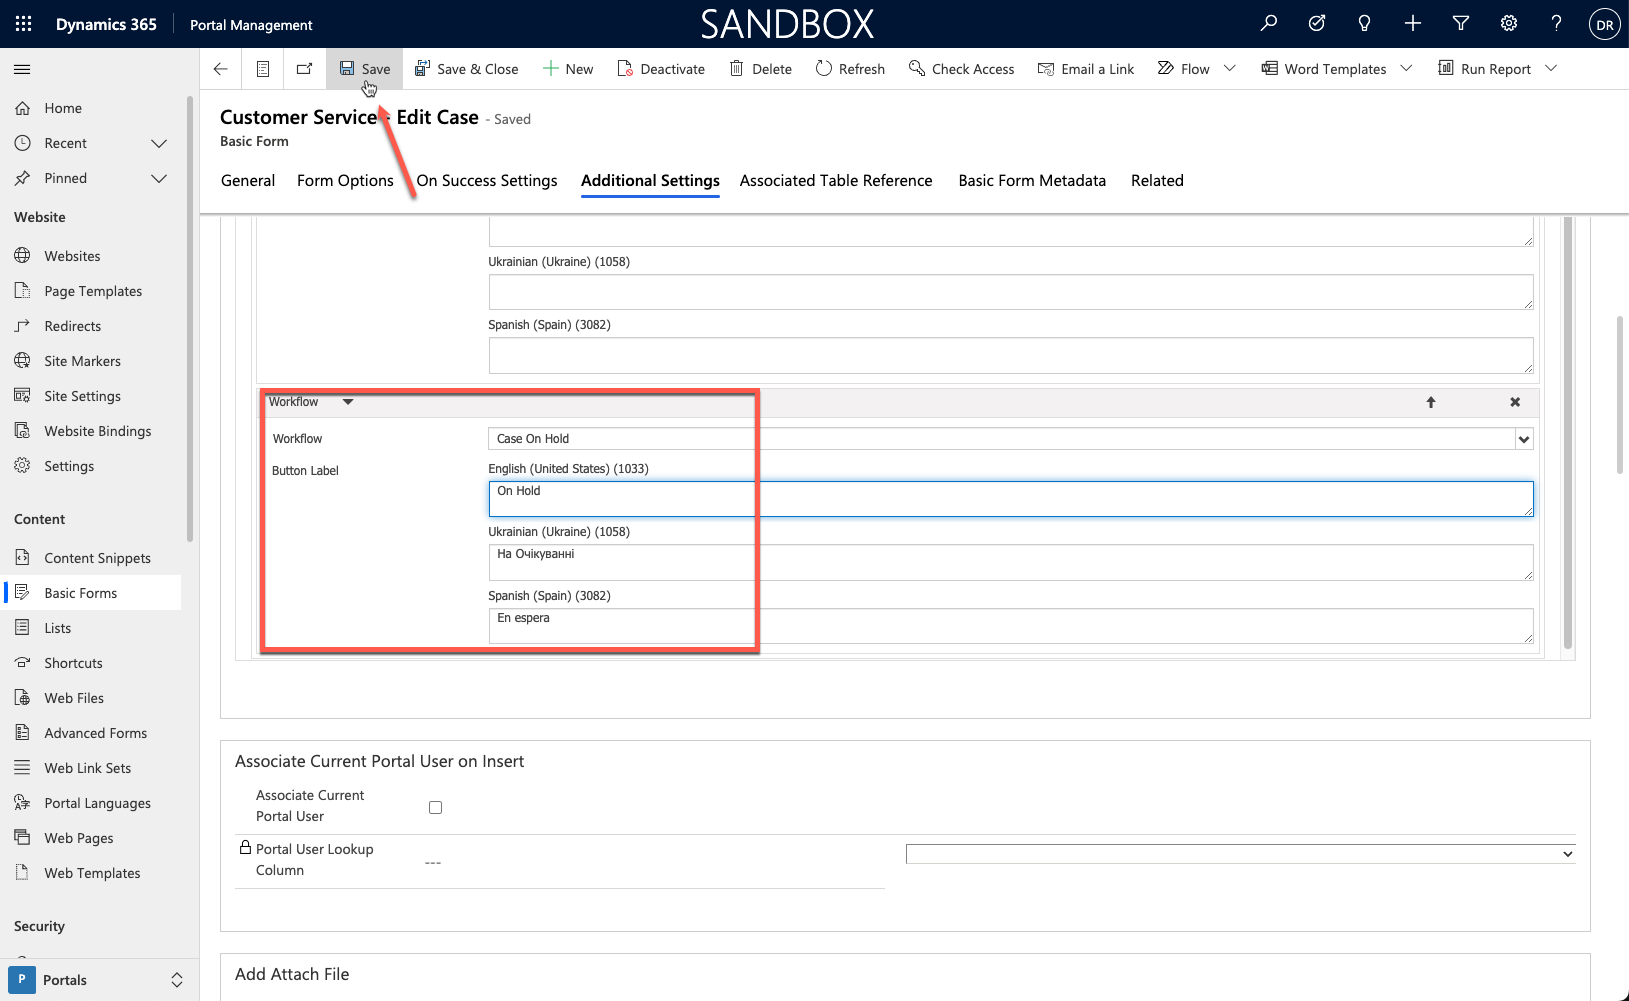
Select the Additional Settings tab.
Select Workflow.
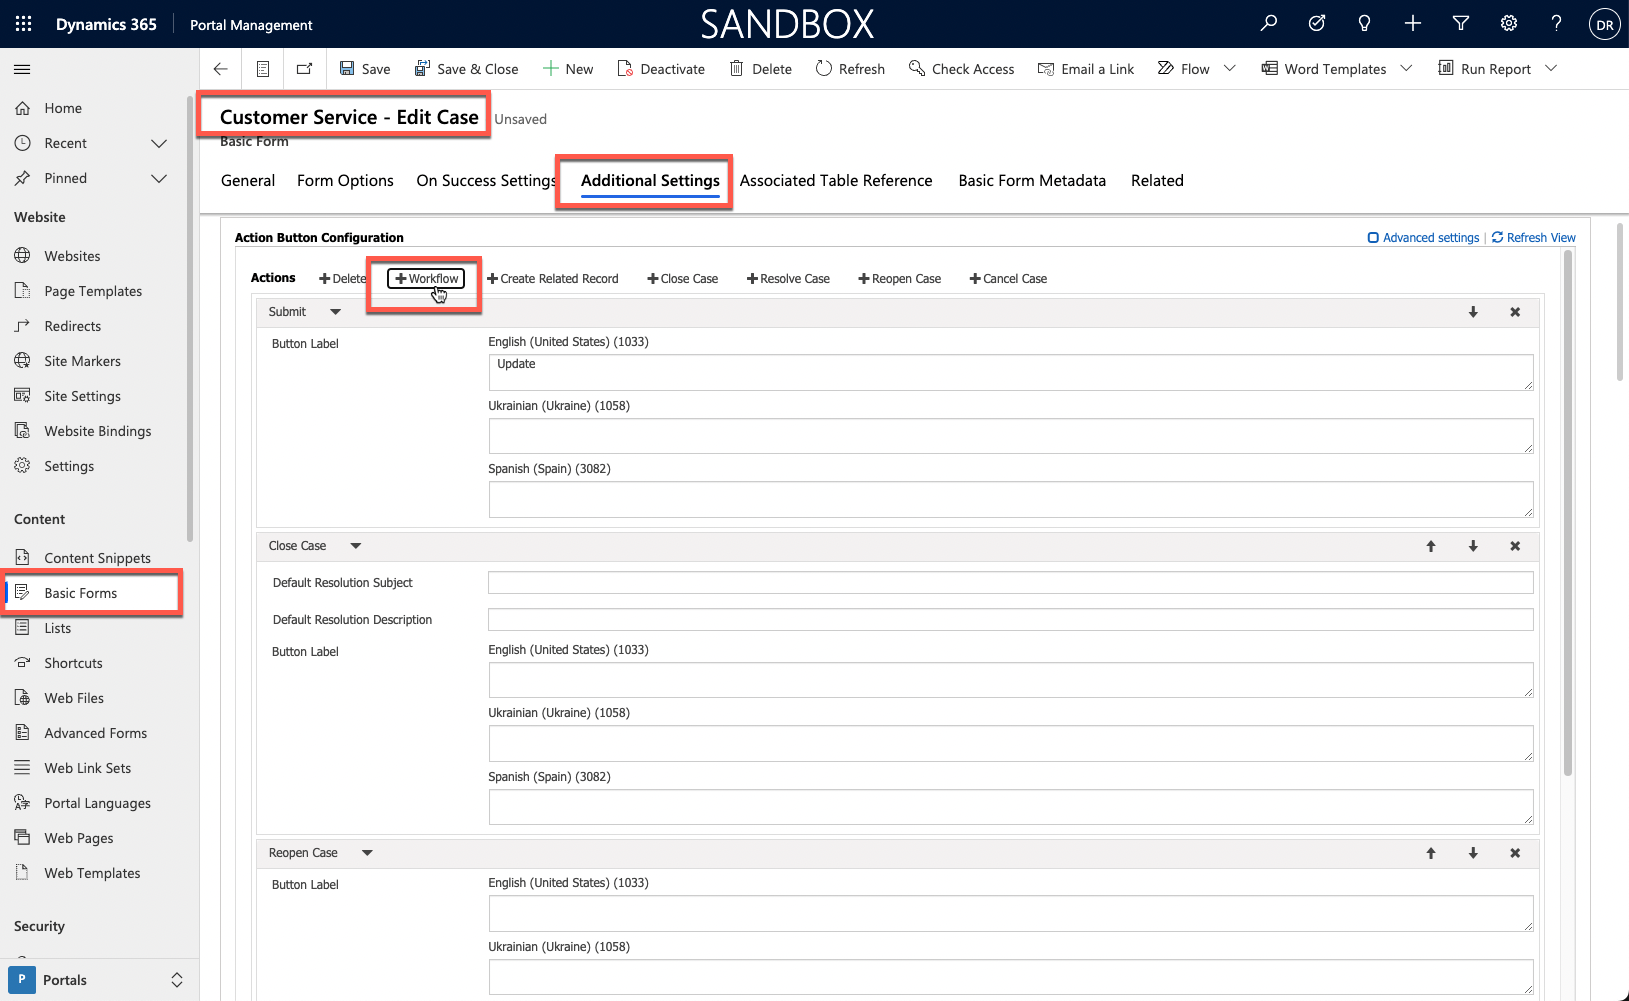
Enter the following values for the Workflow action (you might need to scroll to locate it):
Workflow - Select Case On Hold
Button Label - On Hold
Select Save.
Don't close the window.


Test
To test that your new workflow action button works, follow these steps:
Open your website in a new browser window:
https://yoursite.powerappsportals.com.Sign in as an existing customer.
If you don't have a customer account, follow these steps in the Portal Management app:
Select Contacts.
Select New.
Switch to the Portal Contact form.
Enter your name of choice.
Select Web Authentication.
Enter the username of your choice.
Select Login Enabled.
Select Save.
Select Change Password and then enter the new password of your choice.
Add the Authenticated Users web role to the contact row.
Sign out as a system administrator.
Sign in as the new user.
Select Support on the upper menu bar.
Select an existing case. If no existing cases exist, create and save a new case row.
The case should show as Active - In Progress.
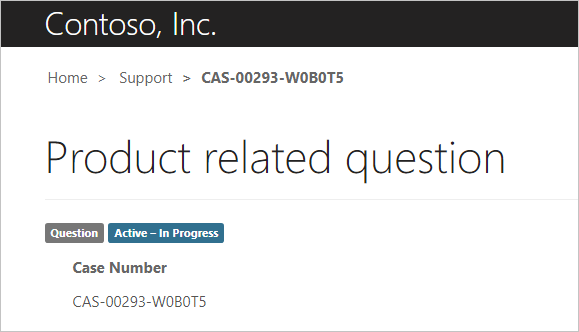
The lower part of the case window should show the new On Hold button.

Select the On Hold button. A message stating "The workflow has been initiated" will display.
The window will refresh, and the case status will change to Active - On Hold.
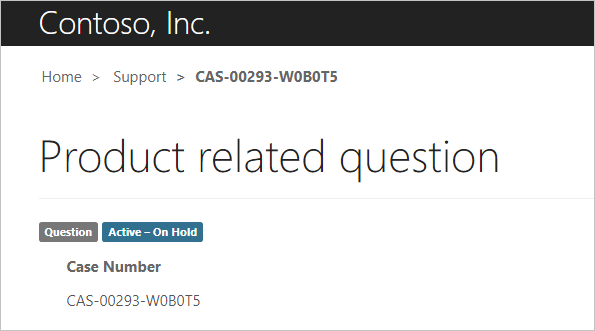
Scroll down and verify that the On Hold button is still present.
Enhance the action button
Having the workflow button visible at all times doesn't make sense in certain scenarios, such as for disabled cases. You can enter extra information to enhance the user experience.
Switch to the Portal Management app.
Select Basic Forms.
Select Customer Service - Edit Case.
Select the Additional Settings tab.
Select Advanced settings and then locate the Workflow action.
Enter the following values:
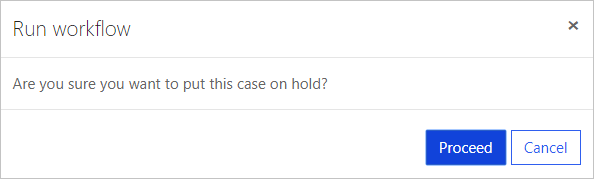
Confirmation Required - Yes
Confirmation - Are you sure you want to put this case on hold?
In the Filter Criteria box, copy and paste the following FetchXML:
<fetch>
<table name="incident" >
   <attribute name="incidentid" />
   <filter type="and" >
      <condition attribute="statecode" operator="eq" value="0" />
      <condition attribute="statuscode" operator="neq" value="2" />
   </filter>
</table>
</fetch>
This FetchXML ensures that the button is only visible when the case is active (
statecode eq 0 (Active)) and the status reason column isn't On Hold (statuscode neq 2 (On Hold)).
Select Save.

Test the action button
Next, you'll test the action button by following these steps:
Open the website and sign in as a user.
Select Support.
Create a new case and then enter data of your choice.
Select Save.
Confirm that the status is Active - In Progress and that the On Hold button is visible.
Select On Hold. The confirmation will display.
Select Cancel.
Select Close case and then select Yes when prompted.

The case status should state Resolved - Problem Solved. Only the Reopen Case button should be visible.
Extra exercise
You might want to add a Resume workflow and an action button to the form. The action button should only be visible when the case is on hold.
This exercise shows how Power Pages helps you extend forms, effectively converting simple data entry forms into a part of a web app.