Create AutoText
AutoText is a reusable block of structured or free-text content that you can insert into a report. It helps standardize frequently used phrases, templates, or sections to improve consistency and reduce manual entry.
Why create AutoText?
Creating AutoText enables you to:
- Reduce repetitive typing during report creation.
- Maintain consistent report structure across studies.
- Improve accuracy by reusing validated language.
- Streamline workflows by preconfiguring content for common procedures.
What to configure when you create AutoText
- Content body: The text, structured elements, or template that appears in the report.
- Text fields: Placeholders for variable data, such as measurements or findings.
- Merge fields: Structured inputs that capture standardized data elements.
- Default attributes: Settings that control when AutoText inserts automatically in a report.
- Procedure mapping: Optional linkage to procedure codes for automatic selection.
AutoText supports both simple macros, such as short phrases, and complex templates with nested AutoTexts and dynamic fields.
Where AutoText fits in the workflow
- AutoText is created and managed in the AutoText Manager.
- Templates and macros can be inserted into reports during dictation or editing.
- AutoText can be associated with procedure codes to automatically populate reports.
Procedural guidance
Follow these steps to create a new AutoText in PowerScribe One.
Create a new AutoText
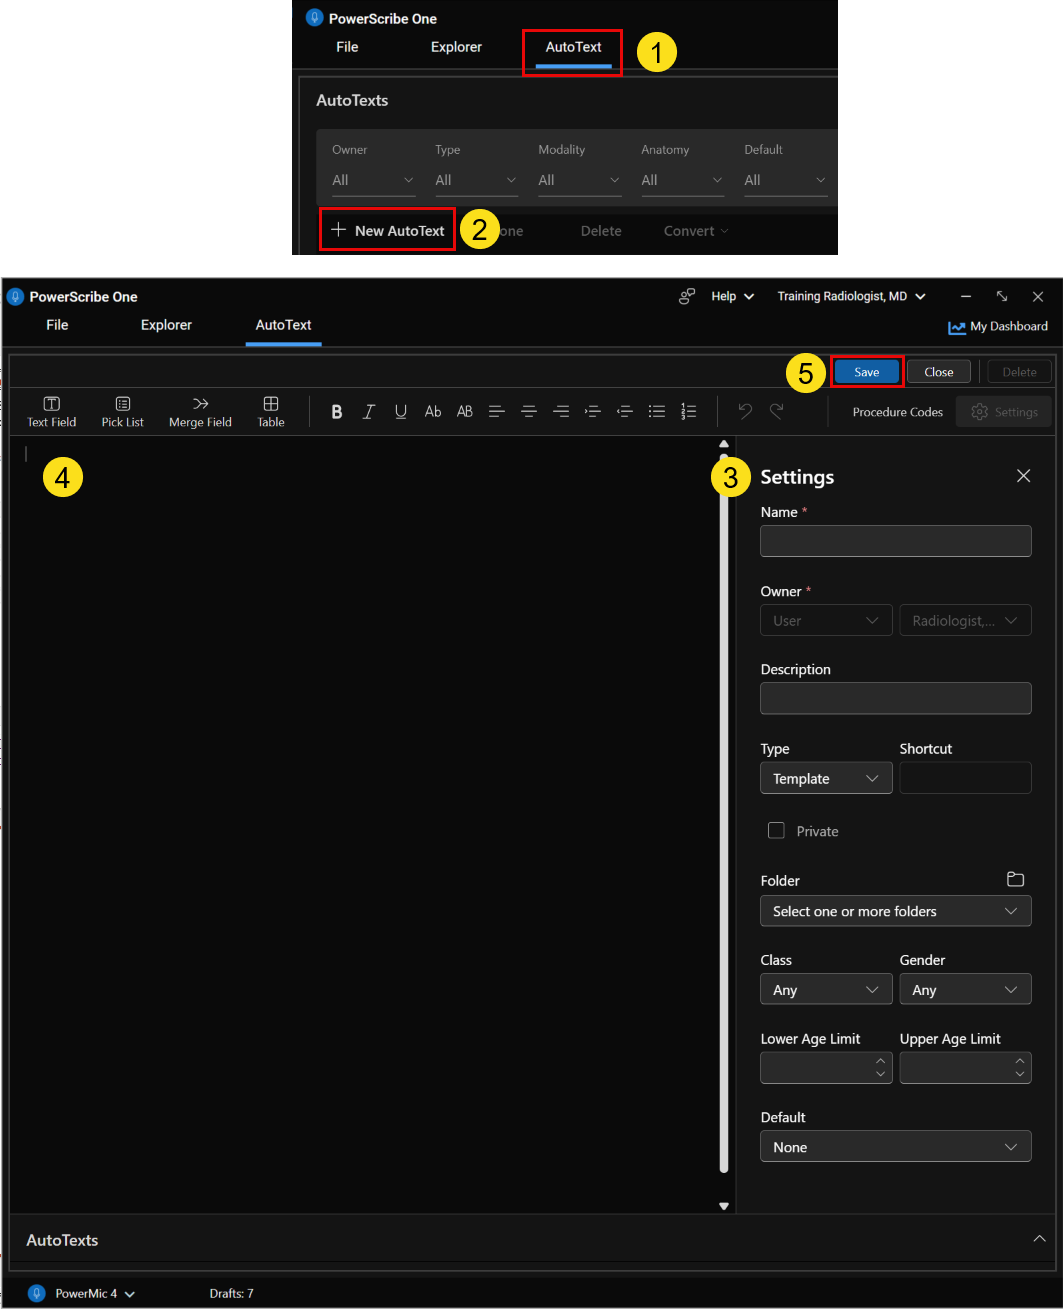
Open the AutoText Manager.
- Open the PowerScribe One client application.
- From the Explorer or Report Editor screen, select AutoText from the menu.
- The AutoText Manager opens.
In the AutoText Manager, select New AutoText.
The AutoText Editor opens with Settings displayed.
In Settings, enter the following information:
AutoText name
Type a Name for the AutoText. This name appears in AutoText search results and can be dictated to invoke the AutoText if it's configured as a Template or Macro.
Tip
Naming tips
- Use at least two syllables.
- Choose a name that's easy to dictate.
- Use lowercase, except for initials. For example, enter CT chest.
- Don't use punctuation or special characters.
- All AutoText names within an account must be unique.
Optional description
Enter a Description to help explain the purpose or usage of the AutoText.
AutoText type
Select a Type:
- Template
- Module
- Macro
Privacy setting (optional)
Select Private if you do not want other non-administrative users to see this AutoText.
Folder assignment (optional)
Assign the AutoText to an existing folder or create a new folder by using the Folder dropdown list.
Apply patient-specific conditions (optional)
Limit when an AutoText is available based on patient attributes.
Patient class and gender
- From the Class dropdown list, select a patient class.
- From the Gender dropdown list, select Male, Female, or Non-Binary.
Note
If you assign a patient class or gender, the AutoText is available only for reports that match those specific attributes.
Age range
Set a Lower Age Limit and Upper Age Limit in years, if needed.
For example, an age range of 0 to 13 years makes the AutoText available for pediatric patients up to 12 years and 23 months.
Note
The AutoText is available only when the patient's age falls within the defined range.
Configure default behavior (optional)
From the Default dropdown list, select the appropriate option.
Important
Default AutoText automatically launches in the Report Editor for assigned procedures when Start with default AutoText is enabled in Preferences > Report Editing > Start with default AutoText. Templates are the recommended AutoText type for default use.
Associate procedure codes (optional)
If appropriate, associate one or more procedure codes with the AutoText so it appears in relevant reporting contexts.
Note
When you assign a procedure code to an AutoText, that AutoText is applied only to the associated exam. If no procedure code is assigned, the AutoText is available for all exam types.
Enter AutoText content.
Type the AutoText content directly in the editor or paste content from an existing AutoText. Formatting, dynamic fields, and reusable components are retained when copying and pasting.
Tip
Use merge fields and nesting to build dynamic AutoText content. When copying content from a third-party application into the AutoText Editor, paste it into PowerScribe One as plain text to avoid formatting issues. Use the keyboard shortcut Ctrl + Shift + V.
When you finish configuring settings and content, select Save.
The AutoText is added to your AutoText library and is immediately available based on the conditions you defined.
Best practices
- Use clear naming conventions to support easy search and reuse.
- Keep templates modular to support nesting and reuse across reports.
- Avoid overloading a single AutoText with excessive content.
- Use fill-in fields instead of free text for variable inputs.
- Periodically review and update AutoText to maintain accuracy.
Applied scenario
You're finalizing a CT abdomen report and frequently mention a standard normal findings section.
Instead of dictating the same content each time, you:
- Create an AutoText titled CT abdomen normal.
- Add structured sections for technique, findings, and impression.
- Include fill-in fields with standard normal findings for each body-part-related section, measurements, and optional findings. You can overwrite default content within fill-in fields or add to it by using spoken content or macros.
- Associate the template with the CT abdomen procedure code.
During future reports, the AutoText appears automatically or can be inserted quickly, allowing you to complete reports faster while maintaining consistent documentation quality.
Accessibility and usability notes
- Use simple, descriptive names to support organization and search functionality.
- Structure template content with clear headings to reduce cognitive load.
- Avoid ambiguous placeholders and clearly label expected inputs.
- Keep templates concise to support faster navigation and editing.
- Use consistent terminology to reduce interpretation errors across users.