Use this unit as a reference for the key AutoText settings, naming guidance, and field options that support creation and maintenance workflows in PowerScribe One.
Review naming and organization conventions
Use consistent naming so AutoText is easier to find in the AutoText Manager and easier to invoke through speech recognition.
Use at least two syllables.
Use lowercase, except for acronyms. For example, CT chest.
Don't use punctuation or symbols in the AutoText name.
Keep the name short and easy to say without a pause.
For example, instead of CT abdomen pelvis with and without contrast, use CT abdomen pelvis with without.
Make AutoText names distinctly different from each other and from commonly dictated phrases so the speech engine can recognize the spoken name more reliably.
Use anatomy followed by laterality when applicable:
- knee left (preferred)
- left knee (avoid)
This approach groups related AutoText together in the AutoText pane:
- knee bilateral
- knee left
- knee right
For modality-based grouping, use a consistent modality acronym:
- US abdomen or ultrasound abdomen
- US chest or ultrasound chest
- US pelvis or ultrasound pelvis
PowerScribe lists AutoText alphabetically in the AutoText pane, so naming consistency directly affects how easy entries are to locate.
Review AutoText types
PowerScribe One uses structured AutoText types to improve report standardization, promote content reuse, and optimize speech recognition.
- Provides the outline for an entire report.
- Is typically inserted automatically into a newly created report as a default AutoText.
- Contains structured sections such as findings, measurements, and impression.
- Includes short statements or phrases invoked by voice during dictation.
- Can be used across multiple report types.
Classify as a macro when it is:
- Voice-invoked.
- Spoken without pause.
Macro types are voice-enabled regardless of categorization.
- Includes specialized content nested within a template.
- Can be reused across multiple templates.
- Is accessible only in the AutoText Manager.
- Isn't available directly during report creation.
Review defaults and category settings
A default AutoText is automatically invoked for a specific procedure. Categories help control when an AutoText is available and in which workflow context it appears.
Best practices for defaults
- Always associate a default AutoText with at least one procedure code.
- Apply additional categorization even when only a single procedure code is set.
- Make sure the default AutoText appears only when the report matches that procedure.
- Consider both defaulting and categorization when you configure site AutoText.
Common default use cases
- Addendum: Make an AutoText a default only for addendums.
- Report: Make an AutoText a default for original reports.
- None: Use for AutoText that shouldn't be defaulted but might still include relevant procedure codes.
Types of field and content options
AutoText can include fields and structured elements that support reusable reporting content.
A Text Field is a dictation placeholder, often used near report headings, where you can dictate content. Frequently used text can be set as a default value.
To insert a Text field
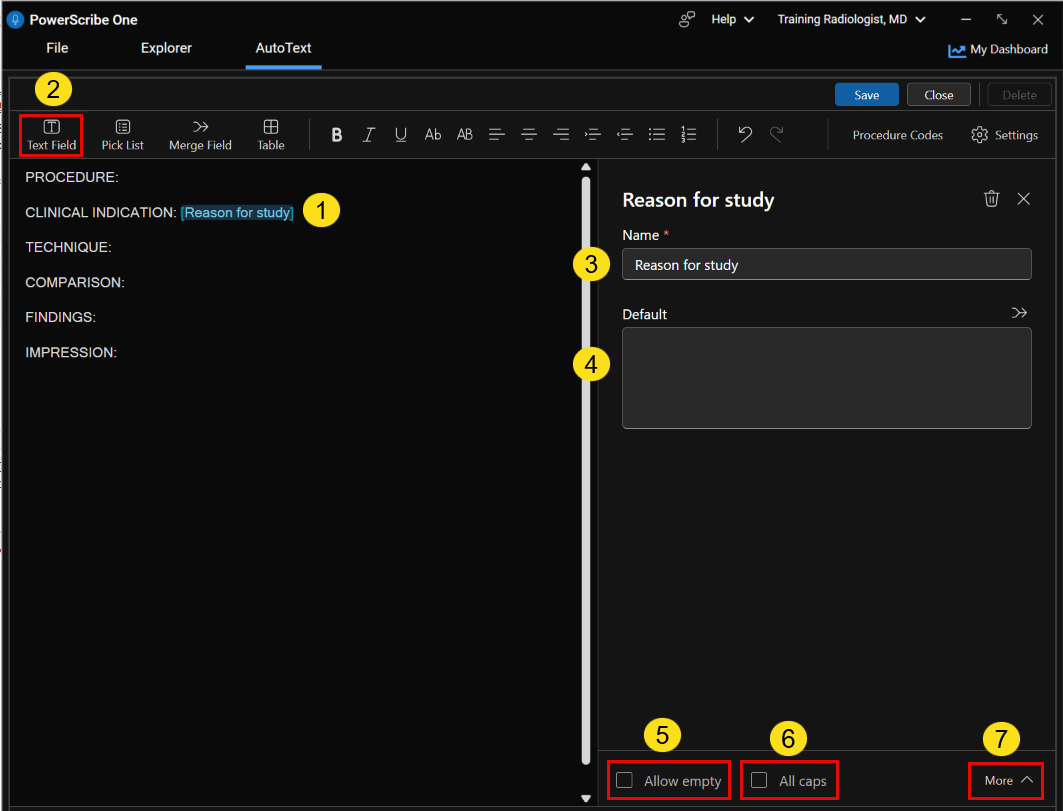
- Open the AutoText for editing and place the cursor where the Text Field should appear.
- Select Text Field on the toolbar.
- In the Text Field pane, enter a Name for the field.
- Optional: In Default text, type or dictate the content that should appear by default.
- Select Allow empty if the field can be left blank.
- Select All Caps if dictated text should appear in uppercase.
- Select More to access more options, if needed.
More Text Field options
- Impression field: Use when the field represents an Impression section but uses a nonstandard name other than Impression, Conclusion, or Summary.
- Does not indicate findings: Use when the field content shouldn't be treated as findings during Ambient Mode dictation.
- Hyponyms: Add related words or fragments to help Ambient Mode identify which dictated findings belong to this field.
- Findings Codes: Use to synchronize structured findings from external sources, such as AI algorithm outputs from the Precision Imaging Network.
Note
PowerScribe One automatically saves changes as you edit AutoText fields.
A Pick List presents predefined choices, and you select one. Available options appear in the Fields section of the Heads-Up Display during reporting.
To insert a Pick List
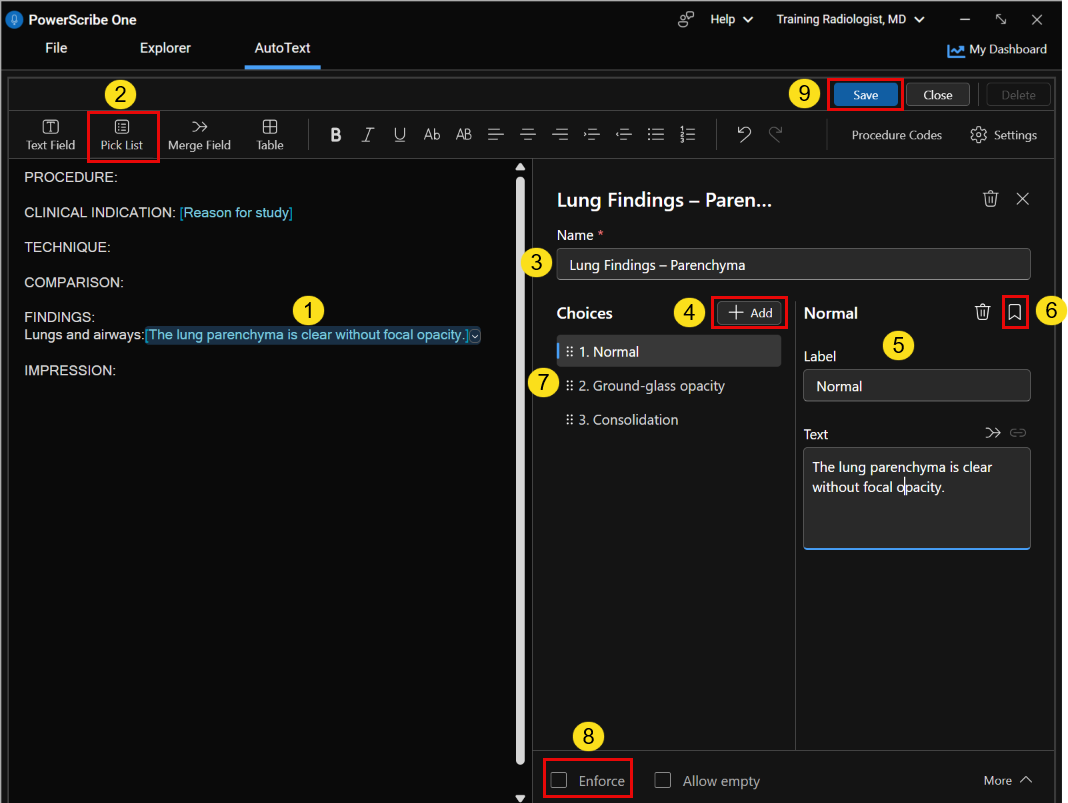
- Open the AutoText for editing and place the cursor where the Pick List should appear.
- Select Pick List on the toolbar.
- Enter a Name for the field.
- Use Add to create additional choices.
- For each choice:
- Enter a Label, which is what you select during reporting.
- Enter Text, which is what appears in the report.
- Optional: Insert a Merge Field or nest an AutoText within a choice.
- Optional: Select the Default icon to set a default choice.
- Reorder choices by dragging them or by using Move Up or Move Down.
- Select Enforce to prevent free dictation from overriding the choices.
- Select Save.
The Pick List appears as a dropdown field in the AutoText.
Merge Fields insert exam-specific or system-generated data, such as measurements or radiation dose.
Types of Merge Fields
- General Fields: Built-in fields populated automatically from PowerScribe One or your EMR or EHR.
- Custom Fields: Created by your system administrator in the PowerScribe One Administrator Portal. These fields might include measurements, radiation dose, or AI findings if enabled.
To insert a Merge field
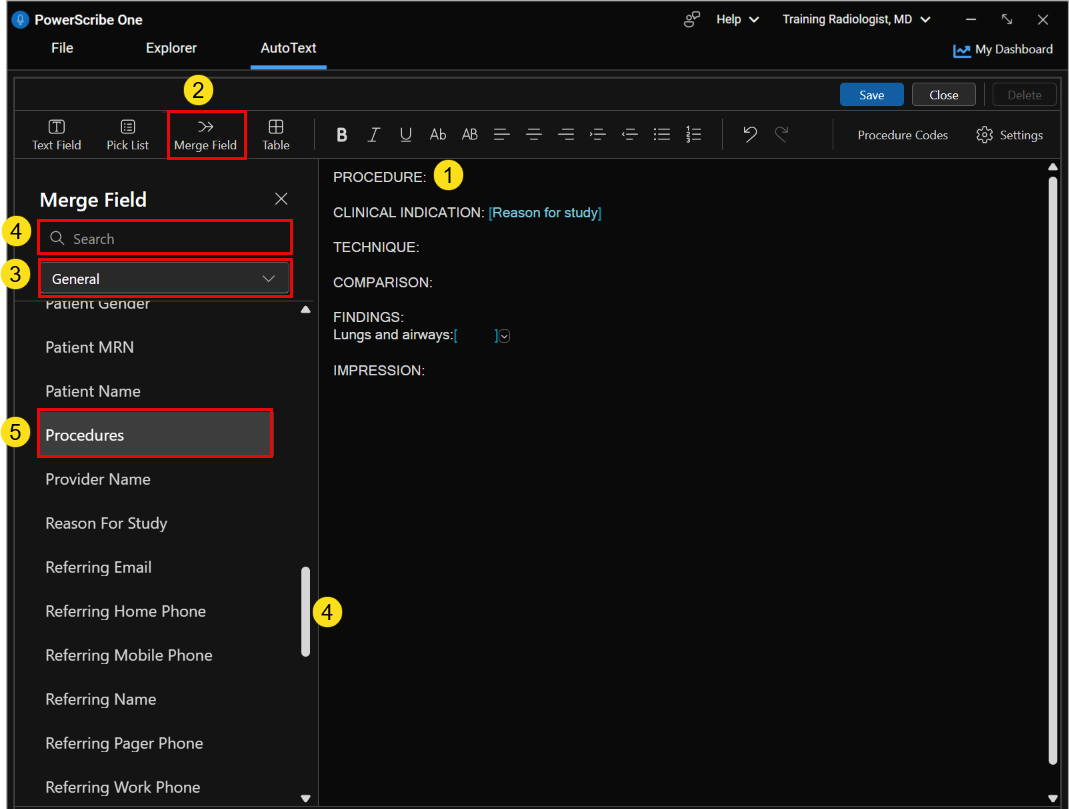
- Place the cursor where the Merge Field should appear.
- Select Merge Field on the toolbar.
- Choose General Fields or Custom Fields.
- Search for or scroll to the desired field.
- Double-click the field to insert it.
The field name appears in the AutoText. The actual data populates when the AutoText is used during reporting.
Note
- Merge fields populate only if data exists. Otherwise, they remain blank.
- Date-based merge fields can be formatted as Date and Time, Date Only, or Time Only by right-selecting the field.
- Custom field groups defined in the Administrator Portal appear in the dropdown list.
Tables help organize numeric and textual data within radiology reports.
Note
If the Table option is unavailable, contact your PowerScribe One administrator.
To add a table to AutoText
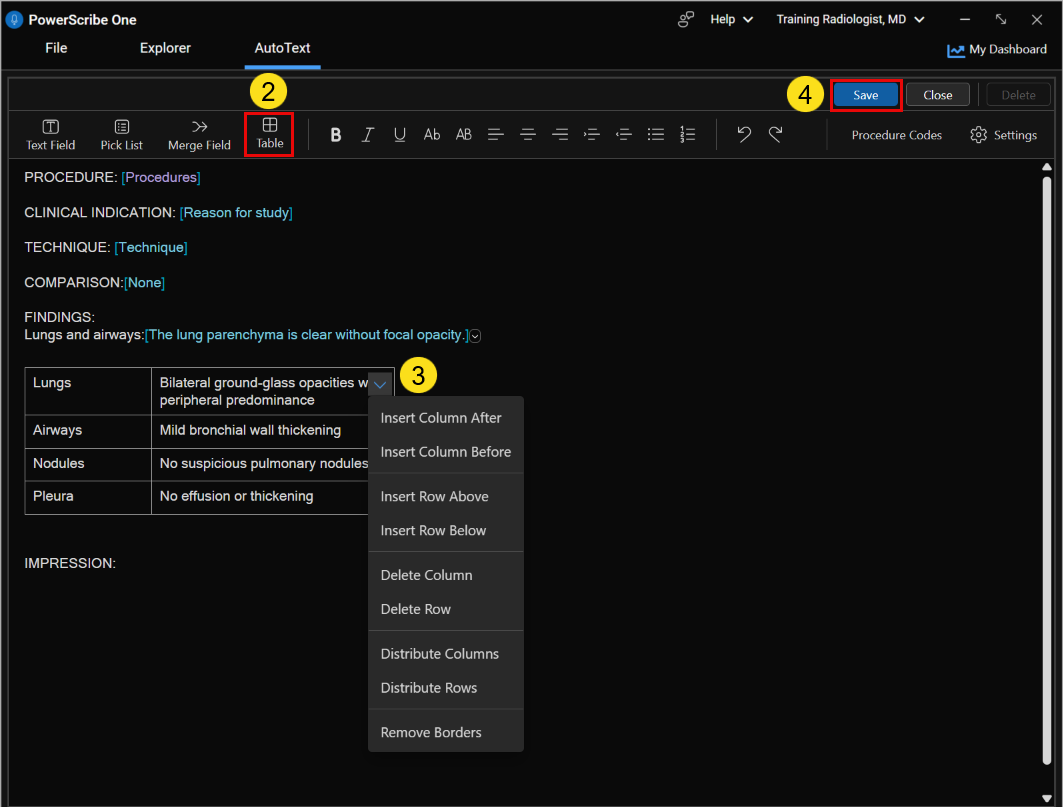
- Create or open an AutoText and place the cursor where the table should appear.
- Select Table on the toolbar to insert a default 3 x 3 table.
- Customize rows and columns by using the table options.
- Select Save when finished.
Text, fields, Pick Lists, Merge Fields, and AutoText can be added to table cells.
Note
- AutoText entries that already contain tables can't be nested.
- Tables created in PowerScribe 360 display correctly in PowerScribe One.
- Pasted content can be added only one cell at a time.
- Downstream systems might alter table formatting.
Best practices
Keep names and labels short, clear, and easy to say.
Use lowercase unless the name or label includes an acronym.
Use descriptive wording that supports recognition and search.
For Pick Lists, define a spoken label for each choice.
Examples: annual, 6 months, severe, moderate, consent.
Ensure that each Pick List label clearly describes the choice for easier recognition.
Avoid creating labels for single-word insertions, such as laterality, because these can be dictated directly.