Exercise - Set up your development environment
To use Visual Studio Code for Azure development, you need to install Visual Studio Code locally and add one or more Azure extensions. In this exercise, we add the Azure App Service extension.
Install Visual Studio Code
To install Visual Studio Code, use the appropriate steps for your operating system.
Windows
Run the installer.
Open Visual Studio Code by pressing the Windows key or selecting the Windows icon on the task bar, typing "Visual Studio Code" and selecting the Visual Studio Code result.
macOS
Expand the contents by double-clicking the downloaded archive.
Drag Visual Studio Code.app to the Applications folder.
Open Visual Studio Code by selecting the icon the Apps section or by searching for Visual Studio Code in Spotlight.
Linux
Debian and Ubuntu
Download and install the .deb package (64-bit) through the graphical software center (if it's available) or through the command line (replacing
<file>with the .deb filename you downloaded):sudo dpkg -i <file>.deb sudo apt-get install -f # Install dependencies
RHEL and Fedora
Use the following script to install the key and repository:
sudo rpm --import https://packages.microsoft.com/keys/microsoft.asc
sudo sh -c 'echo -e "[code]\nname=Visual Studio Code\nbaseurl=https://packages.microsoft.com/yumrepos/vscode\nenabled=1\ngpgcheck=1\ngpgkey=https://packages.microsoft.com/keys/microsoft.asc" > etc/yum.repos.d/vscode.repo'
Update the package cache and install the package by using dnf (Fedora 22 and above):
dnf check-update
sudo dnf install code
openSUSE and SLE
The yum repository also works for openSUSE and SLE-based systems. The following script installs the key and repository:
sudo rpm --import https://packages.microsoft.com/keys/microsoft.asc
sudo sh -c 'echo -e "[code]\nname=Visual Studio Code\nbaseurl=https://packages.microsoft.com/yumrepos/vscode\nenabled=1\ntype=rpm-md\ngpgcheck=1\ngpgkey=https://packages.microsoft.com/keys/microsoft.asc" > /etc/zypp/repos.d/vscode.repo'
Update the package cache and install the package by using:
sudo zypper refresh
sudo zypper install code
Note
For further details about installing or updating Visual Studio Code on various Linux distributions, please see the Running Visual Studio Code on Linux documentation.
Install Azure App Service extension
If you haven't already, open Visual Studio Code.
Open the Extensions browser via the menu on the left.
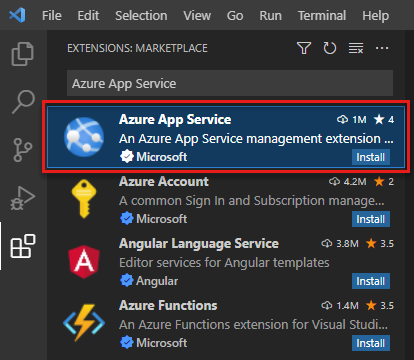
Search for Azure App Service.
Select the Azure App Service result and select Install.
The following screenshot shows the Azure App Service extension selected from the Visual Studio Code extension search results:
Visual Studio Code installs the extension. You're now ready to connect to your Azure subscription and deploy a web, mobile, or API app to an Azure App Service.
Here, you install Visual Studio on either your Windows or macOS development machine.
Exercise steps
To install Visual Studio, use the appropriate steps for your operating system.
Windows
Go to https://visualstudio.microsoft.com/downloads/ and select the edition you want to install.
- Community Free download is always free for students and individuals
- Professional Free trial for small teams
- Enterprise Free trial for large organizations with 500 or more user devices
When the executable finishes downloading, launch the installer and select Modify.
On the Workloads tab, select the Azure development workload. On the right-hand side of the screen, the Installation details pane displays the tools and extensions for Azure.
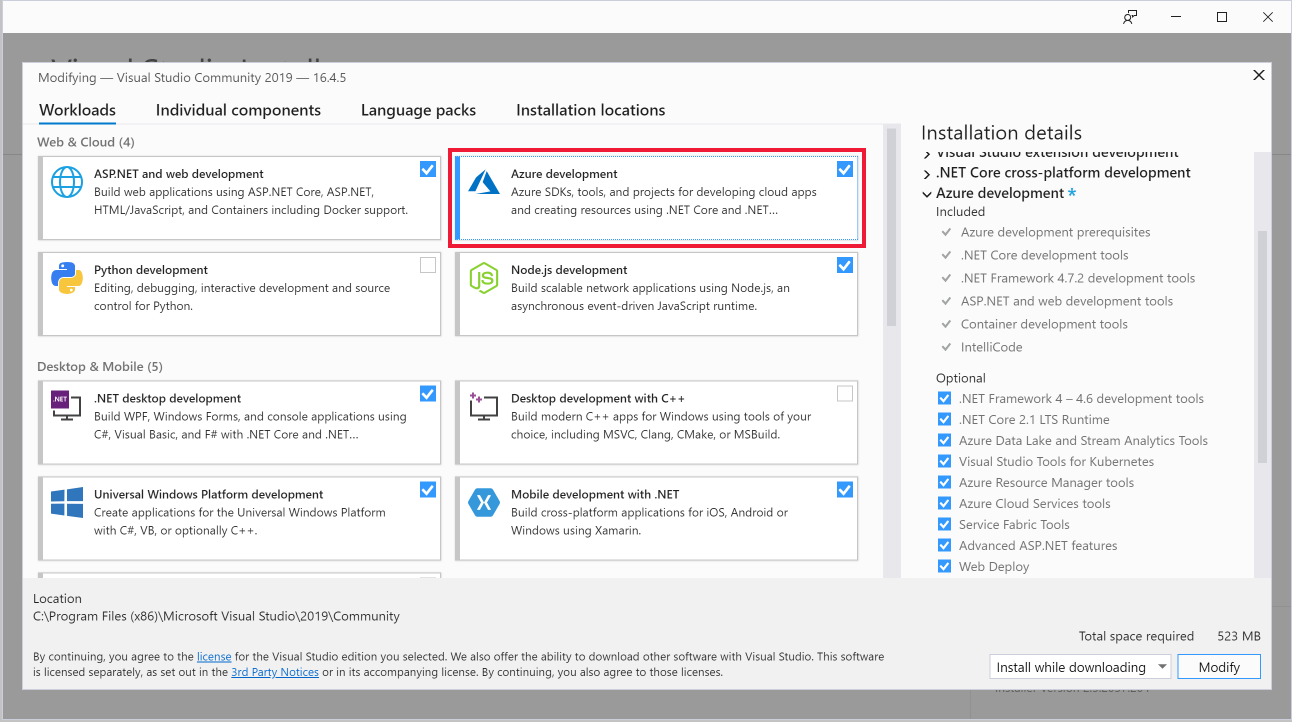
(Optional) Select the check boxes to include ASP.NET and web development, Python development, and Node.js development workloads to be ready to create web applications and scripts in Azure.
Select Install and wait for Visual Studio to install. For systems with Visual Studio already installed, select Modify. If prompted with a User Account Control dialog, select Yes to permit the installer to run.
Visual Studio Installer notifies you of any updates required in the versions you have on your system.
When the installation is complete, select Launch to open Visual Studio.
Here, you install Eclipse and the Azure Toolkit on your development machine. By the end of the exercise, you have everything you need to create a Java application connected to Azure.
Install Eclipse IDE
Download the appropriate Eclipse IDE for your operating system.
Start the Eclipse installer once downloaded.
On Windows, double-click the downloaded file.
On macOS and Linux, unzip the installer from the downloaded file and run it.
Note
The installer might prompt you to install the Java Development Kit, if it is missing.
Select the packages to install. For Java developers, choose either the Java or Java EE Eclipse IDE option.
Select the installation destination on your machine.
Launch Eclipse to validate that it installed correctly.
Install Azure Toolkit for Eclipse
Installing the Azure Toolkit is the same across Windows, macOS, and Linux.
Start Eclipse and open a workspace.
Install the Azure Toolkit for Eclipse plugin, by dragging the following icon into the Eclipse workspace.

In the confirmation dialog, select Confirm to continue.
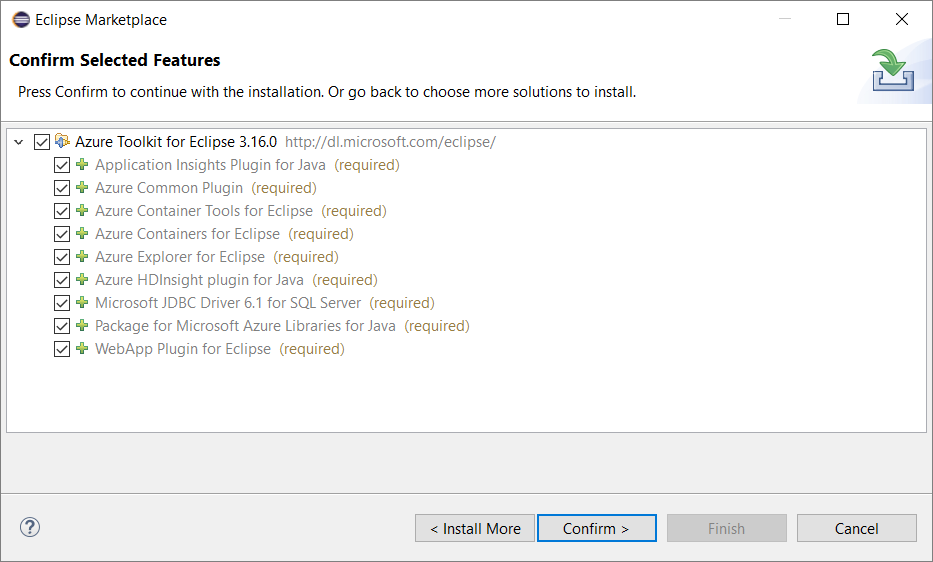
Review and accept the license agreements, then select Finish.
Eclipse downloads and installs the Azure Toolkit.
Restart Eclipse, if necessary.
Validate the Azure Toolkit installation by verifying that Azure exists in the Tools menu.
Here, you install IntelliJ IDEA and the Azure Toolkit on your development machine. By the end of the exercise, you have everything you need to create a Java application connected to Azure.
Install IntelliJ IDEA
Download the appropriate IntelliJ IDEA for your operating system.
Start the IntelliJ IDEA installer once downloaded.
On Windows, double-click the downloaded file.
On macOS and Linux, unzip the installer from the downloaded file and run it.
Note
The installer might prompt you to install the Java Development Kit, if it is missing.
Select the installation destination on your machine and confirm other settings.
Launch IntelliJ IDEA to validate that it installed correctly.
Install Azure Toolkit for IntelliJ
Installing the Azure Toolkit is the same across Windows, macOS, and Linux.
Start IntelliJ IDEA and open a workspace.
Go to Configure > Settings.
In the Settings dialog, select Plugins, then search for
Azure Toolkit for IntelliJin plugin marketplace.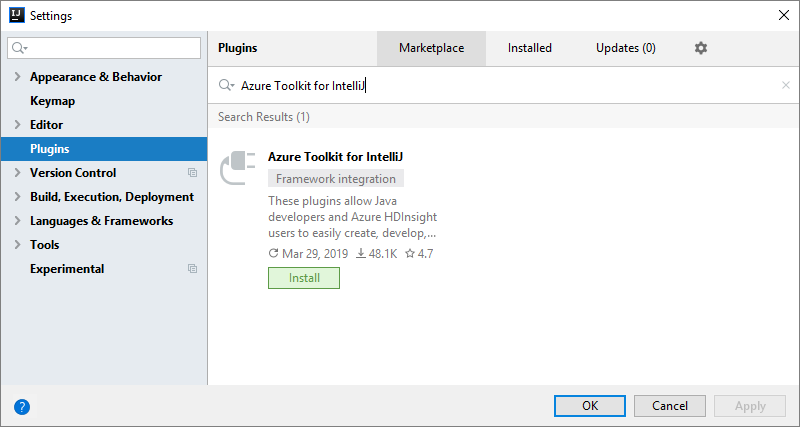
Select OK, then select Install.
Review and accept the license agreements if prompted. IntelliJ IDEA downloads and installs the Azure Toolkit.
Restart IntelliJ IDEA after the installation.
Verify that the Azure Toolkit ha installed checking the Tools menu for Azure.