Exercise - Add user authentication
Your shopping list web app needs user authentication. In this exercise, you'll implement login and logout in your app, and display the current user login status.
In this exercise, you'll complete the following steps:
- Install the Static Web Apps CLI for local development.
- Run the app and API locally with local authentication emulation.
- Add login buttons for multiple authentication providers.
- Add a logout button if the user is logged in.
- Display the login status of the user.
- Test the authentication workflow locally.
- Deploy the updated app.
Prepare for local development
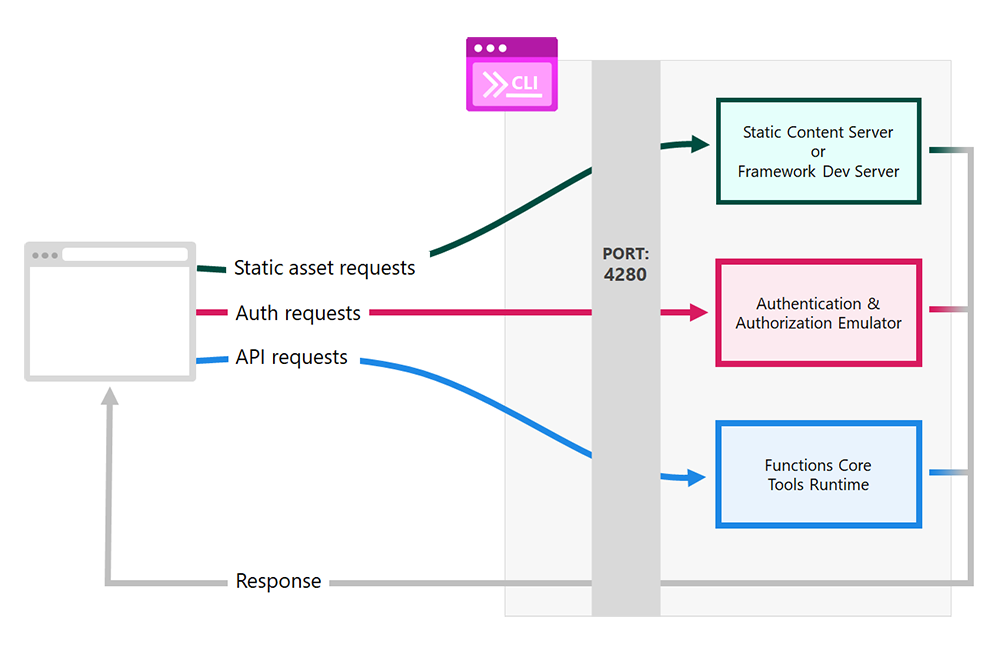
The Static Web Apps CLI, also known as SWA CLI, is a local development tool that allows you to run your web app and API locally and emulate authentication and authorization servers.
Open a terminal on your computer.
Install the SWA CLI running the following command.
npm install -g @azure/static-web-apps-cli
Run the app locally
Now run the app and API locally with a development server. This way, you'll be able to see and test your changes, as your make them in the code.
Open the project in Visual Studio Code.
In Visual Studio Code, open the command palette by pressing F1.
Enter and select Terminal: Create New Integrated Terminal.
Go to the folder of your preferred front-end framework, as follows:
cd angular-appcd react-appcd svelte-appcd vue-appRun the front-end client application using a development server.
npm startnpm startnpm run devnpm run serveLeave this server running in the background. Now run the API and authentication server emulator using the SWA CLI.
In Visual Studio Code, open the command palette by pressing F1.
Enter and select Terminal: Create New Integrated Terminal.
Run the SWA CLI by running the following command:
swa start http://localhost:4200 --api-location ./apiswa start http://localhost:3000 --api-location ./apiswa start http://localhost:5000 --api-location ./apiswa start http://localhost:8080 --api-location ./apiBrowse to
http://localhost:4280.
The final port used by the SWA CLI is different than the one you've seen before, because it uses a reverse proxy to forward requests to the three different components:
- Your framework development server
- The authentication and authorization emulator
- The API hosted by the Functions runtime
Let the application remain running while you modify the code.
Get the user login status
First, you need to access the user login status by making a query to /.auth/me in the client.
Create the file
angular-app/src/app/core/models/user-info.tsand add the following code to represent the interface for the user information.export interface UserInfo { identityProvider: string; userId: string; userDetails: string; userRoles: string[]; }Edit the file
angular-app/src/app/core/components/nav.component.ts, and add the following method in theNavComponentclass.async getUserInfo() { try { const response = await fetch('/.auth/me'); const payload = await response.json(); const { clientPrincipal } = payload; return clientPrincipal; } catch (error) { console.error('No profile could be found'); return undefined; } }Create a new class property
userInfo, and store the result of the async functiongetUserInfo()when the component is initialized. Implement theOnInitinterface and update the import statements to importOnInitandUserInfo. This code fetches the user information when the component is initialized.import { Component, OnInit } from '@angular/core'; import { UserInfo } from '../model/user-info'; export class NavComponent implements OnInit { userInfo: UserInfo; async ngOnInit() { this.userInfo = await this.getUserInfo(); } // ... }
Edit the file
react-app/src/components/NavBar.js, and add the following code at the top of the function. This code fetches the user information when the component loads and stores it into the state.import React, { useState, useEffect } from 'react'; import { NavLink } from 'react-router-dom'; const NavBar = (props) => { const [userInfo, setUserInfo] = useState(); useEffect(() => { (async () => { setUserInfo(await getUserInfo()); })(); }, []); async function getUserInfo() { try { const response = await fetch('/.auth/me'); const payload = await response.json(); const { clientPrincipal } = payload; return clientPrincipal; } catch (error) { console.error('No profile could be found'); return undefined; } } return ( // ...
Edit the file
svelte-app/src/components/NavBar.svelte, and add the following code in the script section. This code fetches the user information when the component loads.import { onMount } from 'svelte'; let userInfo = undefined; onMount(async () => (userInfo = await getUserInfo())); async function getUserInfo() { try { const response = await fetch('/.auth/me'); const payload = await response.json(); const { clientPrincipal } = payload; return clientPrincipal; } catch (error) { console.error('No profile could be found'); return undefined; } }
Edit the file
vue-app/src/components/nav-bar.vue, and adduserInfoto the data object.data() { return { userInfo: { type: Object, default() {}, }, }; },Add the
getUserInfo()method to the methods section.methods: { async getUserInfo() { try { const response = await fetch('/.auth/me'); const payload = await response.json(); const { clientPrincipal } = payload; return clientPrincipal; } catch (error) { console.error('No profile could be found'); return undefined; } }, },Add the
createdlifecycle hook to the component.async created() { this.userInfo = await this.getUserInfo(); },When the component is created, the user information is fetched automatically.
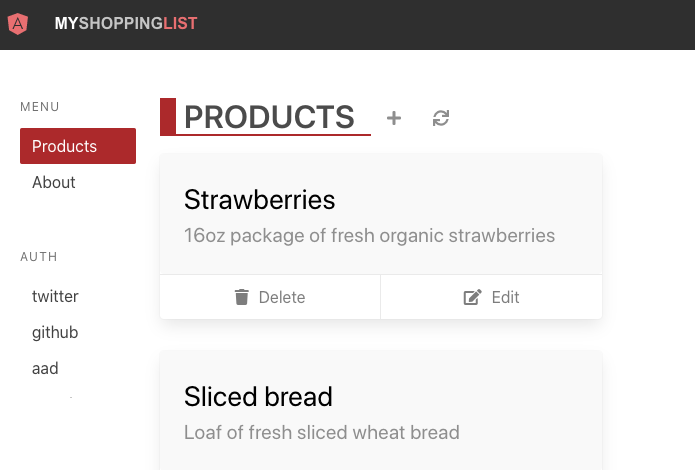
Add login and logout buttons
The user information will be undefined if they're not logged in, so the changes won't be visible for now. It's time to add login buttons for the different providers.
Edit the file
angular-app/src/app/core/components/nav.component.tsto add a list of providers in theNavComponentclass.providers = ['x', 'github', 'aad'];Add the following
redirectproperty to capture the current URL for the post login redirection.redirect = window.location.pathname;Add the following code to the template after the first
</nav>element to display the login and logout buttons.<nav class="menu auth"> <p class="menu-label">Auth</p> <div class="menu-list auth"> <ng-container *ngIf="!userInfo; else logout"> <ng-container *ngFor="let provider of providers"> <a href="/.auth/login/{{provider}}?post_login_redirect_uri={{redirect}}">{{provider}}</a> </ng-container> </ng-container> <ng-template #logout> <a href="/.auth/logout?post_logout_redirect_uri={{redirect}}">Logout</a> </ng-template> </div> </nav>If the user isn't logged in, you display the login button for each provider. Each button links to
/.auth/login/<AUTH_PROVIDER>, and sets the redirection URL to the current page.Otherwise, if the user is already logged in, a logout button displays that links to
/.auth/logout, and also sets the redirection URL to the current page.
You should now see this webpage in your browser.
Edit the file
react-app/src/components/NavBar.jsto add a list of providers at the top of the function.const providers = ['x', 'github', 'aad'];Add the following
redirectvariable below the first variable to capture the current URL for the post login redirection.const redirect = window.location.pathname;Add the following code to the JSX template after the first
</nav>element to display the login and logout buttons.<nav className="menu auth"> <p className="menu-label">Auth</p> <div className="menu-list auth"> {!userInfo && providers.map((provider) => ( <a key={provider} href={`/.auth/login/${provider}?post_login_redirect_uri=${redirect}`}> {provider} </a> ))} {userInfo && <a href={`/.auth/logout?post_logout_redirect_uri=${redirect}`}>Logout</a>} </div> </nav>If the user isn't logged in, you display the login button for each provider. Each button links to
/.auth/login/<AUTH_PROVIDER>, and sets the redirection URL to the current page.Otherwise, if the user is already logged in, you display a logout button that links to
/.auth/logout, and also sets the redirection URL to the current page.
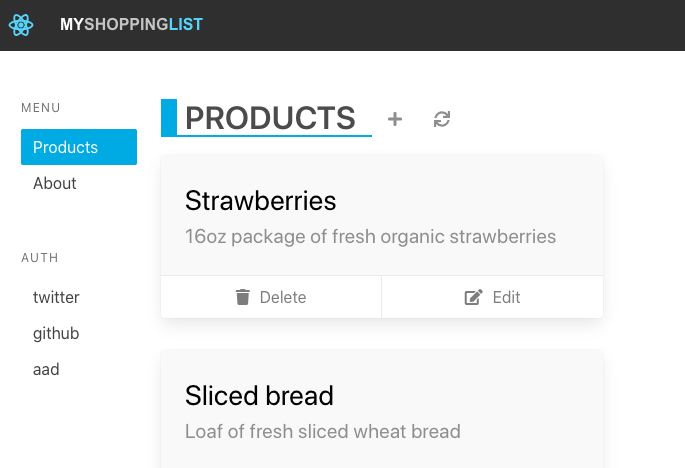
You should now see this webpage in your browser.
Edit the file
svelte-app/src/components/NavBar.svelteto add a list of providers at the top of the script.const providers = ['x', 'github', 'aad'];Add the following
redirectvariable below the first variable to capture the current URL for the post login redirection.const redirect = window.location.pathname;Add the following code to the template after the first
</nav>element to display the login and logout buttons.<nav class="menu auth"> <p class="menu-label">Auth</p> <div class="menu-list auth"> {#if !userInfo} {#each providers as provider (provider)} <a href={`/.auth/login/${provider}?post_login_redirect_uri=${redirect}`}> {provider} </a> {/each} {/if} {#if userInfo} <a href={`/.auth/logout?post_logout_redirect_uri=${redirect}`}> Logout </a> {/if} </div> </nav>If the user isn't logged in, you display the login button for each provider. Each button links to
/.auth/login/<AUTH_PROVIDER>, and sets the redirection URL to the current page.Otherwise, if the user is already logged in, you display a logout button that links to
/.auth/logout, and also sets the redirection URL to the current page.
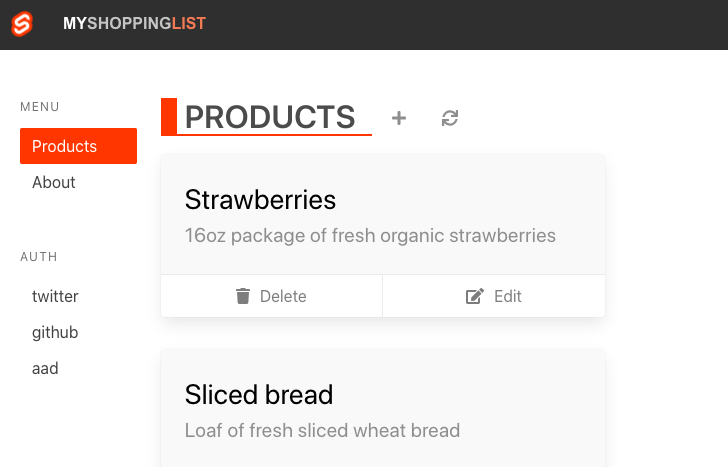
You should now see this webpage in your browser.
Edit the file
vue-app/src/components/nav-bar.vue, and add a list of providers to the data object.providers: ['x', 'github', 'aad'],Add the following
redirectproperty to capture the current URL for the post login redirection.redirect: window.location.pathname,Add the following code to the template after the first
</nav>element to display the login and logout buttons.<nav class="menu auth"> <p class="menu-label">Auth</p> <div class="menu-list auth"> <template v-if="!userInfo"> <template v-for="provider in providers"> <a :key="provider" :href="`/.auth/login/${provider}?post_login_redirect_uri=${redirect}`"> {{ provider }} </a> </template> </template> <a v-if="userInfo" :href="`/.auth/login/${provider}?post_login_redirect_uri=${redirect}`"> Logout </a> </div> </nav>If the user isn't logged in, you display the login button for each provider. Each button links to
/.auth/login/<AUTH_PROVIDER>, and sets the redirection URL to the current page.Otherwise, if the user is already logged in, you display a logout button that links to
/.auth/logout, and also sets the redirection URL to the current page.
You should now see this webpage in your browser.
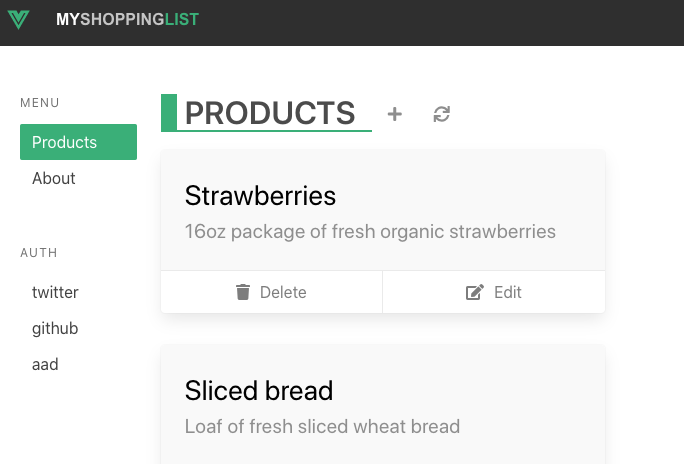
Display the user login status
Before testing the authentication workflow, let's display the user details about the logged-in user.
Edit the file angular-app/src/app/core/components/nav.component.ts, and add this code to the bottom of the template after the final closing </nav> tag.
<div class="user" *ngIf="userInfo">
<p>Welcome</p>
<p>{{ userInfo?.userDetails }}</p>
<p>{{ userInfo?.identityProvider }}</p>
</div>
Note
The userDetails property can be either a username or email address, depending on the identity provided used to log in.
Your completed file should now look like the following:
import { Component, OnInit } from '@angular/core';
import { UserInfo } from '../model/user-info';
@Component({
selector: 'app-nav',
template: `
<nav class="menu">
<p class="menu-label">Menu</p>
<ul class="menu-list">
<a routerLink="/products" routerLinkActive="router-link-active">
<span>Products</span>
</a>
<a routerLink="/about" routerLinkActive="router-link-active">
<span>About</span>
</a>
</ul>
</nav>
<nav class="menu auth">
<p class="menu-label">Auth</p>
<div class="menu-list auth">
<ng-container *ngIf="!userInfo; else logout">
<ng-container *ngFor="let provider of providers">
<a href="/.auth/login/{{ provider }}?post_login_redirect_uri={{ redirect }}">{{ provider }}</a>
</ng-container>
</ng-container>
<ng-template #logout>
<a href="/.auth/logout?post_logout_redirect_uri={{ redirect }}">Logout</a>
</ng-template>
</div>
</nav>
<div class="user" *ngIf="userInfo">
<p>Welcome</p>
<p>{{ userInfo?.userDetails }}</p>
<p>{{ userInfo?.identityProvider }}</p>
</div>
`,
})
export class NavComponent implements OnInit {
providers = ['x', 'github', 'aad'];
redirect = window.location.pathname;
userInfo: UserInfo;
async ngOnInit() {
this.userInfo = await this.getUserInfo();
}
async getUserInfo() {
  try {
    const response = await fetch('/.auth/me');
    const payload = await response.json();
    const { clientPrincipal } = payload;
    return clientPrincipal;
  } catch (error) {
    console.error('No profile could be found');
    return undefined;
  }
}
}
Edit the file react-app/src/components/NavBar.js, and add this code to the bottom of the JSX template after the final closing </nav> tag, to display the login status.
{
userInfo && (
<div>
<div className="user">
<p>Welcome</p>
<p>{userInfo && userInfo.userDetails}</p>
<p>{userInfo && userInfo.identityProvider}</p>
</div>
</div>
)
}
Note
The userDetails property can be either a username or email address, depending on the identity provided used to log in.
Your completed file should now look like the following:
import React, { useState, useEffect } from 'react';
import { NavLink } from 'react-router-dom';
const NavBar = (props) => {
const providers = ['x', 'github', 'aad'];
const redirect = window.location.pathname;
const [userInfo, setUserInfo] = useState();
useEffect(() => {
(async () => {
setUserInfo(await getUserInfo());
})();
}, []);
async function getUserInfo() {
try {
const response = await fetch('/.auth/me');
const payload = await response.json();
const { clientPrincipal } = payload;
return clientPrincipal;
} catch (error) {
console.error('No profile could be found');
return undefined;
}
}
return (
<div className="column is-2">
<nav className="menu">
<p className="menu-label">Menu</p>
<ul className="menu-list">
<NavLink to="/products" activeClassName="active-link">
Products
</NavLink>
<NavLink to="/about" activeClassName="active-link">
About
</NavLink>
</ul>
{props.children}
</nav>
<nav className="menu auth">
<p className="menu-label">Auth</p>
<div className="menu-list auth">
{!userInfo &&
providers.map((provider) => (
<a key={provider} href={`/.auth/login/${provider}?post_login_redirect_uri=${redirect}`}>
{provider}
</a>
))}
{userInfo && <a href={`/.auth/logout?post_logout_redirect_uri=${redirect}`}>Logout</a>}
</div>
</nav>
{userInfo && (
<div>
<div className="user">
<p>Welcome</p>
<p>{userInfo && userInfo.userDetails}</p>
<p>{userInfo && userInfo.identityProvider}</p>
</div>
</div>
)}
</div>
);
};
export default NavBar;
Edit the file svelte-app/src/components/NavBar.svelte, and add this code to the bottom of the template after the final closing </nav> tag, to display the login status.
{#if userInfo}
<div class="user">
<p>Welcome</p>
<p>{userInfo && userInfo.userDetails}</p>
<p>{userInfo && userInfo.identityProvider}</p>
</div>
{/if}
Note
The userDetails property can be either a username or email address, depending on the identity provided used to log in.
Your completed file should now look like the following:
<script>
import { onMount } from 'svelte';
import { Link } from 'svelte-routing';
const providers = ['x', 'github', 'aad'];
const redirect = window.location.pathname;
let userInfo = undefined;
onMount(async () => (userInfo = await getUserInfo()));
async function getUserInfo() {
try {
const response = await fetch('/.auth/me');
const payload = await response.json();
const { clientPrincipal } = payload;
return clientPrincipal;
} catch (error) {
console.error('No profile could be found');
return undefined;
}
}
function getProps({ href, isPartiallyCurrent, isCurrent }) {
const isActive = href === '/' ? isCurrent : isPartiallyCurrent || isCurrent;
// The object returned here is spread on the anchor element's attributes
if (isActive) {
return { class: 'router-link-active' };
}
return {};
}
</script>
<div class="column is-2">
<nav class="menu">
<p class="menu-label">Menu</p>
<ul class="menu-list">
<Link to="/products" {getProps}>Products</Link>
<Link to="/about" {getProps}>About</Link>
</ul>
</nav>
<nav class="menu auth">
<p class="menu-label">Auth</p>
<div class="menu-list auth">
{#if !userInfo}
{#each providers as provider (provider)}
<a href={`/.auth/login/${provider}?post_login_redirect_uri=${redirect}`}>
{provider}
</a>
{/each}
{/if}
{#if userInfo}
<a href={`/.auth/logout?post_logout_redirect_uri=${redirect}`}>
Logout
</a>
{/if}
</div>
</nav>
{#if userInfo}
<div class="user">
<p>Welcome</p>
<p>{userInfo && userInfo.userDetails}</p>
<p>{userInfo && userInfo.identityProvider}</p>
</div>
{/if}
</div>
Edit the file vue-app/src/components/nav-bar.vue, and add this code to the bottom of the template after the final closing </nav> tag, to display the login status:
<div class="user" v-if="userInfo">
<p>Welcome</p>
<p>{{ userInfo.userDetails }}</p>
<p>{{ userInfo.identityProvider }}</p>
</div>
Note
The userDetails property can be either a username or email address, depending on the identity provided used to log in.
Your completed file should now look like the following:
<script>
export default {
name: 'NavBar',
data() {
return {
userInfo: {
type: Object,
default() {},
},
providers: ['x', 'github', 'aad'],
redirect: window.location.pathname,
};
},
methods: {
  async getUserInfo() {
    try {
      const response = await fetch('/.auth/me');
      const payload = await response.json();
      const { clientPrincipal } = payload;
      return clientPrincipal;
    } catch (error) {
      console.error('No profile could be found');
      return undefined;
    }
  },
},
async created() {
  this.userInfo = await this.getUserInfo();
},
};
</script>
<template>
<div column is-2>
<nav class="menu">
<p class="menu-label">Menu</p>
<ul class="menu-list">
<router-link to="/products">Products</router-link>
<router-link to="/about">About</router-link>
</ul>
</nav>
<nav class="menu auth">
<p class="menu-label">Auth</p>
<div class="menu-list auth">
<template v-if="!userInfo">
<template v-for="provider in providers">
<a :key="provider" :href="`/.auth/login/${provider}?post_login_redirect_uri=${redirect}`">{{ provider }}</a>
</template>
</template>
<a v-if="userInfo" :href="`/.auth/logout?post_logout_redirect_uri=${redirect}`">Logout</a>
</div>
</nav>
<div class="user" v-if="userInfo">
  <p>Welcome</p>
  <p>{{ userInfo.userDetails }}</p>
  <p>{{ userInfo.identityProvider }}</p>
</div>
</div>
</template>
Test authentication locally
Everything is now in place. The final step is to test if everything is working as expected.
In your web app, select one of the identity providers to log in.
You'll be redirected to this page:
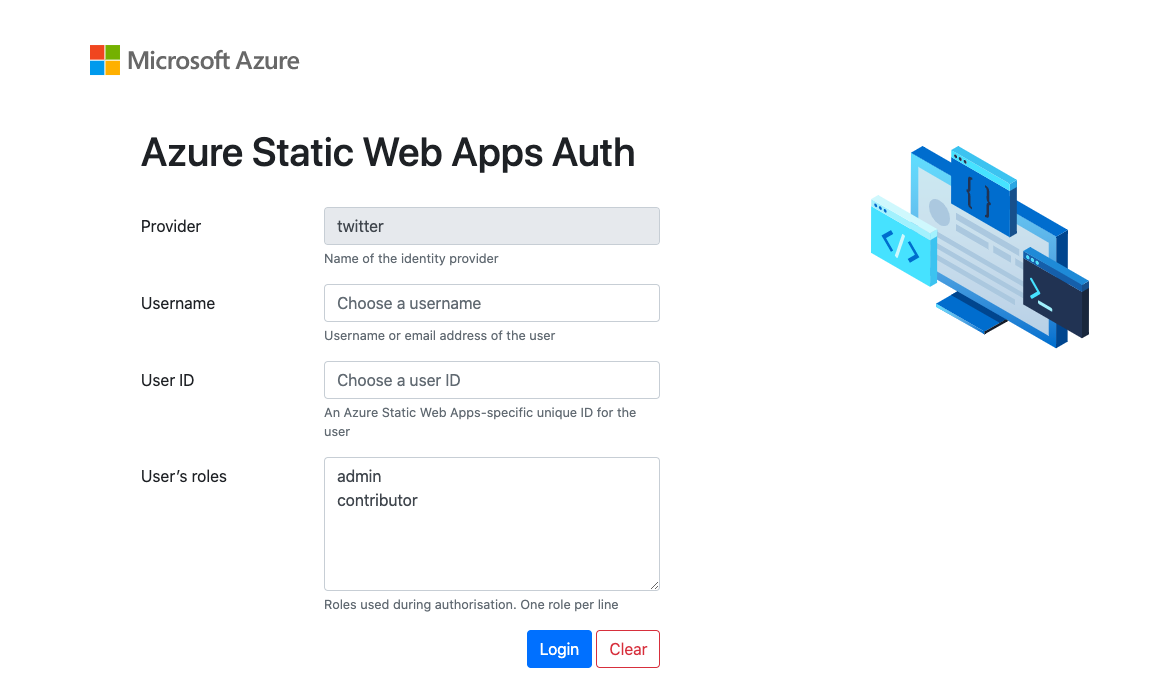
This is a fake authentication screen, provided by the SWA CLI, allowing you to test authentication locally by providing yourself user details.
Enter
mslearnas username and1234for the user ID.Select Login.
After the login, you're redirected to the previous page. You can see the login buttons have been replaced by a logout button. You can also see your username and the selected provider below the logout button.
Now that you checked that everything works as expected locally, it's time to deploy your changes.
You can stop the running app and API by pressing Ctrl-C in both terminals.
Deploy your changes
In Visual Studio Code, open the command palette by pressing F1.
Enter and select Git: Commit All.
Enter
Add authenticationas the commit message, and press Enter.Open the command palette by pressing F1.
Enter and select Git: Push, and press Enter.
After you pushed your changes, wait for the build and deploy process to run. The changes should be visible on your deployed app after that.
Next steps
Your app now supports user authentication and your next step is to restrict some parts of the app to unauthenticated users.