Create a Java web app
Your company is currently running several Java web apps on internal servers. To reduce the high costs associated with maintaining those servers, your company wants to migrate your web apps to Azure App Service.
Your development team has experience using Maven to create desktop apps, and you already use Maven to automate the build process for your Java projects. You understand that Maven uses plugins for projects to add extra functionality, and you want to use an archetype to create a web app that you can deploy to Azure App Service.
In this unit, you'll revisit how Maven and archetypes can help create Java web apps. You'll learn how to create a small Java web app and run it locally. Then, you'll learn what to add to the Project Object Model (POM) file to enable local testing for your new app.
Using Maven to automate building Java web apps
Maven is the most used Java build tool, and you can use it for building and managing any Java-based project. It helps streamline the processes for how developers build Java projects with a standard way to build the projects, a clear definition of what the project consisted of, an easy way to publish project information, and a way to share JARs across several projects. Maven's goals are to:
- Make the build process easier.
- Transparently migrate to new features.
- Provide a uniform build system.
- Implement guidelines about best practice in development.
What are archetypes?
Maven's creators needed a way to provide a consistent best practice to follow when developers structure new projects, and they discovered that there are several similarities between different kinds of projects. The creators used this information to define these project types as templates called archetypes, which Maven uses to create the scaffolding for new projects quickly. Here are several examples of common archetypes:
| Archetype | Description |
|---|---|
maven-archetype-archetype |
Generates an archetype project |
maven-archetype-mojo |
Generates a sample Maven plugin |
maven-archetype-plugin |
Generates a Maven plugin |
maven-archetype-plugin-site |
Generates a Maven plugin site |
maven-archetype-quickstart |
Generates a Maven project |
maven-archetype-simple |
Generates a simple Maven project |
maven-archetype-site |
Generates a Maven site that demonstrates some of the supported document types like APT, XDoc, and FML |
maven-archetype-site-simple |
Generates a simple Maven site |
maven-archetype-webapp |
Generates a Maven web app project |
In the next exercise, you'll create a web app that you can deploy to Azure. For example, to create a new Java web app using Maven, you'd use the following syntax:
mvn archetype:generate \
  -DgroupId=com.microsoft.example \
  -DartifactId=MyWebApp \
  -DarchetypeArtifactId=maven-archetype-webapp \
  -DarchetypeVersion=1.4 \
  -DinteractiveMode=false
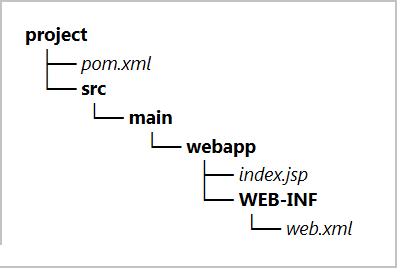
Running the preceding command creates a project directory structure with these contents:
What are Project Object Model (POM) files?
One of the core components of a Maven project is a Project Object Model (POM) file, which is an XML document named pom.xml that resides in the directory tree of a project. The POM file contains the properties, dependencies, build phases, plugins, and goals for a project. When you build your application, Maven will take care of the managing the dependencies for you.
Maven is built on a plugin framework, and adding plugins to a POM file is how developers define goals for their projects. When you run Maven, you can execute a specific goal by using the syntax mvn [plugin-name]:[goal-name], and Maven will run all of the goals up to the [goal-name] that you specify.
The following example illustrates the pom.xml file contents that were generated by the mvn archetype:generate command with the maven-archetype-webapp archetype in the preceding section of this unit.
<?xml version="1.0" encoding="UTF-8"?>

<project xmlns="http://maven.apache.org/POM/4.0.0" xmlns:xsi="http://www.w3.org/2001/XMLSchema-instance"
  xsi:schemaLocation="http://maven.apache.org/POM/4.0.0 http://maven.apache.org/xsd/maven-4.0.0.xsd">
  <modelVersion>4.0.0</modelVersion>

  <groupId>com.microsoft.example</groupId>
  <artifactId>MyWebApp</artifactId>
  <version>1.0-SNAPSHOT</version>
  <packaging>war</packaging>

  <name>MyWebApp Maven Webapp</name>
  <!-- FIXME change it to the project's website -->
  <url>http://www.example.com</url>

  <properties>
    <project.build.sourceEncoding>UTF-8</project.build.sourceEncoding>
    <maven.compiler.source>1.7</maven.compiler.source>
    <maven.compiler.target>1.7</maven.compiler.target>
  </properties>

  <dependencies>
    <dependency>
      <groupId>junit</groupId>
      <artifactId>junit</artifactId>
      <version>4.11</version>
      <scope>test</scope>
    </dependency>
  </dependencies>

  <build>
    <finalName>MyWebApp</finalName>
    <pluginManagement><!-- lock down plugins versions to avoid using Maven defaults (may be moved to parent pom) -->
      ...
    </pluginManagement>
  </build>
</project>
How to add plugins to a Maven project
To add a plugin to your Maven project, you need to add the specific XML for that plugin to the pom.xml file. There are two useful plugins that allow developers to run web apps locally on their machines: Eclipse Jetty and Apache Tomcat. The Azure App Service plugin supports both of these web servers. To add one of these servers to your project, you'd add the requisite XML for the plugin to the <plugins> tag.
For example, to add the Tomcat 11 plugin, you'd add XML like the following example:
<plugin>
  <groupId>org.codehaus.cargo</groupId>
  <artifactId>cargo-maven3-plugin</artifactId>
  <version>1.10.13</version>
  <configuration>
    <container>
      <containerId>tomcat11x</containerId>
    </container>
  </configuration>
</plugin>
Note
To find a plugin and its related information, you can search the Central Repository at https://search.maven.org/.
Once you add the XML for the Tomcat plugin, the <build> element should resemble the following example:
  <build>
    <finalName>MyWebApp</finalName>
    <pluginManagement><!-- lock down plugins versions to avoid using Maven defaults (may be moved to parent pom) -->
      <plugins>
        <plugin>
          <artifactId>maven-clean-plugin</artifactId>
          <version>3.1.0</version>
        </plugin>
        <!-- see http://maven.apache.org/ref/current/maven-core/default-bindings.html#Plugin_bindings_for_war_packaging -->
        <plugin>
          <artifactId>maven-resources-plugin</artifactId>
          <version>3.0.2</version>
        </plugin>
        <plugin>
          <artifactId>maven-compiler-plugin</artifactId>
          <version>3.8.0</version>
        </plugin>
        <plugin>
          <artifactId>maven-surefire-plugin</artifactId>
          <version>2.22.1</version>
        </plugin>
        <plugin>
          <artifactId>maven-war-plugin</artifactId>
          <version>3.2.2</version>
        </plugin>
        <plugin>
          <artifactId>maven-install-plugin</artifactId>
          <version>2.5.2</version>
        </plugin>
        <plugin>
          <artifactId>maven-deploy-plugin</artifactId>
          <version>2.8.2</version>
        </plugin>
        <plugin>
          <groupId>org.codehaus.cargo</groupId>
          <artifactId>cargo-maven3-plugin</artifactId>
          <version>1.10.13</version>
          <configuration>
            <container>
              <containerId>tomcat11x</containerId>
            </container>
          </configuration>
        </plugin>
      </plugins>
    </pluginManagement>
  </build>
After you've added the Tomcat plugin to your project, you can use the following Maven command to build the project, start the Tomcat server, and test your web app:
mvn package cargo:run
This command builds your app, starts a Tomcat server on the default port of 8080, and loads the Tomcat server. To load your web app, navigate to http://localhost:8080/MyWebApp (MyWebApp is specified in the <finalName> element in pom.xml).
When you load the web app, it shows the default index.jsp page from your project's src\webapp folder.
In the next exercise, you'll create a Java web app using Maven.