Query relational data in Azure SQL Database
You run SQL commands from tools and utilities that connect to the appropriate database. The tooling available depends on the database management system you're using. In this unit, you'll learn about the tools you can use to connect to Azure SQL Database.
Retrieve connection information for Azure SQL Database
You can use any of these tools to query data held in Azure SQL Database:
- The query editor in the Azure portal
- The
sqlcmdutility from the command line or the Azure Cloud Shell - SQL Server Management Studio
- Visual Studio Code
- SQL Server Data Tools
To use these tools, you first need to establish a connection to the database. You'll require the details of the server to connect to, an Azure SQL Database account (a username and password) that has access to this server, and the name of the database to use on this server. You can find the server name for a database using the Azure portal: go to the page for your database, and on the Overview page note the fully qualified server name in the Server name field.
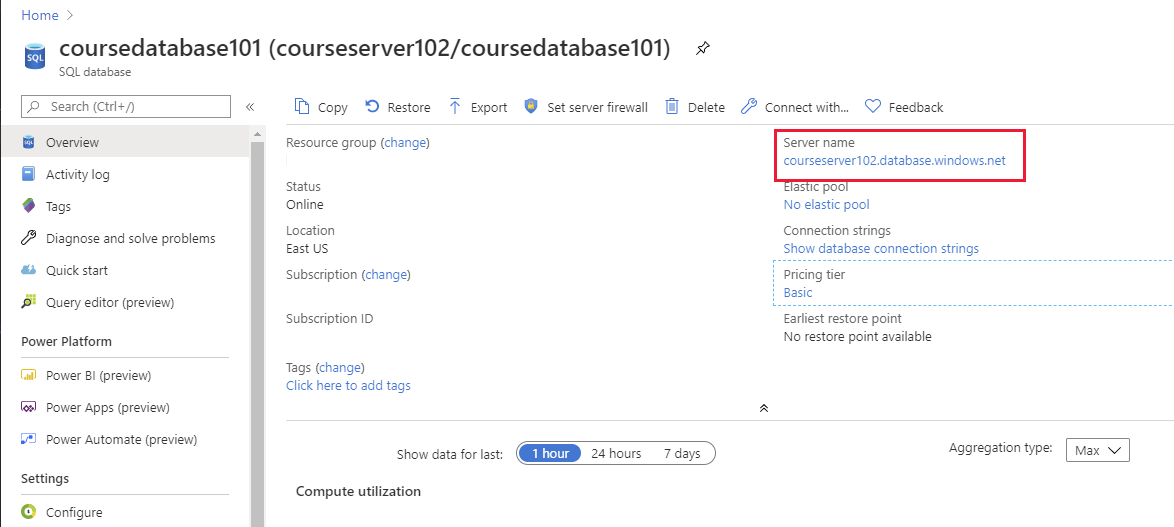
Some tools and applications require a connection string that identifies the server, database, account name, and password. You can find this information from the Overview page for a database in the Azure portal: select Show database connection strings.
Note
The database connection string shown in the Azure portal doesn't include the password for the account. You must contact your database administrator for this information.
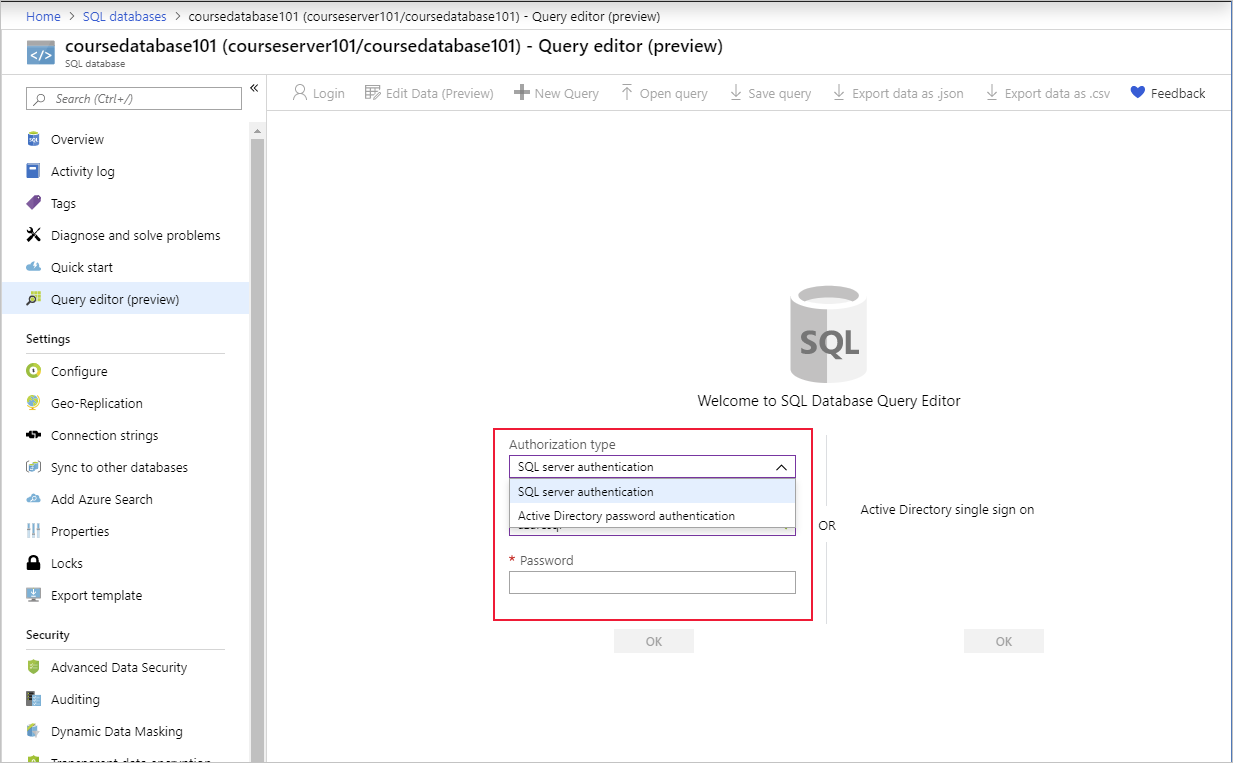
Use the Azure portal to query a database
To access the query editor in the Azure portal, go to the page for your database and select Query editor. You'll be prompted for credentials. You can set the Authorization type to SQL Server authentication and enter the user name and password that you set up when you created the database. Or you can select Microsoft Entra password authentication and provide the credentials of an authorized user in Microsoft Entra ID. If Active Directory single sign-on is enabled, you can connect by using your Azure identity.
You enter your SQL query in the query pane and then click Run to execute it. Any rows that are returned appear in the Results pane. The Messages pane displays information such as the number of rows returned, or any errors that occurred:
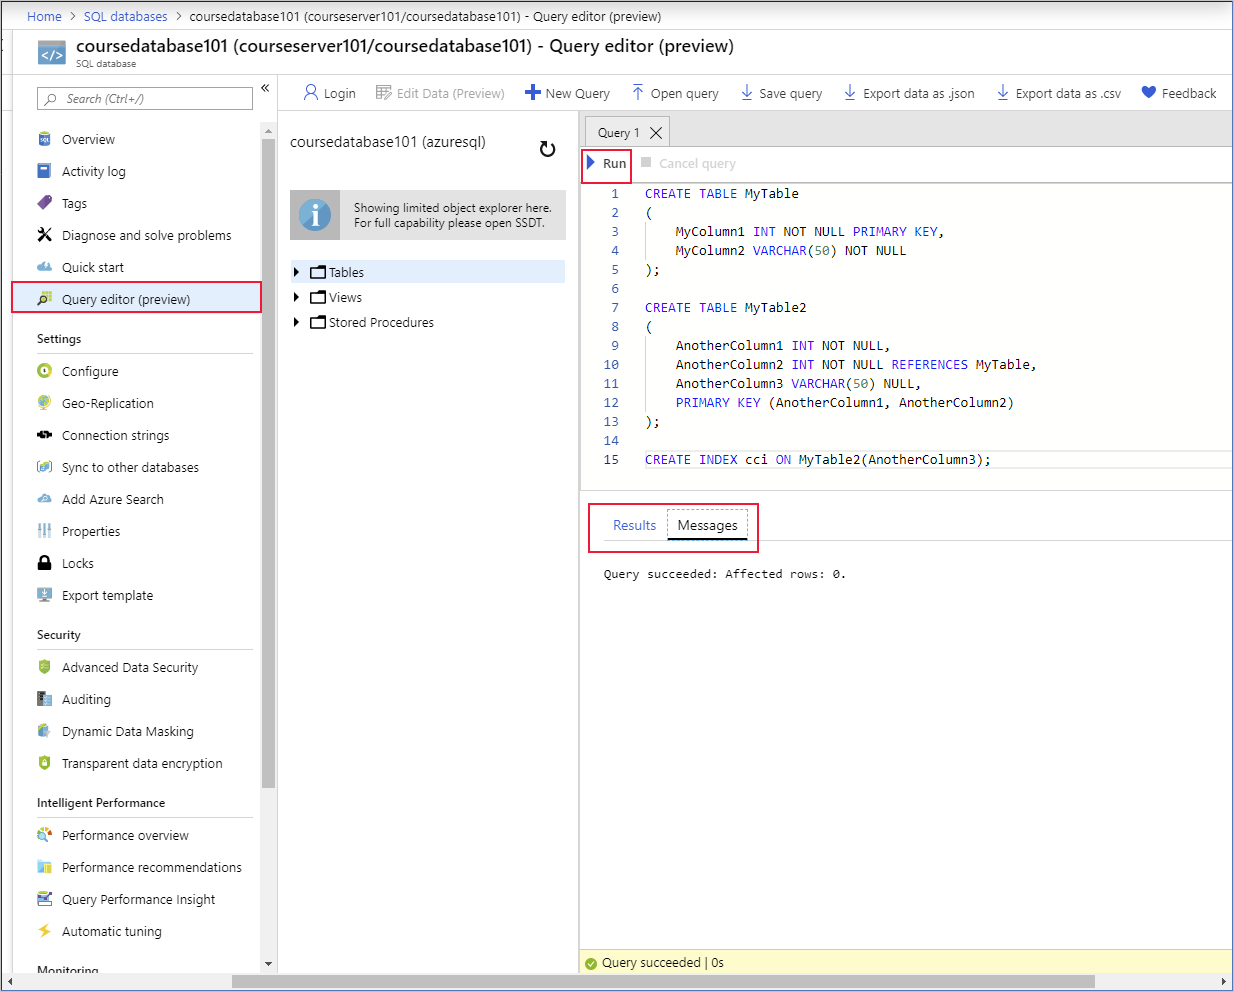
You can also enter INSERT, UPDATE, DELETE, CREATE, and DROP statements in the query pane.
Use SQLCMD to query a database
The sqlcmd utility runs from the command line and is also available in the Cloud Shell. You specify parameters that identify the server, database, and your credentials. The code below shows an example. Replace <server> with the name of the database server that you created, <database> with the name of your database, and <user name> and <password> with your credentials.
Note
To use the sqlcmd utility from the command line, you must install the Microsoft command line utilities on your computer. You can find download instructions, and more details on running the sqlcmd utility on the sqlcmd Utility web page.
sqlcmd -S <server>.database.windows.net -d <database> -U <username> -P <password>
If the sign-in command succeeds, you'll see a 1> prompt. You can enter SQL commands, then type GO on a line by itself to run them.
Use SQL Server Management Studio
SQL Server Management Studio (SSMS) is a graphical utility for creating and running SQL queries from your desktop. For download and installation instructions, visit the Download SQL Server Management Studio (SSMS) page on the Microsoft website.
The first time you run SQL Server Management Studio the Connect to Server dialog box should open. If it doesn't appear, you can open it manually by selecting File > Connect Object Explorer.
Fill in the following fields using the server name, user name, and password for your Azure SQL Server:
Setting Description Server type Database Engine Server name The fully qualified server name. You can find the server name in the Azure portal, as described earlier. Authentication Microsoft Entra - Password (recommended) for Microsoft Entra accounts, or SQL Server Authentication for SQL logins. Login The server admin account user name. Specify the user name from the account used to create the server. Password The password you specified when you provisioned the server. 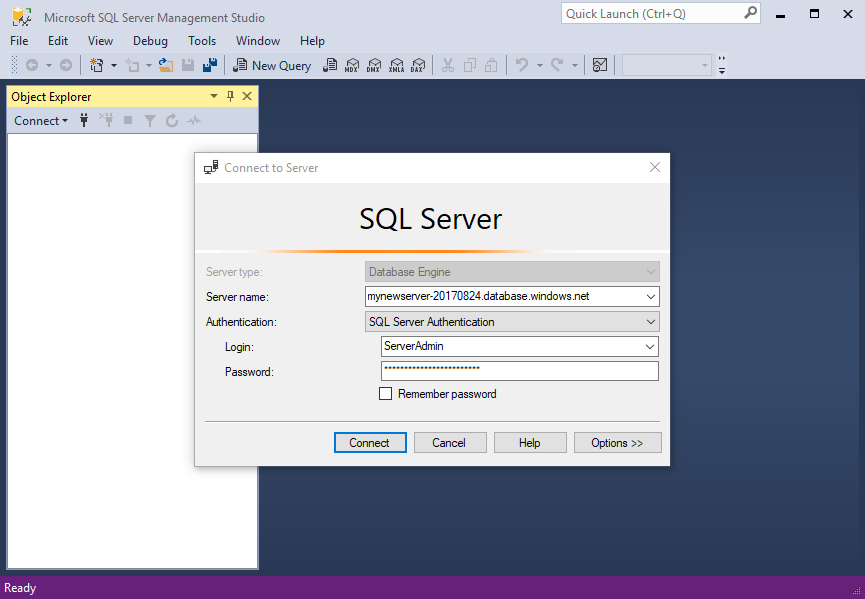
Select Connect.
If your server doesn't have a firewall rule allowing SQL Server Management Studio to connect, you need to create one. For details, see Create a server-level firewall rule using the Azure portal.
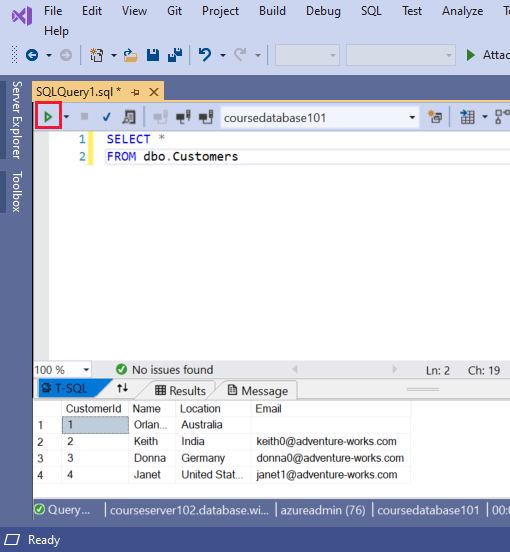
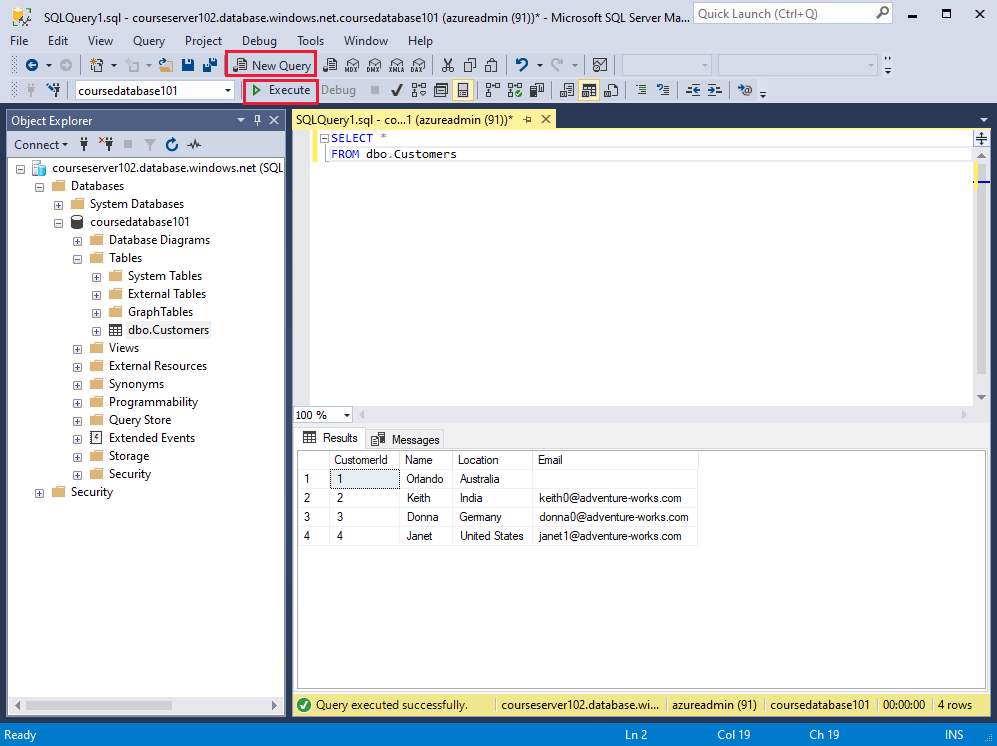
After successfully connecting, your server is available in the Object Explorer window. You can expand Databases to view your database and its objects. Use the New Query button in the toolbar to create and run scripts of SQL commands.
The example below uses Transact-SQL commands to create a new database (CREATE DATABASE and ALTER DATABASE commands are part of the Transact-SQL dialect, and aren't part of standard SQL). The script then creates a new table named Customers, and inserts four rows into this table. Again, the version of the INSERT statement, with four VALUES clauses, is part of the Transact-SQL dialect. The -- characters start a comment in Transact-SQL. The [ and ] characters surround identifiers, such as the name of a table, database, column, or data type. The N character in front of a string indicates that the string uses the Unicode character set.
Note
You can't create new SQL databases from a connection in SQL Server Management Studio if you're running SQL Database single database or elastic pools. You can only create new databases in this way if you're using SQL Database managed instance.
IF NOT EXISTS (
   SELECT name
   FROM sys.databases
   WHERE name = N'TutorialDB'
)
CREATE DATABASE [TutorialDB];
GO

ALTER DATABASE [TutorialDB] SET QUERY_STORE=ON;
GO

-- Switch to the TutorialDB database
USE [TutorialDB]
GO

-- Create a new table called 'Customers' in schema 'dbo'
-- Drop the table if it already exists
IF OBJECT_ID('dbo.Customers', 'U') IS NOT NULL
DROP TABLE dbo.Customers;
GO

-- Create the table in the specified schema
CREATE TABLE dbo.Customers
(
   CustomerId        INT    NOT NULL   PRIMARY KEY, -- primary key column
   Name      [NVARCHAR](50)  NOT NULL,
   Location  [NVARCHAR](50)  NOT NULL,
   Email     [NVARCHAR](50)  NOT NULL
);
GO

-- Insert rows into table 'Customers'
INSERT INTO dbo.Customers
   ([CustomerId],[Name],[Location],[Email])
VALUES
   ( 1, N'Orlando', N'Australia', N''),
   ( 2, N'Keith', N'India', N'keith0@adventure-works.com'),
   ( 3, N'Donna', N'Germany', N'donna0@adventure-works.com'),
   ( 4, N'Janet', N'United States', N'janet1@adventure-works.com');
GO
To execute the script, select Execute on the toolbar. Notifications appear in the MESSAGES pane showing query progress.
Use SQL Server Data Tools in Visual Studio
Visual Studio is a popular development tool for building applications. It's available in several editions. You can download the free community edition from the Visual Studio Downloads page on the Microsoft website.
SQL Server Data Tools are available from the Tools menu in Visual Studio. To connect to an existing Azure SQL Database instance:
In Visual Studio, on the Tools menu, select SQL Server, and then select New Query.
In the Connect dialog box, enter the following information, and then select Connect:
Setting Value Server name The fully qualified server name, from the Overview page in the Azure portal Authentication SQL Server Authentication Login The user ID of the server admin account used to create the server Password Server admin account password Database Name Your database name Screenshot of the Connect dialog box in Visual Studio.](../media/3-sql-sever-data-tool-connect.png)
In the Query window, enter your SQL query, and then select the Execute button in the toolbar. The results appear in the Results pane.