Populating and sending commands
Lab overview
Dynamics 365's Connected Field Service solution provides the ability to remotely monitor IoT enabled devices to keep track of up time, device statistics, anomalies, and more. After an IoT device communicates an anomaly or exception, that information is sent to Connected Field Service as an alert. Once the alert is captured, IoT devices can be remotely managed and interacted with using IoT device commands from within Dynamics 365. To assist some flexibility, the data populated in these commands can be easily populated using command and property definitions.
The purpose of this hands-on-lab is to introduce you to creating and defining command and property definitions in Connected Field Service. Additionally, we will demonstrate how you can automate the process of sending commands using Dynamics 365 functionality.
Scenario
You work for a plumbing and heating company that sells and services smart home devices. Since many of the devices that you service are smart devices, information from those devices can be captured remotely to aid in the servicing of that equipment. Your organization has several defined scenarios that include the processes that will be used while servicing equipment. These processes can vary depending on several factors including:
Type of device in need of service
Severity of the issue detected
Age of the device
Location of the device
Availability of resources to work on a specific device
The above items represent only a small portion of factors that your organization uses to determine the process for servicing equipment.
Lately, you have been installing many smart thermostat devices. These devices have been handy in being able to track temperature and humidity readings in areas when it is important to maintain a consistent temperature and humidity. Because you have much more information available than previously, it has forced you to create new processes for handling and resolving issues reported by these devices. The first area you would like to focus on is for automating the process used for temperature-related issues.
Your organization is looking to implement the following process:
If a device detects a temperature reading of more than 70 degrees, an alert should be surfaced in your Connect Field Service environment.
If the temperature reading is between 70 degrees and 85 degrees, a command should be sent to remotely reset the device to see if the issue resolves itself.
Your organization wants to make it as easy as possible for technicians to create commands and modify parameters. They would like to pre-define a few of the commands and properties that are common to these smart thermostat devices.
The two commands they want to pre-define are:
- Notification:
{"CommandName":"Notification","Parameters":{"Message":"Technician has been dispatched"}}
- Set Values:
{"CommandName":"Set Values","Parameters":{"Reading":{"Temperature":"30","Humidity":"30"}}}
Exercise 1: Define command and property definitions
Task 1: Create device categories
Navigate to Power Apps and make sure you are in the correct environment that has Connected Field Service configured.
Select Apps and click to open the Connected Field Service application.
Switch to the Settings area of the sitemap.
Select Device Categories and click + New.
Enter Temperature for Name and click Save.
Click + New again.
Enter Humidity for Name and click Save.
Task 2: Create property definitions
Select Property Definitions from the sitemap and click + New.
Configure your property definition as follows:
Name: Message
Type: String
Editable: Yes
Visible: Yes
Additional Properties:
- Default: A technician has been dispatched.
Save and Close the Message property definition.
Click the + New button.
Configure your property definition as follows:
Name: Reading
Type: Object
Save and Close the reading property definition.
Click the + New button.
Configure your property definition as follows:
Name: Temperature
Type: Whole Number
Parent Property: Reading
Editable: Yes
Visible: Yes
Additional Properties:
MinValue: 1
MaxValue: 120
Default: 65
Save and Close the Temperature property definition.
Click + New again.
Configure your property definition as follows:
Name: Humidity
Type: Whole Number
Parent Property: Reading
Editable: Yes
Visible: Yes
Additional Properties:
MinValue: 1
MaxValue: 100
Default: 40
Save and Close the Humidity property definition.
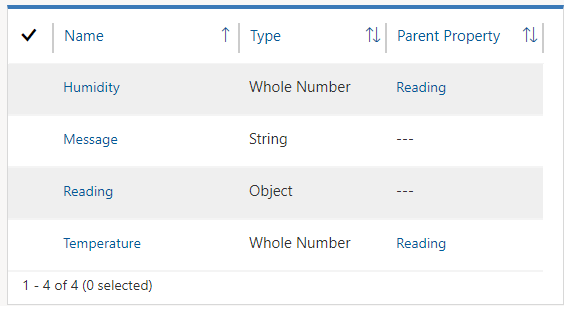
Your completed property definitions should resemble the image below:
Task 3: Create command definitions
Select Command Definitions and click + New.
Configure your command definition as follows:
- Name: Notification
Save the Notification command definition and leave it open. This will also enable the Property Definition sub-grid.
Click Add Existing IoT Device Category.
In the lookup records, select both the temperature and humidity categories.
Click Add.
Click Add Existing IoT Property Definition.
Select Message, click Add.
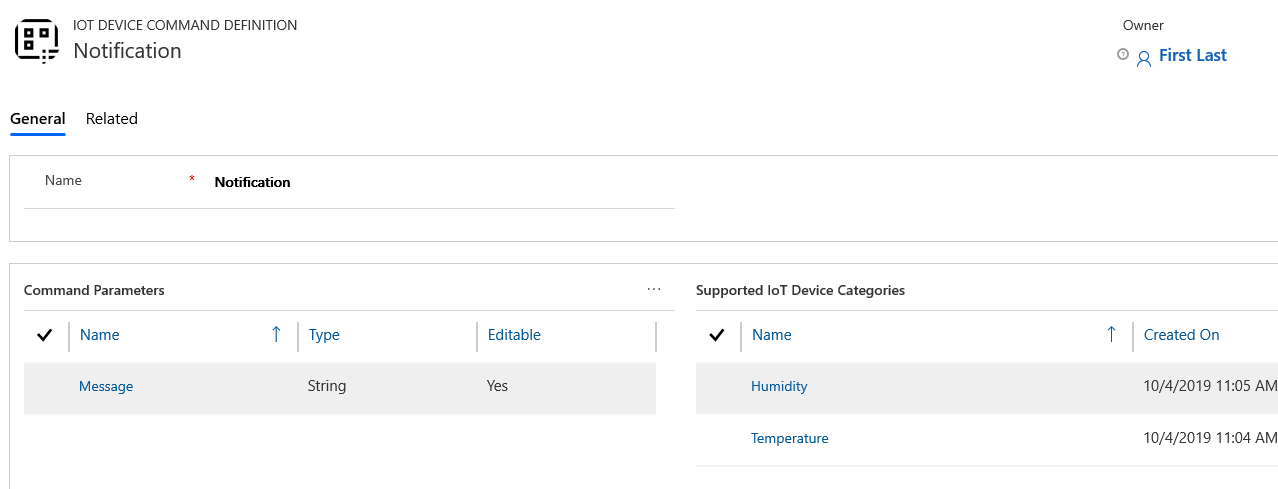
The completed Notification command definition should resemble the image below:
Click the + New button.
Configure your command definition as follows:
- Name: Set Values
Save the Set Values command definition and leave it open.
Click Add Existing IoT Device Category.
In the lookup records, select both the Temperature and Humidity categories.
Click Add.
Click Add Existing IoT Property Definition.
Select Reading, click Add.
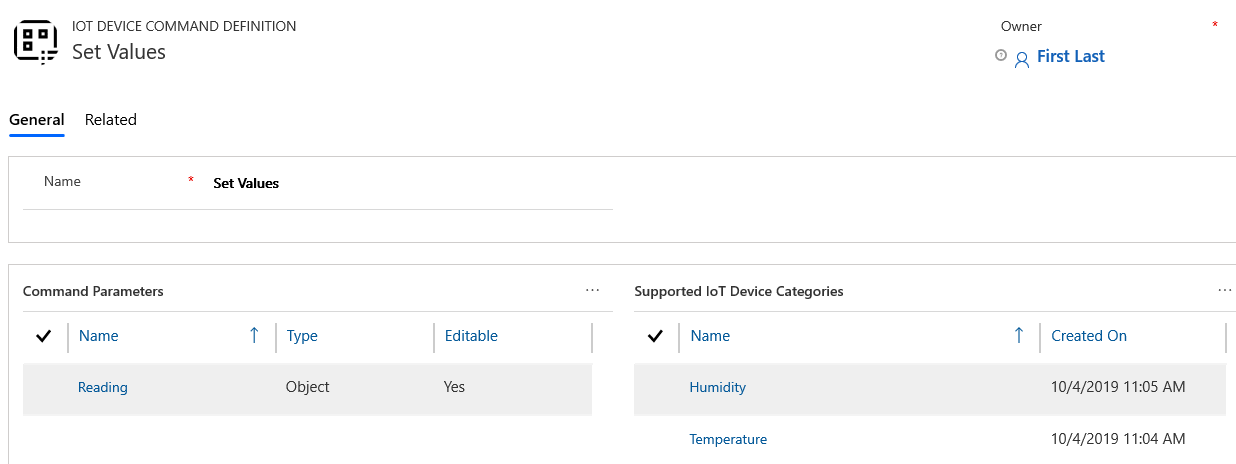
The completed Set Values command definition should resemble the image below:
Exercise 2: Using definitions to populate commands
Task 1: Attach to simulator (Optional)
Note
If you already have the simulator open from the Unit 3 exercise, you can skip straight to Task 2. Otherwise follow the steps below to attach to the simulator.
In your web browser, select a new tab and navigate to Azure portal. Sign in to Azure if prompted. You need an Azure subscription associated with the account you are using.
Select Resource Groups.
Open the resource group you are using with Connected Field Service, and select the Simulator.
Click the Simulator URL to open the thermostat simulator. The simulator should open in a new tab.
On the simulator click Connection.
Switch back to your Azure subscription, close the simulator app service screen.
Open the IoT Hub.
Highlight the IoT Hub name and Copy it.
Switch back to your simulator screen and paste the IoT hub name into the Host field.
Switch back to your Azure subscription, select Shared Access Policies.
Open the iothubowner policy and copy the Primary key.
Switch back to your simulator screen and paste the Primary Key into the Key field.
Click the Connect button. Your Simulator is connected and ready to use.
Task 2: Use simulator to generate and interact with alerts
With the simulator open, click the Refresh button to ensure all registered devices are available.
From the Select a device drop-down, select the smt-9876 device. A green dot should appear next to the refresh button, and after a few seconds it should start transmitting information.
On the Temperature Slider, set it to 75 Degrees and wait for the temperature status to register on in the Messages Sent window.
Switch to the browser tab that has Connected Field Service loaded.
Switch to the Connected Field Service sitemap area.
Select IoT Alerts.
Open the Temperature of 75 exceeded a threshold of 70 Alert.
On the Command Bar, click Send Command.
Click Advanced.
Enter Set Device Values for Name.
Under Message to Send, click in the lookup field next to Command, select the Set Values command.
The message should display with the Temperature and Humidity properties pre-defined.
Change Temperature to 60
Change Humidity to 35
On the Command bar, click the Send & Close button.
Switch back to your simulator, after a short while the device should have its values set to the values defined in the message. Depending on internet speeds, and other factors it can take several minutes for this to occur.
Set the temperature on the device to 86 degrees and wait for it to register in the Messages Sent.
Switch to the browser tab that has Connected Field Service loaded.
Select IoT Alerts.
Open the Temperature of 86 exceeded a threshold of 70 alert.
On the Command Bar, click Send Command.
Click Advanced.
Enter Dispatch Tech for Name.
Under Message to Send, click in the lookup field next to Command, select the Set Values command.
The message should display with the Message property pre-defined.
On the Command bar, click the Send & Close button.
Switch back to your simulator, after a short while a message should appear in the Messages Received that a Technician has been dispatched. Depending on internet speeds, and other factors it can take several minutes for this to occur.
If you check the status of "IOT Alert" in the Connected Field Service environment, it should now change to "In Progress -- Command Sent".
Exercise 3: Automate sending of commands
Task 1: Create a new IoT alert process solution
Navigate to Power Apps and make sure you are in the correct environment.
Select Solutions and click New Solution.
Name the solution IoT Alert Processes.
Click on the Publisher drop down and select + Publisher.
Configure the Publisher as follows.
Display Name: Connected Field Service Course
Prefix: cfs
Click Save and Close.
Click on the Publisher dropdown and select the publisher you created.
In the Version field, enter 1.0.0.0. and click Create.
Click to open the IoT Alert Process solution you created.
Click Add Exiting and select Entity.
Select IoT Alert and click Next.
Do not include required components. Click Add again.
Task 2: Customize the IoT alert entity
Click to open the IoT Alert Process solution.
Click to open the IoT Alert entity.
Select the Fields tab and click + Add Field.
Provide the information mentioned below:
Display Name: Reading
Data Type: Whole Number
Minimum Value: 0
Maximum Value: 250
Click Done.
Click + Add Field again.
Configure the new field as follows:
Display Name: Customer
Data Type: Lookup
Target Record Type: Account
Click Done.
Click Save Entity.
Select Solutions and click Publish All Customizations.
Task 3: Copy set values command message
Navigate to Power Apps and make sure you are in the correct environment.
Select Apps and open the Connected Field Service application.
Select Commands and click + New.
Scroll down to the Message to Send section and select Set Values for Command.
Click Switch to JSON View.
Copy the JSON and save it to a Notepad.
Close the Connected Field Service application without saving the Command record.
Task 4: Create a flow to populate values
Navigate to Power Apps and make sure you are in the correct environment.
Select Solutions and click to open the IoT Alert Process solution.
Click + New and select Flow. This will open a New window.
Rename the Flow Populate Alert Fields and Set Values.
Search for Microsoft Dataverse and select Common Data Service (Current Environment). Make sure that you have selected the one with "Current Environment".
Select When a Record is Created, Updated, or Deleted.
Select Create for Trigger Condition, IoT Alerts for Entity, and select Organization for Scope.
Click on the Menu button and select Rename.
Rename the When Alert is Created and click + New Step.
Search for Parse and select Parse Json.
Click on the Content field and select Alert Data from the Dynamic Content pane.
Paste the JSON schema below in the Schema field.
 {
     "type": "object",
     "properties": {
         "deviceid": {
             "type": "string"
         },
         "readingtype": {
             "type": "string"
         },
         "reading": {
             "type": "integer"
         },
         "eventtoken": {
             "type": "string"
         },
         "threshold": {
             "type": "integer"
         },
         "ruleoutput": {
             "type": "string"
         },
         "time": {
             "type": "string"
         }
     }
 }
Rename the step ParseAlertDate and click + New Step.
Search for Get a Record and select Get a Record (Current Environment). Make sure that you have selected the one with "Current Environment".
Rename the step Get Customer Asset.
Select Customer Assets for Entity Name.
Click on the Item Identifier field and select Customer Asset (Value) from the Dynamic Content pane.
Click + New Step.
Search for Update a Record and select Update a Record (Current Environment). Make sure that you have selected the one with "Current Environment".
Rename the step Update Alert.
Select IoT Alerts for Entity Name, click on the Records Identifier field and select IoT Alert from the Dynamic Content pane.
Click Show Advanced Options.
Click on the Customer (Account) field and type accounts().
Place your cursor between ( and ) and select Account (Value) from the Dynamic content.
Click on the Reading field and select reading of the Parse Json step from the Dynamic content.
Hide Advanced Options.
Click + New Step.
Select Condition.
Click on the Choose Value field and select Reading from the Update Alert step.
Select Is Greater than or Equal to.
Enter 71 for Value, click + Add, and select Add Row.
Click on the Choose Value field and select Reading from the Update Alert step in the Dynamic Content.
Select Is Less than or Equal to.
Enter 85 for Value.
Your condition should now look like the image below.

Go to the Yes branch and click Add an Action.
Search for Create a New Record and select Create a New Record (Current Environment). Make sure that you have selected the one with "Current Environment".
Rename the step Send Set Values Command.
Select IoT Device Commands for Entity Name, click on the Name field and select Description from the When Alert is created action in the Dynamic Content.
Add Set Device Values to the Name and click Show Advanced Options.
Click on the Customer Asset field and type msdyn_customerassets().
Place your cursor between ( and ) and select Customer Assets (Value) from the When Alert is created action in the Dynamic Content.
Click on the Device field and type msdyn_iotdevices().
Place your cursor between ( and ) and select Device (Value) from the When Alert is created action in the Dynamic Content.
Click on the Parent Alert field and type msdyn_iotalerts().
Place your cursor between ( and ) and select IoT Alert from the Update Alert action in the Dynamic content.
Select the Device ID field and select Device ID from the When Alert is Created action in the Dynamic Content pane.
Paste the JSON you copied from the Set Values command in the Message field.
{"CommandName":"Set Values","Parameters":{"Reading":{"Temperature":65,"Humidity":40}}}Click Hide Advanced Options.
Click Add an Action.
Search for Update a Record and select Update a Record (Current Environment) Make sure that you have selected the one with "Current Environment".
Rename the step Deactivate Alert.
Select IoT Alerts for Entity Name.
Click on the Record Identifier field and select IoT Alert from the Update Alert action in the Dynamic Content pane.
Click Show Advanced Options.
Set the Status to Inactive and Hide Advanced Options.
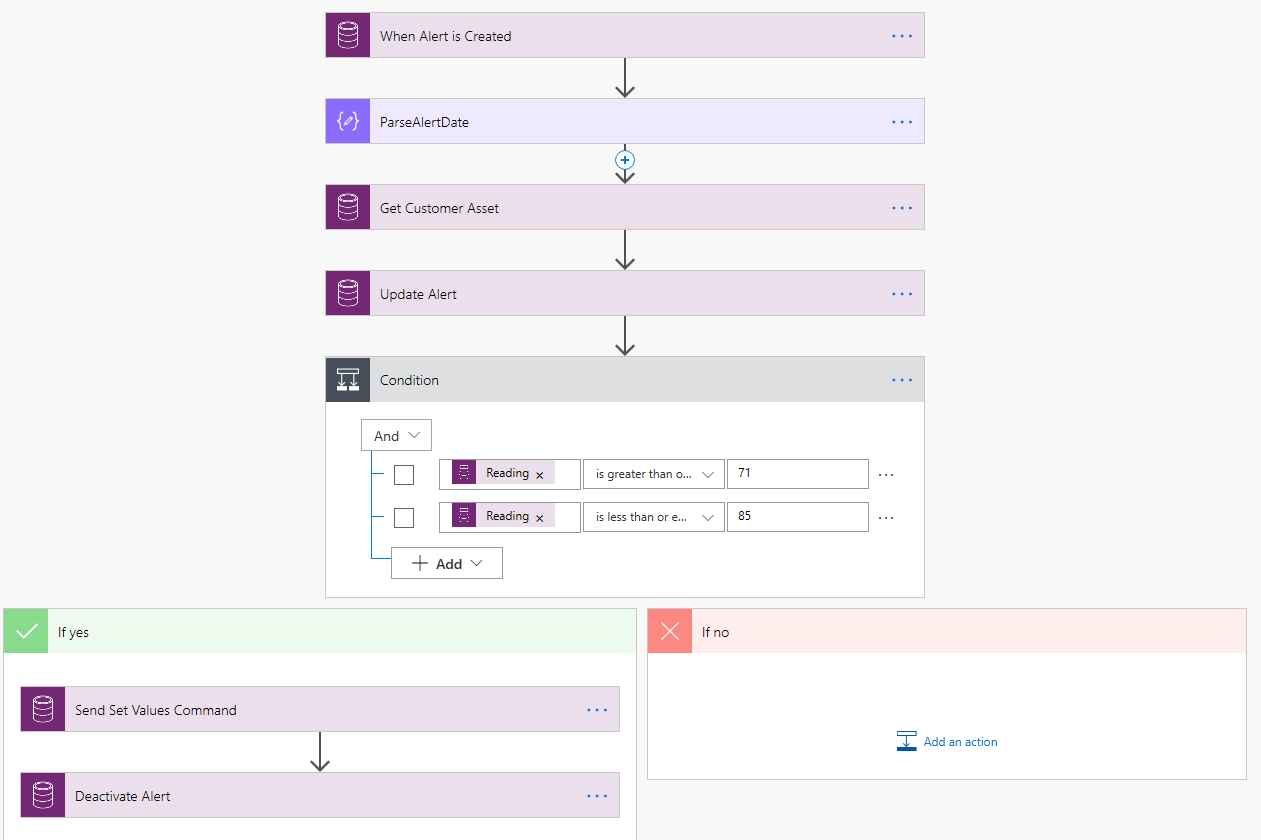
Your flow should now look like the image below.
Click Save.
Task 5: Test the process
Switch back to the web browser tab that contains your simulator. If this is not connected, please follow the same process to open and simulator and create a connection to the IoT Hub.
Set the temperature to 80 Degrees and wait for it to register in the Messages Sent window.
Because the temperature was between 71 degrees and 85 degrees, a command will be sent to the device to set the values on the device. It can take several minutes for the reboot command to be sent to the device.
Switch to the browser tab that has Connected Field Service loaded.
Select IoT Alerts.
Switch the view to Inactive IoT Alerts.
Open the Temperature of 80 exceeded a threshold of 70 Alert.
Select the Commands tab. You should see a Command that was sent to the device.