Configure row-level security with the static method
As a data modeler, you set up RLS by creating one or more roles. A role has a unique name in the model, and it usually includes one or more rules. Rules enforce filters on model tables by using Data Analysis Expressions (DAX) filter expressions.
The static method in row-level security (RLS) uses a fixed value in the DAX filter, while the dynamic method uses a DAX function.
Note
By default, a data model has no roles. A data model without roles means that users (who have permission to query the data model) have access to all model data.
It's possible to define a role that includes no rules. In this case, the role provides access to all rows of all model tables. This role set up would be suitable for an admin user who is allowed to view all data.
RLS involves several configuration steps. Begin by creating a report in Microsoft Power BI Desktop, which includes importing data, applying star schema design principles, and creating report visuals. Then, set up RLS roles using DAX and test them within Power BI Desktop. Once the roles are configured, deploy the report to Microsoft Power BI service, add members to the roles, and conduct final testing in the Power BI service.
Create a report in Power BI Desktop
Follow the typical steps to create a report in Power BI Desktop. Use Microsoft Power Query to retrieve and clean the data. Then, confirm that the relationships exists between the tables by using the Modeling tab. We recommend you apply star schema design principles to produce a model comprising dimension and fact tables. It’s common to set up Power BI to enforce rules that filter dimension tables, allowing model relationships to efficiently propagate those filters to fact tables.
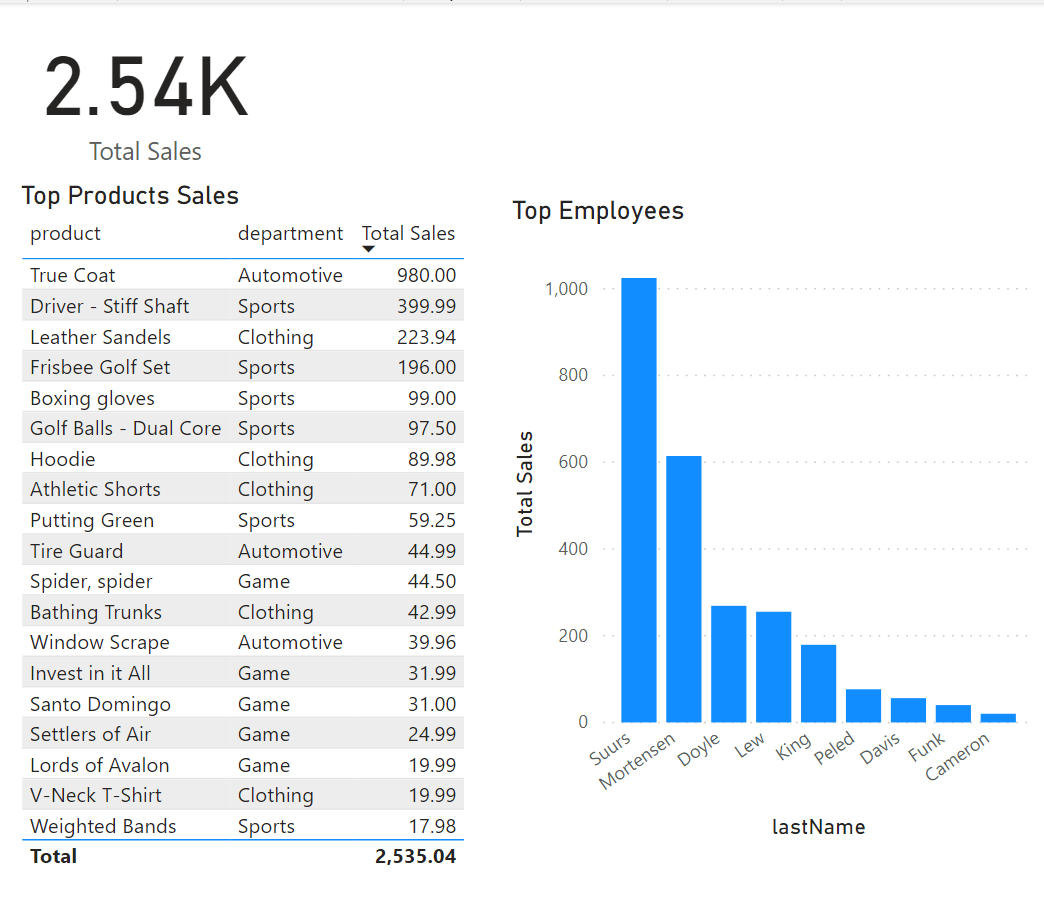
Your next step is to create a Power BI report.
Notice how the preceding table has rows for all sales, including all departments. You will be limiting visibility so that only employees of a specific department can see their own sales.
Create RLS roles in Power BI Desktop
Power BI row-level security (RLS) uses DAX to control who can see which data. Consider it as always adding another filter to the appropriate users, regardless of the filters, slicers, or interactions that the users choose on a Power BI report.
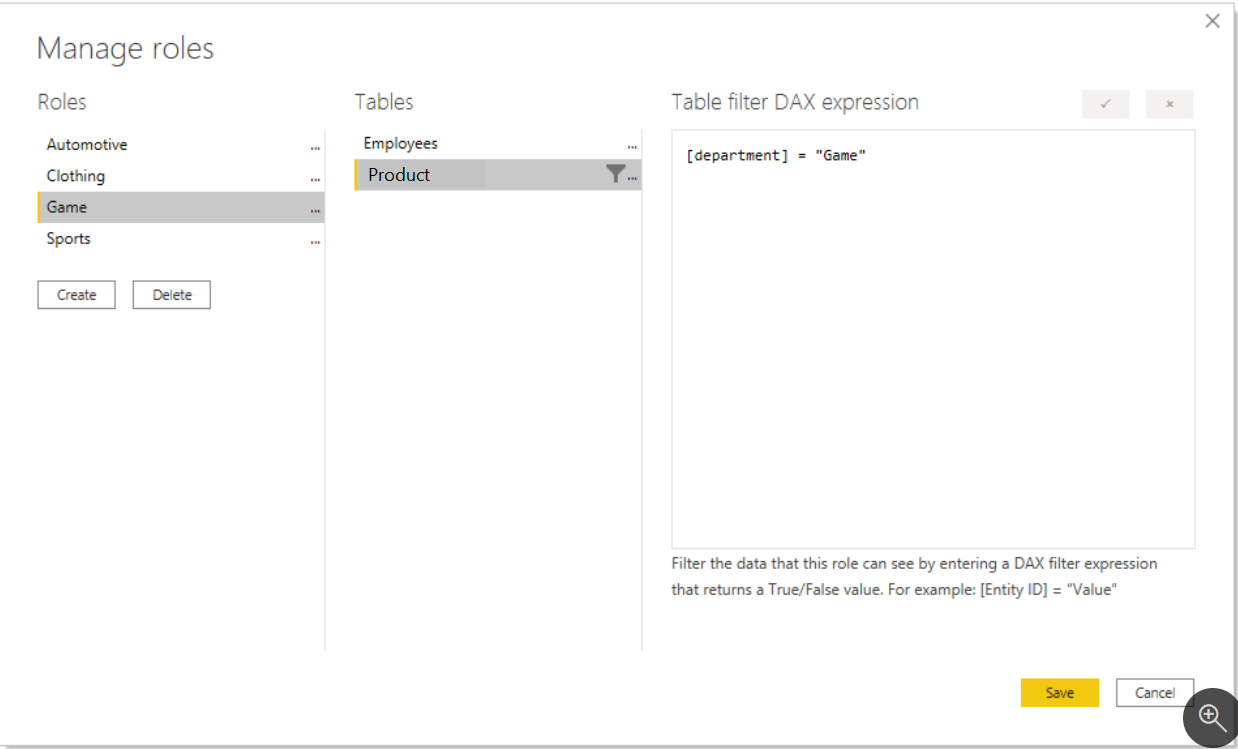
To create RLS roles in Power BI Desktop, select the Modeling tab, and then select Manage Roles. On the Manage security roles page, create a role for each department, and then add a filter or DAX expression to it. For instance, you can create a role called Game and then add the filter or DAX expression [Department] = "Game". Then, whenever a member of that role interacts with the report, Power BI will add that filter to their interactions, thus limiting what they see.
A fixed value is used in the filter on the right side of the equal sign (in this case, "Game"). The intention is that, if you ever need to add a category, you will need to create a new role with a new value in the DAX expression.
The DAX filter is applied to every interaction, slicer, and filter that the user applies. If you have a DAX filter that performs poorly, the user experience will be negatively impacted. Therefore, keep the DAX filter as simple as possible.
Test the roles in Power BI Desktop
You can validate that the filter is working by selecting the Modeling tab and then selecting View as Roles.
In the View as roles window, select the Game role. The report now renders as if you were in that role, and you will only see the records that are included in the Game department.
You can undo this filter by selecting View as roles again and then selecting None.
Deploy the report to Power BI service
You can deploy the report to Power BI service by selecting the Publish button on the Home tab and then selecting a workspace.
Add members to the role in Power BI service
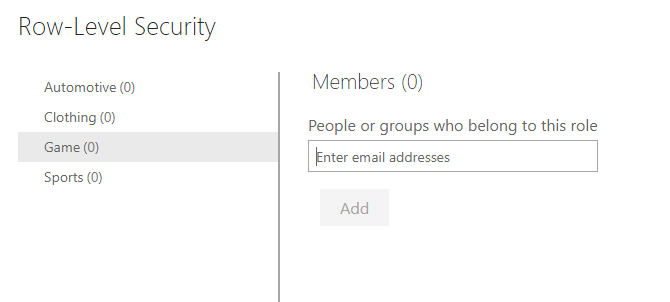
To add members to the role in Power BI service, go to your workspace in Power BI service. Find the semantic model that you created with the same name as your report. Select the ellipsis (...) button and then select Security.
In the Row-Level Security screen, you can add Microsoft Entra ID users and security groups to the security role. When members are added to this role, the DAX filter that you previously defined will be applied to them. If members are not added to the role, but they have access to the report, RLS will not apply to them. You can add the three people in the Game department to the Game role. Now, when those members sign in, they will only see the report with data that applies to them.
Note
RLS only applies to viewers in a workspace. Workspace members assigned Admin, Member, or Contributor roles have edit permissions for the semantic model, and therefore, RLS does not apply to them
Tip
When possible, it’s a good practice to map roles to security groups. That way, there will be fewer mappings, and you can delegate the group membership management to the network administrators.
Test the roles in Power BI service
Testing roles in Power BI service allows you to simulate and verify that the row-level security (RLS) configurations are working as intended. Select the ellipsis (...) next to the Game role on the Row-Level Security screen and then selecting Test as role.
This selection will display the report as if you were a member of the role in Power BI service.
Now that you understand how to configure RLS with the static method, let’s explore how to do it dynamically.


