Create an agent in Copilot Chat
Business users with no programming or technical background can create their own agents using Agent Builder, the lightweight, built‑in authoring experience inside Microsoft 365 Copilot Chat. Agent Builder makes it easy for anyone to design helpful, task‑oriented agents that support everyday work.
All you need to do is describe the agent's purpose in natural language, and Agent Builder automatically converts your description into structured instructions. No coding or technical knowledge is required. In turn, Agent Builder generates a draft agent and translates your natural language description into detailed, programmatic instructions that guide the agent's actions. From that starting point, you can optionally configure the agent to include more detailed settings, knowledge sources, and customization options.
Whether you’re building a simple assistant to answer common questions or preparing the foundation for a more advanced, fully managed agent built in Copilot Studio, this training walks you through each step. By the end, you should understand how to create, refine, and test an agent directly within Copilot Chat using a fast, intuitive, and approachable process designed for business users.
Agent Builder
Agent Builder is the lightweight, in-context authoring interface available directly within Microsoft 365 Copilot Chat. It's designed for business users with no programming experience and makes it easy to build declarative agents. This approach enables employees to create agents quickly without learning new tools or writing code, supporting productivity while staying fully within the Microsoft 365 environment. If desired, agents created in Agent Builder can later be upgraded into the full Copilot Studio environment when advanced features, integrations, or enterprise management tools are needed.
Once the draft version of your agent is generated, you can use Agent Builder to fine‑tune, customize, and connect your agent to knowledge sources so it can provide more targeted responses and actions. You can do so using natural language in Agent Builder's Describe tab, or you can manually configure the agent in the Configure tab.
To create an agent in Microsoft 365 Copilot Chat, you must select the New agent option in the navigation pane on the Copilot Chat page. Doing so opens the New Agent page, where you can either:
- Provide an initial description of the agent that you want Agent Builder to automatically configure for you.
- Select the Skip to configure option to manually configure the agent yourself.
- Select a template from a list of predefined agent templates. Agent Builder configures the agent based on the selected template.
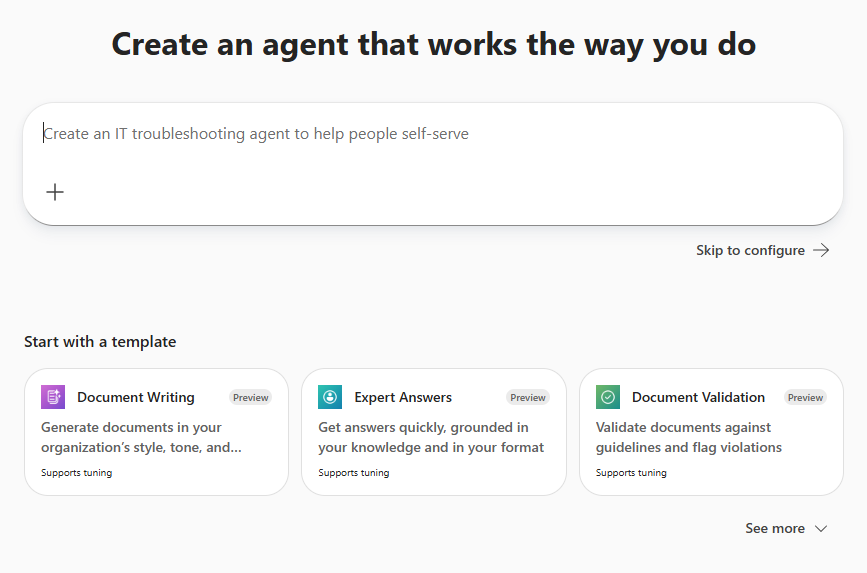
If you select a template, Agent Builder prepopulates the fields in your agent with values from the template, such as icon, name, description, instructions, and suggested prompts, which you can edit. Templates are covered in more detail in the next training unit.
If you enter a description on the New Agent page, Agent Builder analyzes the description to:
- Assign an agent name (or use the name you provide if mentioned in your description)
- Generate an initial set of agent instructions
- Prepare a draft structure that you can refine in Agent Builder
If you submit a description on the New Agent page, the Agent Builder form opens, which contains the Describe and Configure tabs for further authoring. In this scenario, the Describe tab appears by default. However, if you selected the Skip to configure option, Agent Builder's form displays the Configure tab instead.
Warning
The Describe tab might not be available in all regions or languages, depending on feature availability and rollout status. If the Describe tab isn't available yet in your region or preferred language, you must manually build your agent through the Configure tab.
The remainder of this training unit focuses on using the Describe tab. The next training unit explores the Configure tab.
Use the Describe tab (if available) to begin the agent creation process
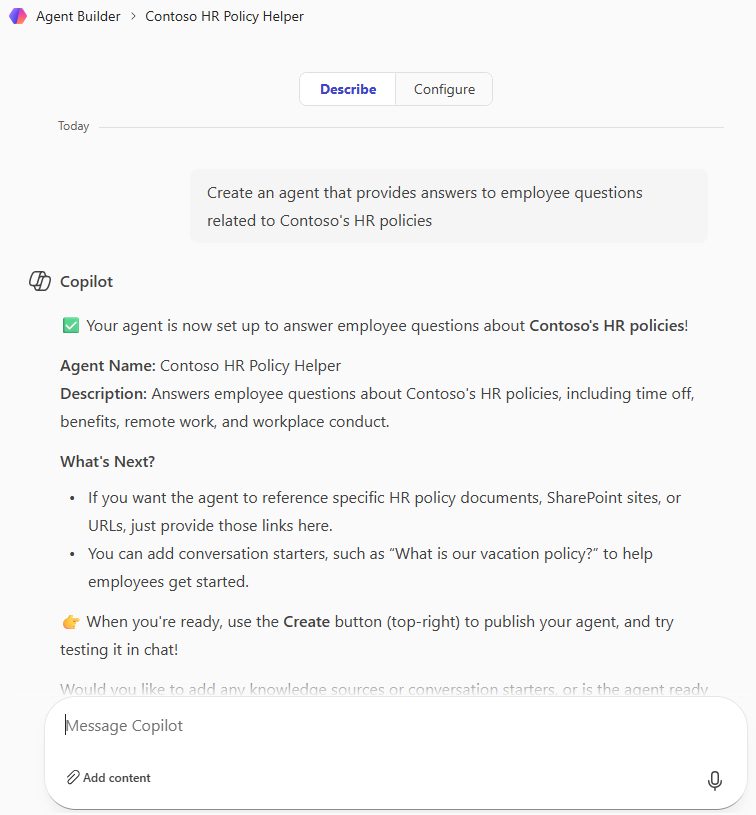
If the Describe tab is available in your region or preferred language, you can use it to create the basic shell of an agent using plain language. Based on the description that you provide on the New Agent page, Agent Builder creates a draft version of your agent. On the Describe tab, it displays a conversation that typically includes some of the information that it automatically configured for the agent. The following items are examples of some of the features that Agent Builder might display in the conversation:
Name. If you entered an agent name in the description that you submitted on the New Agent page, then it uses that name. Otherwise, it assigns a name based on the agent description. For example, let's assume you entered "Create an agent that provides answers to employee questions related to Contoso's HR policies" as your agent description. Based on that description, Agent Builder might assign an agent name like "Contoso HR Policy Helper."
Description. Agent Builder provides an expanded version of the description that you entered on the New Agent page. In our Contoso HR agent example, Agent Builder might display something like "Answers employee questions about Contoso's HR policies, including common HR queries related to time off, benefits, remote work, workplace conduct, and so on."
Instructions. Agent Builder converts the description that you entered on the New Agent page into a detailed set of instructions that guides how the agent responds. In our Contoso HR agent example, Agent Builder might generate an instruction like "Assist Contoso employees with questions and guidelines about HR policies and procedures. Include general guidelines, error handling and limitations, and follow-up and closing actions. Kindly refuse to provide personal information if requested."
Conversation starters. Agent Builder creates several suggested prompts that can be used to start a chat session. In our Contoso HR agent example, Agent Builder might display "Vacation policy, Parental leave, Benefits Overview, and Performance Review Process" as conversation starters. In the Agent preview pane that's displayed on the right side of the page, it then displays the actual questions for each of these conversation starters. For example, under "Vacation Policy," it might display a question such as "How much vacation time do Contoso employees receive annually?"
Capabilities enabled. Agent Builder displays the settings that it configured for the agent based on the description that you entered on the New Agent page. In our Contoso HR agent example, Agent Builder might display something like "Disable Web browsing. Responses must be based on Contoso HR policy documents and web sites."
The following screenshot displays the Describe tab for the Contoso HR Policy Helper agent that was mentioned earlier.
Clarify your agent description
After you enter a description of the agent, Agent Builder might ask you a series of questions (sometimes through suggested prompts) to clarify any of the tasks that were included in it. Typically, the more detail you provide in your description, the fewer questions it tends to ask. This conversational experience provides a rich, yet simple natural language way to create an agent. Agent Builder progressively refines the agent in each turn of the conversation, ensuring that changes are saved automatically.
Here's a list of some of the more common things Agent Builder might ask you:
Clarification of the agent's purpose. Agent Builder might ask you to elaborate on the specific tasks or goals you want the agent to achieve. For example, it might ask, "Can you provide more details on the primary function of this agent?"
Target audience. It might inquire about the intended users of the agent. Questions like "Who plans to use this agent?" or "What is the skill level of the target audience?" help tailor the agent's responses.
Contextual information. The builder might ask for more context or background information that the agent should be aware of. For instance, "Are there any specific scenarios or use cases the agent should be prepared for?"
Response style and tone. It might ask about the preferred tone and style of the agent's responses. Questions like "Should the agent's responses be formal or casual?" or "Do you have any specific guidelines for the agent's communication style?" are common.
Handling specific queries. The builder might seek clarification on how to handle certain types of queries. For example, "How should the agent respond to questions it can't answer?" or "Are there any specific topics the agent should avoid?"
Integration with other systems. If the agent needs to interact with other systems or databases, the builder might ask for details on these integrations. Questions like "Does the agent need to access any external databases or APIs?" are typical.
Fallback mechanisms. The builder might ask about fallback mechanisms in case the agent encounters an issue. For instance, "What should the agent do if it encounters an error or can't find the requested information?"
These questions help ensure the agent is well-defined and capable of meeting the specific needs and expectations of its users.
Tip
When writing your agent’s natural language description, consider including details from the previous list, such as the agent’s purpose, target audience, response style, and any needed integrations. When you provide this information up front, it helps Agent Builder better understand your intent, ask fewer follow-up questions, and generate a more complete draft of your agent.
Next steps
Once you clarify the agent description, there are several actions that you can perform next:
Test the draft version of the agent. Once you finalize your conversation with Agent Builder regarding the agent's instructions, it's recommended that you test the draft version of your agent through the Describe tab. Even before you add any custom knowledge sources in the Configure tab, the agent can still provide responses based on its built-in capabilities and general knowledge. In doing so, the agent uses its preexisting understanding and any default configurations to generate answers.
In the Agent preview pane that's displayed on the right side of the page, you can select one or more of the suggested prompts that Agent Builder generated to test the agent. You can also test the agent by entering a custom prompt in the prompt field that appears at the bottom of the preview pane. If you decide that the agent's instructions need to be modified based on its responses to the submitted prompts, you can use the Copilot prompt field at the bottom of the Describe tab to submit your change requests.
Chat with Agent Builder about improving the agent. Agent Builder updates instructions in real time as you refine the agent through conversation. Use the Copilot prompt field at the bottom of the Describe tab to request changes to the agent. For example, you might want to enter a prompt that asks Agent Builder to suggest ways in which to improve the agent. Based on its responses, you can decide whether you want to request any of its suggested changes.
Or, you might have some specific changes in mind that you want it to make. For example, you might want Agent Builder to change the tone of the agent's responses (for example, from a formal tone to a more casual tone), or to provide citations to the websites or documents that it uses when it generates responses. If you request any changes in your Copilot chat conversation, Agent Builder automatically updates the agent's instructions accordingly.
Tip
Initial testing of the draft version of your agent on the Describe tab is recommended for testing your natural language instruction. However, for more accurate and relevant responses tailored to your specific needs, you should also define and test the knowledge sources in the Configure tab. See the later unit in this training module for detailed information on testing an agent
Finalize your agent and start sharing it. If you're satisfied with the agent's responses and any changes that you requested of Agent Builder, you can select the Create button at the top of the form to finalize your agent. Doing so converts it from a draft version to a live agent, which you can then share with other users.
Manually configure the agent. Even if you're satisfied with the draft version of the agent, you can select the Configure tab to manually review the agent's settings and possibly update them before creating the live version of the agent on the Configure tab.
The next training unit examines how you can use the Configure tab in Agent Builder to refine your agent or manually create an agent from scratch.
Note
We recognize that different people like to learn in different ways. You can choose to complete this module in video-based format or you can read the content as text and images. The text contains greater detail than the videos, so in some cases you might want to refer to it as supplemental material to the video presentation.