Connect data with School Data Sync
School Data Sync (SDS) automates the import and syncing of SIS data with Microsoft 365 and ensures that user and class information stays current as rosters change. In the Connect Data phase, you configure:
- The SIS source system
- The format of incoming data
- Identity matching rules
- The date when syncing should stop
These settings create the inbound flow, which defines how data is brought into SDS.
SDS supports a defined set of input formats. While many student information systems can be used as data sources, all incoming data must ultimately conform to SDS supported CSV schemas (SDSv1 or SDS 2.1) or validated API integrations to be processed successfully.
Use managed data to enable Microsoft 365 scenarios
After data is connected, you can enable one or more managed data scenarios in Microsoft 365. These scenarios use synced users, classes, and roles stored in Microsoft Entra ID to support:
- Microsoft Teams for Education
- Microsoft Intune for Education
- Exchange Online
- SharePoint Online
- OneNote Class Notebook
- Rostering and single sign-on (SSO) for third-party education apps
During each sync run, SDS applies data matching and validation rules. Only valid required and optional data is written to the SDS cache. SDS flags data that fails validation as errors or warnings and doesn't process it further.
What is the Connect Data phase?
Note
A Microsoft 365 Education tenant and Microsoft Global Admin access are required to use SDS.
The Connect Data step defines how SDS imports SIS data. You create the inbound flow by configuring the:
- Source system
- Data format
- Identity matching rules
- Sync end date for the academic session
By default, the inbound flow runs twice a day.
First sync run and basic validation
During the first run, SDS connects to the defined source and performs basic validation to ensure the:
- OneRoster API connection is valid, or
- CSV files contain the correct names, required headers, and no structural issues like duplicate columns
After basic validation, SDS transforms the data for import and prepares it for advanced validation.
SDS also stores an updated copy of user and group information from Microsoft Entra ID in its cache. This cached data helps SDS more efficiently match SIS user records with existing Microsoft Entra ID user objects. At this stage, SDS doesn't yet write the match link to the user object.
SIS syncing methods
SDS supports two primary methods for importing SIS data.
CSV files
CSV imports give you granular control over what data is synced into SDS. SDS supports CSV files that conform to the SDSv1 or SDS 2.1 schema requirements. SIS platforms that don't natively produce SDS formatted files must export their data and transform it to match one of these supported schemas before import:
- SDS Version 1 CSV (SDSv1): The legacy format still widely in use today.
- SDS Version 2.1 CSV: The recommended format going forward. Version 2.1 supports more user roles and education organization types. It's designed for higher education scenarios but also expands role support for K-12. SDS will continue building on this format.
CSV import works for almost any SIS that can export data using one of the supported formats.
The following data sources and export formats aren't directly supported by SDS. Data from these sources must be exported and transformed into a supported SDS CSV schema (SDSv1 or SDS 2.1) before import, or connected using a supported API where available:
- Apple School Manager CSV
- Google Identity Management exports
- SDS UK CSV
- Clever CSV exports
OneRoster API
The OneRoster API provides a standards-based method for syncing SIS data with SDS. After you enter the required credentials, the connection process is fast and straightforward. Once it's configured, SDS begins importing and syncing data automatically.
List of Values
SDS includes a feature called List of Values (also called enums) to improve data validation and normalization. List of Values checks incoming data against expected types and helps ensure that only clean data enters the cache.
SDS includes default lists, and you can extend these lists to meet regional or institutional requirements. Custom lists can be created for:
- Academic subjects
- Demographics (like race, ethnicity)
- Grade levels
- Organization types
- Person flags
During processing, SDS validates all data according to matching and validation rules.
- Errors occur when required fields fail validation; SDS removes the record.
- Warnings occur when optional fields fail validation; SDS keeps the record but removes the invalid value.
List of value matching is case insensitive. If a supplied value doesn't match any supported code, SDS flags the mismatch in sync health reports.
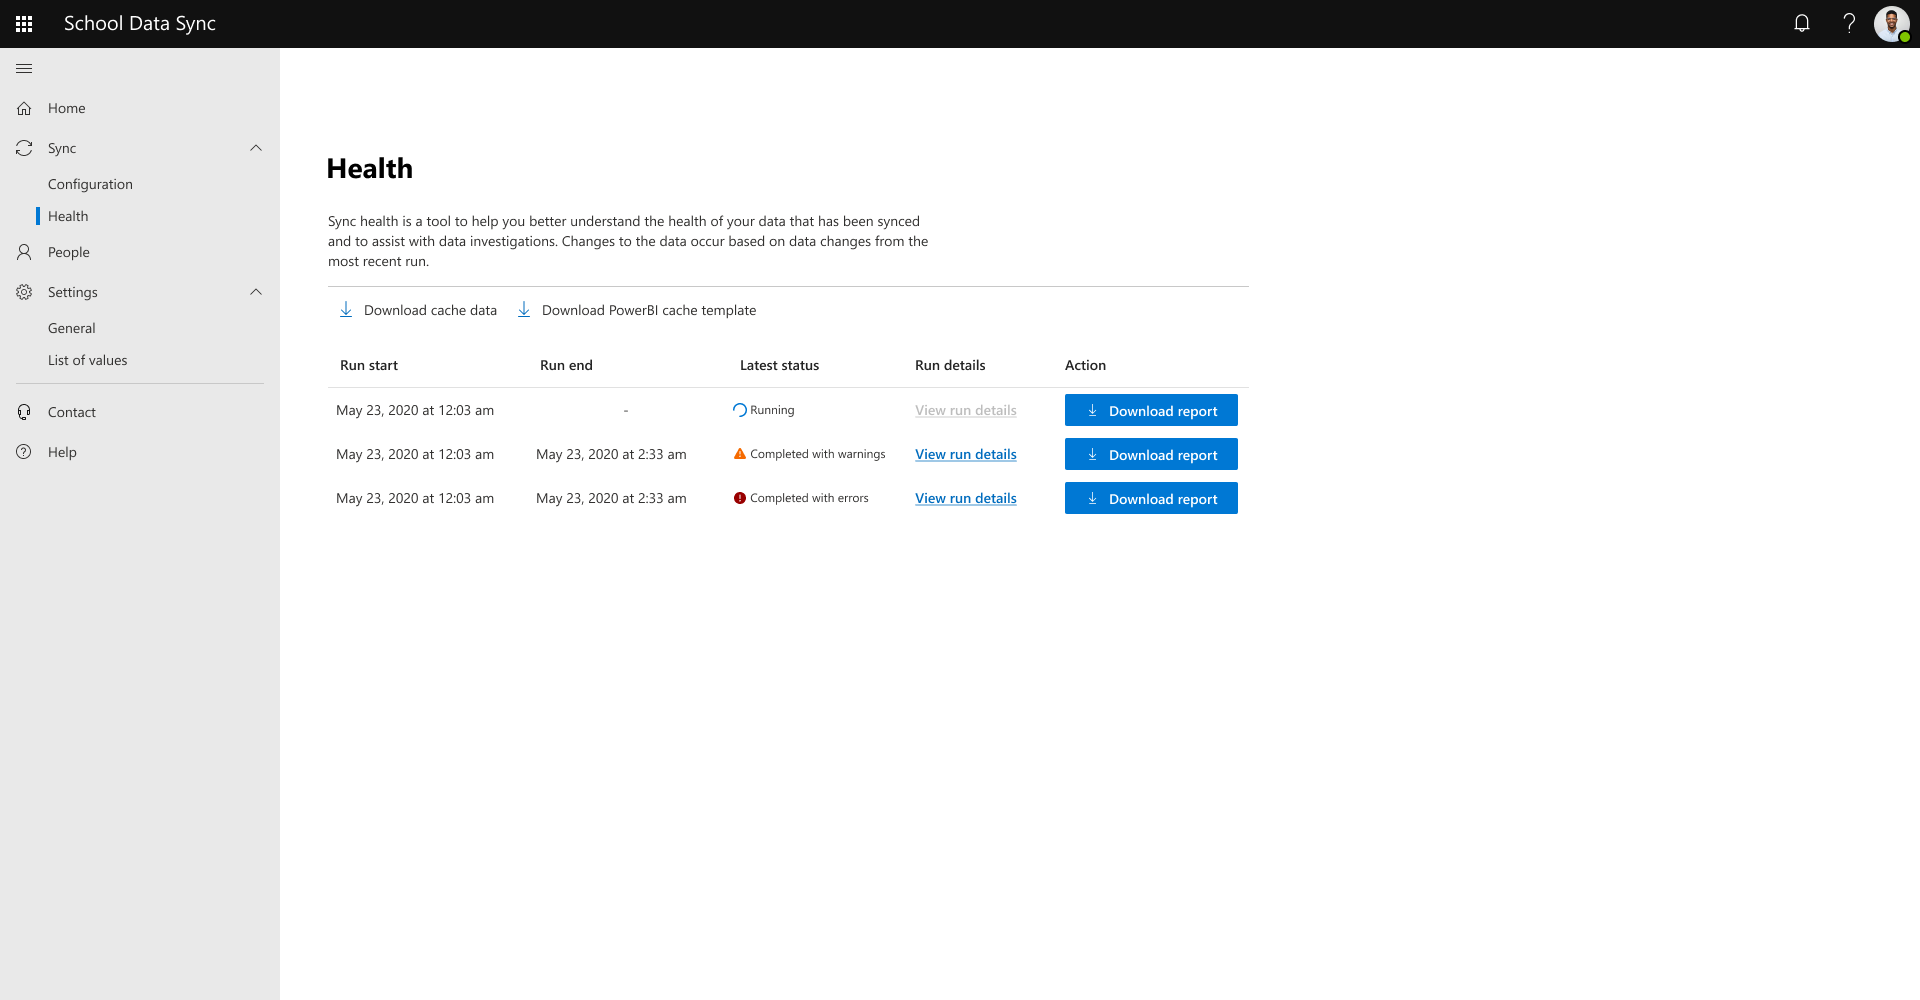
For details, refer to Managing List of Values.
SDS Version 1 CSV
SDSv1 is the most common legacy format. Some legacy fields aren't supported in the current version of SDS, for example:
- School principal
- School address
- School grade levels
- Section term information
For details on what's supported, refer to SDS V1 CSV File Format.
SDSv1 scenarios are grouped into:
- User management, which includes students, teachers, and schools (student, teacher, and school files).
- Rosters, which include classes and enrollments (section, student enrollment, and teacher roster files).
- Student contacts, which include parent and guardian information (student, guardian, and relationship files).
Grade values and core subject values must align with the correct List of Values codes.
SDS Version 2.1 CSV
SDS 2.1 provides expanded role and organization support for both higher education and K-12. Like SDSv1, the data is organized into user management, rosters, and student contacts.
- User management uses orgs, users, and roles files. The roles file links users to organizations.
- Rosters use classes and enrollments files. Enrollment roles are defined in the enrollments file, independent of user roles defined elsewhere. Other files, like courses or academic sessions, can be included when needed.
- Student contacts use users and relationships files. A guardian or contact must have a user record before SDS can process relationships.
Why SDS Version 2.1 CSV is recommended
SDS 2.1 offers significant improvements over SDSv1:
- Simplified structure
- A single enrollments file
- A single users file for all user types
- Alignment with OneRoster 1.1, enriched for SDS
- Expanded support for higher education
- New org types: college, campus, research center, department
- New roles: assistant, professor, researcher, lecturer
- New user levels: postsecondary, undergraduate, graduate, alumni
- Role flexibility (for example, professor in one class, student in another)
- Expanded support for K–12
- New org types: district, region, division, province
- More staff roles: office staff, nurse, assistant, occupational therapist, physical therapist, speech therapist
Assist SDS Classic customers during transition
If you're helping SDS Classic customers move to the new SDS experience, be aware that several legacy SDS Classic formats are not supported.
For each scenario, we recommend the following course of action.
| File type | Recommended course of action |
|---|---|
| SDS UK CSV | Export and transform data into SDSv1 CSV or SDS 2.1 CSV (recommended) before importing into SDS |
| SDSv2 CSV | Must transition to SDS 2.1 CSV |
| Clever CSV | Use the Clever REST API integration with SDS, or export Clever data and transform it into SDS formatted CSV |
| Apple School Manager | CSV exports aren't supported; data must be manually transformed into SDS 2.1 CSV |
| Google Identity Management | Federation alone doesn't provide SDS data; user and roster data must be exported and transformed into SDS compatible CSV |
| PowerSchool | Use supported PowerSchool APIs or export data in SDS 2.1 CSV format |
Differences from SDS Classic (discontinued)
SDS Classic sometimes required splitting data into multiple sync profiles, especially for large datasets. The new SDS no longer requires splitting files when sourcing from the same system. SDS now manages large data loads internally and no longer has a two-million-row limit.
If an SDS Classic customer is still splitting exports from a single SIS, they must update their process as they no longer need to split their files.
CSV file validation in the inbound flow
When you're configuring the inbound flow, SDS prompts you to upload CSV files after selecting SDSv1 CSV or SDS 2.1 CSV.
CSV validation occurs in two stages:
- Basic validation
- Checks for missing files
- Checks for required headers
- Checks for formatting issues, like duplicate columns
- Initial data validation
- Ensures referential integrity across files
- Displays a list of the top validation issues
Automate CSV uploads with Power Automate
The first CSV upload is manual, but you can automate future uploads using the Power Automate School Data Sync template. With this template, you can:
- Schedule upload times
- Receive notifications for successes and failures
- Maintain upload logs using the On-premises Data Gateway on any Windows device hosting exported SIS files
Combining SIS exports with Power Automate allows for fully automated CSV import to SDS.
Power Automate templates require appropriate licensing.
Get started with School Data Sync
- Open Microsoft Edge.
- Go to sds.microsoft.com.
- Sign in and select Get started.
- Review the overview of supported Connect Data methods.
- Select Continue.
- Wait for SDS to activate.
- When you're prompted, begin connecting SIS data.
This process creates the inbound flow, which runs twice a day by default.
Create an inbound flow in School Data Sync
To create the inbound flow, you need to have the following information ready to tell SDS how to access SIS data.
- CSV (local file upload) or API (direct connection to the SIS)
- Names of the:
- SIS
- Institution
- Source names must be unique.
- Choose SDSv1 CSV or SDS 2.1 CSV.
Step 1: Required and optional files
The files you need depend on your scenario. File selection rules ensure that only valid combinations are included before validation begins.
For SDSv1 CSV
User-only management requires:
- school.csv
- student.csv
- teacher.csv
To manage classes and rosters, you must include:
- section.csv
- studentenrollment.csv
- teacherroster.csv
Optional files:
- user.csv
- guardianrelationship.csv (requires user.csv)
For SDS 2.1 CSV
User-only management requires:
- orgs.csv
- users.csv
- roles.csv
To manage classes and enrollments, you must include:
- classes.csv
- enrollments.csv
Optional files (to enhance experience or resolve references):
- academicsessions.csv (required if any other file references sessions)
- courses.csv (required if classes reference courses)
- demographics.csv
- userflags.csv
- relationships.csv
Step 2: File selection and initial checks
If you accidentally select a file with the correct name, you can remove it and re-select the correct file. At this stage, SDS only verifies file names based on the rules displayed in the wizard.
After all required files are selected, select Next to move to the rulechecking step.
Step 3: File upload and schema validation
SDS uploads the CSV files to temporary cache. After the upload, SDS performs basic schema validation to check for formatting errors. When validation finishes, SDS displays the results.
- If a file contains errors, a message appears that the file doesn't match the expected format. The wizard lists the files and errors preventing continuation.
- If a file is missing but optional, a warning appears telling you the missing optional file. If it's intentional, you can continue.
- If all files pass validation, SDS displays a confirmation message. Select Next to continue.
Step 4: Initial data validation
SDS then performs a data validation using core data matching and validation rules. This check identifies errors or warnings early and gives you an opportunity to correct issues before the first full sync. Wait for the validation to finish.
When the validation is complete, SDS displays a summary of:
- Total rows processed
- Error count
- Warning count
Select View details for any file—for example, users.csv—for more information. The summary includes:
- A downloadable file to help with data investigation
- Columns that triggered validation errors or warnings
- Description and severity of rules triggered
- Examples of the top 10 flagged records
An error indicates that required data is missing or invalid. A warning means that an optional field contains invalid data.
After reviewing the results, you can upload the corrected data, exit and return later, or continue with setup.
Step 5: User identity rules
Before continuing, it's important to understand how data flows from the SIS into SDS and Microsoft Entra ID. You can define user identity rules for both staff and student roles. These rules determine how SDS matches existing users and, if it's enabled, how SDS creates unmatched users during the Managed Data User Provisioning flow.
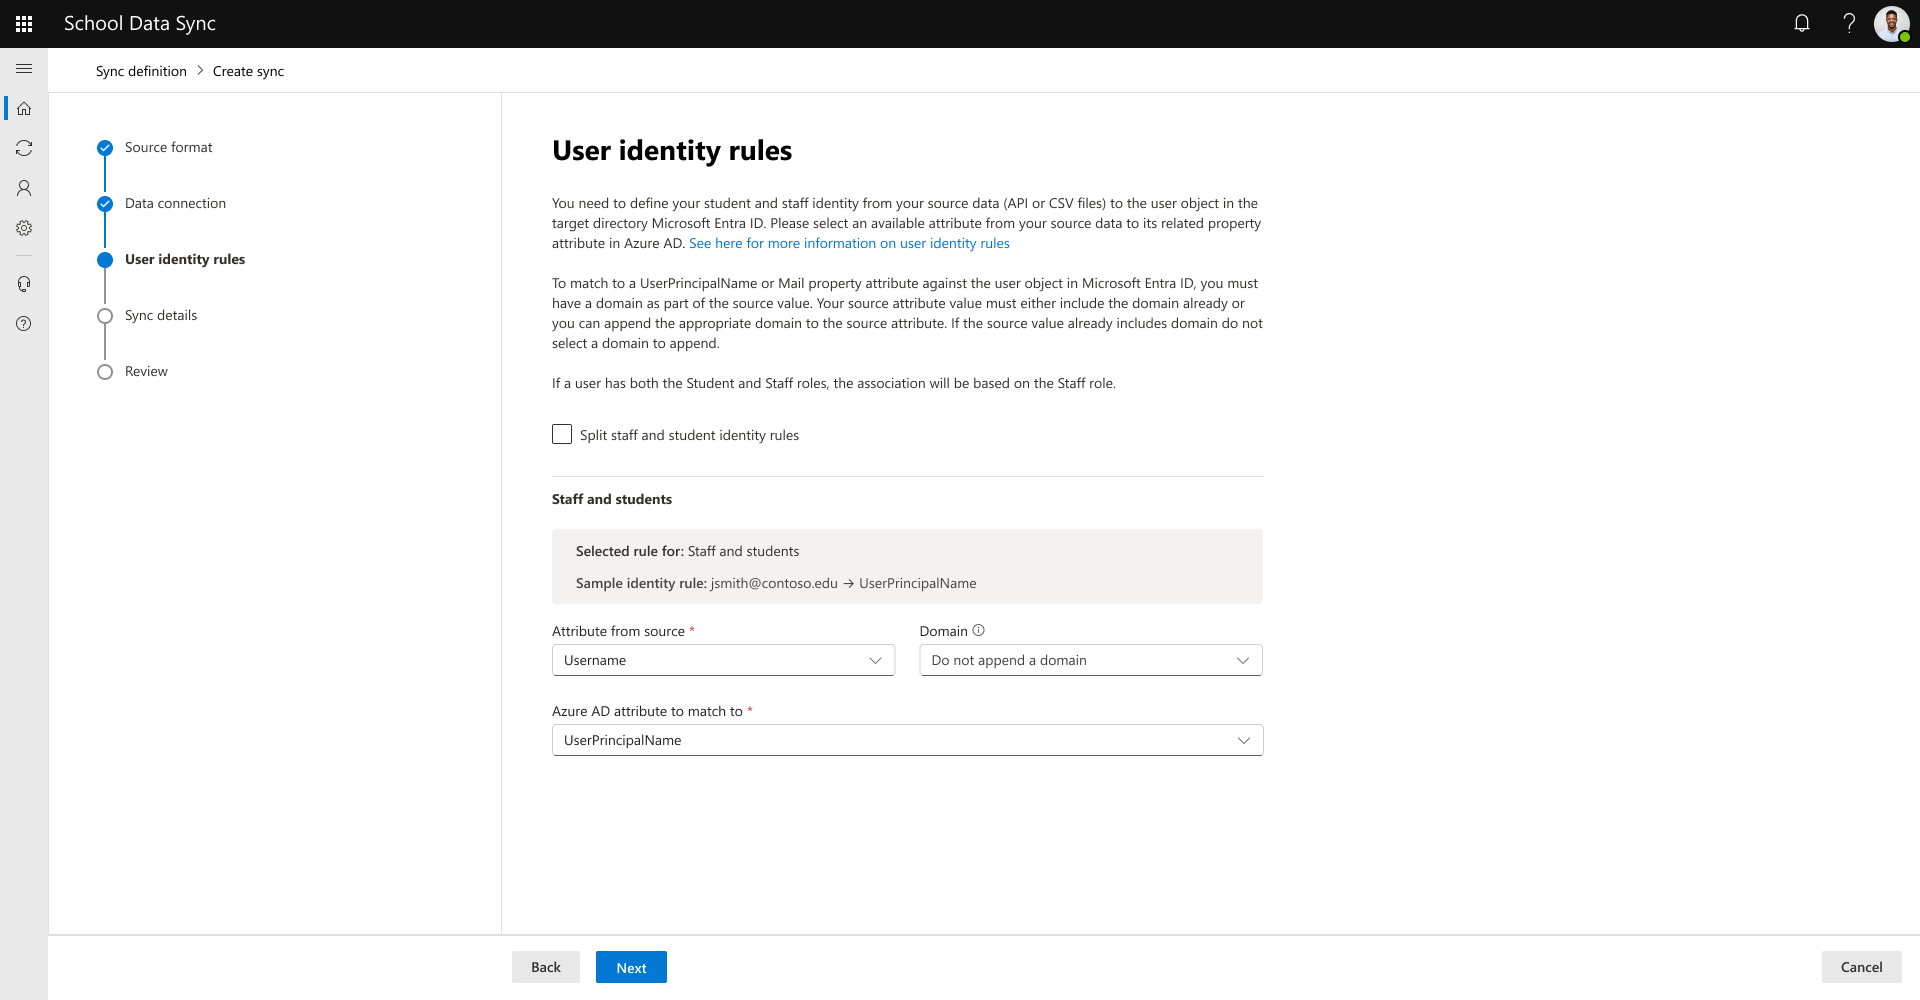
Initial user mapping occurs in the inbound flow and is stored in the SDS cache. SDS doesn't write any updates to Microsoft Entra ID during this step.
In SDS 2.1 CSV, a user can belong to multiple organizations and have multiple roles. SDS determines whether to apply staff or student identity rules using the following logic:
- If IsPrimary is set for all student roles, use student identity rules.
- If IsPrimary is set for any staff role, use staff identity rules.
- If IsPrimary is set for both, use staff identity rules.
- If IsPrimary isn't set for any roles, default to staff identity rules.
If a user has multiple organizations and multiple roles, a separate rule determines what value SDS writes to Microsoft Entra ID when the Managed Data User Provisioning flow is enabled. SDS uses the Organization Role Sort Order defined in the default User Roles List of Values.
Step 6: Select the source identity value
Define the source identity value—the user identifier coming from your SIS. SDS treats this value as a simple alphanumeric string. Supported source attributes include:
- Username (SDSv1 CSV, SDS 2.1 CSV, OneRoster API)
- Email (SDSv1 CSV, SDS 2.1 CSV, OneRoster API)
- Active Directory Match ID (SDS 2.1 CSV only)
You can also append a domain. If the domain is already present in the value, SDS will append it again, which can prevent successful matching. You can choose different domains for staff and student users.
Step 7: Select the Microsoft Entra ID attribute
Choose the attribute in Microsoft Entra ID to match against. Options include:
- User Principal Name (UPN)
Select Next.
Step 8: Set the sync end date
Define when SDS should stop syncing updates from the SIS for the academic session. Many institutions set this date near the end of the school year. Adjust the end date as needed. If your SIS no longer marks data as active after a certain date, set the sync end date earlier to avoid unintended data removal.
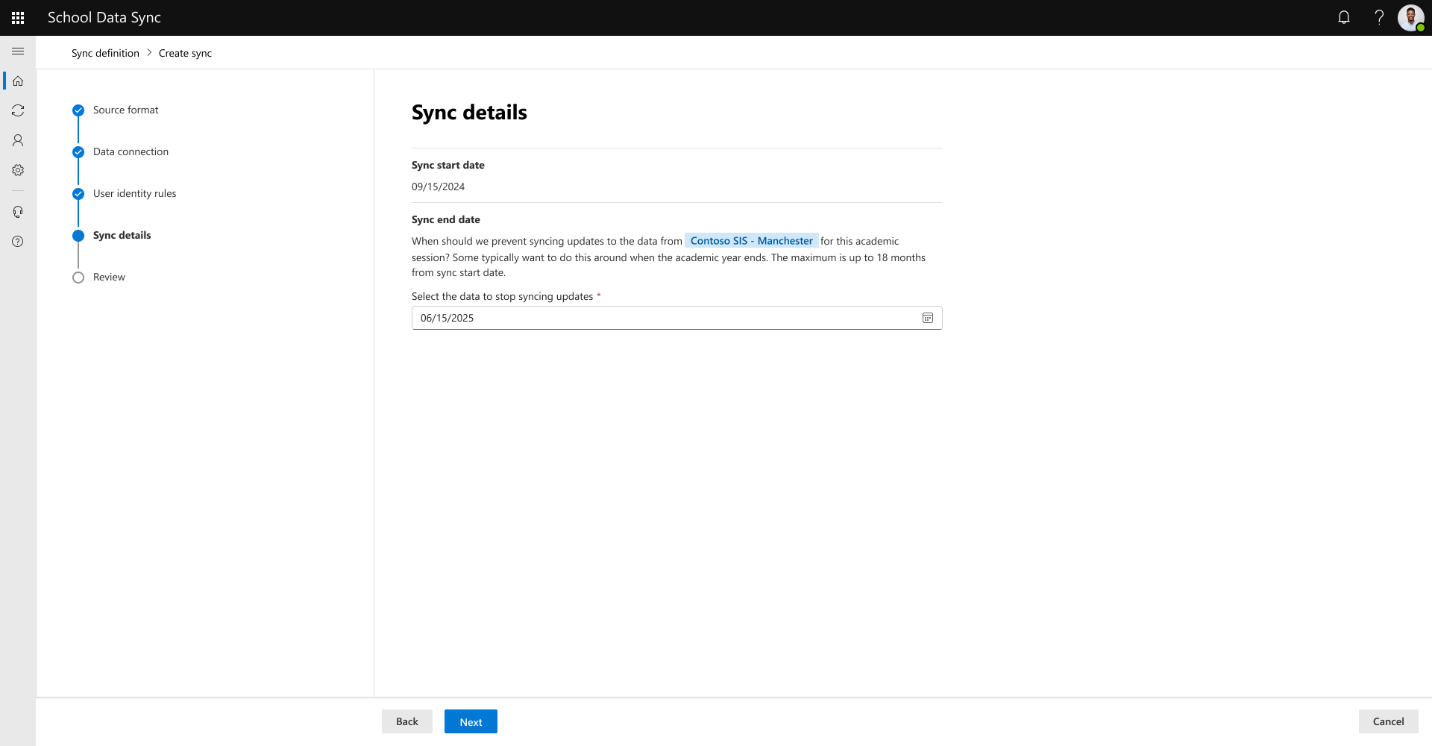
Select Next.
Step 9: Review and create
On the Review and create page, verify that all details are correct. If changes are needed, go back. (If you return to the connection steps, you must re-upload the CSV files.) When you're ready, select Connect data.
SDS submits the request to create the inbound flow. After you select Finish, you can begin configuring Managed Data options to provision users, groups, and rosters in Microsoft 365. You can proceed immediately (recommended) or wait for the first sync to complete. The Managed Data configuration is covered in the next unit.
OneRoster API overview
SDS supports import through the OneEdTech OneRoster 1.1 API specification, an industry standard for exchanging SIS data. With this method, customers can connect directly to their SIS using RESTbased OneRoster 1.1 APIs. This allows schools to sync data without CSV files and enables core SDS capabilities across Microsoft 365.
Several SIS providers support direct OneRoster API integration with SDS. For the full list of providers, refer to aka.ms/orProviderOverview.
Set up the OneRoster API connection
Connecting SDS to the SIS through OneRoster is straightforward. After the SIS exposes the OneRoster API, provide the required credentials in SDS. Once you configure the inbound flow, SDS automatically updates data without any additional steps, similar to scheduled CSV import but with no file handling needed.
Performance improvements with OneRoster API
SDS includes several enhancements to improve performance for SIS providers using OneRoster:
- No school-based lookups: SDS no longer performs queries based on selected schools. This reduces sync time and query load on SIS systems.
- Active data filtering: The SIS must configure the OneRoster connection so that the active flag is enabled. This ensures that SDS receives data only for the active school year and session.
- Delta Sync support: SDS uses the DateLastModified property to perform incremental updates. This significantly reduces sync times after the first run. If the SIS doesn't support Delta Sync, SDS issues GETall requests for active endpoints during each run.
Note
Some SDS Classic OneRoster providers that haven't completed Delta Sync validation continue operating in GETall mode until validation is completed.
Parent and guardian data
If the SIS provider supports parent and guardian sync, you can enable this feature in SDS. The provider must complete validation with the SDS Deployment Engineering team to make this feature available. SDS doesn't support mixing CSV and OneRoster data for parent and guardian records. When this option is enabled, parent and guardian information is included in the users endpoint.
Demographics and user flags
Demographics are an optional OneRoster endpoint. The provider must complete validation before you can include this data.
User or person flags require additional support from the SIS. OneRoster enables metadata extensions, which allow SIS providers to supply flags in the metadata field using key-value pairs:
- Key: Microsoft.userflags
- Values: Comma-separated code values (multiple values must be enclosed in quotes)
As with other extended endpoints, the provider must complete validation before you can enable flags in SDS.
Connect Data using OneRoster API
Starting the Connect Data wizard is the same as the process for connecting data using CSV. For API connections, the key differences appear on the Source format step of the inbound flow creation wizard.
Note
For the OneRoster demonstration, we will focus only on components and behaviors that are specific to the OneRoster API import method. For the rest of the data connection process, refer to the "Create an inbound flow in School Data Sync" section.
Step 1: Select Source format
On the Source format page, select API. Then select Next.
SDS retrieves the list of OneRoster SIS providers and their profile configurations. These profiles determine what options and fields appear in the following steps.
Step 2: Enter API credentials
Based on the provider profile, SDS asks you for either:
- OAuth 1.1, or
- OAuth 2.0, which also requires an Access token URL
If the provider uses OAuth 1.1, an access token URL isn't required.
Typical fields required for API connection are:
- Web access URL - The base URL where the SIS exposes its OneRoster API
- Client ID (sometimes called User ID)
- Client secret (sometimes called Password)
- Access token URL - Different from the web access URL, required only for OAuth 2.0
Each SIS provider has its own instructions for generating secure credentials, but SDS only needs readonly access.
After you enter all required information, select Next.
Step 3: Credential validation
SDS attempts to connect and validate the credentials:
- If validation fails, SDS shows an error message explaining why it failed. You can go back, correct the values, and try again.
- If validation succeeds, SDS displays "Data connection validated successfully." Select Next to continue.
Step 4: Optional data
Based on the provider's profile and supported endpoints, SDS might show options to include additional data, like:
- Contacts (parents and guardians)
- Demographics
If an option is available, you can choose to enable or disable that data. If an option is missing or disabled, that means the provider hasn't yet been validated for that data type.
If you work with SIS providers that support OneRoster, encourage them to complete optional data validation with the SDS Deployment Engineering team so customers can use these features.
Step 5: Complete the wizard
After the APIspecific steps, the remaining pages in the wizard are the same as for CSV:
- Define user identity rules (source value and Microsoft Entra ID target attribute).
- Set the sync end date for the academic session.
- Review the configuration and select Connect data.
How SDS processes OneRoster data during sync
During each sync run, the inbound flow prepares and standardizes incoming data.
- Map roster data: SDS maps roster data from OneRoster to a temporary import schema that SDS uses for all supported formats. This schema normalizes data before import.
- Cache Microsoft Entra ID data: In parallel, SDS pulls a copy of the tenant's Microsoft Entra ID users and groups into the SDS cache. SDS uses this cache to apply user identity rules and match SIS identities to existing Microsoft Entra ID user objects. At this stage, SDS only stores mappings in its cache; it doesn't yet write links back to Microsoft Entra ID.
- Prepare for advanced validation: SDS uses the import schema for advanced validation to assess data health. SDS focuses on identifying errors and warnings and follows the principle of "good data in, bad data out." Only data that passes validation moves forward in the process.
In the next unit, we cover the second phase of School Data Sync: Manage Data.