Exercise - Customize Identity
In the previous unit, you learned how customization works in ASP.NET Core Identity. In this unit, you extend the Identity data model and make the corresponding UI changes.
Customize the user account UI
In this section, you're going to create and customize the Identity UI files to be used in lieu of the default Razor Class Library.
Add the user registration files to be modified to the project:
dotnet aspnet-codegenerator identity --dbContext RazorPagesPizzaAuth --files "Account.Manage.EnableAuthenticator;Account.Manage.Index;Account.Register;Account.ConfirmEmail"In the preceding command:
- The
--dbContextoption provides the tool with knowledge of the existingDbContext-derived class namedRazorPagesPizzaAuth. - The
--filesoption specifies a semicolon-delimited list of unique files to be added to the Identity area.Account.Manage.Indexis the profile management page. This page is modified later in this unit.Account.Registeris the user registration page. This page is also modified in this unit.Account.Manage.EnableAuthenticatorandAccount.ConfirmEmailare scaffolded but not modified in this unit.
Tip
Run the following command from the project root to view valid values for the
--filesoption:dotnet aspnet-codegenerator identity --listFilesThe following files are added to the Areas/Identity directory:
- Pages/
- _ViewImports.cshtml
- Account/
- _ViewImports.cshtml
- ConfirmEmail.cshtml
- ConfirmEmail.cshtml.cs
- Register.cshtml
- Register.cshtml.cs
- Manage/
- _ManageNav.cshtml
- _ViewImports.cshtml
- EnableAuthenticator.cshtml
- EnableAuthenticator.cshtml.cs
- Index.cshtml
- Index.cshtml.cs
- ManageNavPages.cs
- The
Extend IdentityUser
You're given a new requirement to store your users' names. Since the default IdentityUser class doesn't contain properties for first and last names, you need to extend the RazorPagesPizzaUser class.
Make the following changes to Areas/Identity/Data/RazorPagesPizzaUser.cs:
Add the
FirstNameandLastNameproperties:using System.ComponentModel.DataAnnotations; using Microsoft.AspNetCore.Identity; namespace RazorPagesPizza.Areas.Identity.Data; public class RazorPagesPizzaUser : IdentityUser { [Required] [MaxLength(100)] public string FirstName { get; set; } = string.Empty; [Required] [MaxLength(100)] public string LastName { get; set; } = string.Empty; }The properties in the preceding snippet represent additional columns to be created in the underlying
AspNetUserstable. Both properties are required and are therefore annotated with the[Required]attribute. Additionally, the[MaxLength]attribute indicates that a maximum length of 100 characters is allowed. The underlying table column's data type is defined accordingly. A default value ofstring.Emptyis assigned since nullable context is enabled in this project and the properties are non-nullable strings.Add the following
usingstatement to the top of the file.using System.ComponentModel.DataAnnotations;The preceding code resolves the data annotation attributes applied to the
FirstNameandLastNameproperties.
Update the database
Now that the model changes are made, accompanying changes must be made to the database.
Ensure that all your changes are saved.
Create and apply an EF Core migration to update the underlying data store:
dotnet ef migrations add UpdateUser
dotnet ef database update
The
UpdateUserEF Core migration applied a DDL change script to theAspNetUserstable's schema. Specifically,FirstNameandLastNamecolumns were added, as seen in the following migration output excerpt:info: Microsoft.EntityFrameworkCore.Database.Command[20101] Executed DbCommand (37ms) [Parameters=[], CommandType='Text', CommandTimeout='30'] ALTER TABLE [AspNetUsers] ADD [FirstName] nvarchar(100) NOT NULL DEFAULT N''; info: Microsoft.EntityFrameworkCore.Database.Command[20101] Executed DbCommand (36ms) [Parameters=[], CommandType='Text', CommandTimeout='30'] ALTER TABLE [AspNetUsers] ADD [LastName] nvarchar(100) NOT NULL DEFAULT N'';Examine the database to analyze the effect of the
UpdateUserEF Core migration on theAspNetUserstable's schema.In the SQL Server pane, expand the Columns node on the dbo.AspNetUsers table.
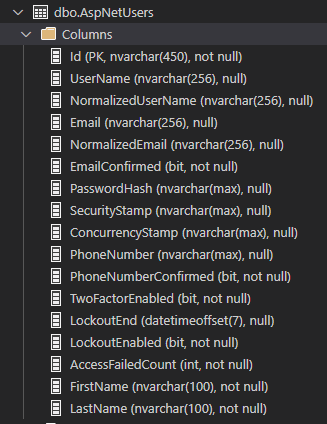
The
FirstNameandLastNameproperties in theRazorPagesPizzaUserclass correspond to theFirstNameandLastNamecolumns in the preceding image. A data type ofnvarchar(100)was assigned to each of the two columns because of the[MaxLength(100)]attributes. The non-null constraint was added becauseFirstNameandLastNamein the class are non-nullable strings. Existing rows show empty strings in the new columns.

Customize the user registration form
You added new columns for FirstName and LastName. Now you need to edit the UI to display matching fields on the registration form.
In Areas/Identity/Pages/Account/Register.cshtml, add the following highlighted markup:
<form id="registerForm" asp-route-returnUrl="@Model.ReturnUrl" method="post">
    <h2>Create a new account.</h2>
    <hr />
    <div asp-validation-summary="ModelOnly" class="text-danger" role="alert"></div>
    <div class="form-floating mb-3">
        <input asp-for="Input.FirstName" class="form-control" />
        <label asp-for="Input.FirstName"></label>
        <span asp-validation-for="Input.FirstName" class="text-danger"></span>
    </div>
    <div class="form-floating mb-3">
        <input asp-for="Input.LastName" class="form-control" />
        <label asp-for="Input.LastName"></label>
        <span asp-validation-for="Input.LastName" class="text-danger"></span>
    </div>
    <div class="form-floating mb-3">
        <input asp-for="Input.Email" class="form-control" autocomplete="username" aria-required="true" placeholder="name@example.com" />
        <label asp-for="Input.Email">Email</label>
        <span asp-validation-for="Input.Email" class="text-danger"></span>
    </div>
With the preceding markup, First name and Last name text boxes are added to the user registration form.
In Areas/Identity/Pages/Account/Register.cshtml.cs, add support for the name text boxes.
Add the
FirstNameandLastNameproperties to theInputModelnested class:public class InputModel { [Required] [StringLength(100, ErrorMessage = "The {0} must be at least {2} and at max {1} characters long.", MinimumLength = 1)] [Display(Name = "First name")] public string FirstName { get; set; } [Required] [StringLength(100, ErrorMessage = "The {0} must be at least {2} and at max {1} characters long.", MinimumLength = 1)] [Display(Name = "Last name")] public string LastName { get; set; } /// <summary> /// This API supports the ASP.NET Core Identity default UI infrastructure and is not intended to be used /// directly from your code. This API may change or be removed in future releases. /// </summary> [Required] [EmailAddress] [Display(Name = "Email")] public string Email { get; set; }The
[Display]attributes define the label text to be associated with the text boxes.Modify the
OnPostAsyncmethod to set theFirstNameandLastNameproperties on theRazorPagesPizzaobject. Add the following highlighted lines:public async Task<IActionResult> OnPostAsync(string returnUrl = null) { returnUrl ??= Url.Content("~/"); ExternalLogins = (await _signInManager.GetExternalAuthenticationSchemesAsync()).ToList(); if (ModelState.IsValid) { var user = CreateUser(); user.FirstName = Input.FirstName; user.LastName = Input.LastName; await _userStore.SetUserNameAsync(user, Input.Email, CancellationToken.None); await _emailStore.SetEmailAsync(user, Input.Email, CancellationToken.None); var result = await _userManager.CreateAsync(user, Input.Password);The preceding change sets the
FirstNameandLastNameproperties to the user input from the registration form.
Customize the site header
Update Pages/Shared/_LoginPartial.cshtml to display the first and last name collected during user registration. The highlighted lines in the following snippet are needed:
<ul class="navbar-nav">
@if (SignInManager.IsSignedIn(User))
{
    RazorPagesPizzaUser? user = await UserManager.GetUserAsync(User);
    var fullName = $"{user?.FirstName} {user?.LastName}";

    <li class="nav-item">
        <a id="manage" class="nav-link text-dark" asp-area="Identity" asp-page="/Account/Manage/Index" title="Manage">Hello, @fullName!</a>
    </li>
UserManager.GetUserAsync(User) returns a nullable RazorPagesPizzaUser object. The null-conditional ?. operator is used to access the FirstName and LastName properties only if the RazorPagesPizzaUser object isn't null.
Customize the profile management form
You've added the new fields to the user registration form, but you should also add them to the profile management form so existing users can edit them.
In Areas/Identity/Pages/Account/Manage/Index.cshtml, add the following highlighted markup. Save your changes.
<form id="profile-form" method="post">
    <div asp-validation-summary="ModelOnly" class="text-danger" role="alert"></div>
    <div class="form-floating mb-3">
        <input asp-for="Input.FirstName" class="form-control" />
        <label asp-for="Input.FirstName"></label>
        <span asp-validation-for="Input.FirstName" class="text-danger"></span>
    </div>
    <div class="form-floating mb-3">
        <input asp-for="Input.LastName" class="form-control" />
        <label asp-for="Input.LastName"></label>
        <span asp-validation-for="Input.LastName" class="text-danger"></span>
    </div>
    <div class="form-floating mb-3">
        <input asp-for="Username" class="form-control" disabled />
        <label asp-for="Username" class="form-label"></label>
    </div>
In Areas/Identity/Pages/Account/Manage/Index.cshtml.cs, make the following changes to support the name text boxes.
Add the
FirstNameandLastNameproperties to theInputModelnested class:public class InputModel { [Required] [StringLength(100, ErrorMessage = "The {0} must be at least {2} and at max {1} characters long.", MinimumLength = 1)] [Display(Name = "First name")] public string FirstName { get; set; } [Required] [StringLength(100, ErrorMessage = "The {0} must be at least {2} and at max {1} characters long.", MinimumLength = 1)] [Display(Name = "Last name")] public string LastName { get; set; } /// <summary> /// This API supports the ASP.NET Core Identity default UI infrastructure and is not intended to be used /// directly from your code. This API may change or be removed in future releases. /// </summary> [Phone] [Display(Name = "Phone number")] public string PhoneNumber { get; set; } }Incorporate the highlighted changes in the
LoadAsyncmethod:private async Task LoadAsync(RazorPagesPizzaUser user) { var userName = await _userManager.GetUserNameAsync(user); var phoneNumber = await _userManager.GetPhoneNumberAsync(user); Username = userName; Input = new InputModel { PhoneNumber = phoneNumber, FirstName = user.FirstName, LastName = user.LastName }; }The preceding code supports retrieving the first and last names for display in the corresponding text boxes of the profile management form.
Incorporate the highlighted changes in the
OnPostAsyncmethod. Save your changes.public async Task<IActionResult> OnPostAsync() { var user = await _userManager.GetUserAsync(User); if (user == null) { return NotFound($"Unable to load user with ID '{_userManager.GetUserId(User)}'."); } if (!ModelState.IsValid) { await LoadAsync(user); return Page(); } user.FirstName = Input.FirstName; user.LastName = Input.LastName; await _userManager.UpdateAsync(user); var phoneNumber = await _userManager.GetPhoneNumberAsync(user); if (Input.PhoneNumber != phoneNumber) { var setPhoneResult = await _userManager.SetPhoneNumberAsync(user, Input.PhoneNumber); if (!setPhoneResult.Succeeded) { StatusMessage = "Unexpected error when trying to set phone number."; return RedirectToPage(); } } await _signInManager.RefreshSignInAsync(user); StatusMessage = "Your profile has been updated"; return RedirectToPage(); }The preceding code supports updating the first and last names in the database's
AspNetUserstable.
Configure the confirmation email sender
The first time you tested the app, you registered a user and then clicked a link to simulate confirming the user's email address. In order to send an actual confirmation email, you need to create an implementation of IEmailSender and register it in the dependency injection system. To keep things simple, your implementation in this unit doesn't actually send email to a Simple Mail Transfer Protocol (SMTP) server. It just writes the email content to the console.
Since you're going to view the email in plain text in the console, you should change the generated message to exclude HTML-encoded text. In Areas/Identity/Pages/Account/Register.cshtml.cs, find the following code:
await _emailSender.SendEmailAsync(Input.Email, "Confirm your email",
    $"Please confirm your account by <a href='{HtmlEncoder.Default.Encode(callbackUrl)}'>clicking here</a>.");
Change it to:
await _emailSender.SendEmailAsync(Input.Email, "Confirm your email",
    $"Please confirm your account by visiting the following URL:\r\n\r\n{callbackUrl}");
In the Explorer pane, right-click the RazorPagesPizza\Services folder and create a new file named EmailSender.cs. Open the file and add the following code:
using Microsoft.AspNetCore.Identity.UI.Services;
namespace RazorPagesPizza.Services;

public class EmailSender : IEmailSender
{
    public EmailSender() {}

    public Task SendEmailAsync(string email, string subject, string htmlMessage)
    {
        Console.WriteLine();
        Console.WriteLine("Email Confirmation Message");
        Console.WriteLine("--------------------------");
        Console.WriteLine($"TO: {email}");
        Console.WriteLine($"SUBJECT: {subject}");
        Console.WriteLine($"CONTENTS: {htmlMessage}");
        Console.WriteLine();

        return Task.CompletedTask;
    }
}
The preceding code creates an implementation of IEmailSender that writes the contents of the message to the console. In a real-world implementation,
SendEmailAsyncwould connect to an external mail service or some other action to send email.In Program.cs, add the highlighted lines:
using Microsoft.AspNetCore.Identity;
using Microsoft.EntityFrameworkCore;
using RazorPagesPizza.Areas.Identity.Data;
using Microsoft.AspNetCore.Identity.UI.Services;
using RazorPagesPizza.Services;

var builder = WebApplication.CreateBuilder(args);
var connectionString = builder.Configuration.GetConnectionString("RazorPagesPizzaAuthConnection");
builder.Services.AddDbContext<RazorPagesPizzaAuth>(options => options.UseSqlServer(connectionString));
builder.Services.AddDefaultIdentity<RazorPagesPizzaUser>(options => options.SignIn.RequireConfirmedAccount = true)
      .AddEntityFrameworkStores<RazorPagesPizzaAuth>();

// Add services to the container.
builder.Services.AddRazorPages();
builder.Services.AddTransient<IEmailSender, EmailSender>();

var app = builder.Build();
The preceding registers
EmailSenderas anIEmailSenderin the dependency injection system.
Test the changes to the registration form
That's everything! Let's test the changes to the registration form and confirmation email.
Make sure you saved all your changes.
In the terminal pane, build the project and run the app with
dotnet run.In your browser, navigate to the app. Select Logout if you're logged in.
Select Register and use the updated form to register a new user.
Note
The validation constraints on the First name and Last name fields reflect the data annotations on the
FirstNameandLastNameproperties ofInputModel.After registering, you get redirected to the Register confirmation screen. In the terminal pane, scroll up to find the console output that resembles the following:
Email Confirmation Message
--------------------------
TO: jana.heinrich@contoso.com
SUBJECT: Confirm your email
CONTENTS: Please confirm your account by visiting the following URL:

https://localhost:7192/Identity/Account/ConfirmEmail?<query string removed>
Navigate to the URL with Ctrl+click. The confirmation screen displays.
Note
If you're using GitHub Codespaces, you might need to add
-7192to the first part of the forwarded URL. For example,scaling-potato-5gr4j4-7192.preview.app.github.dev.Select Login and sign in with the new user. The app's header now contains Hello, [First name] [Last name]!.
In the SQL Server pane in VS Code, right-click on the RazorPagesPizza database and select New query. In the tab that appears, enter the following query and press Ctrl+Shift+E to run it.
SELECT UserName, Email, FirstName, LastName
FROM dbo.AspNetUsers
A tab with results similar to the following appears:
UserName Email FirstName LastName kai.klein@contoso.com kai.klein@contoso.com jana.heinrich@contoso.com jana.heinrich@contoso.com Jana Heinrich The first user registered before adding
FirstNameandLastNameto the schema. So the associatedAspNetUserstable record doesn't have data in those columns.
Test the changes to the profile management form
You should also test the changes you made to the profile management form.
In the web app, sign in with the first user you created.
Select the Hello, ! link to navigate to the profile management form.
Note
The link doesn't display correctly because the
AspNetUserstable's row for this user doesn't contain values forFirstNameandLastName.Enter valid values for First name and Last name. Select Save.
The app's header updates to Hello, [First name] [Last name]!.
To stop the app, press Ctrl+C in the terminal pane in VS Code.
Summary
In this unit, you customized Identity to store custom user information. You also customized the confirmation email. In the next unit, you'll learn about implementing multifactor authentication in Identity.