Exercise - Create a registry
Note
The first time you activate a sandbox and accept the terms, your Microsoft account is associated with a new Azure directory named Microsoft Learn Sandbox. You're also added to a special subscription named Concierge Subscription.
Before you can publish the Bicep modules for the CDN and website, you need to create a registry for your organization. Then publish the shared modules to the registry. Other teams can then create deployments that include the shared modules.
In this exercise, you will:
- Deploy a new private registry for your toy company to use.
- Connect to your registry to verify that it was created successfully.
To deploy resources to Azure, you need to sign in to your Azure account from the Visual Studio Code terminal. Be sure you've installed the Azure CLI, and sign in with the same account that you used to activate the sandbox.
On the Terminal menu, select New Terminal. The terminal window usually opens in the lower half of your screen.
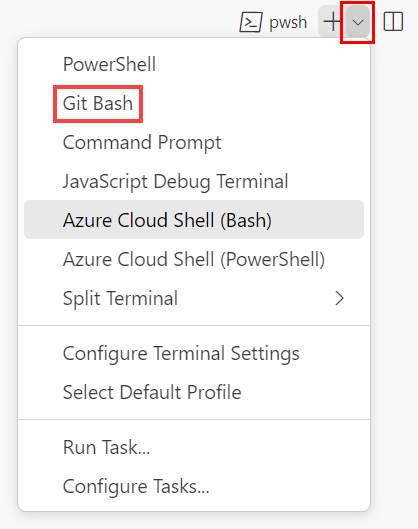
If the terminal window displays bash on the right side, it means the correct shell is already open. Alternatively, if you see a bash shell icon on the right, you can select it to launch the shell.

If a shell other than bash appears, select the shell dropdown arrow, and then select Git Bash.
In the terminal, go to the directory where you saved your template. For example, if you saved your template to the templates folder, you can use this command:
cd templates
Install Bicep
Run the following command to ensure you have the latest version of Bicep:
az bicep install && az bicep upgrade
Sign in to Azure
In the Visual Studio Code terminal, sign in to Azure by running the following command:
az loginIn the browser that opens, sign in to your Azure account. The Visual Studio Code terminal displays a list of the subscriptions associated with this account. Select the subscription called Concierge Subscription.
If you've used more than one sandbox recently, the terminal might display more than one instance of Concierge Subscription. In this case, use the next two steps to set one as the default subscription.
Get the Concierge Subscription IDs.
  az account list \
   --refresh \
   --query "[?contains(name, 'Concierge Subscription')].id" \
   --output table
Set the default subscription by using the subscription ID. Replace {your subscription ID} with the latest Concierge Subscription ID.
az account set --subscription {your subscription ID}
Set the default resource group
When you use the Azure CLI, you can set the default resource group and omit the parameter from the rest of the Azure CLI commands in this exercise. Set the default to the resource group that's created for you in the sandbox environment.
az configure --defaults group="<rgn>[sandbox resource group name]</rgn>"
To deploy resources to Azure, you need to sign in to your Azure account from the Visual Studio Code terminal. Be sure you've installed Azure PowerShell, and sign in to the same account that activated the sandbox.
On the Terminal menu, select New Terminal. The terminal window usually opens in the lower half of your screen.
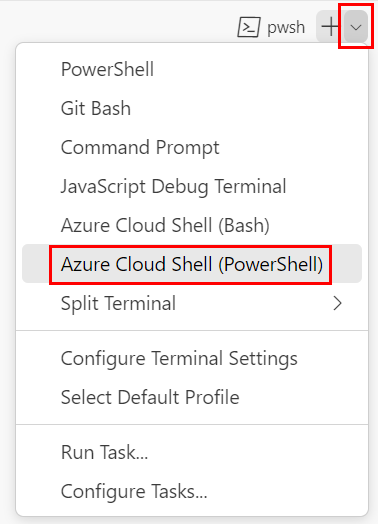
If the terminal window displays pwsh or powershell on the right side, it means the correct shell is already open. Alternatively, if you see a PowerShell shell icon on the right, you can select it to launch the shell.

If a shell other than pwsh or powershell appears, select the shell dropdown arrow, and then select PowerShell.
In the terminal, go to the directory where you saved your template. For example, if you saved your template in the templates folder, you can use this command:
Set-Location -Path templates
Install the Bicep CLI
To use Bicep from Azure PowerShell, install the Bicep CLI.
Sign in to Azure by using Azure PowerShell
In the Visual Studio Code terminal, run the following command:
Connect-AzAccountA browser opens so that you can sign in to your Azure account. The browser might open in the background.
After you sign in to Azure, the terminal displays a list of the subscriptions associated with this account. If you activated the sandbox, a subscription named Concierge Subscription is displayed. Select it for the rest of the exercise.
If you've used more than one sandbox recently, the terminal might display more than one instance of Concierge Subscription. In this case, use the next two steps to set one as the default subscription.
Get the subscription ID. Running the following command lists your subscriptions and their IDs. Look for
Concierge Subscription, and then copy the ID from the second column. It looks something likeaaaa0a0a-bb1b-cc2c-dd3d-eeeeee4e4e4e.Get-AzSubscriptionChange your active subscription to Concierge Subscription. Be sure to replace {Your subscription ID} with the one that you copied.
$context = Get-AzSubscription -SubscriptionId {Your subscription ID}
Set-AzContext $context
Set the default resource group
You can set the default resource group and omit the parameter from the rest of the Azure PowerShell commands in this exercise. Set this default to the resource group created for you in the sandbox environment.
Set-AzDefault -ResourceGroupName <rgn>[sandbox resource group name]</rgn>
Create a container registry
Here, you create a new registry to store and share your Bicep modules. This example uses Azure Container Registry.
Select a unique name for your container registry. The name must be globally unique across Azure. Choose one that's 5 to 50 characters in length and that contains letters and numbers. You use the name in subsequent steps.
Create a container registry by running this command in the Visual Studio Code terminal. Replace the
YOUR_CONTAINER_REGISTRY_NAMEplaceholder with the name that you selected in the preceding step.az acr create \ --name YOUR_CONTAINER_REGISTRY_NAME \ --sku Basic \ --location westus
Tip
You can also create a container registry by using Bicep. In this example, we use the Azure CLI for simplicity.
Select a unique name for your container registry. The name must be globally unique across Azure. Choose one that's 5 to 50 characters in length and that contains letters and numbers. You use the name in subsequent steps.
Create a container registry by running this command in the Visual Studio Code terminal. Replace the
YOUR_CONTAINER_REGISTRY_NAMEplaceholder with the name that you selected in the preceding step.New-AzContainerRegistry ` -Name YOUR_CONTAINER_REGISTRY_NAME ` -Sku Basic ` -Location westus
Tip
You can also create a container registry by using Bicep. In this example, we use the Azure PowerShell cmdlet for simplicity.
List the modules in your registry
Now that you've created your registry, you can connect to it to verify that it's working.
List the modules in the registry by running this command. Replace the
YOUR_CONTAINER_REGISTRY_NAMEplaceholder with the name that you selected earlier.az acr repository list \ --name YOUR_CONTAINER_REGISTRY_NAMENotice that you don't specify any credentials to connect to the container registry. The Azure CLI uses the same credentials that you used to sign in to the Azure CLI. You have access to the container registry because you created it.
The Azure CLI command returns a list that contains no results:
[]You see no results because you haven't published any modules yet. You'll learn more about publishing modules in the next unit.
List the modules in the registry by running this command. Replace the
YOUR_CONTAINER_REGISTRY_NAMEplaceholder with the name that you selected earlier.Get-AzContainerRegistryRepository ` -RegistryName YOUR_CONTAINER_REGISTRY_NAMENotice that you don't specify any credentials to connect to the container registry. Azure PowerShell uses the same credentials that you used to sign in to the Azure PowerShell cmdlets. You have access to the container registry because you created it.
The Azure PowerShell cmdlet shows no output.
There are no results because you haven't published any modules yet. You learn more about publishing modules in the next unit.