Set up and configure SharePoint Embedded
- 15 minutes
In this exercise, you'll create a Microsoft Entra ID application, setup SharePoint Embedded on your Microsoft 365 SharePoint tenant, and create your first Container Type and Container.
Prerequisites
- Postman installed desktop client signed in to a Postman free or paid account.
- Access to an administrator account in a Microsoft 365 tenant.
- Windows PowerShell prompt.
Register Microsoft Entra ID application
Custom SharePoint Embedded applications use a custom Microsoft Entra ID application to authenticate and obtain the necessary permissions to call the Microsoft Graph and Microsoft SharePoint APIs.
Open a browser and navigate to the Microsoft Entra ID admin enter. Sign in using a Work or School Account for your Microsoft 365 tenant that has global administrator rights.
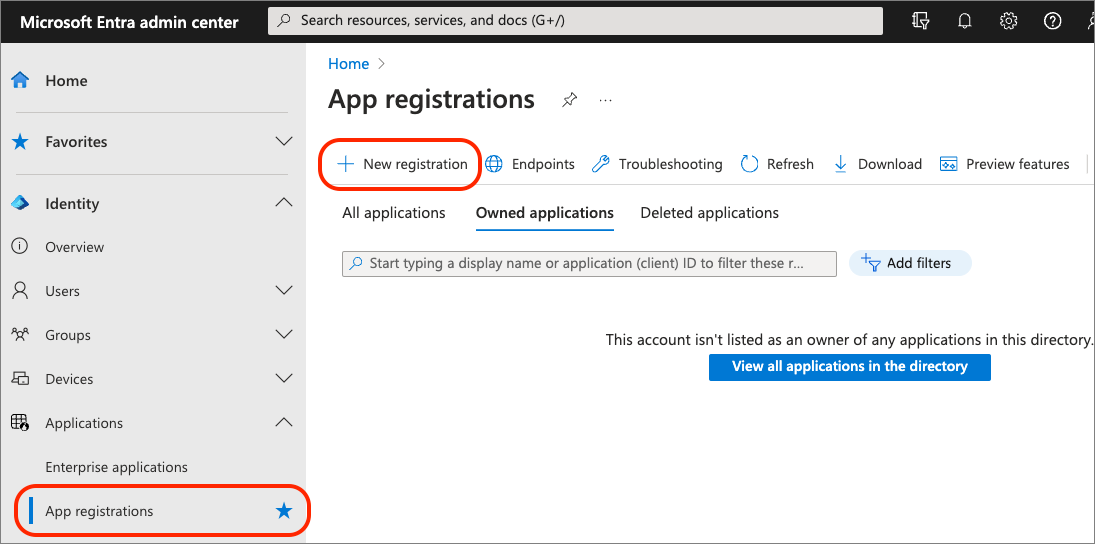
Select Identity > Applications > App registrations in the left-hand navigation and then select New Registration.
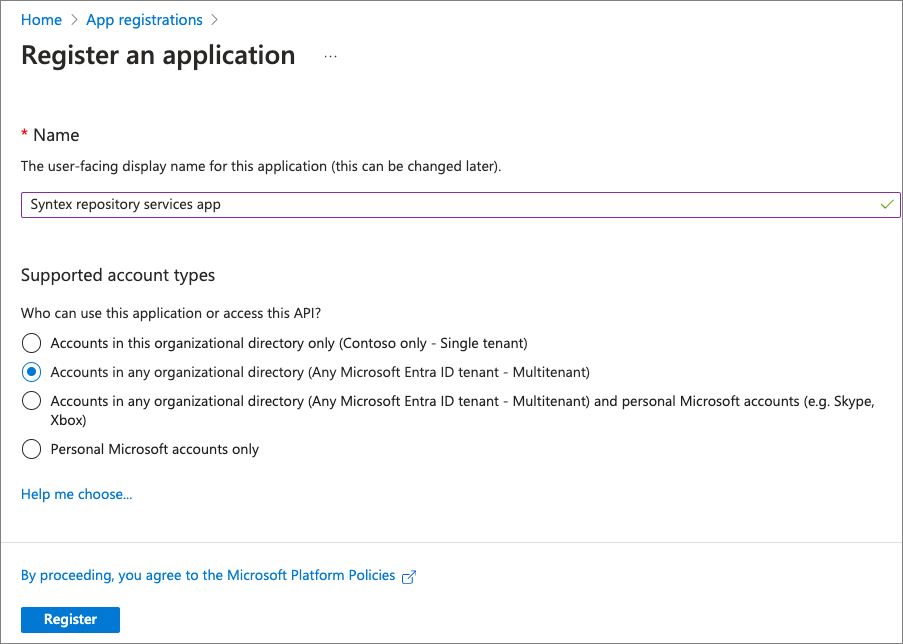
On the Register an application page, set the values as follows, and then select Register:
- Name: SharePoint Embedded app
- Supported account types: Accounts in any organizational directory (Any Microsoft Entra ID tenant - Multitenant)
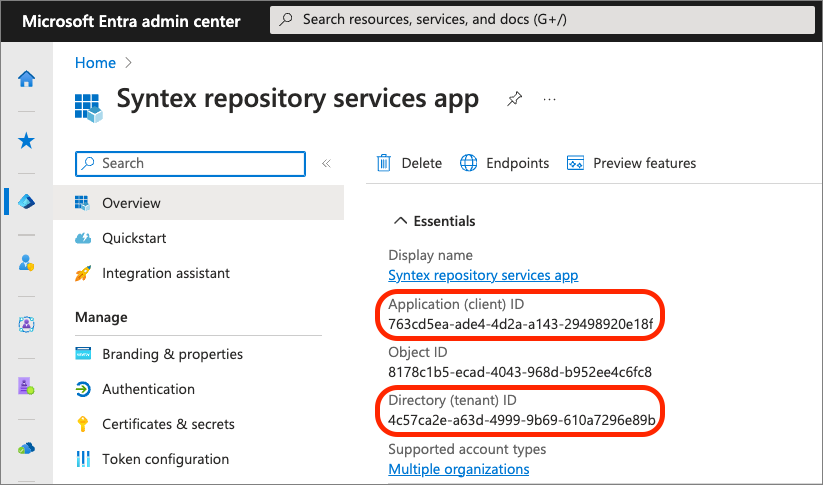
After creating the SharePoint Embedded app, Microsoft Entra ID displays the details of the new app. Create a text file to keep track of multiple values you'll need later in this module.
Copy the Application (Client) ID & Directory (tenant) ID from the app's overview page into your local text file.
Configure authentication
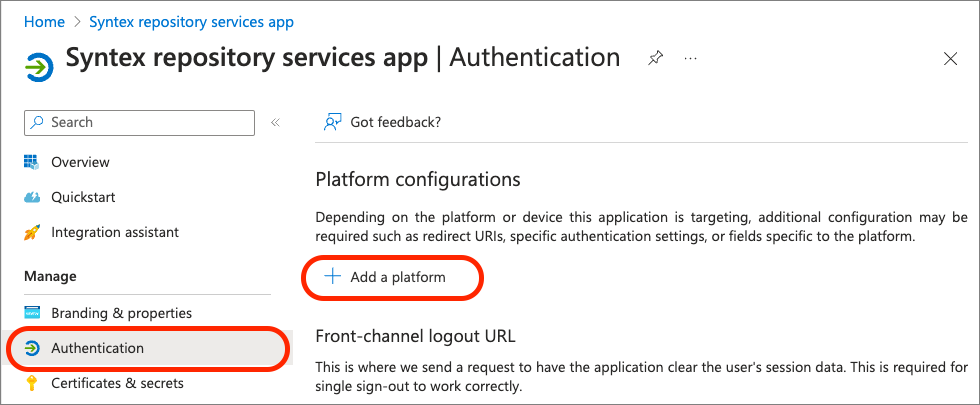
Next, configure the app's authentication settings. Select Manage > Authentication from the left-hand navigation, then select Add a platform.
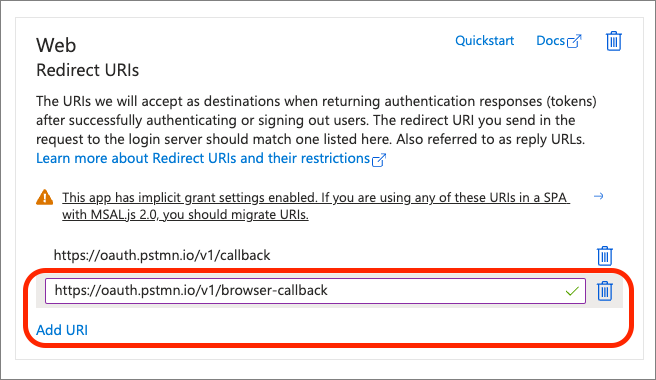
Select the Web option and for the Redirect URIs, enter https://oauth.pstmn.io/v1/callback and select Configure.
Next, select Add URI for new Web platform, https://oauth.pstmn.io/v1/browser-callback and select Configure.
These two options will be used to authenticate and obtain access tokens using the Postman client later in this module.
Scroll down to the section Implicit grant and hybrid flows and select the Access tokens (used for implicit flows) option, then select Save.
Add another platform by selecting Add a platform, Single-page application, and set the Redirect URI to http://localhost, and select Configure.
Configure API Permissions
Next, configure the app with more permissions so it can create and access Container Types and Containers.
Note
At the time of publication, the necessary permissions are not yet visible in the API selector in the Microsoft Entra ID admin center. To add the permissions, FileStorageContainer.Selected for Microsoft Graph and Container.Selected for SharePoint, you'll add them directly to the app's manifest by the permission IDs.
Select Manage > Manifest from the left-hand navigation. Locate the property requiredResourceAccess and edit it so it looks like the following JSON:
"requiredResourceAccess": [
  {
    "resourceAppId": "00000003-0000-0ff1-ce00-000000000000",
    "resourceAccess": [
      {
        "id": "4d114b1a-3649-4764-9dfb-be1e236ff371",
        "type": "Scope"
      },
      {
        "id": "19766c1b-905b-43af-8756-06526ab42875",
        "type": "Role"
      }
    ]
  },
  {
    "resourceAppId": "00000003-0000-0000-c000-000000000000",
    "resourceAccess": [
      {
        "id": "085ca537-6565-41c2-aca7-db852babc212",
        "type": "Scope"
      },
      {
        "id": "40dc41bc-0f7e-42ff-89bd-d9516947e474",
        "type": "Role"
      }
    ]
  }
],
Important
Do not create duplicate objects with the same resourceAppIds. Instead add the additional objects to the existing resourceAppIds. For example, if the requiredResourceAccess is already set to the following:
"requiredResourceAccess": [
 {
   "resourceAppId": "00000003-0000-0000-c000-000000000000",
   "resourceAccess": [
     {
       "id": "e1fe6dd8-ba31-4d61-89e7-88639da4683d",
       "type": "Scope"
     }
   ]
 }
],
Add the two new permissions to the existing "resourceAppId": "00000003-0000-0000-c000-000000000000" object so it now has three (3) permissions.
Grant admin consent to the new permissions
Some of the permissions require admin consent. Select API Permissions in the left-hand navigation, scroll to the bottom of the page, and select the link Enterprise applications.
On the Permissions page, select Grant admin consent for Contoso. If prompted to sign-in, use the same Work and School account you used to sign-in to the Microsoft Entra ID admin center. On the Permissions requested page, select Accept to grant admin consent to the two pairs of permissions: FileStorageContainer.Selected for Microsoft Graph and Container.Selected for SharePoint. The two pairs represent the application & delegated options for each of the two permissions.
Create a client secret
For an app to authenticate using the OAuth2 client credentials flow with Microsoft Entra ID, it needs both the client ID and a client secret.
Select Manage > Certificates & secrets from the left-hand navigation.
In the Client Secrets section, select New client secret. Add a description and select an expiration duration, then select Add.
After creating the client secret, it will be shown one time so make sure you copy this as the client secret in your local text file for use in a later in this module. If you don't copy this value, you'll have to create a new secret as you can't ever view a previously created secret.
Create a certificate
Unlike Microsoft Graph which allows app authentication with a client ID and secret, SharePoint requires the app to authenticate using the client ID and certificate. So, we now need to create a certificate.
Open a Windows PowerShell prompt as an administrator and run the following PowerShell script. When prompted, enter the name for your certificate, such as SharePoint Embedded:
$name = Read-Host -Prompt "Certificate name: "
$cert = New-SelfSignedCertificate -Subject "CN=$name" -CertStoreLocation "Cert:\CurrentUser\My" -KeyExportPolicy Exportable -KeySpec Signature -KeyLength 2048 -KeyAlgorithm RSA -HashAlgorithm SHA256
Export-Certificate -Cert $cert -FilePath "$name.cer"

# Private key to Base64
$privateKey = [System.Security.Cryptography.X509Certificates.RSACertificateExtensions]::GetRSAPrivateKey($cert)
$privateKeyBytes = $privateKey.Key.Export([System.Security.Cryptography.CngKeyBlobFormat]::Pkcs8PrivateBlob)
$privateKeyBase64 = [System.Convert]::ToBase64String($privateKeyBytes, [System.Base64FormattingOptions]::InsertLineBreaks)

# Private key file contents
$privateKeyFileContent = @"
-----BEGIN PRIVATE KEY-----
$privateKeyBase64
-----END PRIVATE KEY-----
"@

# Output to file
$privateKeyFileContent | Out-File -FilePath "$name.key" -Encoding Ascii
The PowerShell script will save the certificate (*.cer) and the private key (*.key) to the folder where the PowerShell script was executed.
In the Microsoft Entra ID admin center, on the app's Certificates & secrets page, select Certificates and then select Upload certificate.
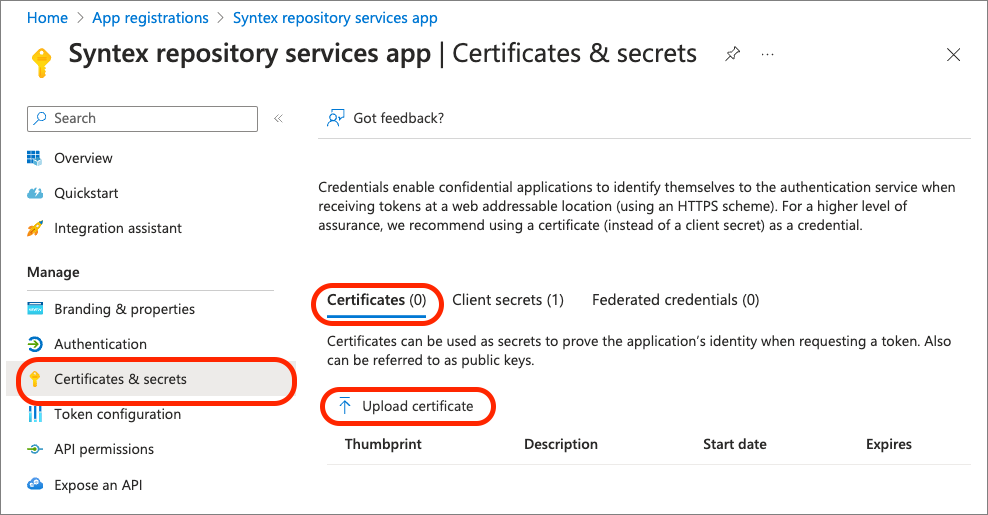
Upload the *.cer generated by the PowerShell script, give the certificate a description, and then select Add.
Once the certificate has been uploaded, copy the entire Thumbprint displayed to your local text file.
Create a new Container Type for your SharePoint Embedded app
The next step is to create a Container Type for your application.
Open a Windows PowerShell prompt as an administrator.
Install or upgrade the SharePoint Online PowerShell module
If you haven't previously installed the SharePoint Online PowerShell module, install it by executing the following command:
Install-Module "Microsoft.Online.SharePoint.PowerShell"
If you have it installed, make sure you have the latest one installed by upgrading it:
Upgrade-Module "Microsoft.Online.SharePoint.PowerShell"
Note
If you aren't sure if it's already installed, try executing the Upgrade-Module first. If it fails, then it's not installed so run the Install-Module cmdlet.
Create the Container Type
With the latest SharePoint Online PowerShell module installed, the next step is to create a Container Type in your tenant.
Update the following values in the following PowerShell script, then execute the script:
{{SPO_ADMIN_URL}}: This is the URL of your SharePoint Online admin center. You can get this by signing into the[https://portal.microsoft.com](https://portal.microsoft.com)with the Work and School of your tenant's admin account, select Show All at the bottom of the left-hand navigation, then select Admin Centers > SharePoint. Copy the URL of the SharePoint admin center and use this value. For example, if your tenant ID is Contoso123, your admin url would behttps://contoso123-admin.sharepoint.com.{{CONTAINER_TYPE_NAME}}: Pick a name for your new Container Type. For example, useFirstContainerType.{{AZURE_ENTRA_APP_ID}}: Set this to the value of the Microsoft Entra ID app ID, also known as the "client ID", you created previously. This value should be in your local text file.
Import-Module "Microsoft.Online.SharePoint.PowerShell"
Connect-SPOService -Url "{{SPO_ADMIN_URL}}"
New-SPOContainerType -TrialContainerType -ContainerTypeName "{{CONTAINER_TYPE_NAME}}" -OwningApplicationId "{{AZURE_ENTRA_APP_ID}}"
The PowerShell script will display the details for your new Container Type, for example:
Container Type ID:
===============================================================================
ContainerTypeId     : 3a6b1fc4-0bd9-04b3-3a2a-4843fbb60914
ContainerTypeName   : FirstContainerType
OwningApplicationId : 763cd5ea-ade4-4d2a-a143-29498920e18f
Classification      : Standard
AzureSubscriptionId : 00000000-0000-0000-0000-000000000000
ResourceGroup       :
Region              :
Copy the ContainerTypeId and ContainerTypeName to your local text file for later use.
Configure Postman to authenticate with Microsoft Entra ID to obtain delegate and application access tokens for Microsoft Graph and SharePoint Online
The last step is to register the new Container Type that you created in the developer/provider Microsoft 365 tenant with the consuming tenant. This is done with the SharePoint REST API. For this step, you'll use the Postman client.
Before you can call the SharePoint REST API with Postman, you need to first configure Postman to obtain an access token.
Create a new Postman environment
First, create a new Postman environment that will store environment variables to simplify calls and centralize all our settings.
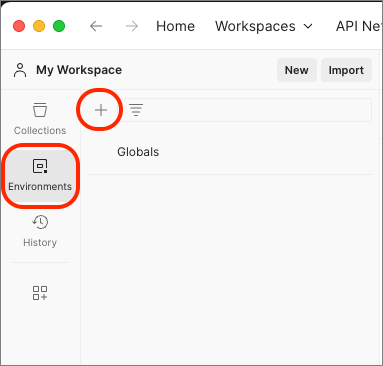
In Postman, select Environments, then select the plus icon to create a new environment.
Name the environment SharePoint Embedded.
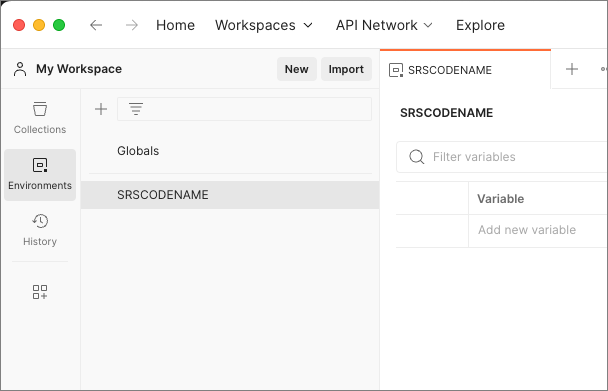
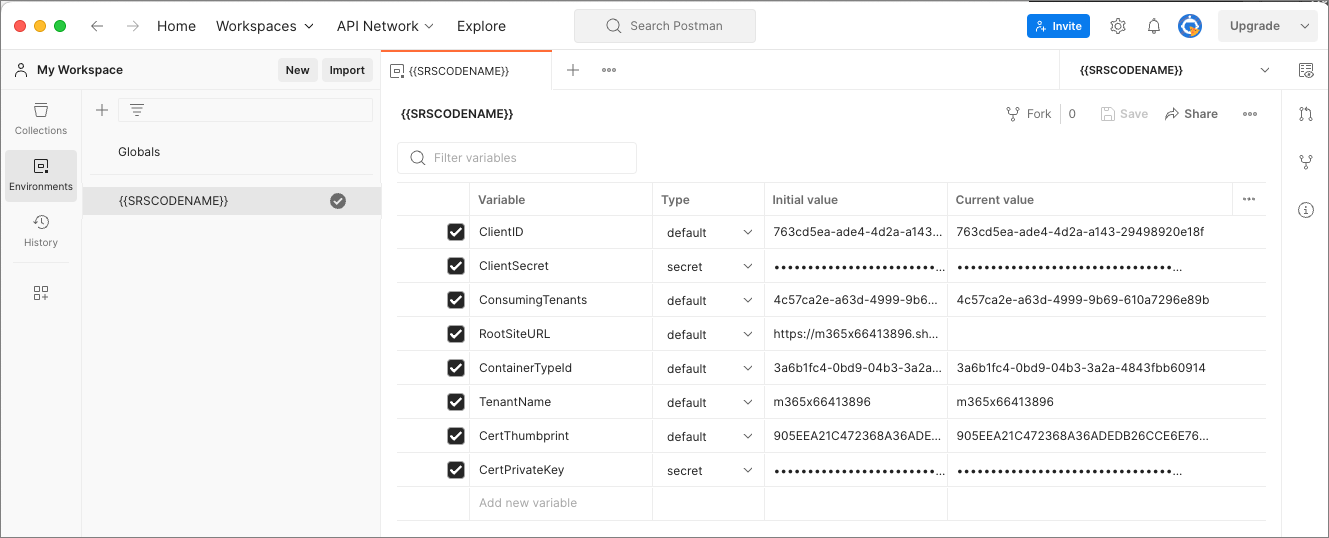
Add the following variables to the environment and set the Initial value to the vales from your local text file. Save the environment once you've added these variables.
| Variable | Type | Notes | Example |
|---|---|---|---|
| ClientID | default | The client/application ID of the app previously created in the Microsoft Entra ID admin center. | 763cd5ea-ade4-4d2a-a143-29498920e18f |
| ClientSecret | secret | The client secret of the app previously created in the Microsoft Entra ID admin center. | JXZ8Q........jbvanC |
| ConsumingTenantId | default | The tenant/directory ID (GUID) of the app previously created in the Microsoft Entra ID admin center. | 4c57ca2e-a63d-4999-9b69-610a7296e89b |
| RootSiteURL | default | The URL of your SharePoint Online tenant, without a trailing slash. This is the same as the SharePoint Online admin center URL without the -admin string. | https://contoso123.sharepoint.com |
| ContainerTypeId | default | The ID of the Container Type you created previously | 3a6b1fc4-0bd9-04b3-3a2a-4843fbb60914 |
| TenantName | default | The ID of your SharePoint Online tenant. This is the first part of the SharePoint Online admin center URL without the -admin string. | contoso123 |
| CertThumbprint | default | The thumbprint of the certificate you previously uploaded for the app you created in the Microsoft Entra ID admin center. | 905EEA21C472368A36ADEDB26CCE6E760049BC1E |
| CertPrivateKey | secret | The certificate private key. Copy the entire contents from the *.key file generated by the PowerShell script you previously executed, including the -----begin and end delimiters of the certificate. | ----BEGIN PRIVATE KEY----- ... -----END PRIVATE KEY---— |
| ContainerID | default | Leave this blank. You'll use this at a later time. |
Select the environment by selecting it in the drop-down selector in the upper-right of the Postman client. The drop-down is just below the gear and alert icons and above the Save and Share buttons on the same row as the tabs.
Create a new Postman collection
Next, create a new Postman collection that will store the requests and obtain the access tokens.
In Postman, select Collections, then select the plus icon to create a new collection
Name the collection SharePoint Embedded.
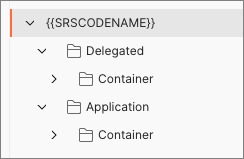
In the new collection, create to sets of folders using the collection's context many to store requests for Containers; one in a Delegated folder and one in an Application folder:
Configure the Postman collection's Application folder
The next step is to update the Application folder's authentication setting. This one requires a bit more work because we need to obtain an app-only token to call Microsoft Graph. To do this, you'll configure the Application folder to download a script and store it into a global variable for use later.
Select the Application folder and then select the Authorization tab. Set the Type to Bearer Token and the Token to {{AppOnlyCertGraphToken}}.
Note
Postman will display a validation error as follows. This is expected and can be ignored for now. This variable will be created with a script in a moment.
Select the Pre-request Script tab and enter the following script:
// download jsrsasign library and save it to a global variable
if (!pm.globals.has('jsrsasign-js')) {
  pm.sendRequest(
    'https://kjur.github.io/jsrsasign/jsrsasign-all-min.js',
    function (err, res) {
      if (err) {
        throw new Error(err);
      } else {
        console.log('Downloaded RSA library');
        pm.globals.set('jsrsasign-js', res.text());
      }
    }
  );
}
Save the changes to the collection.
Configure the Postman collection's Application > Containers folder
Next, select the collection's Application > Containers folder.
On the Authorization tab, set the Type to Inherit auth from parent.
On the Pre-request Script tab and enter the following script:
async function ensureAccessToken () {
  var validToken = false;
  var token = pm.environment.get('AppOnlyCertGraphToken');
  if (token) {
    console.log('checking stored token');
    try {
      var tokenObj = KJUR.jws.JWS.parse(token);
      var nbf = tokenObj.payloadObj.nbf;
      var exp = tokenObj.payloadObj.exp;
      var now = getTimeInSec();
      if (nbf <= now && now < exp) {
        validToken = true;
      } else {
        console.log("Stored access token is expired");
      }
    } catch (e) {
      console.log("Unable to parse stored access token");
    }
  } else {
    console.log("No access token found");
  }
  if (!validToken) {
    acquireAccessToken();
  }
}

function acquireAccessToken() {
  console.log("Acquiring a new access token");
  var jwt = getRequestJwt();
  console.log(jwt);
  var tid = pm.environment.get('ConsumingTenantId');

  const tokenRequest = {
    url: `https://login.microsoftonline.com/${tid}/oauth2/v2.0/token`,
    method: 'POST',
    header: {
      'Content-Type': 'application/x-www-form-urlencoded'
    },
    body: {
      mode: 'urlencoded',
      urlencoded: [
        { key: 'client_assertion_type', value: 'urn:ietf:params:oauth:client-assertion-type:jwt-bearer' },
        { key: 'client_assertion', value: jwt },
        { key: 'client_id', value: pm.environment.get('ClientID') },
        { key: 'scope', value: 'https://graph.microsoft.com/.default' },
        { key: 'grant_type', value: 'client_credentials' }
      ]
    }
  };
  pm.sendRequest(tokenRequest, (error, response) => {
    if (error) {
      console.log('Unable to acquire token: ' + error);
    } else {
      var responseJson = response.json();
      var token = responseJson.access_token;
      if (!token)
        throw Error("Invalid or no access token received");
      pm.environment.set('AppOnlyCertGraphToken', token);
    }
  });
}

function getRequestJwt () {
  var header = {
    'alg': 'RS256',
    'typ': 'JWT',
    'x5t': safeBase64EncodedThumbprint(pm.environment.get('CertThumbprint'))
  };

  var now = getTimeInSec();
  var tid = pm.environment.get('ConsumingTenantId');
  var payload = {
    'aud': `https://login.microsoftonline.com/${tid}/oauth2/v2.0/token`,
    'exp': now + 60 * 60,
    'iss': pm.environment.get('ClientID'),
    'jti': pm.variables.replaceIn('{{$guid}}'),
    'nbf': now,
    'sub': pm.environment.get('ClientID'),
    'iat': now
  };

  var encryptedPk = pm.environment.get('CertPrivateKey');
  var decryptedPk = encryptedPk;
  if (pm.environment.has('CertPassword') && pm.environment.get('CertPassword') !== '') {
    decryptedPk = KEYUTIL.getKey(encryptedPk, pm.environment.get('CertPassword'));
  }
  var sHeader = JSON.stringify(header);
  var sPayload = JSON.stringify(payload);
  return KJUR.jws.JWS.sign(header.alg, sHeader, sPayload, decryptedPk);
}

function getTimeInSec() {
  return Math.floor(Date.now() / 1000);
}

function safeBase64EncodedThumbprint (thumbprint) {
  var numCharIn128BitHexString = 128/8*2;
  var numCharIn160BitHexString = 160/8*2;
  var thumbprintSizes  = {};
  thumbprintSizes[numCharIn128BitHexString] = true;
  thumbprintSizes[numCharIn160BitHexString] = true;
  var thumbprintRegExp = /^[a-f\d]*$/;

  var hexString = thumbprint.toLowerCase().replace(/:/g, '').replace(/ /g, '');

  if (!thumbprintSizes[hexString.length] || !thumbprintRegExp.test(hexString)) {
    throw 'The thumbprint does not match a known format';
  }

  var base64 = (Buffer.from(hexString, 'hex')).toString('base64');
  return base64.replace(/\+/g, '-').replace(/\//g, '_').replace(/=/g, '');
}

var navigator = {}; // fake a navigator object for the lib
var window = {}; // fake a window object for the lib
eval(pm.globals.get('jsrsasign-js'));
ensureAccessToken();
Note
This script will use the environment variables to authenticate with Microsoft Entra ID to obtain an app-only token for Microsoft Graph and store it in a new or existing variable named AppOnlyCertGraphToken. This must be done using a script because Postman does not support the OAuth2 client credentials flow using a client certificate instead of a client secret.
Now, when a request is run from the Application > Containers folder the request's pre-script will obtain a token, update the environment variable that's set in the parent Application folder's Authorization tab, and then execute the request. Because the request is in the Containers folder that has it's Authorization tab set to inherit from the parent, it will pickup the authentication configuration that was reset.
Save the changes to the collection.
At this point, Postman is now configured to obtain an app-only access token for calls to Microsoft Graph.
Register the Container Type with your Consuming Tenant
With Postman configured, now you can add a request to register the Container Type with your consuming tenant.
In Postman, select Collections from the left-hand navigation and expand the SharePoint Embedded > Application node, select the … context menu on the Containers node, and select Add request.
Rename the request to Register Container Type.
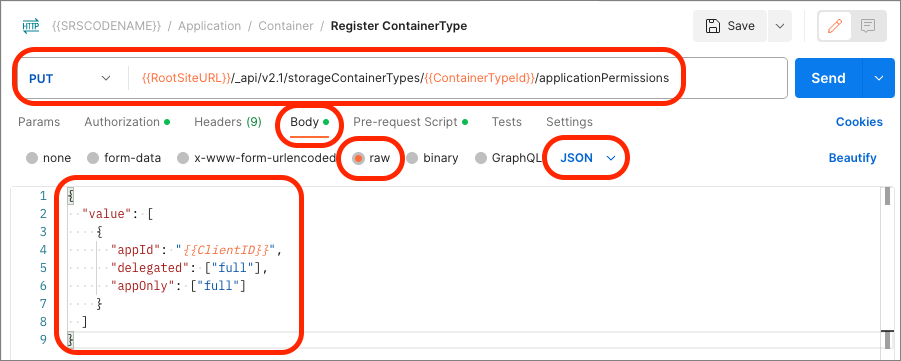
Set the HTTP method to PUT and the following endpoint:
{{RootSiteURL}}/_api/v2.1/storageContainerTypes/{{ContainerTypeId}}/applicationPermissions
On the Pre-request Script, add the following code to obtain an app-only token to call the SharePoint REST API:
async function ensureAccessToken () {
  var validToken = false;
  var token = pm.environment.get('AppOnlyCertSPOToken');
  if (token) {
    console.log('checking stored token');
    try {
      var tokenObj = KJUR.jws.JWS.parse(token);
      var nbf = tokenObj.payloadObj.nbf;
      var exp = tokenObj.payloadObj.exp;
      var now = getTimeInSec();
      if (nbf <= now && now < exp) {
        validToken = true;
      } else {
        console.log("Stored access token is expired");
      }
    } catch (e) {
      console.log("Unable to parse stored access token");
    }
  } else {
    console.log("No access token found");
  }
  if (!validToken) {
    acquireAccessToken();
  }
}

function acquireAccessToken() {
  console.log("Acquiring a new access token");
  var jwt = getRequestJwt();
  console.log(jwt);
  var tid = pm.environment.get('ConsumingTenantId');

  const tokenRequest = {
    url: `https://login.microsoftonline.com/${tid}/oauth2/v2.0/token`,
    method: 'POST',
    header: {
      'Content-Type': 'application/x-www-form-urlencoded'
    },
    body: {
      mode: 'urlencoded',
      urlencoded: [
        { key: 'client_assertion_type', value: 'urn:ietf:params:oauth:client-assertion-type:jwt-bearer' },
        { key: 'client_assertion', value: jwt },
        { key: 'client_id', value: pm.environment.get('ClientID') },
        { key: 'scope', value: pm.environment.get('RootSiteURL') + '/.default' },
        { key: 'grant_type', value: 'client_credentials' }
      ]
    }
  };
  pm.sendRequest(tokenRequest, (error, response) => {
    if (error) {
      console.log('Unable to acquire token: ' + error);
    } else {
      var responseJson = response.json();
      var token = responseJson.access_token;
      pm.environment.set('AppOnlyCertSPOToken', token);
    }
  });
}

function getRequestJwt () {
  var header = {
    'alg': 'RS256',
    'typ': 'JWT',
    'x5t': safeBase64EncodedThumbprint(pm.environment.get('CertThumbprint'))
  };

  var now = getTimeInSec();
  var tid = pm.environment.get('ConsumingTenantId');
  var payload = {
    'aud': `https://login.microsoftonline.com/${tid}/oauth2/v2.0/token`,
    'exp': now + 60 * 60,
    'iss': pm.environment.get('ClientID'),
    'jti': pm.variables.replaceIn('{{$guid}}'),
    'nbf': now,
    'sub': pm.environment.get('ClientID'),
    'iat': now
  };

  var encryptedPk = pm.environment.get('CertPrivateKey');
  var decryptedPk = encryptedPk;
  if (pm.environment.has('CertPassword') && pm.environment.get('CertPassword') !== '') {
    decryptedPk = KEYUTIL.getKey(encryptedPk, pm.environment.get('CertPassword'));
  }
  var sHeader = JSON.stringify(header);
  var sPayload = JSON.stringify(payload);
  return KJUR.jws.JWS.sign(header.alg, sHeader, sPayload, decryptedPk);
}

function getTimeInSec() {
  return Math.floor(Date.now() / 1000);
}

function safeBase64EncodedThumbprint (thumbprint) {
  var numCharIn128BitHexString = 128/8*2;
  var numCharIn160BitHexString = 160/8*2;
  var thumbprintSizes  = {};
  thumbprintSizes[numCharIn128BitHexString] = true;
  thumbprintSizes[numCharIn160BitHexString] = true;
  var thumbprintRegExp = /^[a-f\d]*$/;

  var hexString = thumbprint.toLowerCase().replace(/:/g, '').replace(/ /g, '');

  if (!thumbprintSizes[hexString.length] || !thumbprintRegExp.test(hexString)) {
    throw 'The thumbprint does not match a known format';
  }

  var base64 = (Buffer.from(hexString, 'hex')).toString('base64');
  return base64.replace(/\+/g, '-').replace(/\//g, '_').replace(/=/g, '');
}

var navigator = {}; // fake a navigator object for the lib
var window = {}; // fake a window object for the lib
eval(pm.globals.get('jsrsasign-js'));
ensureAccessToken();
On the Authorization tab, set the Type to Bearer Token and the Token to {{AppOnlyCertSPOToken}}. This token variable is created and set in the pre-request script.
On the Body tab, select the raw type, set the type of data to JSON and add the following code to the body:
{
  "value": [
    {
      "appId": "{{ClientID}}",
      "delegated": ["full"],
      "appOnly": ["full"]
    }
  ]
}
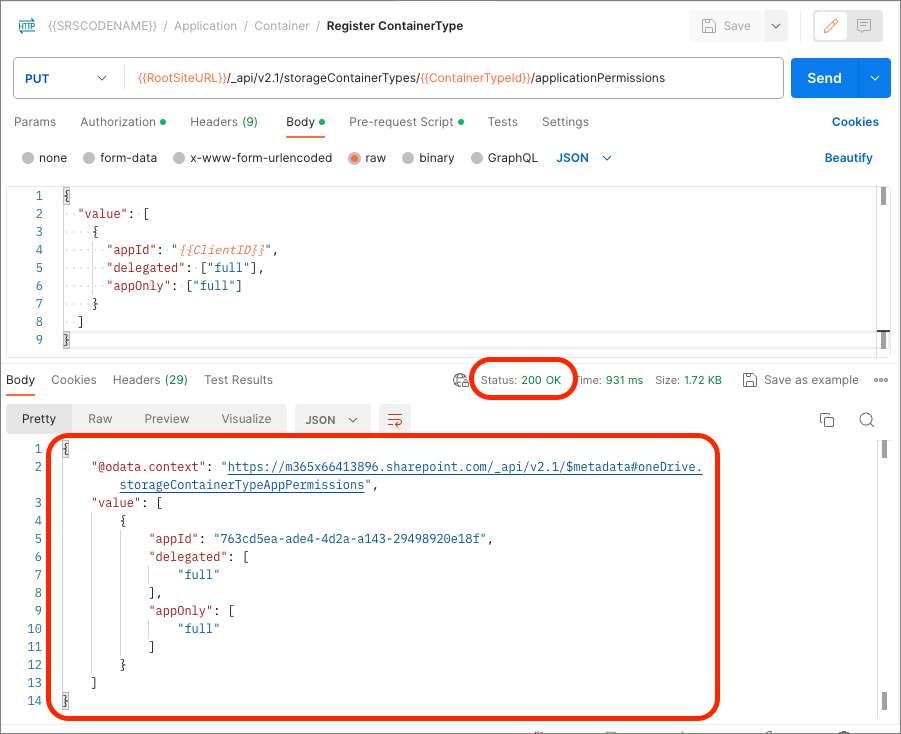
Select the Send button to execute the Register Container Type request. Postman will display the response below the request:
Summary
In this exercise, you created a Microsoft Entra ID application, setup SharePoint Embedded on your Microsoft 365 SharePoint tenant, and create your first Container Type using PowerShell, a new Postman collection and associated environment to submit requests to Microsoft Graph and SharePoint REST APIs.