Second step: Create the data table in Teams
Vocabulary apps do a good job of providing a word’s meaning, but most don't save custom information. This app solves the limitations of vocabulary.
The next step in this project is to create a table—a data table in which relevant vocabulary words and custom information can be entered and saved.
Make the table
Step 4
- From the left navigation pane of the Power Apps, select the cylinder icon for Data. A Data pane will appear.
- From the data pane, select Create new table

Step 5
- Name the table Vocabulary (Under Advanced Settings, its plural name will also automatically be written, however it shouldn't be changed.)
If there are multiple people making the same type of app in the same team, be sure to use a unique file name that identifies this specific table.
- Select Create

The basic table is created. The next step is to customize it.
Customize the table and add records
Once the basic table is created, it can be customized for the vocabulary app. The basic table starts with a Name column. The name of that column will be changed to Word, where each vocabulary word will be input.
More columns will be added:
- Meaning for each word’s definition
- Sentence to record a sentence using the vocabulary word in context
- Contributor for the name or initials of the editor who added the word
Step 6
To change the title of the name column:
- Select the Name column
- From the options that appear, select Edit column

- Change Name to Word
- Select Advanced options
- Change Max length to 500 to provide adequate space. Advanced options needs to be expanded to view that entry field.
- Select Save

Step 7
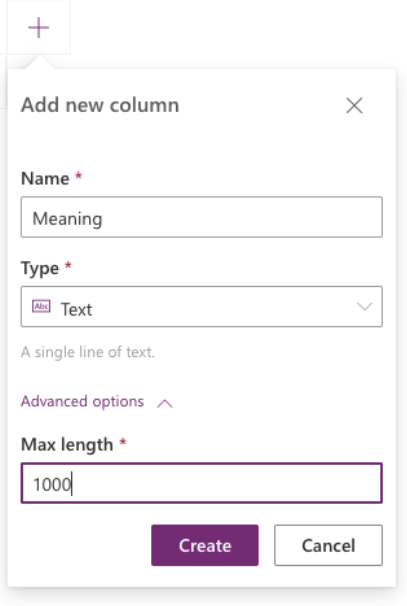
To create the Meaning column:
- Select the + icon beside the word column. This opens options to add a new column.
- Name the new column Meaning on the screen that pops up.
- Select Advanced options
- Change Max length to 1000 to provide space for a definition
- Select Create

Step 8
To create the Sentence column:
- Select the + icon beside the meaning column
- Name the column Sentence
- Select Advanced options
- Change Max length to 1000
- Select Create
Step 9
To create the Contributor column:
- Select the + icon beside the sentence column
- Name the column Contributor
- Select Create (no custom length is required)
Step 10
Select Done at the bottom right when all of the columns have been added.

The columns created in steps 6-10 are useful for learning and teaching vocabulary words. However, the columns can be edited further to fit an educator’s specific needs.
Now it's time to add some “records” to the table. These are the fields in which information is added to each column—the word, definition, sentence, and contributor.
To add a record, select the rows below each column and add information in each of the fields. For this initial vocabulary app, input information for five (or more) words in each row…any words.
Now there are records in the app that can easily be edited, changed, and to which others can be added.