Keep students organized
Imagine you're a college student trying to keep up with the course load in your classes. You're being introduced to new concepts, and it can be overwhelming at times. With devices like Surface Pro for Business and Surface Pro 12-inch, you can take handwritten notes with Surface Slim Pen 2nd Edition and organize your thoughts with Copilot. Let's learn how.
Surface Slim Pen 2nd Edition
If your Surface device supports inking, you can unlock a new interaction method using Surface Slim Pen 2nd Edition. Slim Pen 2nd Edition is a rechargeable pen for Surface designed for precision and a natural writing experience.
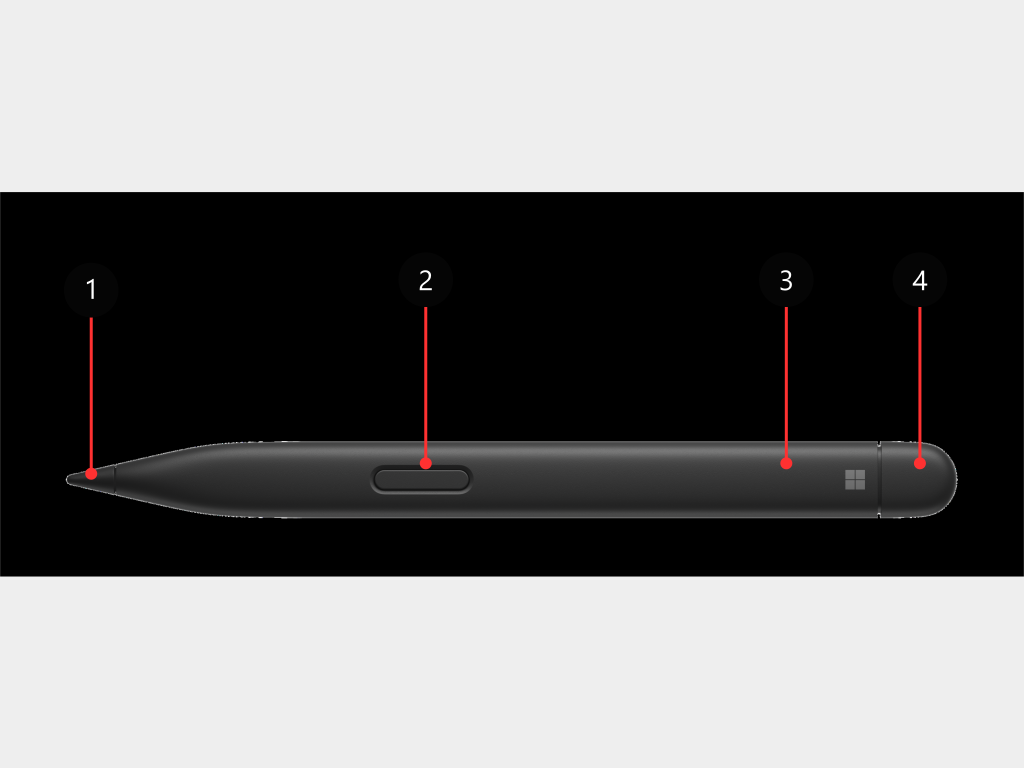
There are four components of Surface Slim Pen 2nd Edition (see diagram above). They are:
- Pen tip
- Right-click and select button
- LED light
- Eraser and top button
To use Slim Pen, it must be charged. How to change this depends on the Surface device that you're using. When it's charging, the LED light will light up and then turn off when charging is complete. Here are the ways to charge your Slim Pen based on the Surface device that you're using:
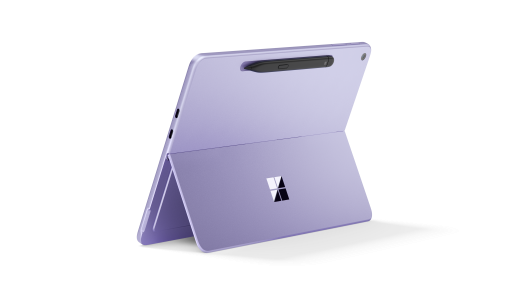
Surface Pro 12-inch: This device has an integrated pen storage slot on the back of the device. Place the pen in the designated area with the select button facing outward.
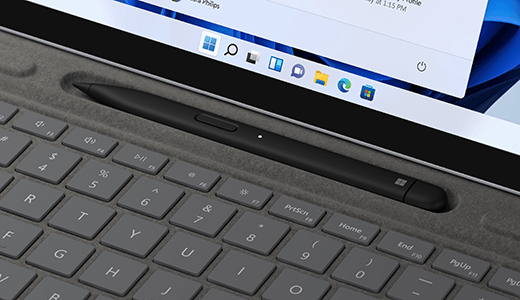
Surface Pro for Business: When using the Surface Pro Flex Keyboard with this device, the pen stows away in the designated pen storage area at the top of the keyboard.

Surface Slim Pen Charger: For all other devices, Surface Slim Pen 2nd Edition can be charged with the Surface Slim Pen Charger via USB-A connection.
Pairing Surface Slim Pen
Once the Pen is charged, use Bluetooth to pair your pen to your Surface device. Pairing lets you use the pen's shortcut button to quickly open apps and perform other shortcuts while using the pen. Here's how to pair:
- Select Start > Settings > Bluetooth & devices > Add device > Bluetooth.
- Press and hold the top button of your pen for 5-7 seconds until the LED light flashes white to turn on Bluetooth pairing mode.
- Select Surface Slim Pen 2 to pair your pen.
Taking notes with OneNote
Now that your Slim Pen is set up, you're ready to take notes during your classes. All Microsoft 365 applications now feature a Draw tab to enable inking experiences throughout the Office experience.
For this example, you'll be using OneNote to take notes during your class. OneNote supports both typed and handwritten notes—an ideal solution for someone that is more comfortable handwriting notes than typing them. To handwrite class notes while using Surface Slim Pen 2nd Edition and OneNote do the following:
- Open the OneNote application.

- On the ribbon, choose the Draw tab.
- In the Tools group, choose a pen or highlighter, and then write notes on the screen.
- To stop using the pen, select the Type button on the Draw tab.
Once you have finished taking your notes, OneNote allows you to convert the handwriting into text. This is useful if you want to share your notes in a more legible format with others. Remember that this feature can only be accessed in the OneNote desktop app, and not in OneNote for Web. To convert handwriting to text, do the following:
- On the Draw tab, choose the Lasso Select button.
- On the page, drag a selection over the handwriting you want to convert.
- On the Draw tab, choose Ink to Text.
You can also convert your handwritten notes to text in other languages. To do so, follow the steps below:
- Check that handwriting is installed for your chosen language. To add a language, open Windows settings, and then select Time & language. Next, select Language & region select and select Add a language to choose your language, and if handwriting is available, select Next to install.
- Open OneNote and navigate to the page containing the handwritten notes you wish to convert.
- On the Draw tab, use the Lasso Select tool to select the handwritten text or drawings you want to convert.
- Switch to the Review tab and choose Language > Set Proofing Language to select your language from the list.
- Once the language is set, close the Proofing language pane and go back to the Draw tab.
- Select the Ink to Text button, and the selected handwritten content will be converted into text and placed on the page, allowing for easier editing, formatting, and sharing.
Copilot in OneNote
You have successfully taken your notes and converted them to text. But with all of your classes and notes, they are a bit jumbled and disorganized. This is where Copilot in OneNote comes in to help you understand, create, and recall information at the click of a button. When available through institutional licensing, Copilot in OneNote uses large language models and your notes to help generate summaries, ideas, and drafts based on your content.
Using Copilot in OneNote you can:
- Generate summaries.
- Create task lists.
- Analyze your ideas.
- Rewrite your notes for clarity.
- Create new content like presentation outlines and meeting drafts.
- Chat with Copilot to get assistance in real-time.
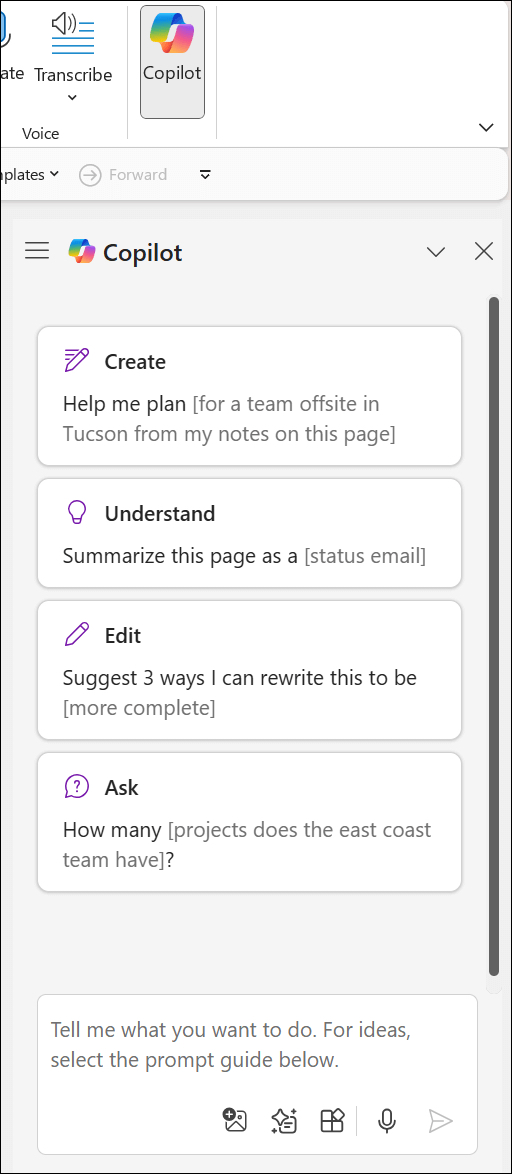
To start interacting with Copilot in OneNote, select the Copilot button from the Home Ribbon.
Summarize your notes
When you have numerous notes from lectures, Copilot can help make sense of everything for you. This is especially useful if you took numerous notes quickly that may be difficult to understand later on. Copilot's Summarize feature makes it easy to make sense of an entire section by default, a selected portion of text, and a specific topic or feature. Here's how to use it:
- Select the Copilot button in the ribbon to open the Copilot pane
- Once you've entered the details (such as key points, action items, or specific questions you want answered), select the Send arrow.
- Copilot generates a summary of your content. You can select Copy to copy Copilot's response and paste it in OneNote or other apps.
Create task lists
Copilot can also create task lists for follow-ups from your notes, a page, or a section. Here's how:
- Select Copilot from the ribbon to open the Copilot pane.
- Once you've entered the details (such as specific tasks, deadlines, or priorities), select the Send arrow. For example, you could enter "Draft a to-do list for my upcoming project brainstorming session, including tasks like preparing talking points, sending invites, and finalizing the agenda."
- Copilot generates a task list in the Copilot pane. You can select Copy to copy Copilot's response and paste it in OneNote or other apps.
Create new notes, pages, and sections
Imagine that you need to work on an assignment but you're not sure where to start. Copilot can help when you're stuck on a blank page and unlock your creativity.
If you need inspiration to ideate on a new assignment, Copilot can help you break mental blocks and provide ideas to get you started. Do the following:
Select Copilot in the ribbon to open the Copilot pane.
In the compose box, enter "Give me ideas" and details to specify what types of ideas you want.
Choose the View Prompt icon to open the Copilot prompt menu and select Give me ideas for.
Select the Send arrow.
Copilot places the ideas in the Copilot pane. You can select Copy to copy Copilot's response and paste it in OneNote or other apps. For larger projects that have overwhelming workloads, Copilot can draft an easy-to-follow plan so you can save time on planning and be more productive. Do the following:
Select Copilot in the ribbon to open the Copilot pane.
In the compose box, enter "Draft a plan" and details about what type of plan you need.
Select the Send arrow.
Copilot places the plan in the Copilot pane. You can select Copy to copy Copilot's response and paste it in OneNote or other apps.
Once the draft of your project is complete, it may need a rewrite. This is usually a difficult process, but Copilot in OneNote can help by rewriting your content for tone, style, formality, and even length. You can also ask Copilot to provide several options for its rewritten responses. Do the following:
- Select Copilot in the ribbon to open the Copilot pane.
- In the compose box, enter a prompt like "Rewrite" and details to clarify how you want the text to be rewritten. You can also do this by selecting some text and clicking the Copilot icon to get the menu option to Rewrite selected text.
- Finish typing in the rest of your prompt to specify the section, selected text, or topic or feature you want to rewrite.
- Select the Send arrow.
- Copilot places the rewritten text in the Copilot pane. You can select Copy to copy Copilot's response and paste it in OneNote or other apps. The features in Copilot are continuously expanding to enhance your experience and productivity. To explore these new capabilities:
- Use the Copilot pane: Access a comprehensive overview of all available features and tools.
- Click the on-canvas OneNote icon: Quickly access specific features tailored to your current task (only available on OneNote for Microsoft 365).
- Check the Help section: Find detailed examples and step-by-step guidance to make the most of the new tools.