Enhance educator workflow with Surface
The latest Surface for Business devices are Copilot+ PCs—which means they're optimized for the future of AI applications. All Surface Copilot+ PCs feature on-device AI experiences with neural processing units (NPUs). For higher education teachers, this helps to accelerate their repetitive tasks.
Imagine you're a university professor balancing teaching, research, and collaboration throughout the day. You plan to teach a class, do some research, and collaborate with fellow researchers on a call. With Surface devices and AI tools, you can stay organized and be productive. Let's explore how Surface can help you make the most of your day.
Summarizing emails in Outlook
To start your day, you open your email inbox and calendar in Outlook. Upon reviewing your inbox, you see a message thread with multiple back-and-forth messages. You have a busy day ahead, and reading through every message would be time-consuming. Copilot can help reduce time spent reviewing long or complex email threads. Follow these steps to summarize an email thread:
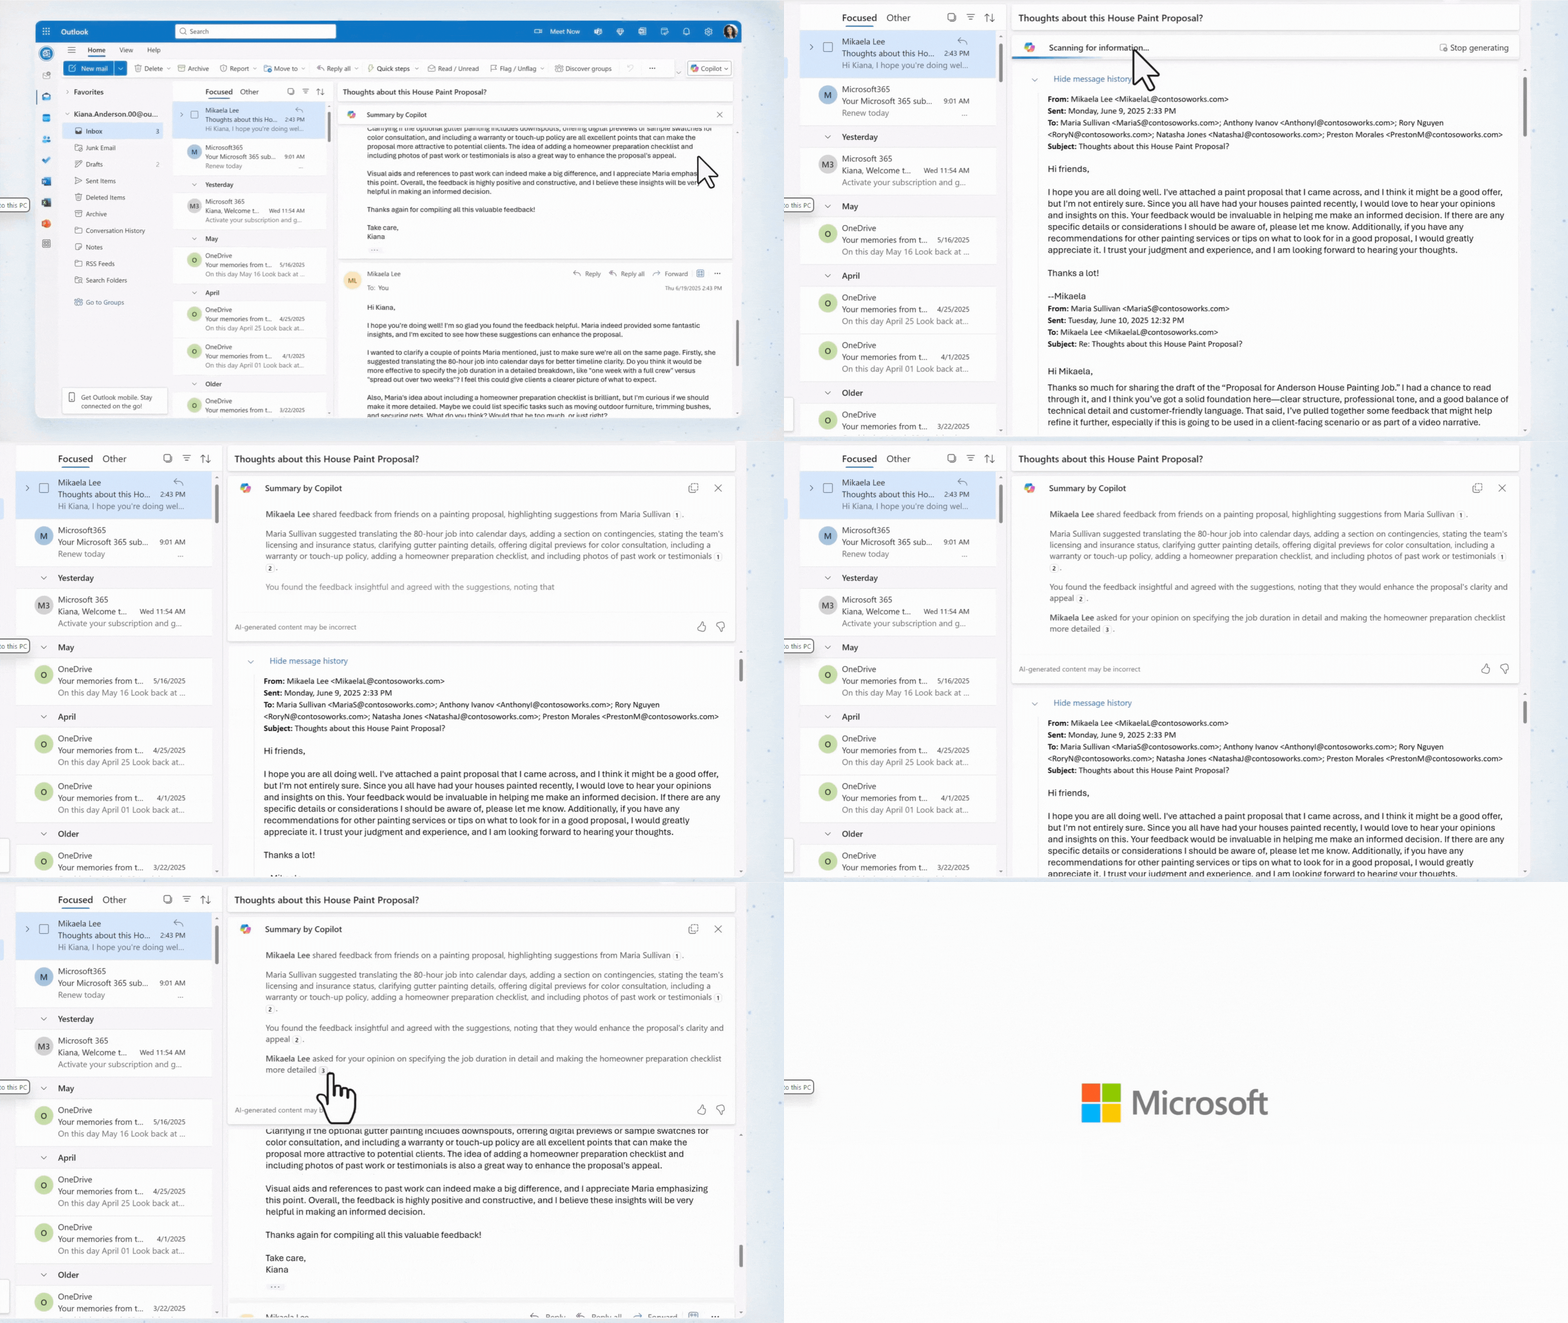
- In either classic Outlook or new Outlook, choose the conversation that you want to summarize.
- Select Summary by Copilot (or it might say Summarize) at the top of the email thread. Copilot scans the thread to identify key points and create a summary for you.
- The summary appears at the top of the email and may include numbered citations that, when selected, take you to the corresponding email in the thread.
- If you're using new Outlook and the email has attachments (PDF, PowerPoint, or Word), you can select Summarize a file. Wait for the summaries to be generated, then review them for a quick view of what you've been sent.
If you're using Outlook on the web, follow these steps:
- In Outlook on the web, choose the conversation that you want.
- Select Summary by Copilot (or it might say Summarize) at the top of the email thread. Copilot scans the thread to identify key points and create a summary for you.
- The summary appears at the top of the email and may also include numbered citations that, when selected, take you to the corresponding email thread.
- If the email has attachments (PDF, PowerPoint, or Word), you can select Summarize a file. Wait for the summaries to be generated, then review them for a quick view of what you've been sent.
Researching and multitasking
After teaching your class, it's time to work on research. In your on-campus office you have a dual monitor set up and Surface USB4 Dock. Connecting this dock to your Surface Pro allows you to have a desktop experience that is more comfortable for research and your Surface provides enough power to run academic, productivity, and AI apps simultaneously.
To get started, let's get familiar with the port selection on the Surface USB4 Dock:
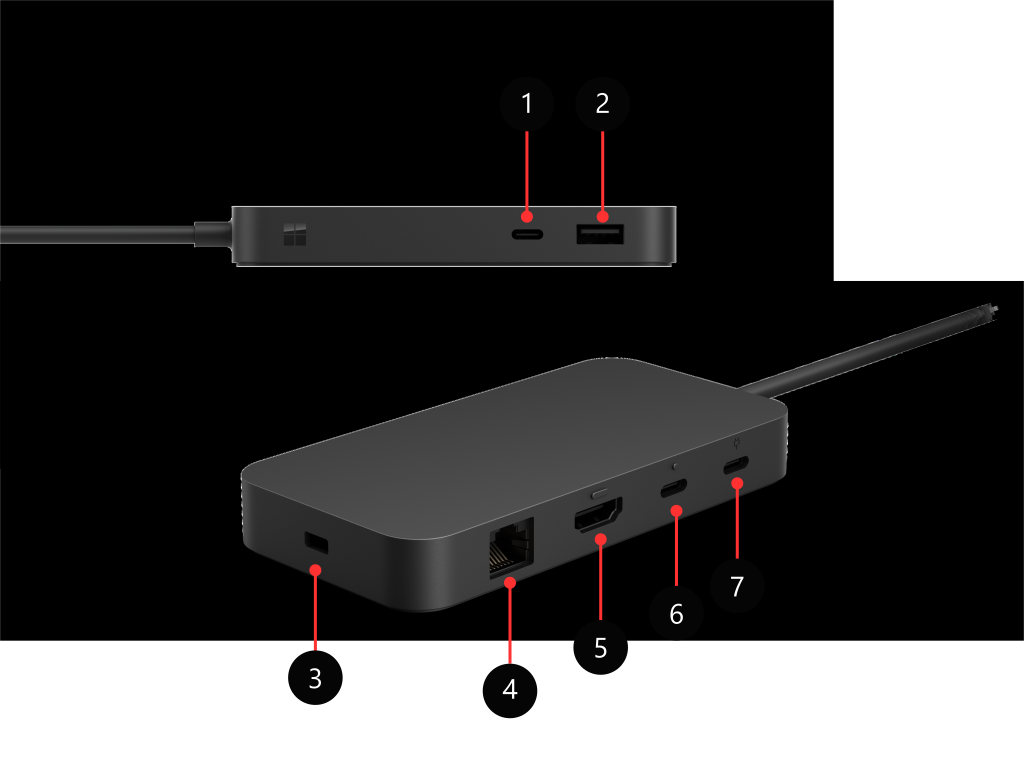
| 1 and 6 | USB-C ports | Connect USB-C accessories, such as external monitors |
|---|---|---|
| 7 | USB-C port (power supply only) | Input power only |
| 2 | USB-A port | Connecting external drives, printers, headsets, etc. |
| 3 | Security lock slot | For attaching a security lock cable, such as a Kensington Lock |
| 4 | Gigabit Ethernet port | For dependable and fast network connection to a wired network |
| 5 | HDMI 2.1 | Connect to an external 4K monitor |
Next let's review the steps for setting up your Surface USB4 Dock:
- Plug the AC end of the dock power cord into the power source, then plug the other end into the power port on the dock.
- If you want to use a wired network connection, connect a network cable to the Ethernet port.
- Connect your USB computer peripherals to the USB ports.
- Connect a video cable from your monitor via the USB-C or HDMI port on the back of your Surface USB4 Dock.
- Connect any essential USB accessories such as a flash drive or audio accessories via the available USB-A and USB-C ports.
After your setup is complete, connect the Surface Dock to your Surface Pro. Your device will charge and automatically connect to the accessories and peripherals that are connected to the Surface USB4 Dock. After you've connected your Surface and your external monitors to the dock, you can choose what to display on each screen. Here's how:
- Go to Start > Settings > System > Display.
- Expand Extend desktop to this display and choose one of the following options: a. Duplicate desktop on 1 and 2. This shows your screen on two displays. b. Extend desktop to this display. Your screen is spread over two screens, and you can drag items between the two screens. c. Show only on __. Your screen appears on the selected screen, and the other screen is blank.
Now that your monitors are set up, you're able to start working on your research. Surface devices feature powerful processors to handle multitasking across multiple applications. To run these simultaneously, a great tool to use is Snap Layouts—allowing you to transition from one app to the next without disrupting your workflow.
Snap allows you to quickly resize and position windows on your screen by dragging them to the edges or corners. This helps you work more efficiently by arranging multiple windows to maximize your screen space. Here are the ways that you can use Snap:
- Snap to the side: drag a window to the left or right edge of the screen to snap it to that side.
- Snap to corner: drag a window to a corner to snap it to that quarter of the screen.
- Maximize vertically: drag a window to the top of the screen to expand it vertically, filling the entire height while maintaining its current width.
Snap Assist is a feature in Snap that makes it even easier to organize your windows and workflow. When you snap a window to one side of the screen, Snap Assist will display thumbnails of your other open windows, allowing you to quickly choose which window to snap to the other side. Here's how to use Snap Assist:
- Snap the first window: select and drag a window to the edge of the screen until a translucent overlay appears. Release the window to snap it into place.
- Snap the second window: select another open window from the thumbnails displayed by Snap Assist to snap it to the other half of the screen.
With the multimonitor setup with Surface USB4 Dock and Snap Layouts, you're able to utilize the power of your Surface device and complete your research more efficiently.
Windows Studio Effects
After your research, the next part of your day involves jumping on a call to speak with your research collaborators. In this session, you'll be leading the conversation so it's important that you look and sound your best. With the AI-enhanced 1080p Studio Camera, dual studio mics, and Omnisonic speakers with Dolby Atmos on your Surface, you can look and sound your best.
Because your Surface is a Copilot+ PC, you can use Windows Studio Effects to stand out on calls. Windows Studio Effects applies AI models built by Microsoft and compiled for devices with an NPU (Neural Processing Unit) to deliver high-fidelity, battery-friendly AI effects. These reduce the burden on the device CPU and GPU and provide a trusted Microsoft AI experience that scales across the entire Windows ecosystem for any compatible device. Here's how to configure this feature on your Surface:
- Open Settings > Bluetooth & devices > Cameras, then select from the list of Connected cameras and open the settings for that camera.
- You'll see a preview of your front-facing camera display and the Camera Effects listed under it.
- Select the Windows Studio Effects that you would like to enable. Some of these have more settings that can be configured. For instance, Background Effects enable you to choose between Standard blur or Portrait blur.
The combination of cutting-edge hardware and AI-driven software on Surface devices empowers educators to do their best work and streamline their repetitive tasks. This frees up more time to focus on teaching their classes and less on administrative work.