Exercise - Set up your environment
Important
You need your own Azure subscription to complete this exercise, and you might incur charges. If you don't already have an Azure subscription, create a free account before you begin.
Before you start to work on your toy company's website pipeline, you need to configure your environment. In this section, you'll make sure that your Azure and Azure DevOps environments are set up to complete the rest of this module.
To meet these objectives, you'll:
- Set up an Azure DevOps project for this module.
- Clone the project's repository to your computer.
- Create a resource group in Azure.
- Create a service connection in Azure Pipelines.
Get the Azure DevOps project
In this section, you'll make sure that your Azure DevOps organization is set up to complete the rest of this module. You'll set it up by running a template that creates a project in Azure DevOps.
The modules in this learning path are part of a progression. Each module has an associated Azure DevOps project.
Tip
Even if you completed the previous module in the learning path, follow these instructions to create a new project and ensure that you give it a new name.
Run the template
Run a template that sets up your Azure DevOps organization.
Important
The Azure DevOps Demo Generator isn't supported anymore, but you can still use it to create demo environments. There's currently no replacement, and its features or availability might change down the road.
Get and run the ADOGenerator project in Visual Studio or another IDE.
When you're asked whether you want to create a new template or use the demo generator, enter 1 and then select Enter.
When prompted to Enter the template number from the list of templates above, enter 41 for Test your Bicep code by using Azure Pipelines, and then select Enter.
Choose your authentication method. You can set up and use a Personal Access Token (PAT) or use device login.
Note
If you set up a PAT, be sure to authorize the necessary scopes. For this module, you can use Full access, but in a real-world situation, you should grant only the necessary scopes.
Enter your Azure DevOps organization name, and then select Enter.
If prompted, enter your Azure DevOps PAT, and then select Enter.
Enter a project name, such as toy-website-test, and then select Enter.
After your project is created, go to your Azure DevOps organization in your browser (at
https://dev.azure.com/<your-organization-name>/) and select the project.In Azure DevOps, Create a self-hosted agent in the Default pool.
Fork the repository
If you haven't already, create a fork of the mslearn-test-bicep-code-using-github-actions repository.
On GitHub, go to the mslearn-test-bicep-code-using-github-actions repository.
Select Fork at the top-right of the screen.
Choose your GitHub account as the Owner, and then select Create fork.
Clone the repository
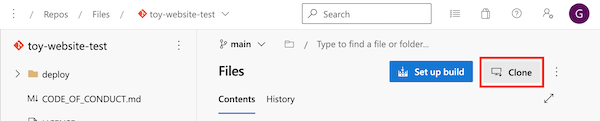
In Azure DevOps, select Repos > Files.

Select Clone.
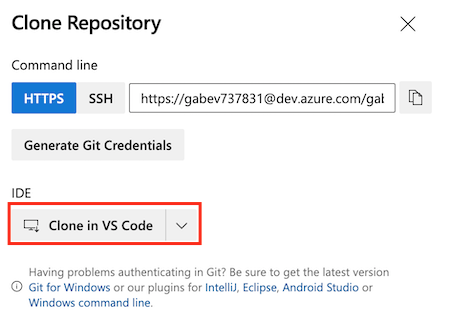
If you're using macOS, you need a special password to clone the Git repository. Select Generate Git Credentials and copy the displayed username and password somewhere safe.
Select Clone in VS Code. If you're prompted to allow Visual Studio Code to open, select Open.
If a dialog prompts you to allow an extension to open the repository URI, select Open.
Create a folder to use for the repository, and then click Select as repository destination.
You're using this repository for the first time, so you're prompted to sign in.
If you're using Windows, enter the same credentials that you used to sign in to Azure DevOps earlier in this exercise.
If you're using macOS, enter the Git username and password that you generated a moment ago.
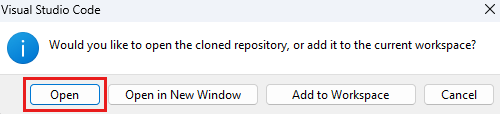
Visual Studio Code prompts you to open the repository. Select Open.

Sign in to Azure
To work with resource groups in Azure, sign in to your Azure account from the Visual Studio Code terminal. Be sure that you've installed the Azure CLI tools.
In the Terminal menu, select New Terminal. The terminal window usually opens in the lower half of your screen.
If the shell shown on the right side of the terminal window is bash, the correct shell is open and you can skip to the next section.

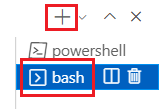
If a shell other than bash appears, select the shell dropdown arrow, and then select Git Bash.
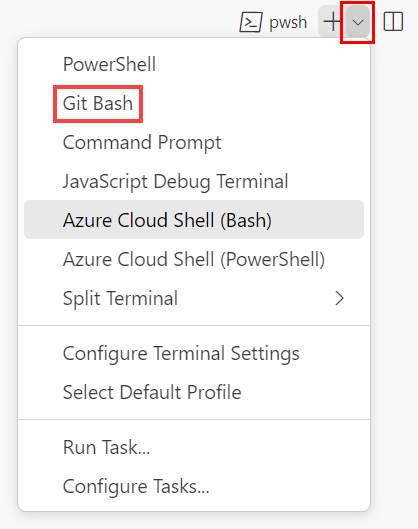
In the list of terminal shells, select bash, and then select the plus sign to open a new terminal that uses the bash shell.
Sign in to Azure by using the Azure CLI
In the Visual Studio Code terminal, run the following command to sign in to Azure:
az loginIn the browser that opens, sign in to your Azure account.
To work with resource groups in Azure, sign in to your Azure account from the Visual Studio Code terminal. Be sure that you've installed Azure PowerShell.
In the Terminal menu, select New Terminal. The terminal window usually opens in the lower half of your screen.
If the shell shown on the right side of the terminal window is powershell or pwsh, the correct shell is open and you can skip to the next section.

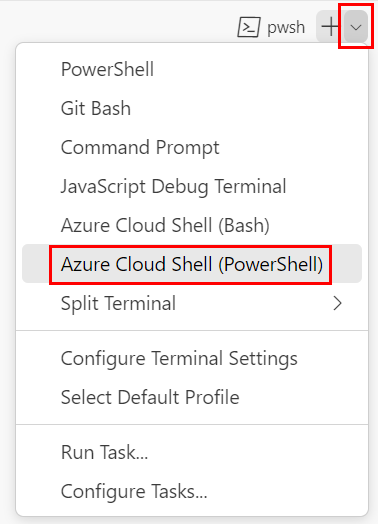
If a shell other than powershell or pwsh appears, select the shell dropdown arrow, and then select PowerShell.
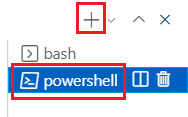
In the list of terminal shells, select powershell or pwsh, and then select the plus sign to open a new terminal that uses the powershell or pwsh shell.
Sign in to Azure by using Azure PowerShell
In the Visual Studio Code terminal, run the following command to sign in to Azure:
Connect-AzAccountIn the browser that opens, sign in to your Azure account.
Create a resource group in Azure
To create a resource group, run this Azure CLI command in the Visual Studio Code terminal:
az group create --name ToyWebsiteTest --location westus3
To create a resource group, run this Azure PowerShell command in the Visual Studio Code terminal:
New-AzResourceGroup -Name ToyWebsiteTest -Location westus3
Create a service connection in Azure Pipelines
Next, create a service connection in Azure Pipelines. This connection automatically creates a service principal in Azure. It also grants the service principal the Contributor role on your resource group, which allows your pipeline to deploy to the resource group.
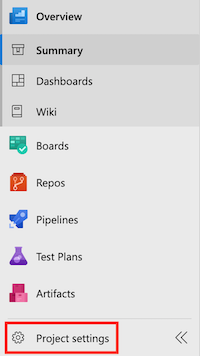
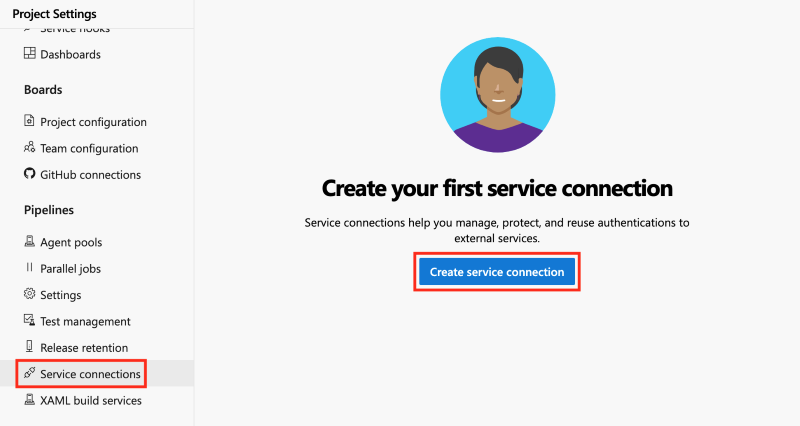
In the project you created earlier, select Project settings.
Select Service connections > Create service connection.
Select Azure Resource Manager > Next.
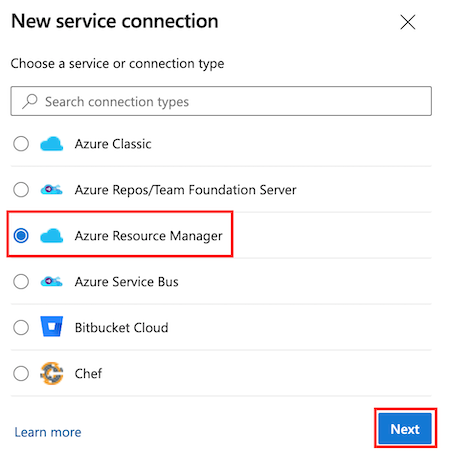
Select App registration (automatic).
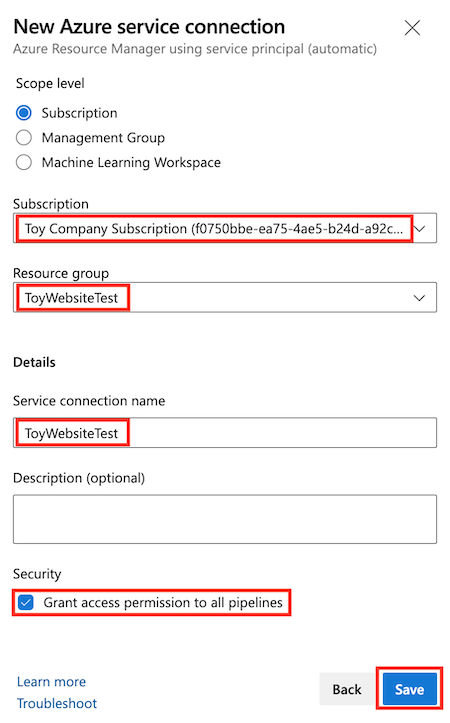
In the Subscription dropdown list, select your Azure subscription.
A pop-up window might prompt you to sign in to Azure. If it does, enter your credentials and sign in.
In the Resource group dropdown list, select ToyWebsiteTest.
In Service Connection Name, enter ToyWebsiteTest. Ensure that the Grant access permission to all pipelines checkbox is selected.
Tip
For the sake of simplicity, you're giving every pipeline access to your service connection. When you create real service connections that work with production resources, consider restricting access to only the pipelines that need them.
Select Save.