Define source columns
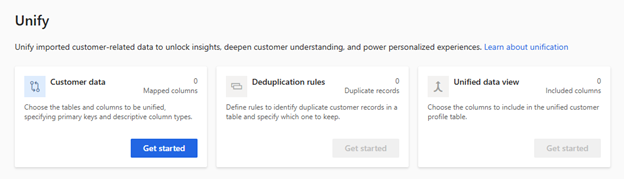
The first stage in creating a unified profile is mapping customer data. This defines which data sets from the ingested data sources will be used to create the unified customer profile.
The two main goals of the map phase are:
Table selection - Identifies which tables can be combined to create a more complete dataset with information about your customers.
Column selection - Identifies which columns for each table should be combined so they can be reconciled in the match and merge phases.
Mapping is done from the Unify page under the Data section on the Customer Insights menu. The first time that you access the mapping phase, no data will be available, so you'll need to select the Get Started under the Source columns section.
The first thing you'll need to do is to Select the tables and columns that you want to use in your profile. Each data source that you ingested will be listed. Under the data sources, you'll see each query that was defined during the ingestion phase. You'll need to select each query information that would be used to create the customer profile. Not every data source needs to be included in a customer profile. Some data sources simply include activities or events that are related to a customer, but not data that would need to be part of the unified profile.
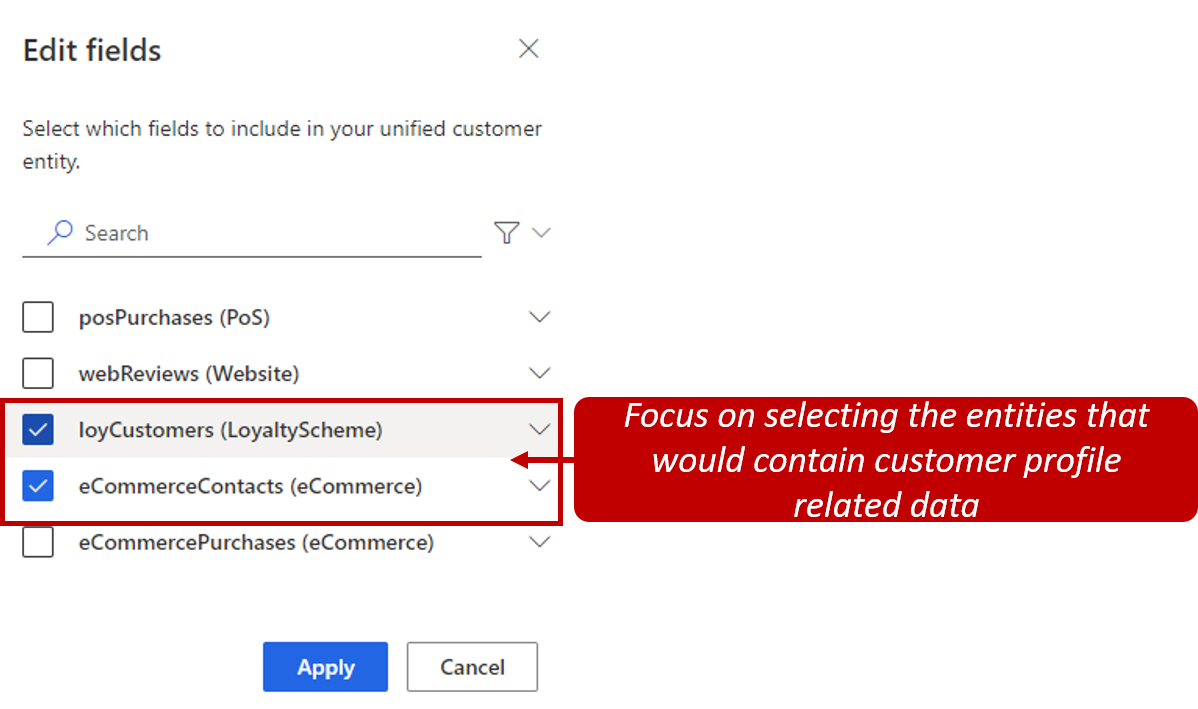
For example, let's say that during the ingestion phase, you ingested the following data sources:
Contacts (eCommerce) - Stores customer profile details that are related to customers who use your e-commerce system.
Customers (Loyalty) - Stores customer profile information related to customers who are a member of your loyalty program.
Purchases (POS) - Stores purchase information made by customers from your Point-of-Sale system about purchases that your customers have made.
Since the Contacts (eCommerce) and Customers (Loyalty) data sources would typically contain customer related details that you want included in profile information, you would likely unify those two data sources to make up the customer profile. Since the POS system contains purchase information that is associated with a customer, it would typically be used to track purchase related activities associated with that customer as well; therefore, that data source doesn't need to be included in the customer profile.
During the mapping phase, you only need to select Contacts (eCommerce) and Customers (Loyalty). An exception to this scenario could be if each record in the POS data source contained address information that defined where to ship information to. In that case, it might be beneficial to include the POS data source in the unified customer profile. Make sure that you carefully consider what data is included in each data source to ensure that you know which data you want to ingest. After you've decided what sources to include in the profile, select Save, which will redirect you to the Map screen so you can provide further details.
Important
To benefit from the data unification process, make sure that you select at least two tables. The map screen is where you will define which column contains the unique identifier for each record. The screen consists of two sections.
Work with tables
On the left side of the Select tables and columns screen, you'll see the list of ingested tables that you selected. The tables are listed in alphabetical order. The order doesn't impact how the customer profile record will merge, which will be done when you complete the match phase. You can move between the different tables by selecting the table that you want to work with.
You can make changes to the tables that are included. For example, if you have ingested data from a new data source that you want to include in the customer profile, you could add the data source in the customer profile by selecting the Select button. This selection will let you either add or remove data sources from the customer profile as needed.
Important
You can only remove tables if you have not merged the data. After a table has been merged, it will appear dimmed and will be unavailable for removal.
Work with columns
When you select a table, all the columns for that table will be displayed in the columns in the Name of table section. For example, if you selected the Contacts (eCommerce) table, the name would display as Columns in Contacts (eCommerce). The system will automatically include all the columns where it can auto identify the column type.
You can decide which specific columns you want to include by selecting the Edit button. Every column that is available in that data source will be listed. You can use the search box or scroll to locate the columns. After you have found them, select the columns that you want to include. All columns can be added by selecting the Select all button. When one column is selected, the Select all button will turn into a Clear all button that you can use to clear all your selections. Make sure that you review which columns are included for each table, because those will be used during the match phase.
Intelligent mapping
The purpose of the mapping process is to ensure that the correct columns from the ingested data source are going to be mapped appropriately on the unified customer profile. While you can go through the mapping process manually, initially the Intelligent mapping feature will be enabled. Intelligent mapping helps to save you time, by automatically determining the type of data in each column and then mapping it to columns in the app.
By default, Intelligent mapping is turned on when you select the tables you want to map. You can add more manual mappings as required. If for any reason, you decide to turn off Intelligent mapping, any intelligent suggestions will be cleared, but any changes made to individual columns will remain. Most of the time you'll likely leave it on to save time.
Select primary keys and define column types
Prior to mapping, each table needs to be prepped so that the application can more effectively map the data when the merge operation runs. You must complete two selections before you can complete the map phase.
Primary key - Each table needs to have one column designated as a primary key. For a column to be a valid primary key, it shouldn't include duplicate values, missing values, or null values.
You can't use multiple columns as the primary key only one column is supported.
Column type - Defines the categories of your columns, such as email address or name. Column types will be auto identified by the system when the table is added.
You can change an existing type or add a customer table type by selecting the Type column for the column that you want to change, and then entering the name that you want to use.

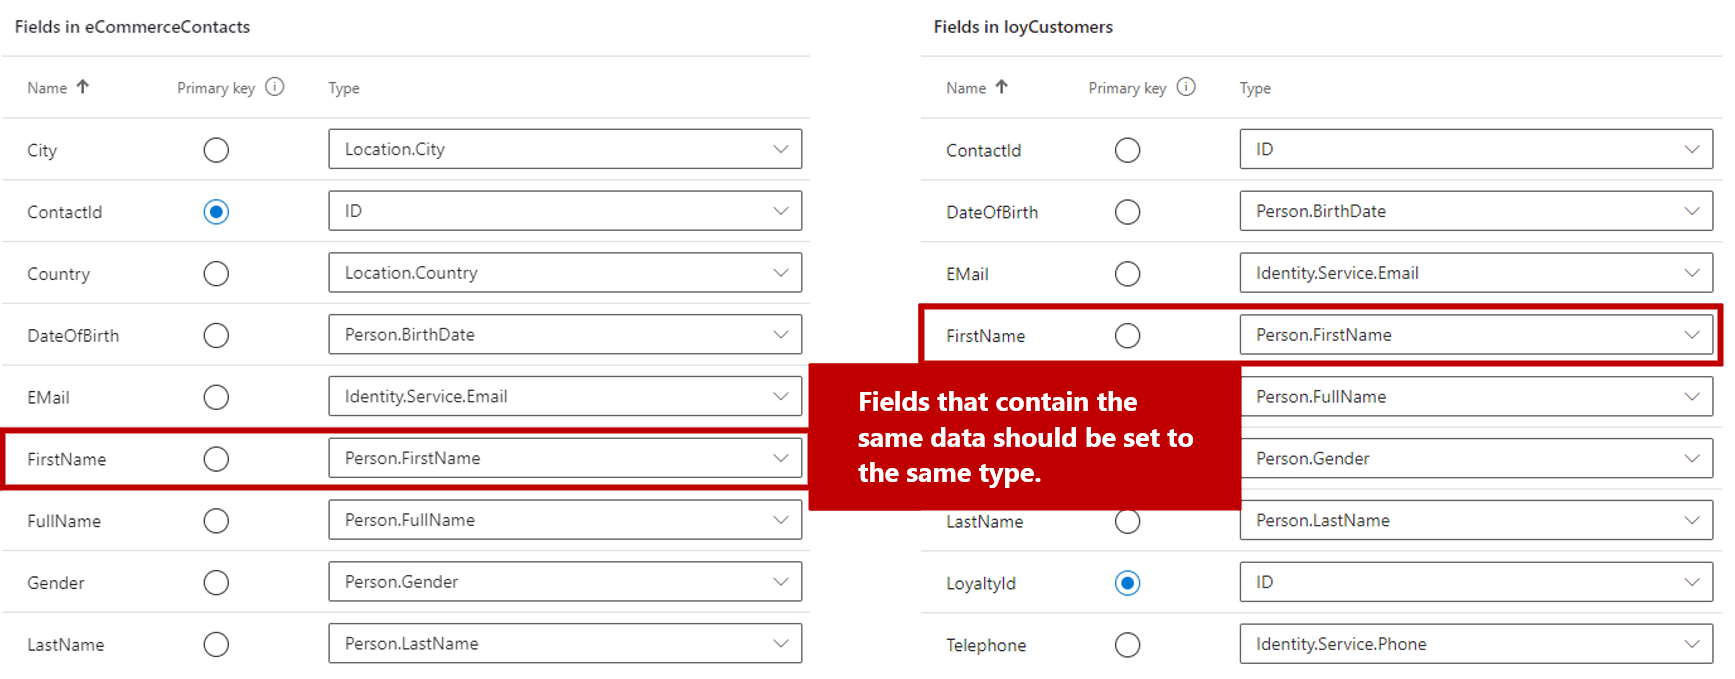
Ensure that your categories are consistent across all the tables that you're including in the profile. This approach ensures that everything will be mapped correctly when the system merges items into the unified profile. For example, if both eCommerce Contacts and Loyalty Customers have a FirstName column, you would want both of those categories to be set to Person.FirstName. When columns are auto identified these categories should align, but you should always double check to be certain.
After all the tables and columns have been mapped, you're ready to advance to the duplication phase.