Define matching rules
Now that we've completed the mapping of source columns, our next step is to define our matching conditions. The matching phase is where you'll specify how to combine your datasets into a unified customer profile dataset. This profile will be used later to unlock unique insights about your customers.
You can't perform any matching unless you've mapped at least two tables during the source mapping phase. The first time that you go through the match process, you need to complete the following mandatory steps:
Specify the order by which your mapped tables will be matched.
Define rules for the first matched pair.
Run your specified matches.
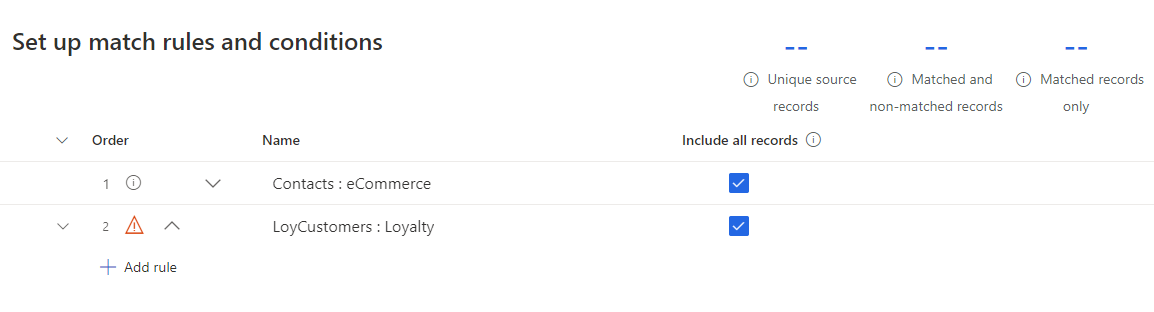
Specify the match order
Each match involves unifying two or more tables into a single table, while maintaining each unique customer record. When you define a match order, you'll need to define which table to use as the primary table. The table that you choose as primary serves as the basis for your unified primary dataset. Essentially, any columns from other tables that are selected during the match phase will be added to this table. Nonetheless, the unified table won't necessarily include all the data that is included in this table.
Two considerations that can help you determine your primary table:
Which table likely has the most complete and reliable data about your customers.
If the table has columns that are also shared by other tables such as name, phone number, or email address. The more shared columns that a table has, the better results you'll have when matching occurs.
If the table doesn't have shared columns with others, select your second most reliable table.
When you know which table is going to be your primary, define the order in which the remaining tables will be evaluated. These tables would be represented as table 2, table 3, and so on.
The match order runs in the following order:
First match - The primary table is matched with table 2.
Second match - The dataset results from the first match are matched with table 3.
Third match - The dataset results from the second match are matched with table 4.
This process continues for all the tables that are defined in the match order. To better explain, consider the Contacts (eCommerce) and Customers (Loyalty) tables that were mapped in the previous unit. If you define Contacts (eCommerce) as the primary, and Customers (Loyalty) as table 2, when matching takes place:
Contacts (eCommerce) would be matched with Customers (Loyalty).
If you added a third table, the results of the Contacts (eCommerce)/Customers (Loyalty) match would be matched against the third table.
The questions that you used to determine your primary table should be used to help you identify table 2 as well. Determine which table you consider has the second most reliable and complete data. Moreover, establish whether that second table includes at least one column that is shared by the primary table, and possibly other columns that are shared by other ingested tables.
Define rules for your first match pair
After you've defined the match order, you're ready to begin defining matching rules. Until the matching rule knows which columns to match and how to match them, the match order will display a warning sign indicating that at least one match rule (which is mandatory) is necessary for your match pair. Match rules dictate the logic by which a specific pair of tables will be matched. To define a rule, select Add rule.

The Add rule pane is where you'll specify the conditions that will apply for that rule. Each condition is represented by two rows that include the following selections:
The column from the primary table that will be used for matching from the first match pair table such as a name, phone, or email address.
The column from the secondary table that will likely have similar information to the column that is selected in the primary table.
From the previous example, because both Contacts: eCommerce and Customers: Loyalty have a FullName column, you would likely select those fields in the condition that you define.
As you define a condition, you can define two other options that impact how matching records are identified and the results that are returned:
Precision method - Indicates the level of precision that the rule should use when determining if it can find a matching record in the other table. The four options that you can choose from are:
Exact - Looks for an exact match between the columns.
High - Fits cases where a 100%, identical match isn't required, but the precision of the match is more important than the reach of the match, such as a financial service for a specific customer.
Low - Fits cases where the opposite of high is true. With this option, you would be more concerned with the reach of the match as opposed to the precision. This option might be used in scenarios like marketing campaigns.
Medium - This option serves as a middle ground between High and Low.
Normalization method - Various normalization options are available that can help to ensure matches such as removing punctuation, not considering whitespace, and treating the values as a type of data, such as an address or phone number.
If you aren't receiving the expected results from your rules, you can always come back later and modify the rule precision and normalization to adjust the results as needed.
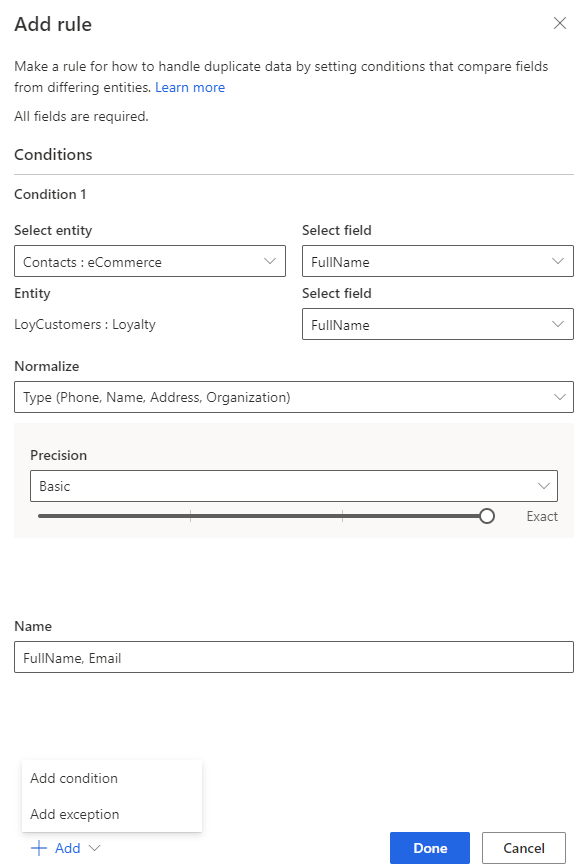
Occasionally, you might want to match tables only if multiple conditions are met, such matching a customer's name and email address. To accommodate this scenario, you can add multiple conditions that are linked together. Each condition can have its own precision and normalization definitions defined. Customer Insights - Data doesn't support OR conditions, so any conditions that are added are treated as AND conditions. Both conditions will need to be met for a match to be found. You can remove conditions as needed. Optionally, you can add exceptions to the rule. Exceptions are used to address rare cases of false positives and false negatives.
Add multiple rules
If you think of rule conditions as a single pair of columns, such as a name or a combination of a name and email address, then rules represent sets of one or more conditions.
If you believe that your tables can be matched based on different sets of columns, you can create more rules. When you define a second rule, the order of the rules matters. The matching algorithm tries to match based on the first rule and will continue to the second rule if no matches were identified under the first rule.
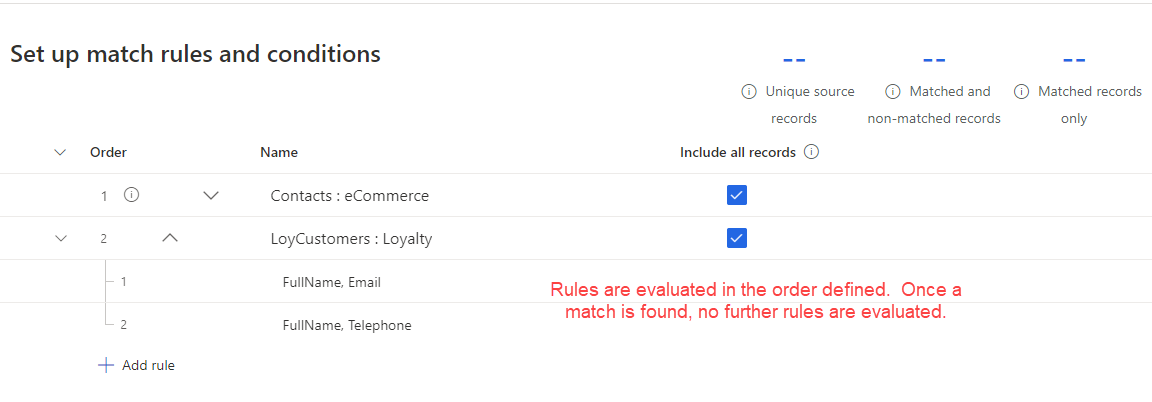
For example, if you have customers in the second data source that don't have email addresses, you could add a second rule that would match based on a combination of name and phone number. When the match order is applied, if it can't find a match based on the name and email, it will move on and try to match based on the name and phone number.
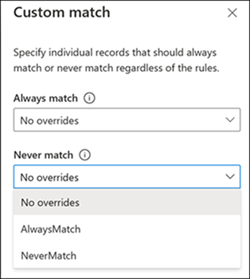
Specify custom match conditions
There will be times where the default match logic needs to be modified to fit your specific needs. For example, there might be times when you want to ensure that specific names are always matched. At the same time, you want to ensure that specific names such as John and Jonathan are never matched. In these instances, you can create custom match rules that will override the default match rules and ensure that records are being matched as you intend them to.
There are four options available:
Always match: Defines values that are always matched, such as always matching Mike and MikeR.
Never match: Defines values that never match, such as never matching John and Jonathan.
Custom bypass: Defines values that the system should always ignore in the match phrase, such as choosing to ignore the values 11111 and unknown.
Alias mapping: Defines values that the system should consider as the same value. You might create an Alias to consider Joe to be equal to Joseph.

When you are in the matched records details section, you can select custom match to create your own rules.
After you select the match type you want to use, you'll need to select Download template. The template contains columns to specify the table and the table primary key values to be used in the custom match. For example, if you want the primary key 12345 from sales table to always match with primary key 3486 from the contact table, fill in the template as noted below:
Table1: Sales
Table1Key: 12345
Table2: Contact
Table2Key: 34567
The same template file can specify custom match records from multiple tables. After adding all the overrides, save the template file. You can then go to Data Sources to ingest the template files as new tables. After the uploaded files and tables are available, select the Custom match option again. You'll see options to specify the tables you want to include. Select the required tables from the dropdown menu and select Done.
For more detailed steps on creating custom match rules, see: Specify custom match conditions.