Create a unified customer profile
The last phase in the data unification process is finalized the customer columns that will appear in the Unified customer profile. This helps to reconcile conflicting data. For example, conflicting data might be a customer name that resides in two of your datasets but shows up slightly different in each set. In one set, the name might be listed as Grant Marshall versus only Grant in another set. Conflicting data might also come in the form of phone number formats that differ slightly, such as 617-8030-91X versus 617803091X. In those instances, merging that conflicting data is done on a column-by-column basis.
Review system recommendations
On the Unified customer columns page, you'll be presented with a list of customer columns. You can use this area to choose which columns you want merged into your unified customer profile table. The customer profile table will be the result of the configuration process.
The image below shows an example of what this might look it:

The following information for the column is shown on the Merge page:
Column Name - This represents the name of the column after the merge.
Table - Represents the table that the column is coming from.
Source - Represents the data source the column is coming from.
Auto merged columns that have more than one column associated with them will have a number next to the name. This number indicates the number of columns that make up the merged column. For example, FullName (2), indicates that the FullName merged column has actual two columns associated with it. You can view the columns included in an auto merged column by selecting the merged column. The columns that make up the merged column will show below the merged attribute.
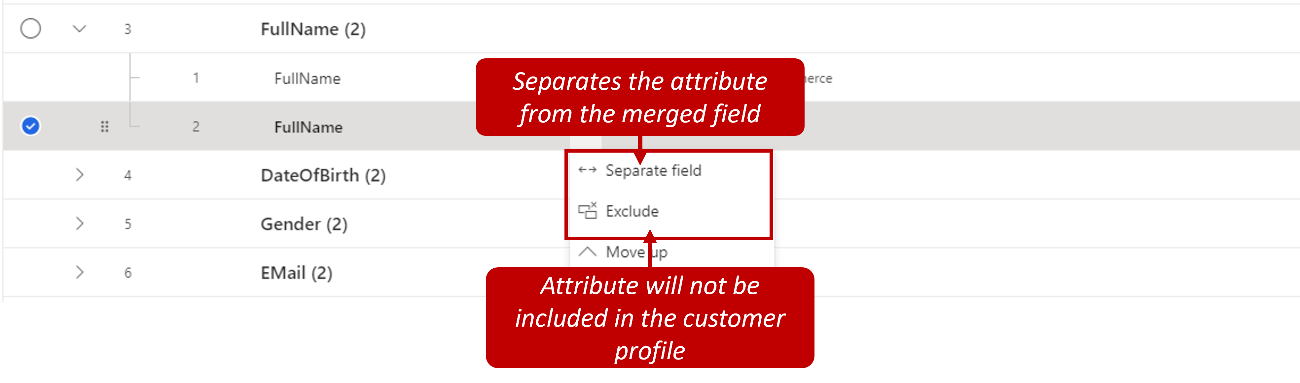
If you want to unmerge any of the auto merged columns, select the ellipsis icon. In the drop-down menu, select Separate columns. Remove columns from the customer profile entity. If you think that some columns should be excluded from the final customer profile table, select the Don't merge option from the same drop-down menu.
Columns will move to the Removed from customer record section.
Add a merged column manually
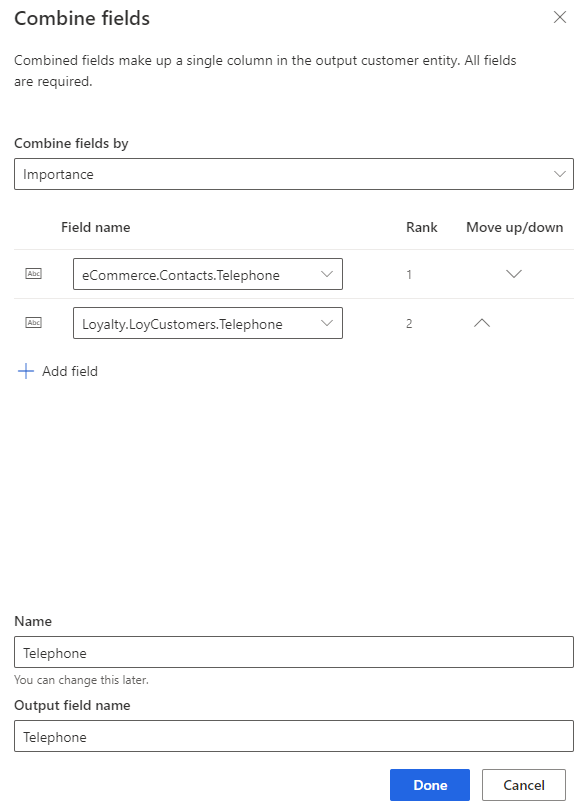
You might find during the review process that some columns need to be combined to create a merged column. This is done by applying the Combine columns option.
There are two options available when combining columns:
Columns: Used in scenarios where you have two columns that should be combined as one, such as a phone number, email, or name.
Group of columns: Used in scenarios where you want to treat a group of columns as a single unit. For example, if our records contain the columns Address1, Address2, City, State, and Zip, we don't want to merge in a different record’s Address2, thinking it would make our data more complete.
When combining columns, you define the following:
Combine columns by - Specifies the criteria that you want to use to combine the columns together. You can choose to combine columns by Importance, Most Recent, or Least Recent.
Columns – Specifies which columns you want to combine. Based on the Combine columns by the option you selected, you can adjust the order of the columns.
Name – Specifies the friendly name that will be used to identify the column in the unified customer profile.
Output column name – Specifies the name of the column as it will be stored in the table.
You can edit any auto merged or manually created merged column at any time by selecting the ellipsis and choosing Edit. This will open the Combine Columns pane. From here you can change the display name, change the columns, and modify the importance rankings.
Additionally, you can specify if any of the auto merged columns should be separated, or if there are any columns that should be excluded from the customer profile.

Review settings
Once you've defined all the columns, matching, and column settings you're ready to create the Unified Customer Profile. On the Review and create customer profiles screen, you can verify all configuration settings or make any necessary changes before creating the customer profiles. Once you've verified that everything is the way you want, select Create customer profiles.

Unify customer profiles
After you initiate the creation of the customer profiles, you'll be taken to the Unify screen. From here, you can modify any of the items you did during the unification process. For example, you might find that your matching rules didn't return the results that you were expecting. At any point, you can go back and modify your matching conditions.

Any changes that you make to the process will impact your customer profiles. After you have made your changes, you can select the Unify option on the command bar. You can choose from the following:
Unify customer profiles: Runs the customer profile creation process again, based on changes that you have made. This can result in updated customer profiles or new profiles being created.
Unify customer profiles and dependencies: Run the customer profile creation process again, and once completed it triggers updates to any down stream processes, such as updating Measures or Segments.
Run matching conditions: Runs your updated matching conditions so you can see how they'll impact the results. It will not update any existing or create new customer profiles.
