Exercise - Upload your project to GitHub
You can import repositories to GitHub using GitHub Importer, the command line, or external migration tools.
About GitHub Importer
If you have source code in Subversion, Mercurial, Team Foundation Version Control (TFVC), or another Git repository, you can move it to GitHub using GitHub Importer. GitHub Importer is a tool that quickly imports source code repositories, including commits and revision history, to GitHub for you.
During an import, depending on the version-control system you're importing from, you can perform some of the following tasks. Authenticate with your remote repository, update commit author attribution, import repositories with large files, or remove large files if you don't want to use Git Large File Storage.
| Import Action | Subversion | Mercurial | TFVC | Git |
|---|---|---|---|---|
| Authenticate with remote repository | X | X | X | X |
| Update commit author attribution | X | X | X | |
| Move large files to Git Large File Storage | X | X | X | |
| Remove large files from your repository | X | X | X |
Importing a repository with GitHub Importer
If you have a project hosted on another version control system, you can automatically import it to GitHub using the GitHub Importer tool. GitHub Importer isn't suitable for all imports. For example, if your existing code is hosted on a private network, our tool isn't able to access it. In these cases, we recommend importing using the command line for Git repositories or an external source-code migration tool for projects imported from other version-control systems.
If you'd like to match the commits in your repository to the authors' GitHub user accounts during the import. First, make sure that every contributor to your repository has a GitHub account before you begin the import.
Repositories and individual files are subject to size limits. For more information, see About large files on GitHub.
To import a repository, follow these steps:
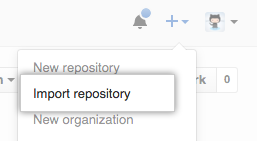
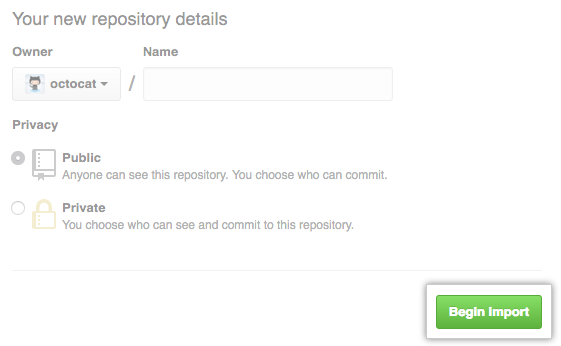
In the upper-right corner of any page, select +, and then select Import repository.
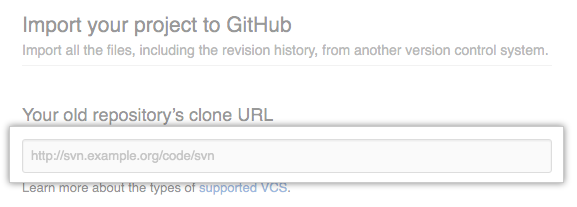
Under "Your old repository's clone URL," type the URL of the project you want to import.
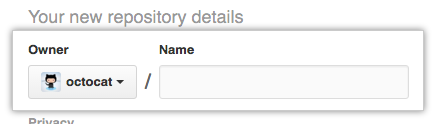
Choose your user account or an organization to own the repository, then type a name for the repository on GitHub.
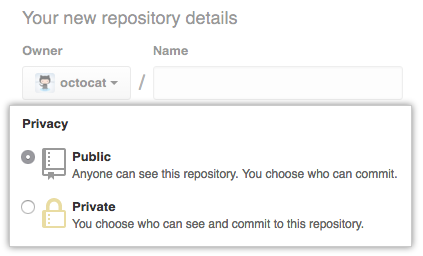
Specify whether the new repository should be public or private. For more information, check out Setting repository visibility.
Review the information you entered, then select Begin import.
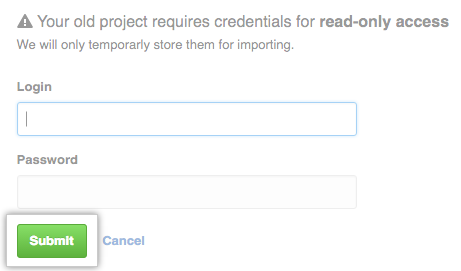
If your old project was protected by a password, type your sign-in information for that project, then select Submit.
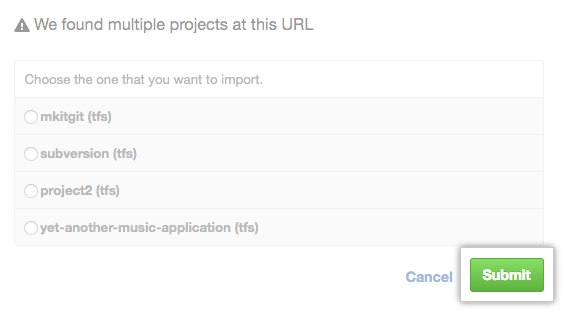
If there are multiple projects hosted at your old project's clone URL, choose the project you'd like to import, then select Submit.
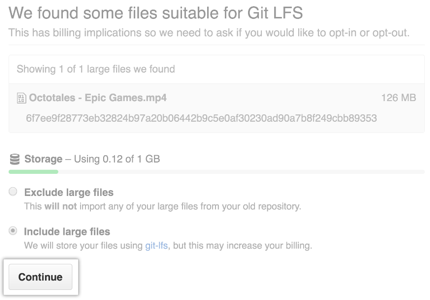
If your project contains files larger than 100 MB, choose whether to import the large files using Git Large File Storage, then select Continue.
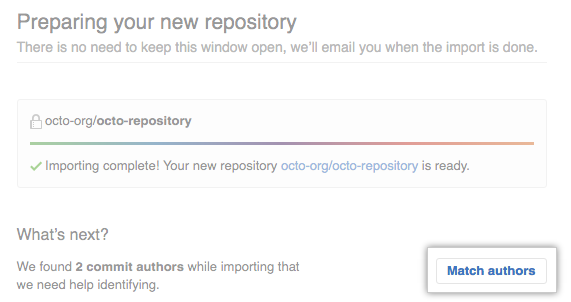
When the repository is fully imported, you receive an email.
Updating commit author attribution with GitHub Importer
During an import, you can match commits in your repository with the GitHub account of the commit author. GitHub Importer looks for GitHub users whose email addresses match the authors of the commits in the repository you're importing. You can then connect a commit to its author using their email address or the author's GitHub username.
Updating commit authors
Follow these steps to update a commit author:
After importing your repository, on the import status page, select Match authors.
Next to the author whose information you'd like to update, select Connect.
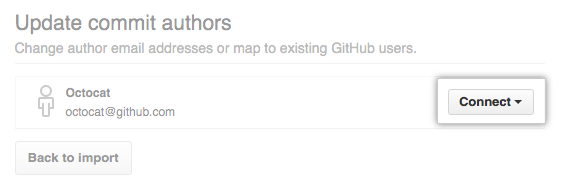
Type the email address or GitHub username of the author, then press Enter.
Attributing commits to a GitHub user with a public email address
If an author of a commit in your imported repository has a GitHub account associated with the email address they used to author the commits, and they don't set their commit email address as private. Then, GitHub Importer matches the email address associated with the commit to the public email address associated with their GitHub account, and attributes the commit to their GitHub account.
Attributing commits to a GitHub user without a public email address
If the author of a commit in your imported repository doesn't set a public email address on their GitHub profile, or set their commit email address as private. Then, GitHub Importer might not be able to match the email address associated with the commit with their GitHub account.
The commit author can resolve this issue by setting their email address as private. Their commits are then attributed to <username>@users.noreply.github.com, and the imported commits are associated with their GitHub account.
Attributing commits using an email address
If the author's email address isn't associated with their GitHub account, they can add the address to their account after the import, and the commits will be correctly attributed.
If the author doesn't have a GitHub account, GitHub Importer attributes their commits to the email address associated with the commits.
Importing a GitHub repository using the command line
If GitHub Importer isn't suitable for your purposes, such as if your existing code is hosted on a private network, then we recommend importing using the command line.
Before you start, make sure you know:
- Your GitHub username
- The clone URL for the external repository, such as
https://external-host.com/user/repo.gitorgit://external-host.com/user/repo.git(perhaps with auser@in front of theexternal-host.comdomain name)
For purposes of demonstration, we use:
- An external account named ext-user
- An external Git host named
https://external-host.com - A GitHub personal user account named ghuser
- A repository on GitHub.com named repo.git
Follow these steps to import your external repository:
Create a new repository on GitHub. You import your external Git repository to this new repository.
Make a "bare" clone of the repository using the external clone URL. On the command line, enter the following command. This command creates a full copy of the data, but without a working directory for editing files, and ensures a clean, fresh export of all the old data.
$ git clone --bare https://external-host.com/ext-user/repo.git
#Makes a bare clone of the external repository in a local directory
Push the locally cloned repository to GitHub using the "mirror" option, which ensures that all references, such as branches and tags, are copied to the imported repository.
$ cd repo.git
$ git push --mirror https://github.com/ghuser/repo.git
#Pushes the mirror to the new repository on GitHub.com
Remove the temporary local repository.
$ cd ..
$ rm -rf repo.git
Adding locally hosted code to GitHub
If you have existing source code or repositories stored locally on your computer or private network, you can add them to GitHub by typing commands in a terminal. Either by typing Git commands directly, or by using GitHub CLI.
GitHub CLI is an open source tool for using GitHub from your computer's command line. GitHub CLI can simplify the process of adding an existing project to GitHub using the command line. To learn more about GitHub CLI, check out About GitHub CLI.
Adding a local repository to GitHub with GitHub CLI
Follow these steps to add a local repository with GitHub CLI:
In the command line, navigate to the root directory of your project.
Initialize the local directory as a Git repository.
git init -b mainStage and commit all the files in your project.
git add . && git commit -m "initial commit"To create a repository for your project on GitHub, use the
gh repo create subcommand. When prompted, select Push an existing local repository to GitHub and enter the desired name for your repository. If you want your project to belong to an organization instead of your user account, specify the organization name and project name withorganization-name/project-name.Follow the interactive prompts. To add the remote and push the repository, confirm yes when asked to add the remote and push the commits to the current branch.
Alternatively, to skip all the prompts, supply the path to the repository with the
--sourceflag and pass a visibility flag (--public,--private, or--internal). For example,gh repo create --source=. --public. Specify a remote with the--remoteflag. To push your commits, pass the--pushflag. For more information about possible arguments, reference the GitHub CLI manual.
Adding a local repository to GitHub using Git
Follow these steps to add a local repository using Git:
Create a new repository on GitHub.com. To avoid errors, don't initialize the new repository with README, license, or
gitignore files. You can add these files after your project is pushed to GitHub.
Open Git Bash.
Change the current working directory to your local project.
Initialize the local directory as a Git repository.
$ git init -b mainAdd the files in your new local repository. This command also stages them for the first commit.
$ git add .
# Adds the files in the local repository and stages them for commit. To unstage a file, use 'git reset HEAD YOUR-FILE'.
Commit the files that are staged in your local repository.
$ git commit -m "First commit"
# Commits the tracked changes and prepares them to be pushed to a remote repository. To remove this commit and modify the file, use 'git reset --soft HEAD~1' and commit and add the file again.
At the top of your repository on GitHub.com's Quick Setup page, select the Copy button to copy the remote repository URL.

In the Command prompt, add the URL for the remote repository. Your local repository is pushed to this location.
$ git remote add origin <REMOTE_URL>
# Sets the new remote
$ git remote -v
# Verifies the new remote URL
Push the changes in your local repository to GitHub.com.
$ git push origin main
# Pushes the changes in your local repository up to the remote repository you specified as the origin
Source code migration tools
You can use external tools to move your projects to GitHub. We recommend using GitHub Importer to import projects from Subversion, Mercurial, Team Foundation Version Control (TFVC), or another Git repository. You can also use these external tools to convert your project to Git.
Importing from Subversion
In a typical Subversion environment, multiple projects are stored in a single root repository. On GitHub, each of these projects typically map to a separate Git repository for a user account or organization. We suggest importing each part of your Subversion repository to a separate GitHub repository if:
- Collaborators need to check out or commit to that part of the project separately from the other parts
- You want different parts to have their own access permissions
We recommend these tools for converting Subversion repositories to Git:
Importing from Mercurial
We recommend hg-fast-export for converting Mercurial repositories to Git.
Importing from TFVC
We recommend git-tfs for moving changes between TFVC and Git.
For more information about moving from TFVC (a centralized version control system) to Git, see Migrate to Git from centralized version control.