Share an agent with other users
When an everyday business user creates an agent in SharePoint and Microsoft 365 Copilot Chat, they can share their agent with other users. Sharing an agent is crucial for several reasons:
- Sharing an agent ensures that all relevant team members who have the necessary permissions have access to the agent's capabilities. Doing so enables users to benefit from the automated assistance and information the agent provides. These benefits can significantly enhance productivity and streamline workflows. They do so by allowing users to quickly find answers and perform tasks without needing to leave the agent's respective SharePoint or Copilot Chat environment.
- Sharing an agent helps maintain consistency and accuracy across the team. It does so by providing a centralized source of information and assistance, provided the shared users have access to the same knowledge sources. Sharing an agent ensures that all users receive the same guidance and support, which reduces the risk of errors and discrepancies.
The main purpose for sharing an agent is to extend its benefits to a broader audience within the user's organization. When you share an agent, you're making its functionalities available to other users, allowing them to use the agent's capabilities to improve their work processes. These capabilities include accessing information, automating repetitive tasks, and receiving timely assistance on various topics.
Note
Users that you share your agent with must also have the necessary Microsoft 365 licenses to access the agents.
Sharing an agent with other users ensures the agent's underlying knowledge sources, such as SharePoint files and folders, are accessible to those users. When you share an agent, its knowledge sources are automatically shared with the users, provided they have the necessary permissions to access those sources. Making the agent's knowledge sources available to others is essential for the agent to generate accurate and relevant responses for those users. It ensures the users have the necessary access to benefit fully from the agent's capabilities.
When you share an agent in Copilot Chat, you must select the sharing option that's appropriate for the agent. The following table lists the available sharing options.
| Sharing option | Description |
|---|---|
| Anyone in your organization | Anyone in your organization can use the sharing link to use the agent. |
| Specific users in your organization | Specific user groups can use the sharing link to use the agent. These user groups must be specified through the names or emails of individuals, security groups, or Microsoft 365 groups in your tenant's Microsoft directory. |
| Only you | Only the author of the agent can use the agent. No one else can use the sharing link. This sharing option is selected by default. |
These sharing options don't apply to SharePoint agents. Instead, SharePoint relies on an approval process by the site owner or site administrator to make an agent available to site members and site visitors. This approval process is examined in the later section on sharing an agent in SharePoint.
The sharing and approval processes for agents in Copilot Chat and SharePoint are designed to fit the specific needs and workflows of each platform.
- In Copilot Chat, the sharing options provide flexibility in how you distribute the agent.
- In SharePoint, the approval process ensures the agent is appropriate for the site and its users.
Both Copilot Chat and SharePoint agents can only return information from knowledge sources that the shared users can access. For Copilot Chat agents that contain knowledge sources from SharePoint files and folders, Microsoft recommends that you share the agent with specific users in your organization through security groups to ensure they have access to the necessary files and folders. Doing so automatically shares the files with users so the agent can return responses from those sources.
Note
When you share an agent in Copilot Chat or approve an agent for sharing in SharePoint, the people who can use the shared agent can't edit it. This restriction maintains the integrity and functionality of the agent, ensuring that only the owner can modify its settings or behavior.
Improve collaboration by sharing agents
Sharing an agent can be beneficial for collaboration and efficiency. However, there are scenarios where it might be best to keep the agent private or limit its sharing. For example:
- Sensitive information. If the agent handles sensitive or confidential data, such as financial records, personal employee details, or proprietary business strategies, sharing it broadly could pose a security risk. In these scenarios, it's essential to restrict access to ensure that only authorized personnel can view or interact with this information. Doing so helps maintain data privacy and prevent potential breaches.
- Incomplete or unverified agents. Agents that are still in development or testing phases might not be fully reliable. Sharing these agents prematurely could lead to misinformation or errors in workflows, which can disrupt business processes. It's best to wait until the agent is thoroughly tested and verified for accuracy before sharing it with a wider audience.
- Specific use cases. Some agents are designed for specific tasks or departments. For instance, an agent created for the finance department might include functionalities and data relevant only to finance professionals. Sharing such an agent with other departments could cause confusion and clutter their workspace with irrelevant tools.
- Compliance and governance. Organizations often have strict compliance and governance policies that must be adhered to. Sharing agents that don't comply with these policies could lead to regulatory issues or penalties. It's crucial to ensure that any shared agent meets all organizational and legal standards to avoid potential complications.
- Resource constraints. If an agent requires significant computational resources or incurs high usage costs, it might be wise to limit its sharing. Overloading systems with resource-intensive agents can affect performance and lead to increased expenses. By controlling access, you can manage resource allocation more effectively and avoid unnecessary costs.
Share an agent in Copilot Chat
Sharing an agent in Microsoft 365 Copilot Chat can revolutionize the way businesses operate, making collaboration and efficiency more streamlined than ever. Sharing an agent allows team members to access the same information and resources, ensuring everyone is on the same page. It fosters a collaborative environment, where information flows freely and efficiently.
Unlike sharing an agent in SharePoint, no approval from an administrator is required before the user who created the agent can share it in Copilot Chat. You can share an agent at the time you create it, or after the agent is live. When you share an agent, the people you share the agent with can use it, but they can't edit it.
Note
Users that you share your agent with must also have a Microsoft 365 license.
As you work through the process of creating an agent in Copilot Chat, once you select the Create button, Microsoft 365 Copilot creates the agent and returns the following screen that enables you to share the agent.
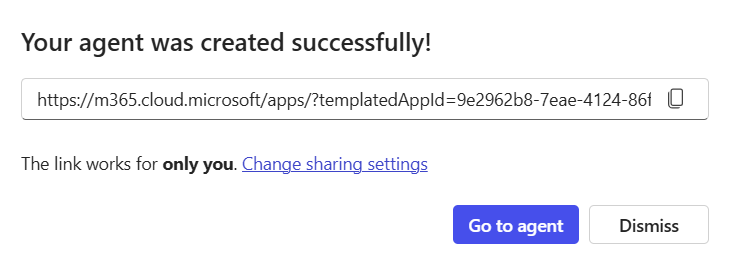
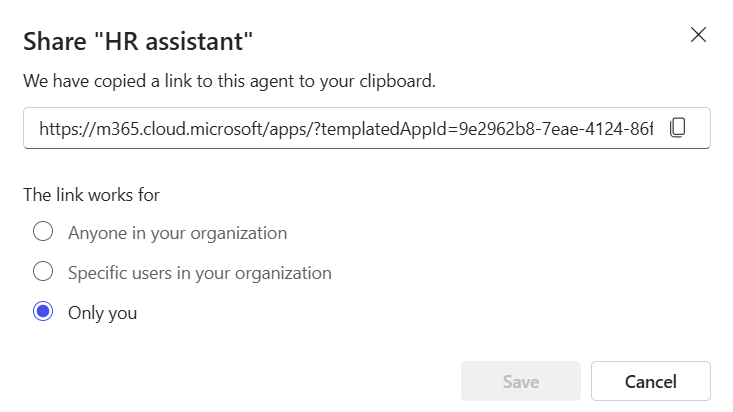
You can copy the link and email it to users, or you can select the Change sharing settings option to select the desired sharing setting. The following screen appears when you select the Change sharing setting option.
Caution
When the Share option is set to Specific users in your organization, the search results might include distribution groups. Sharing an agent with a distribution group can cause the share to fail.
This window allows you to select the sharing option that you want to apply to this agent. See the table in the previous section for an explanation of each option.
You can still share an agent once it's live. The following sections describe the two ways in which you can share a live agent.
Share the agent with individuals in your organization
This option allows you to select the same sharing options that are available at the time you create an agent - Anyone in your organization, Specific users in your organization, and Only you.
Sign in to Microsoft 365 Copilot with your work or school account. The Microsoft Copilot Chat page appears by default.
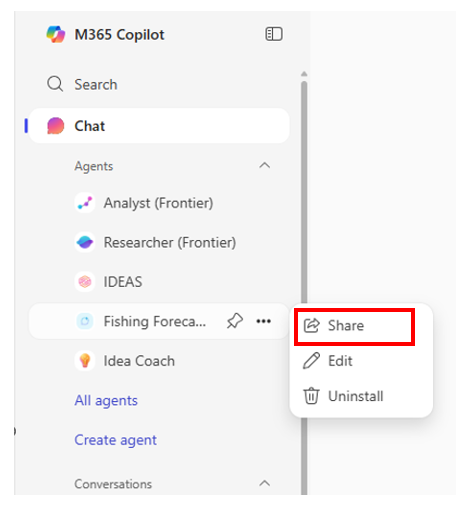
If the agent that you want to share appears in the list of pinned and unpinned agents, then hover over the agent and select the ellipsis (More) icon that appears. In the drop-down menu that appears, select Share.
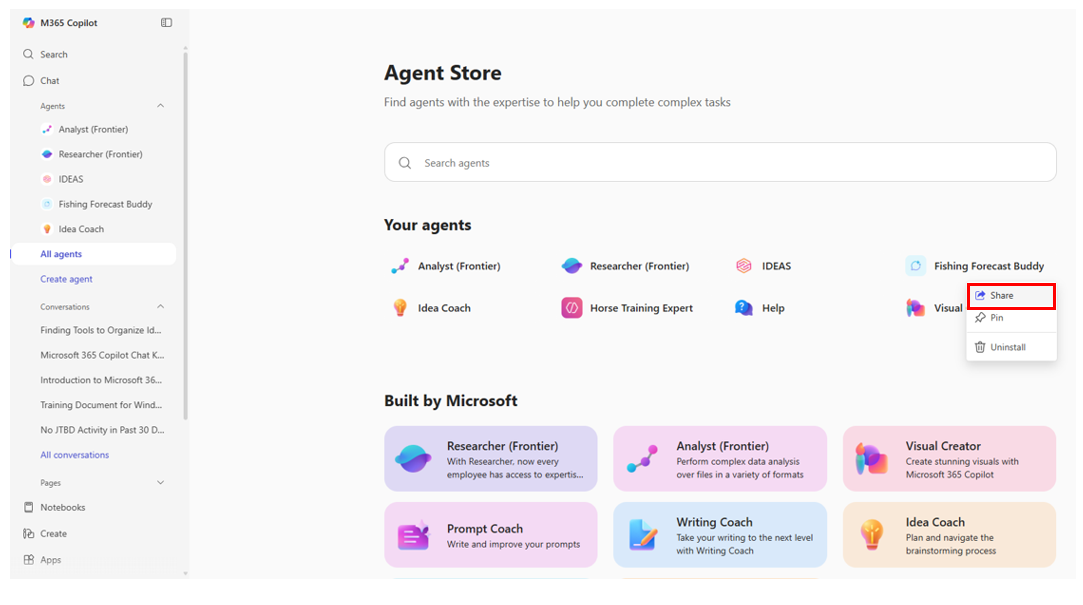
If the agent that you want to share doesn't appear in the list of pinned and unpinned agent, then select All agents in the navigation pane. This option opens the Agent Store, which displays your agents and the prebuilt agents that you used, along with the prebuilt agents that were created by Microsoft. In the list of Your Agents, select the ellipsis icon that appears for that agent, and in the drop-down menu that appears, select Share.
Regardless of which sharing method you used, in the Change sharing settings window that appears, select the sharing option that you want to apply.
Share the agent through external applications
Rather than sharing your agent directly with individuals, this sharing option allows you to seamlessly share your agent through various external applications, such as Facebook, LinkedIn, WhatsApp, Outlook, and so on. When you share an agent through an app, you're enabling the agent to interact with or transfer information to that platform, enhancing its utility across different communication or collaboration tools.
From the navigation pane on the Microsoft 365 home page, right-click on the agent in the agent pane. In the menu that appears, select Share.
In the Share window that appears, select the application that you wish to use to share the agent.
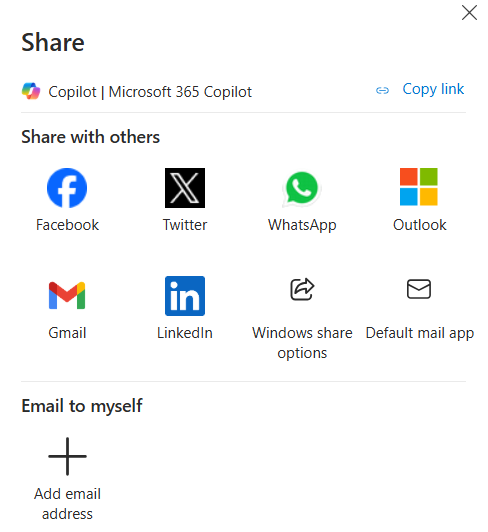
When you select an app, the app opens and presents a corresponding method for sharing the agent. For example, if you select a social media platform such as Facebook, a window appears that enables you to create a post in your Facebook account that includes the link to the agent. If you select an email app such as Outlook, a New Email page appears that displays the link for the agent in the body of the message. You can fill out the email form and send it to whomever you want to share the agent with.
Automatically share SharePoint files and folders in Copilot Chat agents
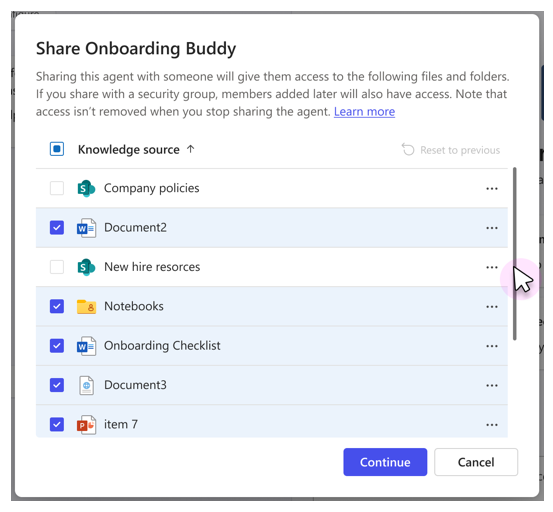
When you share a Copilot Chat agent, the users to which the agent is shared might not have access to its underlying knowledge sources. The agent respects the end user's information and access privileges. If the user doesn't have access to a knowledge source, the agent can't include content from it when generating a response. You can automatically share the underlying Knowledge sources with security groups when the Share option is set to Specific users in your organization.
Note
Only files and folders added to the agent can be automatically shared. A site administrator must grant user permissions through site settings.
When you share an agent that uses files or folders as knowledge sources, those files and folders are automatically made available to users to whom the agent is shared. This process ensures the users have access to the necessary content within the agent without needing to manually select or share each file or folder individually.
However, it's important to note that the sharing process depends on the permissions set for those files or folders. If the author of the agent doesn't have the necessary permissions to share or update the sharing permissions of the files or folders, the sharing fails. Additionally, any file sensitivity labels applied to files in SharePoint or OneDrive are respected, which can further restrict sharing.
If the sharing of a file or folder fails, the agent itself is still shared with the user. However, Copilot can't use those files and folders when generating answers to the user's queries. To resolve this issue, the agent's author must contact the file owners or the SharePoint site administrator and request them to manually grant permission to the file or folder directly from SharePoint.
When a user's access to the agent is removed, it doesn't affect their access to the shared file or folders. Use file permission management in SharePoint to manage user's access to the files and folders.
Share an agent in SharePoint
The primary difference between sharing an agent in SharePoint and Copilot Chat is the person who can share the agent.
- In Copilot Chat, when a user creates an agent, the user can share it with specific employees or deploy it to their entire organization. No administrative action is required.
- In SharePoint, after a user creates an agent for a site, the site's owner or administrator must approve the agent to make it available for other site members and site visitors to use. The site owner or admin can also set an agent as the default agent for the site, which makes it the first agent that loads up for site visitors when they launch the chat pane.
Approve an agent for a SharePoint site
One of the primary reasons for requiring a site owner or administrator to approve a user's agent is to ensure the agent aligns with the site's purpose. Other reasons for requiring agent approval include:
- Security and permissions. The process of approving agents ensures they respect the existing security settings and permissions within SharePoint. As such, users only see content they're allowed to access.
- Relevance and accuracy. By approving agents, site owners or admins can ensure that the information provided by the agents is relevant to the site's purpose and accurate. This helps in maintaining the quality and reliability of the information shared.
- Control and management. Site owners or admins can manage which agents are available to site visitors. They can set an agent as the default for the site, making it the first agent that loads up for site visitors when they launch the chat pane.
- Customization and personalization. Approved agents can be tailored to meet the specific needs of the audience, providing a more personalized user experience.
The approval process for an agent in SharePoint involves several steps the site owner or admin must perform to ensure the agent aligns with the site's purpose and security settings. Here's a high-level overview of the recommended approval process:
- Creation and submission. When a user creates an agent in SharePoint, the agent must be submitted for approval. The person who created the agent typically performs this step.
- Review by site owner or admin. Once submitted, the site owner or admin reviews the agent. They verify whether the agent respects the existing security settings and permissions within SharePoint. This step ensures that users only see content they're allowed to access.
- Relevance and accuracy check. The site admin or owner also ensures the information provided by the agent is both accurate and relevant to the site's purpose. This step helps maintain the quality and reliability of the shared information.
- Approval or rejection. After the review, the site admin or owner can either approve or reject the agent. If approved, the agent can be found by all site visitors by navigating to Site Assets > Copilots > Approved. If rejected, the site owner or admin should provide feedback to the agent's creator to make any necessary adjustments.
This process ensures that all agents in SharePoint are secure, relevant, and useful for the site's members and visitors.
Approved agents are always available from the agent picker for site members and visitors. Approved agents can also be differentiated from the agents that are recommended for a user. A site owner or admin should perform the following steps to approve an agent:
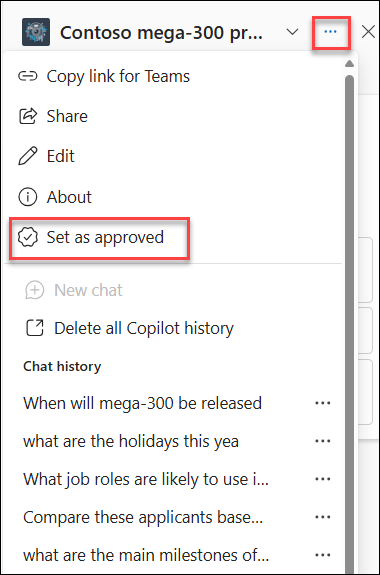
From the agent picker, select the agent that you want to approve, then select the ellipsis (the three dots) next to the agent.
From the drop-down menu that appears, select Set as approved.
In the Set this as an approved agent for this site dialog box that appears, select OK.
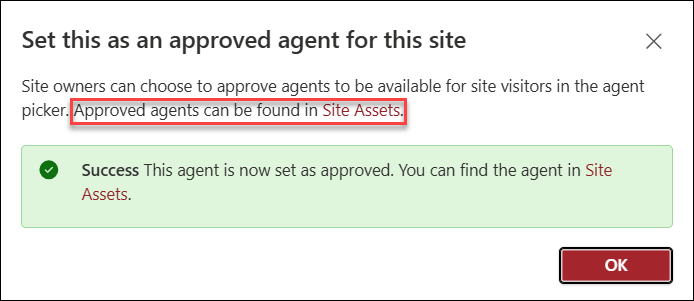
The agent is now approved, and all site visitors can find it by navigating to Site Assets > Copilots > Approved.
Note
When a site admin or owner creates an agent for a SharePoint site, the agent is automatically approved. Why? Because the site owner or admin has the necessary permissions and authority to create and approve agents without requiring the normal approval steps. As such, the agent is immediately available to other site members or visitors once a site admin or owner creates it.

Note
A SharePoint site's ready-made agent is always considered approved and can be reset as the default agent for a site.
Troubleshoot sharing errors
When sharing an agent and its knowledge sources, you might encounter the errors listed in the following table.
| Error code | Description |
|---|---|
| Something went wrong | An internal service error message. Contact Microsoft Support if this error continues to occur. |
| Couldn't share | Insufficient privileges to update the sharing permissions on certain files. The error identifies the files that were unable to be shared. The agent owner should go into SharePoint to try updating these permissions manually. For more information, see: Share a document to learn how to share files, and Sharing errors in SharePoint and OneDrive for an error code reference. |
If sharing fails, users who don't have access to the folder and files don't receive responses generated from those knowledge sources. Selecting the option to share with specific users in your organization through security groups ensures the underlying knowledge sources are shared. Files can only be shared with valid individuals or security groups in your directory.