Implement permissions and permission sets
Users are assigned permission sets depending on the plan assigned to the user in Microsoft 365. You can then proceed to assign permission sets to the users to define which database objects, and thereby which UI elements, they have access to, and in which companies. When you add users to user groups, that will make it easier to assign the same permission sets to multiple users.
A permission set is a collection of permissions for specific objects in the database. All users must be assigned one or more permission sets before they can access Business Central.
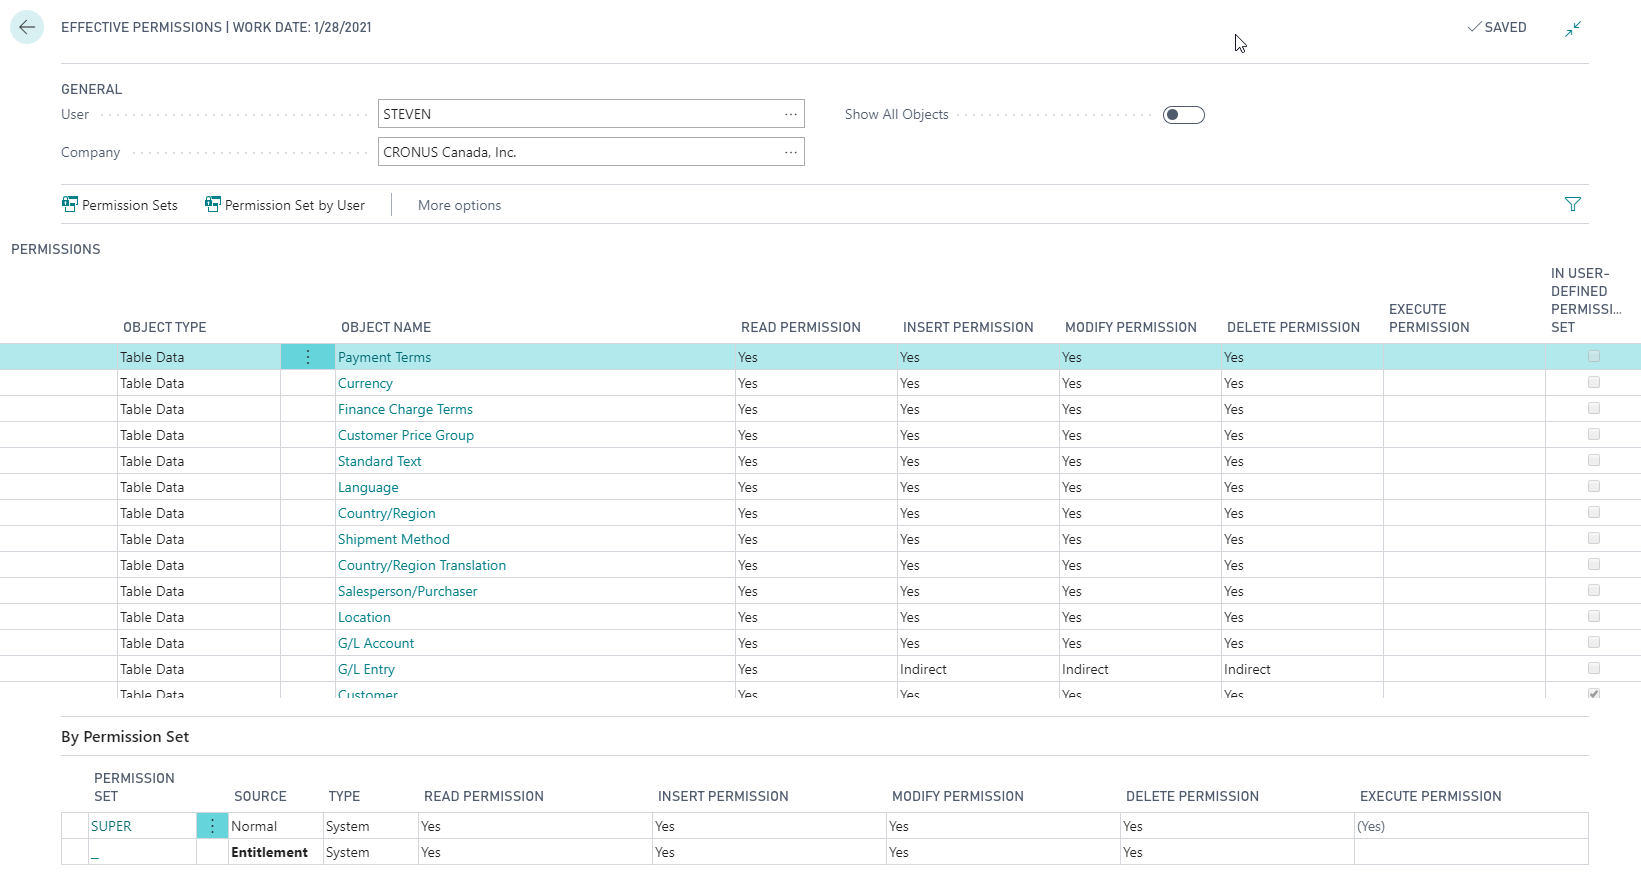
From the User Card page, you can open the Effective Permissions page to see which permissions the user has and which permission sets grant those permissions.
Permission sets function as containers of permissions, so that you can easily manage multiple permissions at a time. You must first create a permission set, and then add permissions to it.
A Business Central solution typically contains several predefined permission sets that are added by Microsoft or by your software provider.
Predefined permission sets are of the following types:
System
Extension
You can't create or edit these types of permission sets or the permissions within them. However, you can copy them to define your own permission sets and permissions. Permission sets that users create are of type User-Defined and can be edited.
Create or modify permissions
To create or modify permissions manually, follow these steps:
On the Permission Sets page, select the row for a permission set, and then choose the Permissions action.
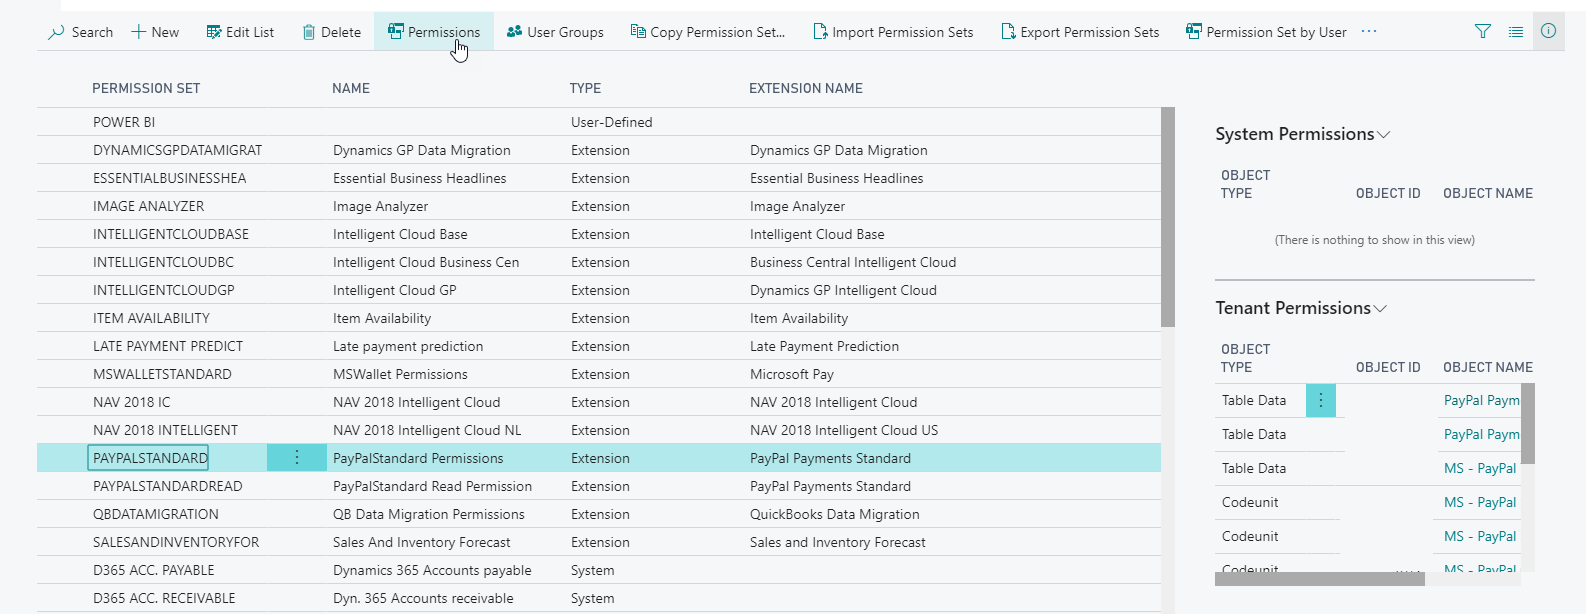
On the Permissions page, create a new line or edit the fields on an existing line.
In each of the five access type fields: Read Permission, Insert Permission, Modify Permission, Delete Permission, and Execute Permission, you can select one of the following three permission options:
Yes: The user can perform the action on the object in question.
Indirect: The user can perform the action on the object in question but only through another related object that the user has full access to.
Blank: The user cannot perform the action on the object in question.
Indirect permissions
You can assign an indirect permission to use an object only through another object. A common example is that a user has permission to run the Sales-Post codeunit (codeunit 80). The Sales-Post codeunit performs many tasks, including modifying the Sales Line table (table 37).
When the user posts a sales document, Business Central checks whether the user has permission to modify the Sales Line table. If not, the user receives an error message.
The user does not need to have full access to the Sales Line table to run the Sales-Post codeunit. If the user has indirect permission for the Sales Line table, then the Sales-Post codeunit runs successfully.
When a user has indirect permission, that user can only modify the Sales Line table by running the Sales-Post codeunit or another object that has permission to modify the Sales Line table. This restriction means that user can only modify the Sales Line table when doing so from supported application areas. The user cannot run the feature inadvertently or maliciously by other methods.
Record-level security
For record-level security in Business Central, you use security filters to limit a user's access to data in a table. A security filter describes a set of records in a table that a user has permission to access. You can specify, for example, that a user can only read the records that contain information about a customer. This means that the user cannot access the records that contain information about other customers.
Create permission sets by recording actions
To create or modify permission sets by recording your actions, follow these steps:
Choose the search for page icon in the top-right corner of the page, enter Permission Sets, and then choose the related link. Alternatively, if you are already on the Users page, choose the Permission Sets action.
On the Permission Sets page, choose the New Action.
On a new line, fill in the Name field.
Choose the Permissions action.
On the Permissions page, choose the Record Permissions action, and then choose the Start action.
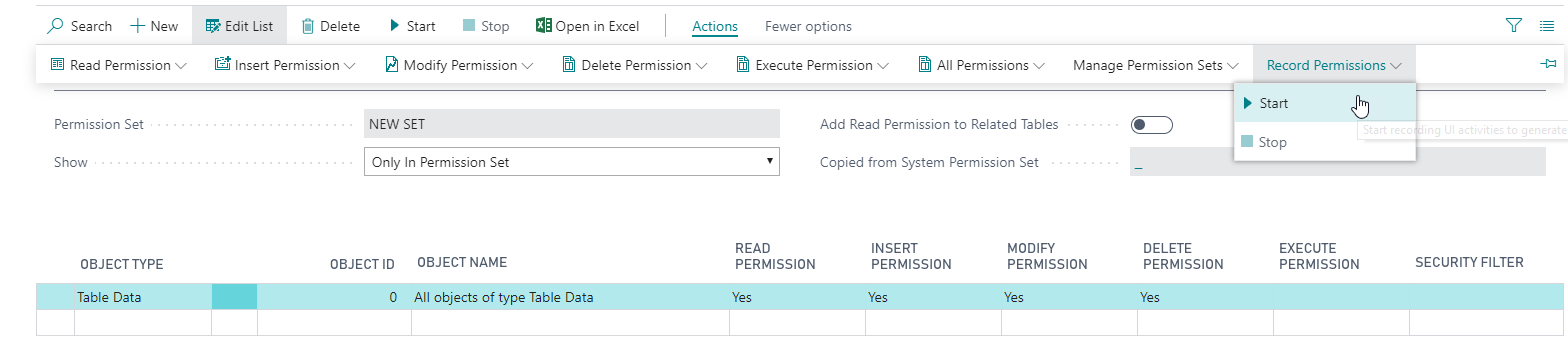
This starts a recording process that captures all your action in the user interface.
Go to the pages and activities in Business Central that you want users with this permission set to be able to access. You must carry out the tasks that you want to record permissions for.
When you want to finish the recording, return to the Permissions page, and then choose the Stop action.
Choose the Yes button to add the recorded permissions to the new permission set.
For each object in the recorded list, specify if users can insert, modify, or delete records in the recorded tables.
When you edit a permission and thereby the related permission set, the changes will also apply to other users that have the permission set assigned.
Assigning a permission to a specific user
You can assign permissions to users in two ways:
Define permission sets on a user's user card.
Select the check box for a user, on a column, for a related permission set, on a row, on the Permission Set by User page. With this method, you can also assign permissions sets to user groups.
To assign a permission set on a user card, follow these steps:
Choose the search for page icon in the top-right corner of the page, enter Users, and then choose the related link.
Select the user that you want to assign permission to. Any permission sets that are already assigned to the user are displayed in the Permission Sets FactBox.
Choose the Edit action to open the User Card page.
On the User Permission Sets FastTab, on a new line, fill in the fields as necessary.
To assign permission sets to a user on the Permission Set by User page, follow these steps:
Choose the search for page icon in the top-right corner of the page, enter Users, and then choose the related link.
On the Users page, select the relevant user, and then choose the Permission Set by User action.
On the Permission Set by User page, select the [user name] check box on a line for the relevant permission set to assign the set to the user.
Select the All Users check box to assign the permission set to all users.
Modify permissions from the Effective Permissions page
To get an overview of a user's permissions, follow these steps:
Choose the search for page icon in the top-right corner of the page, enter Users, and then choose the related link.
Open the card of the relevant user.
Choose the Effective Permissions action.
The Permissions part lists all the database objects that the user has access to. You cannot edit this section.
The By Permission Set part shows the assigned permission sets through which the permissions are granted to the user, the source and type of the permission set, and to which extend the different access types are permitted.
For each row that you select in the Permissions section, the By Permission Set section shows which permission set or sets that the permission is granted through. In this section, you can edit the value in each of the five access type fields, Read Permission, Insert Permission, Modify Permission, Delete Permission, Execute Permission.
To edit a permission set, in the By Permission Set part, on the line for a relevant permission set of type User-Defined, choose one of the five access type fields and select a different value.
To edit individual permissions within the permission set, choose the value in the Permission Set field to open the Permissions page.
Copy a permission set
You can create a new permission set by copying another. The new set will include all of the permissions and permission sets from the set you copied. How the permissions and permission sets are arranged in the new permission set differs, depending on your choice in the Copy operation field.
Copy by reference - The original permission set and all of the permission sets that were added to it are listed on the Results pane.
Flat permission copy - All permissions from all permission sets are included in a flat list on the Permissions pane. Permissions aren't organized by permission set.
Clone - Create an exact copy of the original permission set.
To copy a permission set, follow these steps:
On the Permission Sets page, select the line for a permission set that you want to copy, and then choose the Copy Permission Set action.
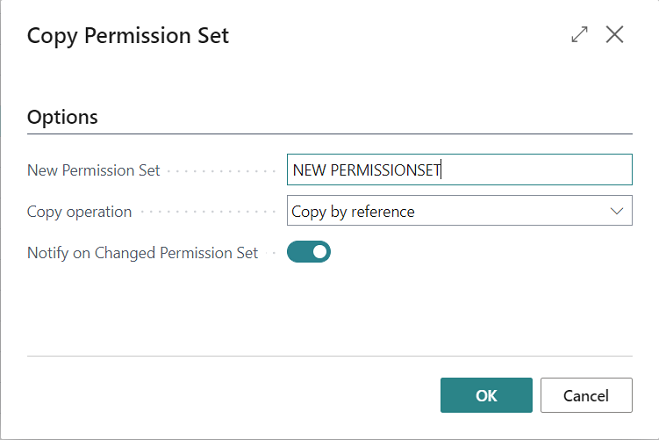
On the Copy Permission Set page, specify the name of the new permission set.
In the Copy operation field, specify how to arrange permissions in the new permission set.
Optional: If you're adding a System permission set, you might want to be notified if the name or content of the original permission set changes in a future version. This lets you consider whether to update your user-defined permission set. To receive a notification, turn on the Notify on Changed Permission Set toggle.

The Permission Sets pane on the Permission Set page shows the list of permission sets that are included and excluded.

The Results pane on the Permission Set page shows the hierarchy of included and excluded permission sets. For example, if a permission set is excluded, it's excluded from all lower sets in the hierarchy.

The Permissions section of the Permission Set page lets administrators decide whether to fully exclude permissions or reduce the access level to Indirect for a specific object. To verify and view all permissions in a permission set, select the View all permissions action on the Permission Set page.

Configure permissions based on licenses
Administrators can configure permissions sets and user groups for each license. For example, the commonly used license, Dynamics 365 Business Central Team Member, has the following permissions sets by default:
D365 READ
D365 TEAM MEMBER
EDIT IN EXCEL - VIEW
EXPORT REPORT EXCEL
LOCAL
Other permission sets are added automatically based on the user groups assigned to the license. When creating a new user based on this license, Business Central assigns the permission sets originating from the user groups and the permission sets from the license. The same starting permissions are assigned to the user if their user account was created automatically in Business Central or if the administrator used the Update Users from Microsoft 365 action on the Users page.
If this default configuration isn't the right setup for a particular environment, the admin can change that configuration. However, customized permissions will affect only new users who are assigned that license. Permissions for existing users who are assigned the license won't be affected.
To customize permissions by license, perform the following steps.
Sign in to Business Central using an administrator account.
Select the Search for Page icon, enter License Configuration, and then choose the related link.
In the License Configuration page, select the license that you want to customize, and then select the Configure action.
Select the Customize permissions field to switch on customization, and then make any relevant changes.
In this example, the admin wants to remove the permission to edit in Excel, so they remove the Excel Export Action user group from the Team Member license. Going forward, new users that are assigned the Team Member license won't get the option to export data to Excel. If the organization changes their minds on the subject, they can just go back to the License Configuration page and switch off the customization for that license type.
This customization of permissions only takes effect for new users that you assign the relevant license. Existing users aren't updated. It's recommended that you customize permissions before you start assigning users licenses in the Microsoft 365 admin center.
Set user email policies to control who can read email sent from Business Central
It's not uncommon that multiple people or teams work on single transaction. Usually, one prepares draft emails and others complete and send emails to customers or vendors you work with. Administrators now have more control over who gets to see which emails by setting email view policies.
From the Users list, you can specify user email policies by choosing the Related menu, and then selecting the Email View Policy action.

You can control the email messages that a user can see in the Email Outbox and Sent Emails pages.
Select a user, and then choose one of the following options in the Email View Policy field.
View own emails - The user can view only their own email messages.
View all emails - The user can view all email messages, including emails that were sent by other users.
View if access to all related records - This view policy is used if no other policy is specified. A user can view email messages that other users sent if the user has access to the record that was sent and all of the related records. For example, User A sent a posted sales invoice to a customer. User B can see the email message if they have access to both the invoice and the customer.
View if access to any related records - The user can view email messages that were sent by other people if the user has access to at least one record that is related to the record that was sent. For example, User A sent a posted sales invoice to a customer. User B can see the email message if they have access to either the invoice or the customer.
If you leave the User ID field empty and then select the Email View Policy action, the policy that you define applies to all users.
Get more information about effective permissions
Users can only see their own permissions in the Effective Permissions page. You can view other users' effective permissions only if you're assigned to the SECURITY or SUPER permissions. Otherwise, if you try to access the effective permissions assigned to another user, an error message displays.
The Effective Permissions page offers additional information about the source of each permission. For example, whether the source is a security group, or a permission is inherited. The page also contains a column where administrators can review the security filters that are applied.
