Create and activate assignment rules
Now that you've defined which sellers that your assignment rules can apply to and have set up other options such as availability and attributes, you can create assignment rules. Assignment rules for leads and opportunity records define different conditions, such as which records to use and the sellers that you can assign items to. After a rule is activated and a record satisfies the conditions that are defined in the rule, the record is automatically assigned to a seller.
To create assignment rules, go to the Sales Hub app, select Sales Insights settings > Work assignment. rules, Select the Add assignment rule button. Depending on which record type you've selected, the rule is created for that record type. For example, if your record type is set to Lead, you'll create a new lead assignment rule when you select the Add assignment rule button.

When you create an assignment rule, you'll need to define four items:
Rule name - Specifies the name of the rule to display in the application.
Eligible records for this rule - Defines the group of records that this rule applies to.
Assign these “records” to a seller, team, or queue - Defines which sellers, teams or queues, that these records can be assigned to.
Distribute leads by - Defines the distribution method to use to assign records.
In the Select eligible leads for this rule section, you can specify the following options:
Default segment for leads - All new leads that are created are assigned to sellers in accordance with the conditions that are defined in the rule.
Select a segment - Use this option to identify a segment that contains the records that you want to be considered as part of the rule. Active segments that are related to the record type that you've selected are displayed in the list. For more information, see Create segments and connect them to sequences.
When you select a segment, the system uses the conditions that are specified in the segment; however, if you want to add more conditions, you can add them on top of the conditions that have been defined in the segment.
For example, you might be using the Leads from web segment to only use leads that are coming from the web. However, you could also include a condition that limits to only using leads with a Rating of Hot.
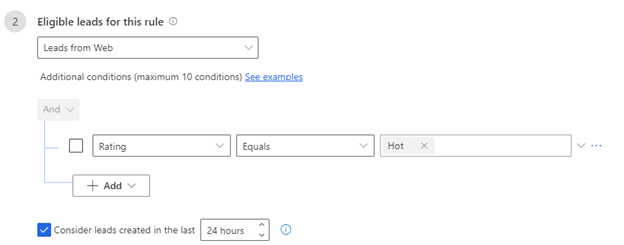
Consider leads created in the last N hours - Use this option to specify a time frame that you want to assign records within. If no seller is available to take the record within the set time frame, then the system marks the record as overdue with the status reason of Seller not assigned as record is older than the set time frame. For more information, see View unassigned records.

Now that you know which records you want the rule to apply to, you need to identify who to assign the records to. Under Assign these leads to sellers or a team, you can select from the following options:
Seller
Any seller - Assign leads to any seller according to their availability, capacity, or distribution pattern.
Seller with matching attributes - Assign leads to sellers who satisfy the conditions that are defined through attributes that are selected from Dynamics 365 or assignment rules. The following options are available:
Use existing fields from seller records in Dynamics 365
Use seller attributes defined for assignment rules
Specific sellers – Allows you to specify which sellers the rule should apply to.
Team
Teams with matching attributes - Assign leads to teams who satisfy the conditions that are defined through attributes that are selected from Dynamics 365 or assignment rules.
Specific teams – Allows you to specify which teams the rule should apply to.
Queue
Que's with matching attributes - Assign leads to queues who satisfy the conditions that have been defined through attributes that are selected from Dynamics 365 or assignment rules.
Specific queue – Allows you to specify which queue the rule should apply to.
This option is discussed in more detail later in this module. For more information, see Manage seller attributes.
For example, you want to assign leads to sellers who are based out of Seattle. Select the Use existing fields from seller records in Dynamics 365 option and then select Add > Add row. Enter the condition as City (attribute) Equals (condition) Seattle (value).
Specific sellers - Assign leads to specific sellers. Select the sellers from the Choose sellers lookup.
Specific teams - Assign leads to a specific team. The lead is available for all members of the team whom you select.

Important
When you select the Specific teams option, the Distribute leads by option won't display because the leads are assigned to teams, not individual users.
The last option that you need to define is how to distribute leads. Under Distribute leads by, choose one of the following options:
Round robin - The system distributes leads on a cyclical basis to sellers who are qualified to receive the lead, based on the conditions of the assignment rule.
Load balancing - The system distributes leads among sellers depending on their current workload. This approach helps ensure that all sellers are equally busy.
Assign if seller is available within time (optional) - Select this option to consider the seller's work schedule when you're assigning leads. For more information, see Configure your work availability.
Assign leads based on seller capacity (optional) - Select this option to consider the maximum number of leads that a seller can handle at once. For more information, see Set lead capacity for sellers.

After you've set up everything the way that you want, select Create rule to create and activate the rule. The rule will be listed in the Rules section, which is organized in ascending order by date. The most recently created rule is always listed at the bottom of the list unless you move it.